Run ISETUP
Server installation consists of a series of ISPF panels, which gather the required information. After the panel dialog is complete, JCL is created and submitted to install the server on z/OS. This JCL job retrieves the remainder of the data sets from the media and configures a basic working server.
- Execute the ISETUP member of your high_level_qualifier.HOME.DATA using
ISPF option 6.
The first Installation and Configuration panel opens.
Note:Option 1 has been deprecated and will be removed in a future release. Choose option 2.
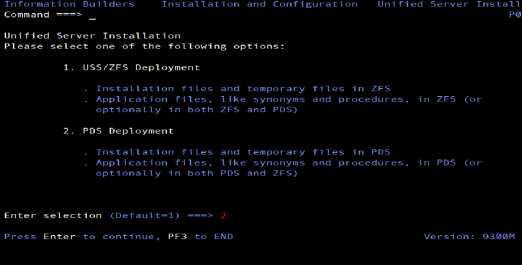
- Type 2 and press Enter to continue to
the next panel.
The following panel opens.
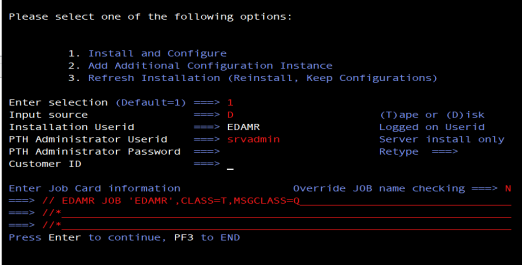
- Complete the panel as directed in the following table.
Field
Instructions
Enter selection
Accept the default value 1, Install and Configure, for a new installation.
For option 2, Add Additional Configuration Instance, see Adding a Configuration Instance for PDS.
For option 3, Refresh Installation, see Upgrading Your ibi WebFOCUS Reporting Server Release for PDS.
Input source
Enter the input source:
- D for Disk - If you selected manual download from the download instructions.
Installation Userid
Shows the current logon ID. It cannot be changed.
PTH Administrator Userid
An ID is required to administer the server immediately after initial installation. This ID is defined and maintained solely in the realm of the server. It defaults to srvadmin, and it can be changed here.
For more information about running the server in secure mode, see Configure Security.
PTH Administrator Password
Password for the PTH Administrator ID. It cannot be left blank and must be matched at Retype field.
Enter Job Card information
To provide JOB card information for submitting jobs to the JES queue, provide a valid job name (a maximum of seven characters following the // on the first JCL line), which defaults to the user ID that you are currently using.
This job name is used for multiple submissions (for example, jobnameA, jobnameB, jobnameC, and so on) in the JCL generated by the installation procedure.
Customer ID Enter the Customer ID that was provided to you with your WebFOCUS software.
Override JOB name checking
To provide your own JOB card information, including JOB name, enter Y and provide valid JOB card information in the Enter Job Card information field. The JOB card information that you enter will be used for each job that is submitted.
- Press Enter to continue to the next panel.
In this and some later panels, you can see a field's default value (if one exists) by blanking out the field and pressing Enter.
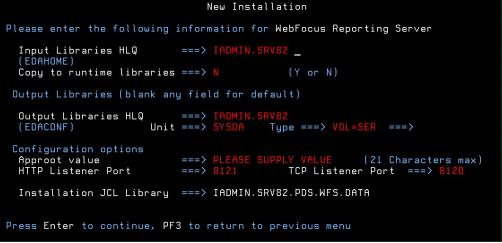
Complete the panel as follows.
Field
Instructions
Input Media
Input Libraries HLQ
(EDAHOME)
This is the high-level qualifier you specified when processing the .run file.
Copy to runtime libraries
Accept the default N to run from the datasets created when you processed the .run file. The 'Y' option has been deprecated.
General Installation Parameters
Output Libraries HLQ
This is the high-level qualifier that the installation procedure will use to allocate output libraries.
Unit/Type
These show the values that the installation process will use to allocate the output libraries. If necessary, you can change these to site-specific values.
Type can be VOL=SER (default), DATACLAS, MGMTCLAS, or STORCLAS.
Approot value
This is where application components will reside.
Note that this high-level qualifier must differ from the output libraries high-level qualifier (EDACONF) that you entered at the top of the panel.
To specify a different qualifier for application components, change the value for this field. It can be up to 21 characters.
HTTP Listener Port
This is the port number that the server will use for HTTP. It is the first of three connection ports that must be available to the server.
For example, if you choose port 8101, then ports 8101, 8102, and 8103 are used by the server. Ensure that you choose ports that are not currently being used.
TCP Listener Port
This is the port number of the TCP Listener.
The default is one less than the port specified for the HTTP Listener, but it can be any port number other than the three reserved for HTTP.
- Press Enter to continue to the next panel.
The Data Adapter panel may open. If the Data Adapter panel opens, continue with Step 8; otherwise, skip to Step 9.
- The Data Adapter panel lists adapters that require the allocation
of MVS libraries in IRUNJCL or environment variables in the EDAENV
member. To select specific adapters:
- Type Y next to the required adapters and press Enter.
- Supply the requested information, which is described in Collect Required Information for Adapters.
After you have finished installing and configuring the server, you can use the WebFOCUS Reporting Server browser interface to finish configuring these adapters, and to configure adapters that do not have MVS JCL requirements.
- Press Enter to continue to the next panel.
The JSCOM3 Listener configuration panel opens.
This panel prompts for a value for JDK_HOME. For more information see Installation Requirements for PDS. It also prompts for values for edahome_dir and edaconfi_dir, as described in ZFS Home and Configuration Directory Requirements.
- Configuration of the JSCOM3 Listener is either optional or mandatory depending on which adapters were selected. If any Java-based adapters were selected (EJB, Call Java, JDBC, Microsoft SQL Server), the configuration of all three paths listed above is mandatory. If SAP-based adapters were selected (SAP or SAP BW), only edahome_dir and edaconf_dir are required.
- If no Java-based or SAP-based adapters were selected, this configuration might still be desirable to enable the server-side graphics feature. To skip the configuration, leave the path blank.
- Press Enter to continue to the next panel.
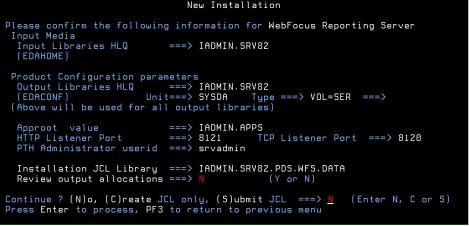
The Confirmation panel opens.
- If you wish to review a list of the data sets to be allocated,
type Y in the Review output allocations field
and press Enter.
A panel opens listing the data sets. You may need to page down to see the entire list. Press Enter when you are done to return to the confirmation panel.
- Ensure that all values on the Confirmation panel are correct,
then select one of the following options
- N to return to the initial panel so that you can change installation values.
- C to create JCL which you can submit at a later time. The JCL is placed in your high_level_qualifier.PDS.WFS.DATA configuration library.
- S to create JCL in high_level_qualifier.PDS.WFS.DATA, and submit the job immediately.
where:
high_level_qualifierIs the high-level qualifier to be used for all output libraries. You specified the high-level qualifier during installation, as described in Step 4. Run ISETUP, in Step 4.
- As the job is processed, in SDSF, check JESLOG for errors and return codes.
The following is a table of the jobs created. All members are created in the configuration library (as described in Step 11).
|
Job |
Description |
|---|---|
|
ISETUPJ1 |
Main JCL Job stream that is used to install the server. |
|
ISOPTS1 |
Options used to install. |
The following members all call procedure IRUNJCL, which is the main server JCL. If you need to change the server JCL, change member IRUNJCL.
|
Member |
Description |
|---|---|
|
ISTART |
Starts the server. |
|
ISAVEDIA |
JCL to print a copy of configuration files for diagnostic purposes. |
|
ITRCON |
Starts the server with traces on. |
The following members contain batch JCL for auxiliary functions, and are created in the configuration library.
|
Member |
Description |
|---|---|
|
CMRUN |
JCL to run ibi Data Migrator batch jobs. |
|
DB2VverPR |
Db2 DBRM, where ver is your supported version of Db2 referenced in GENDB2 JCL. |
|
GENDB2 |
JCL to bind the Db2/CAF plan. |
|
IRDAAPPC |
Example CLIST to run RDAAPP Client test tool. |
|
IRDAAPPJ |
Example JCL to run RDAAPP Client test tool. |
The following members contain sample started task JCL, and are created in the configuration library.
|
Member |
Description |
|---|---|
|
IWAYS |
A started task that starts the server. |
|
EDAENV |
A parameter file used by the server. It contains all required environment variables. |
Overview of Manual Steps Following ISETUP
The following features are not installed by ISETUP. For these features, follow the instructions in the WebFOCUS Reporting Server Installation Guide for your current production version of WebFOCUS Reporting Server:
- Data Adapters (Interfaces, for example, Db2 or ADABAS).
Important: All data adapter files are included and allocated in WebFOCUS Reporting Server after you run ISETUP. However, using the instructions in the relevant Installation Guides for those data adapters, you must reinstall every data adapter to which you want to have access in the installed version of WebFOCUS Reporting Server.
If you run WebFOCUS Reporting Server out of LPA libraries, perform the following steps:
- Copy all the reentrant modules back into FOCLIB.LOAD from FOCLPA.LOAD. (Use JOB JFSCPBCK.)
- Run ISETUP.
- Copy the reentrant modules from FOCLIB.LOAD back into FOCLPA.LOAD. (Repeat JOB JFSCPLPA.)
- Delete the reentrant modules FROM FOCLIB.LOAD. (Repeat JOB JFSDELPA.)
ISETUP Processing Flow
The installation job should complete with 0 return codes for all steps, and additional libraries will have been created under the high-level qualifier you entered on the ISETUP screen.
There will be the following physical HOME libraries
SYSADMIN1.P.HOME.BIN                                 USERM1
SYSADMIN1.P.HOME.FEX                                 USERM1
SYSADMIN1.P.HOME.ACX                                 USERM1
SYSADMIN1.P.HOME.LOAD                                USERM1
SYSADMIN1.P.HOME.ERR                                 USERM1
SYSADMIN1.P.HOME.ETC                                 USERM1
SYSADMIN1.P.HOME.DATA                                USERM1
SYSADMIN1.P.HOME.MAS                                 USERM1
SYSADMIN1.P.HOME.CICS.LOAD                           USERM1
There will be six physical CONF libraries:
SYSADMIN1.CONF.ACX                                   USERM1
SYSADMIN1.CONF.CFG                                   USERM1
SYSADMIN1.CONF.DATA                                  USERM1
SYSADMIN1.CONF.SQL                                   USERM1
SYSADMIN1.CONF.MAS                                   USERM1
SYSADMIN1.CONF.PRF                                   USERM1