Creating a Source Transformation in a Data Source Object
You can create a source transformation in a data source to add intermediate calculations to the request. Source transformations are performed on a data source object as the records are read, before any filtering or aggregation is performed. This is often useful for complex calculations that are composed of multiple expressions. Creating a source transformation is also helpful in performing data type conversions when multiple steps are required, and if you want to aggregate or filter a calculated column.
Source transformations are only performed for a particular data flow.
A source transformation can contain an expression or a constant.
- If the source transformation contains an expression, you can create the expression with the Transforms Calculator.
- You can also enter a value or expression in the expression area. The format is automatically determined and displayed.
- If you are adding a source transformation to a hierarchical file (for example, FOCUS/FDS), the WITH attribute may be required. The WITH attribute may also be required if you add a source transformation that references a constant.
- Use of some source transformations disables Automatic Passthru. For more information, see Using Automatic Passthru.
- You can create a virtual column that appears whenever a data source is used by adding it to the data source itself via the navigation pane. For more information, see Adding Virtual Columns (DEFINE) in a Synonym.
- When re-using a synonym in a data flow, such as for a recursive
join, the transformations must be the same in all instances of the
synonym in the flow.
If different transformations are required in each instance, you should create multiple synonyms with different synonym names for these sources and use them in the data flow.
In addition to source transformations, you can use the Relational Expression tab of the Transformation Calculator to create a relational expression transformation that can be used in a filter.
Create a Source Transformation in a Data Source Object
- Procedure
- From
the data flow workspace, double-click a data source object, or right-click
it and click Source Transformations.
The Source Transformations dialog displays all of the columns in the data source.
 Note: The columns of the synonym are shaded because they cannot be edited here. Only source transformations can be edited in this dialog.
 - Click
the Insert Transforms button

 .
.
The Transformation Calculator opens.
- Type a name and format for the virtual
column.
Note: If you do not supply a format, the ibi Data Migrator desktop interface will automatically provide the format based on the expression. Similarly, if you supply the wrong format, the desktop interface replaces it with the correct format using a pop-up notification to advise you of the change.
- Use
the Columns/Variables and Functions tabs, and the calculator buttons,
to build the expression for the virtual column. For information
about using functions, see Using Functions.
For information about using variables, see Using Variables in a Flow.
Note: When you create expressions, keep in mind their order of evaluation. For details, see Order of Evaluation.
- Click OK.
The new column appears in the Columns list.
- To verify
that the transformation is working properly, click the Test Transforms button
 .
.
The Test Transformations dialog opens, showing the result of the source transformation.
- Click OK to close the Source Transformations dialog.
Create a Transformation That Uses a Variable
From the Source Transformations dialog:
- Procedure
- Click the Insert Transforms button.
The Transformation Calculator opens.
- Type
a name and type or select a format for the virtual column.
Note: If you do not supply a format, the ibi Data Migrator desktop interface will automatically provide the format based on the expression. Similarly, if you supply the wrong format, the desktop interface replaces it with the correct format using a pop-up notification to advise you of the change.
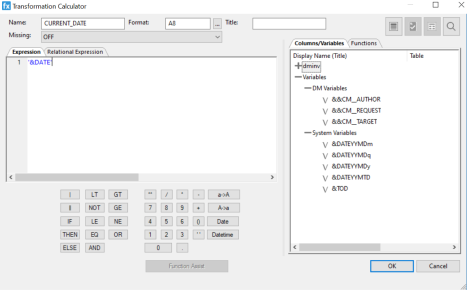
- Double-click
the variable that you want assigned to the column from the Columns/Variables
tab. You can also type in the variable, which must be enclosed in single
quotation marks (‘), as shown in the following image.
- Click OK.
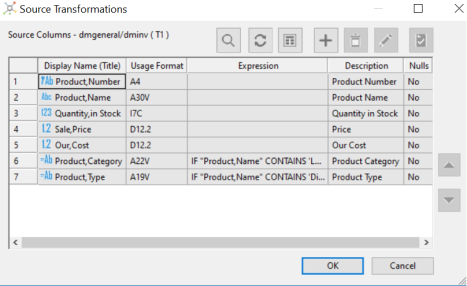
The variable appears in the Expression column in the Source Transformations dialog, as shown in the following image.
![]()
For more information about using variables, see Using Variables in a Flow.
Create a Relational Expression in the Transformation Calculator
The Relational Expression tab of the Transformation Calculator allows you to build an expression that can be used as a filter.
From the Source Transformations dialog:
- Procedure
- Click
the Insert Transforms button.
The Transformation Calculator opens.
- Click the Relational Expression tab.
- Type
in a name for the column.
Note: Since the transformation will always evaluate to either 1 (true) or 0 (false), the format is automatically set to I1.
- Optionally, type in a title for the column.
- Click
the Add New Row button above
the Expression field.
A blank line is added to the Expression field.
- Click the dropdown menu in the Field column, as shown in the following image.
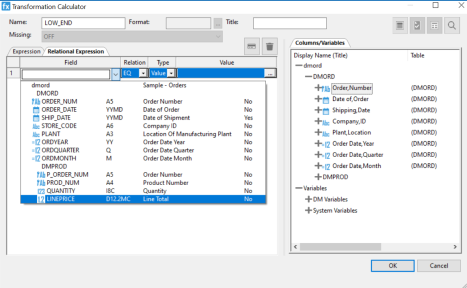
- Select a Column from the dropdown menu.
- Select a Relation from the dropdown menu.
- Select
a Type from the dropdown menu.
The following options are available:
- Value
- Field
- Variable
Note: This field is not available if the Relation is set to IS MISSING or IS-NOT MISSING. If the Relation is set to DB_FILE or NOT DB_FILE, the Type must be a value. - Type
in a value or click the ellipsis (...) to select an available value.
The Value(s) Selection dialog opens.
- Select
one (or more) Available Values and move it to the Selected Value(s)
pane using the arrow. Click OK.
The Transformation Calculator should look like the image below.

- Click OK to close the Transformation Calculator.
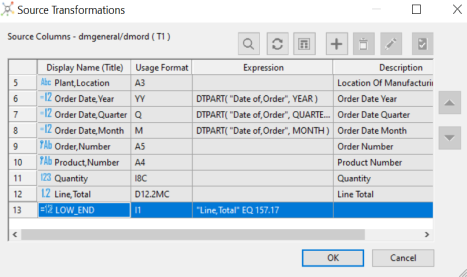
The relational expression appears as a column in the Source Transformations dialog, as shown in the following image.
Source Transformations dialog
To access the Source Transformations dialog from the data flow workspace, double-click a source, or right-click a source and click Source Transformations.
The Source Transformations dialog has the following fields and options:
Lists the columns in the data source. The first section contains the column order.
Is the name of the column, and also shows a symbol that indicates regular columns, key columns, index columns, and virtual columns.
Is the format of the column.
Is the expression for the column.
Is the description of the column.
Indicates whether the column can contain null data.
 Find
Find
Allows you to search for a column.
Refreshes the columns in the data source.
 Sample data
Shows a sample of the data from the data source.
Opens the Transformation Calculator to create a transformation.
Deletes the selected transformation.
Opens the Transformation Calculator to edit a transformation.
Tests the transformations.
Moves the selected transformation up or down within the Source Transformations list.
Source Transformations Shortcut Menu
To access the source transformations shortcut menu, right-click any column of a transformation.
The source transformations shortcut menu has the following options:
Opens the Transformation Calculator for the selected transformation. This is the default action.
Displays a shortcut menu with a list of available functions that can be added as a transformation. Selecting one of the functions opens the Function Assist dialog, which allows you to specify parameters for that function.
Deletes the transformation.
Tests all of the transformations. This can also be done by clicking the Test Transforms button.
This option is only available if the selected transformation contains an error, which is displayed in red text. Selecting this option opens a dialog with the error code and a short explanation of the error.
Copies the selected transformations to memory, so that they can be pasted into this, or another, flow.
Pastes transformations from memory into the transformation list.
Transformation Calculator
To access the Transformation Calculator, click the Insert button in the Transformations dialog.
![]()
The Transformation Calculator has the following fields and options:
Is the name of the column.
Is the format of the column.
Is the title of a new target table created by a data flow. The title is included in the synonym that is created.
Indicates if missing (null) values are allowed in this field. The following options are available:
- OFF. The result is never missing.
- ON. The result is missing only if all missable fields are missing.
- ON ALL. The result is missing if any missable fields are missing.
Displays the Expression dialog.
Displays the Relational Expression dialog.
Displays available columns and variables in a hierarchical tree or in a grid.
Displays a list of functions that are available for your transformations.
Opens the SQL APT Status report.
Verifies the validity of the expression.
Produces sample data for the expression.
Find button
Allows you to search for a function or variable by name.
Insert numbers and operators.
Allows you to specify parameters for the function through a dialog when creating or editing a transformation.
The following operators are available:
Concatenates two values, retaining any trailing blanks after the first one. For example, if FIRST_NAME and LAST_NAME were both in A15 format, the expression
FULL_NAME = FIRST_NAME | LAST_NAME
would produce a column like the following:
MICHAEL      SMITHSON

JANE         JONES

.

.

.
Concatenates two values, suppressing any trailing blanks in the first. For example, to construct the full name and insert a comma, the syntax
FULL_NAME = LAST_NAME || (', ' | FIRST_NAME)
would produce a column like the following:
SMITHSON, MICHAEL

JONES, JANE

.

.

.
The concatenation in the parentheses is done first (preserving the blank space after the comma), and the result is then concatenated to LAST_NAME, suppressing the trailing blanks of LAST_NAME.
Establishes a conditional test.
Specifies the action to perform if the result of a conditional test is TRUE.
Specifies the action to perform if the result of a conditional test is FALSE.
Returns the value TRUE if the value on the left is less than the value on the right.
Returns the value TRUE if the operand is false.
Returns the value TRUE if the value on the left is less than, or equal to the value on the right.
Returns the value TRUE if the value on the left is equal to the value on the right.
Returns the value TRUE if both operands are true.
Returns the value TRUE if the value on the left is greater than the value on the right.
Returns the value TRUE if the value on the left is greater than, or equal to the value on the right.
Returns the value TRUE if the value on the left is not equal to the value on the right.
Returns the value TRUE if either operand is true.
Raises a value to the specified power.
Adds parentheses.
Inserts two single quotation marks. Enter alphanumeric test values between these.
Converts selected text to uppercase.
Converts selected text to lowercase.
Opens the Date Editor dialog, which lets you use the current date or specify a date from the calendar.
Opens the Date Editor dialog, which lets you use the current date and time or specify a date and time from the calendar.
Order of Evaluation
The order of evaluation can affect the result of an expression in a transformation. ibi Data Migrator evaluates numeric and Boolean operators from left to right in the following order:
- Operations enclosed in parentheses
- Exponentiation
- Multiplication and division
- Addition and subtraction
- EQ, NE, LE, LT, GE, GT, NOT
- AND
- OR
Changing the Order of Evaluation
The following expression gives an incorrect result because UNIT_SOLD is first multiplied by UNIT_COST, and then the result is subtracted from RETAIL_PRICE:
RETAIL_PRICE - UNIT_COST * UNIT_SOLD
You can change the order of evaluation and improve readability by enclosing expressions in parentheses. An expression in parentheses is evaluated first. The correct expression for the preceding example is:
(RETAIL_PRICE - UNIT_COST) * UNIT_SOLD