Viewing and Editing Synonym Attributes
The Synonym Editor enables you to view and edit the attributes of a synonym.
View and Edit Synonym Attributes
To view and edit synonym attributes:
- Procedure
- Double-click a synonym, or right-click it and click Open.
The Synonym Editor opens to the Field View tab, which shows a hierarchy of segments and columns on the left, with the attributes and values of the selected item on the right.
The attributes available depend on the type of synonym.
The image below is an example of an SQL data source with a key column selected.
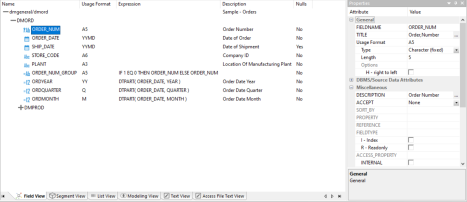
The values for Usage Format, Expression, Description, and Nulls are viewable in the hierarchy with the columns. To edit these values, use the corresponding attribute fields in the Properties pane on the right-hand side of the Synonym Editor.
- You can change the attribute values by typing in new values
or by using the dropdown menus and checkboxes.
The Synonym Editor does not let you make any changes that would render the synonym unusable. Therefore, you cannot edit any value field that is highlighted gray. In addition, if a change does not have proper syntax or format applied, the field may appear in the red text. Messages and warnings appear if you try to save a file that contains an error.
- Save changes by clicking Save from the
Quick Access Toolbar.
Note: You can multi-select fields to change attributes for multiple fields in a single operation. The display changes to show only those attributes that can be changed.
- Close the Synonym Editor by clicking the X.
File Attributes Summary
The image below is an example of an SQL data source with the synonym file name selected.

- Information about the attribute that has focus is displayed at the bottom of the attribute list.
- The attributes available depend on the type of synonym.
Synonyms can have the following file attributes:
Identifies the type of synonym or data source.
The name of the FOCEXEC that will be run before the request containing the Master File.
Defines the default century value, specifying a century number for handling cross-century dates.
Defines the base years, to represent the lowest year to which the century value applies (FDEFCENT).
Enables you to include descriptive information at the file level and specify multiple language descriptions for the synonym. Remarks are displayed along with the file name during reporting.
Identifies the location of the data source to be used in the file name, including the extension and the location of the data file. This option is only available for file data sources, such as fixed format files or XML and JSON documents.
Defines the language to use for the synonym.
Controls the Business View run-time resolution strategy.
Controls the base file DB info inheritance in a cluster.
Segment Attributes Summary
If a synonym segment is selected, the attributes listed below are available.
- Information about the attribute that has focus is displayed at the bottom of the attribute list.
- The attributes available depend on the type of synonym.
Is the name of the segment.
Used in a Master File to encrypt all or some of its segments.
Specifies the type of relationship that a segment has to its parent, and indicates which of the segment fields are key fields and in what order they are sorted.
Type. Identify the segment type and sorting options from the Type dropdown list.
Keys. Enter the names of key fields that you want to use for sorting. For example, no two employees can have the same employee ID number, so you can use that field as the key. A segment instance can have more than one field that makes up the key. That is, two or more field values may be used to distinguish records.
SEGSUF is used when part of the data source being described by the synonym is of a different data source type than that declared for the entire structure. This option is not available for the first segment in a synonym.
Contains a description or comments about the segment.
An optional attribute that enables you to provide the title prefix for the segment fields that appear in reports. You can split the text across up to five separate title lines by separating the lines with a comma.
Is the name of the cross-referenced data source.
Is the name of the cross-referenced segment.
Identifies the common join field for the cross-referenced segment.
Adapter specific fields are shown if an Access File component has been generated with the synonym.
Defines how many members of a dimension can be retrieved for a report.
Identifies the table or view. It may contain the owner ID, as well as the table name. For some synonyms, it must also contain the data source name. This value may be a variable.
Indicates the host server or data source for synonyms. This value may be a variable.
Identifies the names of the columns that constitute the primary key.
Identifies the logical sort sequence of data by the primary key.
Specifies whether write operations are allowed against the table.
Identifies the storage area in which the table resides.
Specifies the type of table persistence and related table properties. This is optional for database management systems that support volatile tables, and required otherwise.
Column/Field Attribute Summary
If a column or field in a synonym is selected, the attributes listed below are available.
- Information about the attribute that has focus is displayed at the bottom of the attribute list.
- The attributes available depend on the type of synonym.
Is the name of the column.
Supplies a title to replace the column name that is normally used in reports and enables you to specify multiple language titles for the column or field.
Describes the data type and format for the column for usage or display.
Assigns an alternative name for a column, or the real column name for a DBMS synonym.
For file data sources, a special reserved ALIAS of INSTANCE means that the associated FIELD will show the name of the file when it is read.
When a FIELDNAME of RECTYPE is used, the ALIAS contains the value that identifies the record type.
Indicates whether the field is part of the primary key for the table.
Sequence number of the field in the primary key for the table.
Describes the type and length of data as it is actually stored in the data source.
Controls how null data is handled, that is, if no transaction value is supplied. This option is not available for KEY fields.
Contains a description or comments about the column or field.
Specifies criteria for validating data.
- OR allows you to specify an acceptable value.
- SYNONYM allows you to specify a synonym as the source of the accept list.
- FOCEXEC allows you to specify a FOCEXEC as the source of the accept list.
- FROM-TO allows you to specify a range of acceptable value fields.
- FIND allows
you to supply file and field names to instruct where to search for
a data source and for a list of acceptable values. You supply the
field name of the data field for which the validation criteria are
being assigned, the file name of the target FOCUS data source where
the field can be found, and the field name of the target data field
that contains the validation criteria.
FIND is only available for FOCUS data sources and does not apply to OLAP-enabled synonyms. Also note that, in the Maintain environment, FIND is not supported when developing a synonym.
Is the name of the sort BY field.
Is the name of the bin BY field.
Is the name of the bin max field.
Contains the name of a field to be included in a dimension.
Describes which hierarchy property the column represents.
Points to the field that is the unique identifier for the hierarchy.
- I - Index identifies an indexed column in a FOCUS database.
- R - Read only indicates a read-only column. This setting is useful for columns that are automatically assigned a value by the RDBMS.
Specifies access options for the column data.
- INTERNAL defines a column that does not appear in sample data or in the list of available columns. This restricts the field from showing in any of the fields lists in the reporting tools.
- NEED_VALUE defines a column that requires a value to access the data.
- Select By defines a column by value, range, or multi-values.
Appends a help message to a column.
This attribute is not used by WebFOCUS.
Sets slowly changing dimension attributes. This option is only available for existing relational targets and is only used by a flow when SCD is enabled in the target object.
A surrogate key is the KEY column in the table and has an SCD type of blank. Other columns with a blank SCD type have no SCD processing done to them. In a synonym, this column will always appear first, even if it is not the first column in the table.
- Logical Key Field. Is
the source database key. Multiple columns may comprise the key.
The best practice, for faster run-time performance, is to ensure that a non-unique index is set for the Logical Key field in the SCD synonym.
- Begin Date/End Date for Type II changes. Indicates
date range for the row values. A null end date indicates that the row is current. If you use Begin and End Date, the End Date column must
be created as nullable, unless you override the default End Date
value of NULL with a value for &&CM__SCDAEDATE.
The data type must be either a Date format or a Date and Time format. However, the formats of the two fields must be identical.
Begin/End Date values for Slowly Changing Dimensions can also be Datetime or Timestamp values.
- Change Flag. For Type I changes, a value is assigned when a row is updated. If a value is not assigned in theTarget Transformations for the Date and Datetime columns, the current date or timestamp is assigned automatically.
- Activation Flag. Indicates
if the row is current.
This field must be an integer or a character A20V. Valid values when this field is described as an integer are:
- 1. Indicates that a record is active.
- 0. Indicates that a record is inactive.
When this field is described as a character field, you can still use the values 1 and 0, or you can assign other values. To assign values, you can use the Set Variables object on a Process Flow tab and set values for the global variables CM_SCDACT and CM_SCDINACT.
- Type I (overwriting history) designates columns whose database values are overwritten with new values.
- Type II (preserving history) designates columns whose database rows are flagged as inactive or assigned an end date. New rows are inserted with the new values.
- blank (non-key permanent columns) indicates that database values are not changed.
Inserts virtual fields in the Master File to show how selected totals progressed through a time period for specified intervals.
Are the styles (for example, font and color) to apply to the field.
The attributes available depend on the type of synonym.
Adapter Specific
Indicates that the field is automatically incremented by the relational database when rows are inserted. This option is only available for selected relational databases. When selected, the field must also be identified with a field type of read-only.
The following attributes are only used if AUTOINCREMENT is checked.
- START. Indicates the starting value for this AUTOINCREMENT field. If not specified, 1 is used.
- INCREMENT. Indicates the increment value for this field. If not specified, 1 is used.
- SEQUENCE. Is the name of the corresponding database SEQUENCE object for this field. This option is only available for ORACLE tables.
Assign SCD Columns On a Synonym
You can assign SCD (Slowly Changing Dimension) Types column attributes from a single dialog in the Synonym Editor. This operation is performed on the segment level from the Field View, Segment View, or Modeling View.
- Procedure
- In the Synonym Editor, right-click the segment name and click Assign SCD Columns from the shortcut menu, as shown in the following image.
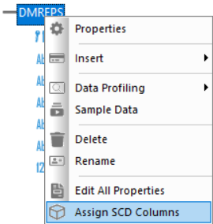
The Assign SCD columns dialog opens.
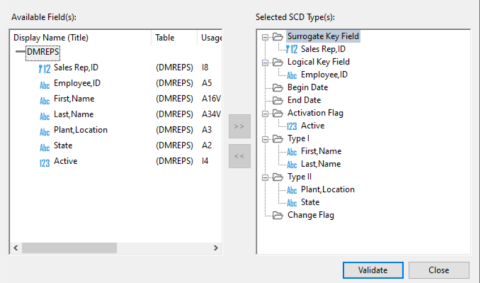
- To assign the SCD Type to a column, click the column in the Available Field(s) section and the SCD type in the Selected SCD Type(s) section, followed by the right arrow. You can also drag the column from the left to the desired SCD Type on the right. An example of assigning SCD types to a column is shown in the following image.
- Click Validate to confirm that all SCD Types are assigned to the synonym columns correctly.
If the validation passes, the synonym can be used as a target synonym in a Data Flow with the Load Type Property set to Slowly Changing Dimensions.
If the validation does not pass, the segment name appears in red. To view the explanation of the error, right-click the segment name and click Error Details.
Pivot Multiple Values to Rows in a Synonym
When you have a column that contains multiple values, you can pivot the column so that each value becomes its own row or column.
- Procedure
- Right-click the column that you want to transpose, point to Pivot, and click Multiple value to rows.
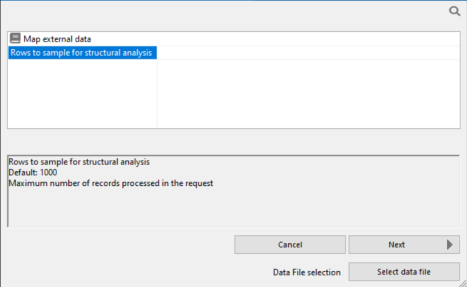
The Select mapping source dialog opens, as shown in the following image.
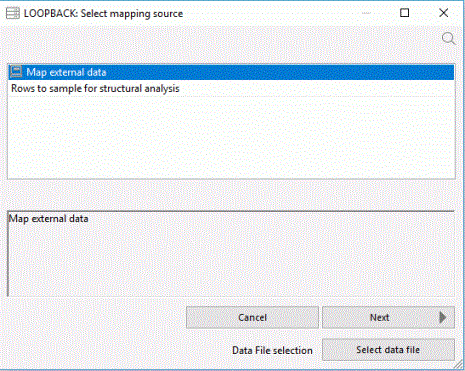
The Rows to sample for structural analysis box allow you to specify the number of rows to examine to determine the structure and data types of the values in the column. Enter a value here, or leave it blank to use the default value of 1000.
If the source column is empty, or contains unrepresentative data, you can choose to use an external file as a prototype instead of the column values. If the source column contains XML and you have an XSD (XML Schema Definition) that describes the structure, you can use it. For either option, click Select data file.
- Click Next.
The Column mapping dialog opens
- Select a data type from the dropdown menu, as shown in the following image.
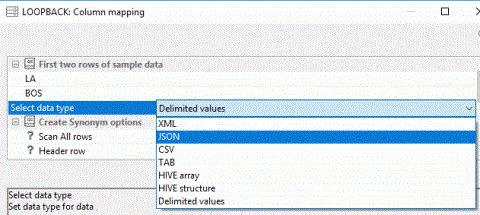
The dropdown menu shows you the suggested data type by default. To help you identify the type of data that is stored in the selected column, the first two rows of data are shown above the dropdown menu.
The available data types are:
- XML (eXtended Markup Language)
- JSON (JavaScript Object Notation)
- CSV (Comma Separated Values)
- TAB (Tab Separated Values)
- Hive Array (List of values. Each one becomes a separate row.)
- Hive Structure
- Delimited Values (specify delimiter and optional enclosure)
Pivoting Repeating Columns in a Synonym
When you have multiple columns or groups of columns that represent identical values, you can pivot the column or group of columns so that each value becomes its own row.
- Repeating column. This transformation pivots each row with a consecutive set of semantically identical data columns into rows. For report generation, three new columns are created.
- Repeating group of columns. This transformation pivots each row with a consecutive set of semantically identical groups of data columns each into rows. For report generation, new columns are created for each column in the original group plus one additional column to identify the grouping.
In each case, fields are created with the information needed to order and display the rows. For numeric values, you can edit the formulas used to do this, but it is not recommended when the field headings are numeric.
Pivot Repeating Columns in a Synonym
- Procedure
- Right-click the first column that you want to transpose, point to Pivot, and click Multiple columns to rows.
The Pivot Columns to Rows dialog opens, as shown in the following image.
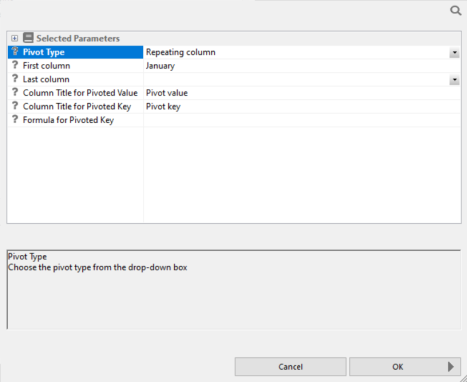
- Select the last column to pivot.
- Click OK.
Pivot Repeating Groups of Columns in a Synonym
- Procedure
- Right-click the column that you want to transpose, point to Pivot, and click Multiple values to rows.
The Select mapping source dialog opens, as shown in the following image for groups.
The Rows to sample for structural analysis box allow you to specify the number of rows to examine to determine the structure and data types of the values in the column. Enter a value here, or leave it blank to use the default value of 1000.
If the source column is empty, or contains unrepresentative data, you can choose to use an external file as a prototype instead of the column values. If the source column contains XML and you have an XSD (XML Schema Definition) that describes the structure, you can use it. For either option, click Select data file.
- Click Next.
The Column mapping dialog opens.
- Select a data type from the dropdown menu, as shown in the following image.
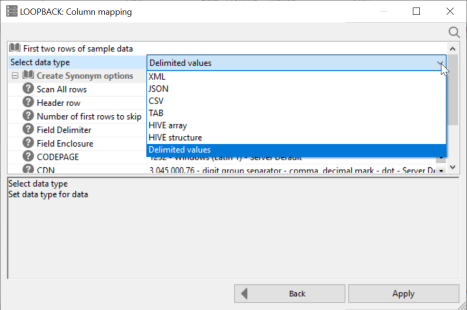
The dropdown menu shows you the suggested data type by default. To help you identify the type of data that is stored in the selected column, the first two rows of data are shown above the dropdown menu.
The available data types are:
- Delimited values. You must supply additional information, such as delimiter.
- XML (eXtended Markup Language)
- JSON (JavaScript Object Notation)
- CSV (Comma Separated Values)
- TAB (Tab Separated Values)
- HIVE array (List of values. Each one becomes a separate row.)
- HIVE structure
- Delimited values (specify delimiter and optional enclosure)
- Click Apply.
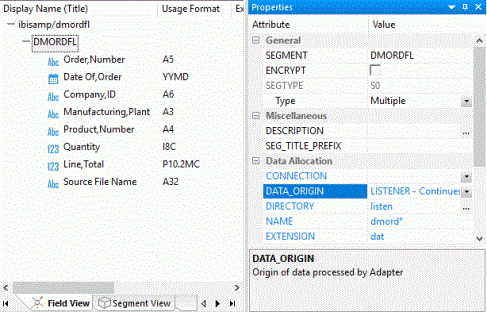
File Listener Attributes
The image below is an example of a fixed format file data source with DATA_ORIGIN of LISTENER.
A fixed format file data source may have the following attributes:
The name of a connection for a fixed format file source that identifies an FTP or SFTP server. This field is optional. If not specified, the file resides locally.
Indicates the origin of data described by the synonym.
FILE. Indicates that a file (or collection of files if a wildcard is used in the dataset parameter) is read once. This is the default.
LISTENER. Indicates that files are read as they appear, as specified in the remainder of the File Collection Parameters.
TAIL. Is reserved for future use.
Defines the location of data files for polling. This can be an application directory, a mapped application name, or a directory location on your file system.
When using a directory on a file system for local files, the name of the physical directory can be used.
When using a directory on a file system for remote data files, a directory relative to the initial directory can be used. For example, if your remote initial directory is /home/user1/apps, using sales sets the data files directory location to /home/user1/apps/sales.
Indicates the name of the file. May include wildcard characters. The default is *.
Indicates the file type that the listener is checking. The default is .ftm.
The parameters below only apply to the Origin of Listener.
Indicates the mechanism used to pick up files from their directories. The options are:
IMMEDIATE. Processes the file as soon as it is detected. This is the default.
TRIGGER. Processes the file when a trigger file is detected. This setting requires an additional setting for the trigger file extension.
A trigger is typically used when processing needs to be delayed. For example, when using FTP to copy files, if you wait until this secondary file appears while a large file is being copied into a directory, the trigger file indicates when processing can begin.
When a pickup strategy of trigger is used, indicate the trigger file extension. The trigger file extension is added to the full name of the file being listened for. For example, if the trigger file extension is .trg, the trigger file for a data file named input.dat would be input.dat.trg. There is no default value.
MONITOR. Monitors the file as soon as a file change is detected.
The files themselves are not read, only their name and location are recorded. This processes files and subdirectories when they are added, changed, or deleted.
Indicates what to do with the file after it has been processed by a file agent. The options are:
DELETE. Deletes the file.
ARCHIVE. Moves the file, while adding a timestamp to the name, to a specified directory. This is the default.
ARCHIVE_LOCAL. Defines the location where the data files will be archived. This location can be an application directory, a mapped application name, or a directory on your local file system.
This option must be used only for a CONNECTION that is set with the FTP or SFTP protocol.
This option allows archiving the files locally, where the Server is running, while the listening directory is on a remote location.
KEEP. Keeps the file. This option is only available for the Trigger pickup type.
Defines the location where the data files will be archived when the DISCARD strategy of ARCHIVE is used. This can be an application directory, a mapped application name, or a directory location on your file system.
When using a directory on a file system for local files, the name of the physical directory can be used.
When using a directory on a file system for remote data files, a directory relative to the initial directory can be used. For example, if your remote initial directory is /home/user1/apps, using sales sets the data files directory location to /home/user1/apps/sales.
Indicates the polling interval (in seconds) for new files arriving in the specified directory. For example, a polling interval of 10 means that the directory is scanned every ten seconds for new files. The default is 10 seconds.
Indicates the timeout interval (in seconds). If there is no activity in this time interval, the processing stops. A zero (0) value means that there is no limit. The default value is 1 second.
The maximum number of errors allowed.
The maximum number of files in the processing queue.
The sort order for files in the processing queue.
Indicates the maximum number of data files processed by the request. The default is 99999999.
Used only for the data origin of TAIL. Indicates the maximum number of records processed by the request. The default is 99999999.
Indicates a missing alpha value in the data source.
Indicates a missing numeric value in the data source.
Indicates a missing date/time/timestamp value in the data source.
File Listener for Use With Excel Sheets
The File Listener can be used to process fixed format files as they appear in a specified directory. It is also possible to use it with Excel files with some additional preparation. These instructions describe the additional steps required to use an Excel worksheet as a source.
For a complete example of using the File Listener, see Loading a Target Table Using the File Listener. For further explanation of the attributes described, see File Listener Attributes.
Create a Synonym for Use With the File Listener and Excel Files
- Procedure
- Right-click an application directory, point to New, and click Synonym via Synonym Editor.
A new synonym opens in the workspace.
If the Properties panel is not visible, right-click the synonym name (for example baseapp/synonym01) and click Properties.
- From the SUFFIX dropdown menu, select FIX.
- From the IOTYPE dropdown menu, select BINARY.
- Right-click the synonym name, point to Insert, and click Segment Manually.
A new segment named SEG1 and a new field named FIELD1 are added. SEG1 is selected.
- In the Properties panel, from the Type dropdown menu, select Multiple.
- From the DATA_ORIGIN dropdown menu, select LISTENER. Enter the following values:
- From the CONNECTION dropdown menu, select <local> or an [S]FTP server.
- In the DIRECTORY and NAME boxes, type the location and name of the file(s) you want to listen for.
- In the EXTENSION box, type xlsx.
- Enter values for PICKUP, DISCARD, POLLING, and TIMEOUT, as required.
- In the workspace, click FIELD1. Enter the following values in the Properties pane:
- In the FIELDNAME box, type FILENAME_FULL.
- In the Usage Format box, type A512.
Expand the DBMS/Source Data Attributes section.
- In the ALIAS box, type INSTANCE_FULL.
- In the ACTUAL box, type A512.
Add a Reference to an Existing Synonym for an Excel Worksheet
If you have a synonym for the Excel worksheet already in place, follow this procedure.
- Procedure
- Right-click the SEG1 segment, point to Insert, and click Reference to Existing Synonym as Child.
The Insert Reference to Existing Synonym as Child dialog opens.
- Click the synonym that describes the Excel worksheets that you want to use as a source and click Select.
The reference to the synonym is added and the segment name is selected.
- In the Properties panel, from the POSITION dropdown menu, select INSTANCE_FULL.
- From the Quick Access toolbar click the save icon. Enter a name for the synonym and click Save.
You can now use the synonym you created as a source in a Data Flow or a Direct Load Flow.
Import Data From an Excel Worksheet
If you do not have a synonym for the Excel worksheet already in place, follow this procedure.
- Procedure
- Right-click the SEG1 segment, point to Insert, and click Segment via Metadata Import.
The Select connection dialog opens.
- Double-click Excel.
The Open dialog opens.
- Select the directory where your spreadsheet resides, then click the workbook and click Create Base Synonyms.
The Status window opens.
- Click Close.
You can now use the synonym you created as a source in a Data Flow or a Direct Load Flow.
Prototype File Monitoring Synonym
A prototype synonym is provided as filemntr.mas for a user with the File Listener pickup strategy Monitor. To create this synonym, first follow the instructions outlined in Create Sample Procedures and Data for File Listener. Then, copy it to an application directory in your application path and edit the File Listener parameters as needed. At a minimum, edit the value for DIRECTORY to point to the application directory (or mapped application name) that you want to monitor. Edit the NAME and EXTENSION values to show the file name (or * for all names) and extensions that you want to monitor.
This synonym contains fields with special values for the ALIAS, as described below.
- INSTANCE_FULL. Full path and name of the file. Cannot be used with INSTANCE. Also available with IMMEDIATE.
- INSTANCE_SIZE. Size of the file in bytes. Also available with IMMEDIATE.
- INSTANCE_DATE. Date that the file was last modified. Also available with IMMEDIATE.
- INSTANCE_TIME. Time that the file was last modified. Also available with IMMEDIATE.
- INSTANCE_TYPE. The value File to indicate a file, or when DATA_ORIGIN is FILE, the value <DIR> to indicate a directory. This directory is only available with MONITOR. Otherwise, the value is always File.
- INSTANCE_ACCS. Access mode for the file. Available on UNIX systems only.
- INSTANCE_RDWR. Indicates if the file is READONLY. Available on UNIX systems only.
- INSTANCE_USER. User that owns the file. Available on UNIX systems only.
- INSTANCE_GROUP. Group identification. Available on UNIX systems only.
- INSTANCE_MONS. Monitoring status. Blank for the initial run, then ADDED, DELETED, MODIFIED, or RENAMED to reflect changes. Only available with MONITOR.
The properties of the prototype synonym are shown in the following image.
