Email Distribution
The Email Distribution folder in the Configuration tab contains default email settings, email retry options, and email security.
The Email Distribution folder contains the following configuration settings.
|
Setting |
Optional or Required/Default Value |
Descriptions and Possible Values |
|---|---|---|
|
Inline Report Distribution |
Required. The default value is Allowed. |
Specifies whether the Schedule tool will enable the email distribution option to send a report in the body of the email (inline). Note: If this option
is cleared after a schedule using this option has been created, the schedule
will fail when it is run. A message in the log will indicate how to fix the
problem.
|
|
Packet Email |
Required. The default value is Yes. |
Controls how task output and burst content are distributed through email. Valid values are:
|
|
Allowed Email Domains and Addresses |
The default value is off. |
Contains the email domains and addresses that are authorized to be used in a distribution. Select the Restrict user input with this list check box to restrict user input of email addresses and domains to the allowed addresses saved in your list. For more information, see Validate Allowed Email Domains and Addresses. Note:
|
|
Restrict Email Distribution to the Email Address of the Schedule Owner |
Optional. |
Check this box if you want to restrict email distribution to the email address of the schedule owner. Note:
If no email address is specified for the schedule owner in the Security Center, the schedule cannot be saved. |
|
Always Compress and Password Protect Distributed Report |
Optional. |
Select this box to have any distributed reports converted into a password-protected Zip file. Passwords can be provided in a distribution file, a dynamic distribution list, or by way of the zip encryption plug-in. If no password is created, the report will not be distributed. The distribution server will enforce this rule on all schedules, including schedules created prior to selecting the check box. Note: When this check
box is selected, Inline Report Distribution will be disabled. If Inline Email
is enabled, the Always Compress and Password Protect Distributed Report check
box will be cleared.
Also, if the Always Compress and Password Protect Distributed Report check box is selected, then the Add Report to Zip File check box in the Distribution tabs of schedules created from both the Basic and Advanced scheduling tools is selected, by default. |
|
Customize Attachment Message |
Optional. |
Provides the ability to specify a custom message. |
|
Default Attachment Message |
Required. |
Defines the default message used in your Email Distribution. The message that you define here displays in the Basic Scheduling Tool. Note: If you
customize the default message, this new message will be the default message for
new schedules.
|
|
Mail Server Defaults section |
||
|
Mail Server |
Required. |
Name of the default mail server used to distribute an email schedule. You can also specify a port for Mail Host using hostname:port. If you do not specify a port or the port you specify is not present, the default port is used. |
|
This Server Requires a Secure SSL Connection |
Optional. |
Select this check box if the specified mail server uses SSL. |
|
This Server Requires a Secure TLS Connection |
Optional. |
Select this check box if the specified mail server uses TLS. |
|
This Server Requires Authentication |
Optional. |
Select this check box if the specified mail server requires authentication with a user ID and password. You can also switch between password and OAuth 2 Authentication. |
|
SMTP User Id/Password |
Required if the mailhost is using SMTP Authorization. No default value. |
User ID and password used to connect to the mailhost. Note: SMTP Authentication is only supported for email schedule distribution and library notification emails.
|
|
SMTP Security Plug-in |
Optional. |
Name of a custom written Java class that implements the WebFOCUS ReportCaster SMTP security interface to dynamically retrieve the user ID and password needed to connect to an SMTP server. For more information, see Configuring Email Distribution. Note: SMTP Authentication is only supported for email schedule distribution and library notification emails.
|
|
Email Reply Defaults section |
||
|
Mail From |
Optional. |
Default value for the email From field. This can be any value. |
|
Mail Reply Address |
Optional. |
Default email reply address when creating an email schedule. Note: If you do not provide a Mail Reply Address, the
default Reply Address used in the Basic and Advanced Scheduling tools will be
the email address of the user that is signed in to WebFOCUS. ReportCaster obtains the email address of the user from the WebFOCUS security system.
|
|
Email Retries section |
||
|
Email Retries |
The default value is 1. |
Number of times the Distribution Server will try to connect to the email server to deliver report output. If the Distribution Server is unable to connect to the email server on the first try, it will attempt to connect again after the specified Email Retry Interval has passed. A message for each attempt is written to the log file. Valid values are 0 through 9. |
|
Email Retry Interval (seconds) |
The default value is 60 seconds. |
Amount of time that the Distribution Server will wait between retries. Valid values are 1 through 999. |
|
Email Reconnection |
||
|
Reconnect if SMTP Server Disconnects |
The default value is Yes. |
If the value in this setting is Yes, the distribution server performs three attempts to reconnect to the SMTP server and resume sending email. If all three attempts are unsuccessful, the distribution server stops processing and writes an error message to the log. If the value is No, no attempts to reconnect are made. |
|
Number of messages per connection |
The default value is 0. |
If the value in this setting is zero (0), there will be no limits on the number of messages that can be sent over a single connection. If a non-zero value appears in this setting, the distribution server will be able to send that many emails over a single connection. It can then make a new connection to send any remaining emails, making as many new connections as necessary. |
Configuring Email Distribution
- Procedure
- From the Tools menu, click WebFOCUS ReportCaster Status.
- Click the
Configuration button.
Note: Authorized users can also access the WebFOCUS ReportCaster Configuration tool from the Administration Console.
- In the left pane, select the Email Distribution folder.
- Populate
the email distribution fields. You can:
- Make changes to the current email settings. For more information, refer to the preceding table.
- Supply any default values that you would like to be available at schedule creation time.
- If your mail server(s) require authentication or SSL or TLS, check the appropriate boxes and enter the required credentials. To use the default implementation, see Using the Default Implementation for the SFTP Security Plug-in.
- Click Save.
Configuring Oauth2 Authentication
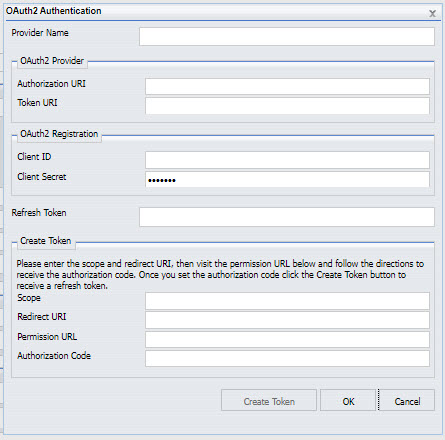
-
Select the OAuth2 Authentication configure icon.
OAuth2 Authentication window pops-up. -
Provide the name of the provider in the Provider Name field.
-
Provide the Authorization URI, Token URI, Client ID, Client Secret in the respective fields.
-
Set the scope for OAuth2 Authentication.
-
Provide a redirect URL in the Redirect URL field.
-
The Permission URL field is auto populated after the above sets are completed.
-
Then visit the permission URL from a browser, and follow the directions to get the authorization code.
-
Provide the authorization code from step 7 in the Authorization Code field.
-
Select Create Token button to generate the refresh token.
-
Select OK to save the configuration.
Using the Default Implementation for the SMTP Security Plug-in
- Procedure
- From the Tools menu, click ReportCaster Status.
- Click the Configuration button.
- In the left pane, select the Email Distribution folder.
- Enter
the following value in the SMTP Security Plug-in field.
ibi.broker.scheduler.plugin.DefaultSMTPSecurityExit
For more information about the Default SMTP Security Exit Interface, refer to the ibi.broker.scheduler.plugin package description found in the ReportCaster API Specifications document, located at https://webfocusinfocenter.informationbuilders.com/javadoc/rcaster/index.html.
- Click Save.
- Create a file called smtp_security_exit.txt using the following
format:
HOSTNAME, AUTHORIZATION REQUIRED(Y,N),USERNAME,PASSWORD,SSL(Y,N),TLS(Y,N)
- Copy the smtp_security_exit.txt file to the .../ReportCaster/cfg directory.
- Restart the Distribution Server.
If the mail server (hostname) is found in the smtp_security_exit.txt file and the authorization required flag is Y, the user and password in the file will be used to authenticate the mail server. If the SSL flag is Y, then SSL will be used. If the TLS flag is Y, TLS will be used.
Validate Allowed Email Domains and Addresses
When sending reports by email, you can restrict user selection of email domains and addresses from a pre-defined list.
The following image shows the Allowed Email Domains and Addresses dialog box in the WebFOCUS ReportCaster Console, where this option is available.
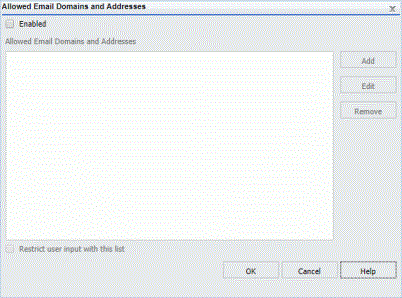
Select the Enabled check box to restrict email distribution to a list of valid email domains and addresses. When the list is enabled, and a user enters an email address that is not on this list, the WebFOCUS ReportCaster job cannot be saved.
If you select the Restrict user input with this list check box, users will only be able to use email domains and addresses selected from this list, applying another layer of email distribution restriction for other users.
Examples of Invalid Email Addresses and Domains
In this example, an Administrator added the following email addresses and email domains to the Allowed Email Domains and Addresses list:
- john@ibi.com
- roger@ibi.com
- @gmail.com
- @yahoo.com
These additions to the list define what is valid and what is invalid for user input.
Invalid Email Addresses
For example, since john@ibi.com was added to the list, if a user types in John@ibi.com, with an upper case J, the email address is valid. This is because the Allowed Email Domains and Addresses feature is not case sensitive.
However, if a user types johnroger@ibi.com, which is a combination of two email addresses that were added to the list, the email address would be invalid, because this specific email address was not added to the list.
Invalid Email Domains
When entering domain addresses, if a user types in any email address with the email domain @gmail.com, it is valid, because @gmail.com is one of the domains added to the list.
However, if a user types in any email address with the email domain @outlook.com, it is not valid, because @outlook.com is not one of the domains added to the list.
Email Domain and Address Restrictions
Restrictions apply during the following situations:
-
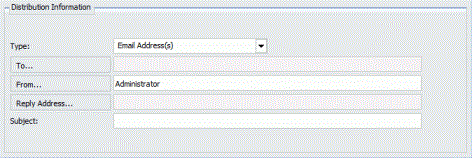
Editing Email Distribution options in the Basic and Advanced Scheduling tools.
The following image shows the Email Distribution options in the Basic and Advanced Scheduling tools. If you select the Restrict user input with this list check box, you can click the To, From, and Reply Address fields to select or create email addresses.
-
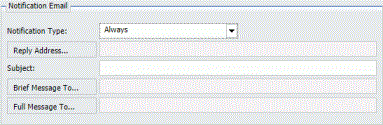
Editing Notification Email options in the Basic and Advanced Scheduling tools.
The following image shows the Notification Email options in the Basic and Advanced Scheduling tools. If you select the Restrict user input with this list check box, you can click the Reply Address, Brief Message To, and Full Message To fields to select or create email addresses.
-
Adding new members to a Distribution List
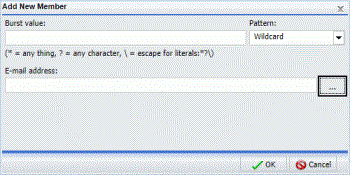
The following image shows the Distribution List Add New Member dialog box. If you select the Restrict user input with this list check box, you can click the ellipsis button next to the E-mail address field to select or create email addresses.
Restrictions also apply to the following file types:
- Distribution Files. If you import an external distribution file, the emails listed in the file are validated against the list of allowed email addresses and domains.
- Dynamic Distribution Lists. If you create a Dynamic Distribution List, the emails selected for use are validated against the list of allowed email addresses and domains.
The Email Selection Dialog Box
When the Restrict user input with this list check box has been selected, you can click a To, From, Cc, Bcc, Reply, Reply Address, Brief Message To, Full Message To, or ellipsis button to display one of three dialog boxes. The dialog box that displays is based on the type of email domain and address information contained in the Allowed Email Domains and Addresses list.
- You can enter multiple email addresses into the To, From, Cc, Bcc, Reply, Reply Address, Brief Message To, and Full Message To fields.
- To cancel the selection of an email address in the Select Email Addresses dialog box, hold the Crtl key and select the email address.
A List of Only Email Addresses
If the Allowed Email Domains and Addresses list contains only email addresses, the Select Email Addresses dialog box allows you to select an email address for the To, Cc, Bcc, or Reply fields, as shown in the following image.
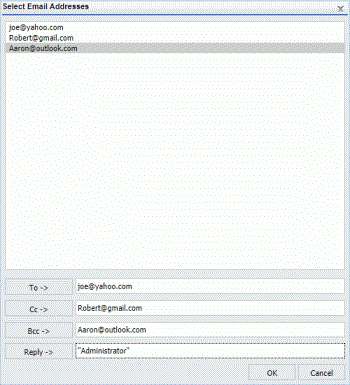
After you select an email address, click the To, Cc, Bcc, or Reply button to assign the email address to the respective field.
A List of Email Domains and Addresses
If the Allowed Email Domains and Addresses list contains both email domains and addresses, the Select or Enter Email Addresses dialog box lets you select from a list of email address. The dialog box also lets you create an email address for specific domains, as shown in the following image.
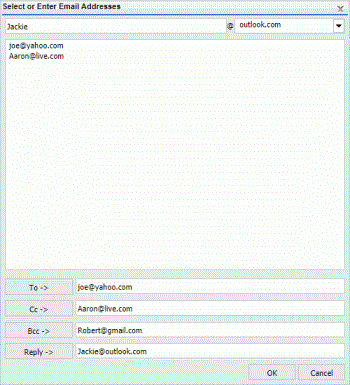
After you select an email address, or enter an email address and choose a domain, click the To, Cc, Bcc, or Reply button to assign the email address to the respective field.
A List of Only Email Domains
If the Allowed Email Domains and Addresses list contains only email domains, the input dialog box lets you select an email domain and enter the name of an email address, as shown in the following image.
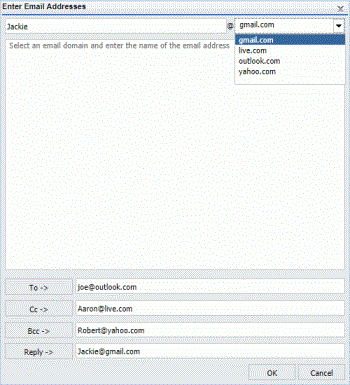
After you enter an email address and choose a domain, click the To, Cc, Bcc, or Reply button to assign the email address to the respective field.