Pre-Authentication

In this section:

In pre-authentication, it is assumed that trusted authentication has already taken place, and user identity information is delivered by one of the methods described in the following topics. In this configuration, no Sign in page is displayed to users. Certain features, such as anonymous access and the ability for users to change their own passwords, should be disabled.

Pre-authentication offers several benefits, such as a single sign on (SSO) experience for users and centralized authentication for administrators, eliminating the need to synchronize passwords between WebFOCUS and another source. Depending on the chosen method of pre-authentication, additional steps may be necessary to ensure that the pre-authentication configuration cannot be compromised. For example, if the pre-authenticated user ID will be passed in an HTTP header, then steps must be taken to ensure that the value of this header cannot be compromised.

Configuring Pre-Authentication With Central Authentication Service (CAS)

How to:

Central Authentication Service (CAS) pre-authentication allows clients such as web applications to authenticate users without gaining access to user security credentials. Instead, the WebFOCUS Client authenticates itself to the CAS server, which then returns a security ticket to the WebFOCUS Client to validate that the connection is secure. The WebFOCUS Client validates the ticket by providing the ticket and its own service identifier to the CAS server, and CAS returns trusted information about whether an individual user has been authenticated.

If the CAS server uses a self-signed certificate, in most cases, you will need to add the certificate authority signing certificate to the trusted root certificates for the JVM used by WebFOCUS.

Procedure: How to Configure Pre-Authentication With Central Authentication Service

Before you begin, complete the prerequisites for Pre-Authentication. For more information, see Configuring Pre-Authentication, External Authentication or External Authorization.

We recommend that you use the Export command to back up the Security Settings configuration files before making changes to the Authentication page. For more information, see How to Export Security Configuration Files.

  1. In the Administration Console, click the Security tab.
  2. Under the Security Zones folder, expand the folder for the Security Zone you wish to update, and then click Authentication.
  3. Click the CAS Authentication entry.
  4. In the Actions section, click Edit.
  5. In the Edit CAS Authentication Settings dialog box, type the URL for the CAS Login Server, using the format:
    https://CASSERVER.domain.com:port/cas/login

    where:

    CASSERVER.domain.com

    Is the network name or IP Address of the server hosting CAS operations.

    port

    Is the port to which the CAS Server is connected.

  6. Type the URL for the CAS Service Ticket Validator, using the format:
    https://CASSERVER.domain.com:port/cas

    where:

    CASSERVER.domain.com

    Is the network name or IP Address of the server hosting CAS operations.

    port

    Is the port to which the CAS Server is connected.

  7. Type the URL for the CAS Service, using the format:
    https://WebFOCUSServer.domain.com:port/ibi_apps

    where:

    WebFOCUSSERVER.domain.com

    Is the network name or IP Address of the server hosting WebFOCUS operations.

    port

    Is the port to which the WebFOCUS Server is connected.

  8. Click OK.
  9. Right-click the CAS Authentication entry, and click Enable.
  10. In the Actions section, click Save.
  11. When you receive the confirmation message, click OK.
  12. When you receive the message to reload the web application, click OK.
  13. Sign out of your current session.
  14. Stop and restart the WebFOCUS Server.
  15. Sign in again as an administrator, and test the connection.

Procedure: How to Add Your CAS CA Certificate to Your TIBCO WebFOCUS cacerts File

If you are using a self-signed certificate for your CAS Server, you will also need to add the CA certificate of this server to the trusted root certificates for the JVM used by WebFOCUS.

Note: This task is not necessary if you are using a certificate signed by a trusted certificate authority.

  1. Export your CA Certificate from your CAS site, and save it in the WebFOCUS environment.
  2. Shut down the Tomcat server.
  3. Navigate to the Tomcat JDK and locate the cacerts file.

    Typically, the cacerts file is located in the drive:\ibi\JDK\jre\lib\security folder in Windows or the installdirectory/ibi/JDK/jre/lib/security folder in UNIX or Linux.

    1. In the folder that contains the cacerts file, open the Command Prompt window, and run the following command:
      ..\..\..\bin\keytool -import
      -alias youralias -keystore cacerts -file path\to\yourca.cert

      where:

      youralias

      Is the alias assigned to your certificate.

      yourca.cert

      Is the certificate file.

    2. If prompted for a password, type changeit. If prompted to import a certificate, type yes.
  4. Restart the Tomcat server.

Example: CAS Validation Errors

CAS validation errors may occur if you are using a self-signed certificate that has not been added to the trusted certificate store. In such cases, you will receive an error similar to the following:

[YYYY-MM-DD hh:mm:ss,sss] ERROR 
org.jasig.cas.client.validation.Cas20ServiceTicketValidator
http-apr-8080-exec-2 - javax.net.ssl.SSLHandshakeException: 
sun.security.validator.ValidatorException: PKIX path building failed: 
sun.security.provider.certpath.SunCertPathBuilderException: 
unable to find valid certification path to requested target 
javax.net.ssl.SSLHandshakeException: 
sun.security.validator.ValidatorException: PKIX path building failed: 
sun.security.provider.certpath.SunCertPathBuilderException:
unable to find valid certification path to requested target
at com.sun.net.ssl.internal.ssl.Alerts.getSSLException(Unknown Source)
.
.
.
... 60 more
Caused by: sun.security.provider.certpath.SunCertPathBuilderException: 
unable to find valid certification path to requested target
at sun.security.provider.certpath.SunCertPathBuilder.engineBuild(Unknown Source)
at java.security.cert.CertPathBuilder.build(Unknown Source)
... 66 more

Configuring Pre-Authentication with HTTP BASIC Authentication

How to:

HTTP Basic Authentication delivers an HTTP message containing a user name and password from a client to a server. The server compares the two values from the message to those User IDs and Passwords stored in a database of users who are valid for a designated realm, which is a set of web pages that require authenticated credentials. Based on the results of this operation, the server returns a message stating the status of the authentication.

Because HTTP BASIC Authentication uses the easily reversible Base64 encoding for its messages instead of encryption, it is non-secure unless used with SSL. To configure HTTP Basic Authentication, you must identify the name of the realm affected by the HTTP Basic Authentication, typically, WebFOCUS. This setting directs the authentication request to that section of the database that lists those users who are entitled to view and work with pages within that realm.

Note: HTTP Digest authentication is not available in release 8.2.01.

Procedure: How to Configure HTTP BASIC Authentication

Before you begin, complete the prerequisites for Pre-Authentication. For more information, see Configuring Pre-Authentication, External Authentication or External Authorization.

We recommend that you use the Export command to back up the Security Settings configuration files before making changes to the Authentication page. For more information, see How to Export Security Configuration Files.

  1. In the Administration Console, click the Security tab.
  2. Under the Security Zones folder, expand the folder for the Security Zone you wish to update, and then click Authentication.
  3. Right-click the HTTP Basic Authentication entry, and then click Edit.
  4. In the Realm name field, accept the default value, WebFOCUS, or type a different name.
  5. Click OK.
  6. Right-click the HTTP Basic Authentication entry, and click Enable.
  7. In the Actions section, click Save.
  8. When you receive the confirmation message, click OK.
  9. When you receive the message to reload the web application, click OK.
  10. Sign out of your current session.
  11. Stop and restart the WebFOCUS Server.
  12. Sign in as an administrator, and test the new configuration.

Configuring Pre-Authentication With Java Container Security

How to:

Java containers, such as Apache Tomcat, IBM WebSphere, and Oracle WebLogic, can authenticate users on behalf of WebFOCUS. The Java container uses the getRemoteUser() call to provide user IDs to WebFOCUS.

Procedure: How to Configure JEE Container Based Authentication

Before you begin, complete the prerequisites for Pre-Authentication. For more information, see Configuring Pre-Authentication, External Authentication or External Authorization.

You must also build a Java container to support user authentication. For more information, consult the documentation provided by the vendor that supplied your installation of Java.

We recommend that you use the Export command to back up the Security Settings configuration files before making changes to the Authentication page. For more information, see How to Export Security Configuration Files.

  1. In the Administration Console, click the Security tab.
  2. Under the Security Zones folder, expand the folder for the Security Zone you wish to update, typically the Default Security Zone, and then click Authentication.
  3. In the Actions section of the Authentication Page, click Options.
  4. In the Authentication Options dialog box, select the Enable custom logout target URL check box.
  5. Accept the default value /signout, or type a custom logout target URL in the Custom logout target URL field, and click OK.
  6. On the Authentication page, right-click JEE Container Based Authentication, and then click Enable.

    All other authentication methods are disabled automatically.

  7. To include form-based authentication in the updated Security Zone configuration, right-click Form Based Authentication, and then click Enable.

    To exclude form-based authentication from this security zone, leave Form Based Authentication disabled.

  8. Consult your Java container documentation for additional instructions on enabling J2EE authentication.
  9. On the Authentication page, in the Security Zones section, click Save.
  10. When you receive a message that the web security configuration data was saved successfully, click OK.
  11. When you receive a message advising you to reload the web application in order for these changes to take effect, click OK.
  12. Sign out of your current session.
  13. Stop and restart the WebFOCUS Server.
  14. Sign in again as an administrator and test the new configuration.

Configuring Pre-Authentication With OpenID Connect

In this section:

How to:

Identity providers, such as Google or Keycloak, deliver authentication services that conform to the specifications of the OpenID Connect protocol.

When Open ID Connect pre-authentication has been enabled, users navigating to the \ibi_apps context are presented with the sign-in screen of their identity provider instead of the WebFOCUS sign-in screen. Users type their credentials on that screen and send them to the OpenID Connect identity provider. When the identity provider determines that the credentials presented by WebFOCUS and the end user are authenticated, the user is redirected to WebFOCUS.

WebFOCUS prepares a client authentication message that returns its own Client ID to the identity provider and can also include scope identifiers that request additional information about the end user.

When the identity provider authenticates the credentials presented by WebFOCUS, it returns the requested user information, and the authenticated user can begin a session.

When users end their session, they must be directed to the sign-out page used by the identity provider instead of the standard WebFOCUS sign-out page. From the identity provider sign-out page they can choose to sign in to their OpenID Connect identity provider again or move on to other web sites or applications.

Configuring OpenID Connect Authentication Settings at an Identity Provider

As an application that accepts OpenID Connect user authentication, your installation of WebFOCUS functions as a client or relying party in the OpenID Connect Authentication process, and an administrator must create an account for this party with an OpenID Connect identity provider.

Even though each OpenID Connect identity provider maintains slightly different configurations and requirements, all providers must conform to the OpenID Connect standard.

Administrators must expect to provide a Client Name and additional information that uniquely identifies their installation of WebFOCUS to the identity provider. This additional information can include the Root URL for their installation of WebFOCUS, and one or more Valid Redirect URIs that identify the location of the resources that process responses delivered from the identity provider during the sign-in process.

The identity provider creates and provides administrators with a Client ID and a Client Secret that is unique to each installation of WebFOCUS. The identity provider also identifies its Custom Logout Target URL. When users end their WebFOCUS session, they are directed to this URL, where they are free to sign in again to the identity provider or move on to other tasks. Administrators include all of these values in their configuration of the Open ID Connect configuration.

Configuring OpenID Connect Authentication Settings Within TIBCO WebFOCUS

The Edit OpenID Connect Authentication Settings dialog box contains the credentials and endpoint URIs that must be delivered to the OpenID Connect identity provider within client authentication messages, as shown in the following image.
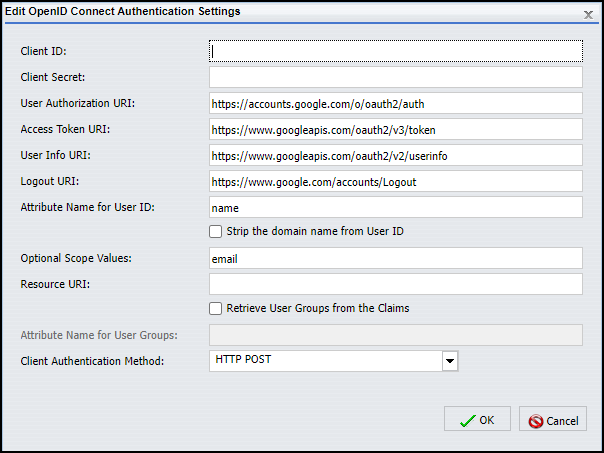
The Edit OpenID Connect Authentication Settings dialog box configured with the default endpoints for Google OpenID Connect.

In order to communicate with an OpenID Connect identity provider, credentials that identify WebFOCUS as a valid relying party, which is a web site or application that needs to authenticate the identity of an end user, must be established with the identity provider. These values must be included in responses from that relying party to requests to grant access to authenticated users.

  • Client ID. Is the unique ID of your installation of WebFOCUS that identifies it to the OpenID Connect identity provider. This value must be unique for every application supported by the identity provider.
  • Client Secret. Is a value shared between WebFOCUS and the identity provider that enables both parties to authenticate messages from each other. It must be delivered with each request to the OpenID Connect identity provider. The value assigned to the client secret must be sufficiently random as to be unguessable. For example:
    sGBAyfVL7YWtP6gudLIjbRZV_N0dW4f3xETiIxqtokEAZ6FAsBtgyIq0MpU1uQ7J08xOTO2zwP0OuO3pMVAUTid

    Identity providers may require a separate sign in before allowing administrators to review and extract this value.

In order to ensure that OpenID authentication requests are directed to the appropriate endpoints, the following URI information must also be included in the Open ID Connect Authentication Settings dialog box.

  • User Authorization URI. Identifies the HTTP endpoint at the identity provider authorization server that can authenticate the end user. Requests for user authentication must be directed to this endpoint.
  • Access Token URI. Identifies the HTTP endpoint at the identity provider authorization server that can issue access tokens. Requests for tokens for authenticated users must be directed to this endpoint.
  • User Info URI. Identifies the protected resource at the identity provider that maintains user information and can return authorized information about the current user when presented with an access token by the client.
  • Logout URI. Identifies the HTTP endpoint at the identity provider to which users must be directed when they choose to sign out of all of their sessions authenticated by the OpenID identity provider. Typically, this is the Sign in page for the OpenID identity provider. At this page, users can sign in again to open another OpenID Connect identity provider session or remain signed out. Note that because the logout redirect URI is defined in this field, there is no need to define a logout URL in the Custom logout target URL field of the Authentication Options dialog box.
  • Attribute Name for User Id. Identifies the specific attribute that maps to the WebFOCUS User ID. The default value in this field is name. You will most likely replace it with email, which indicates that email addresses using the format, local_part@domain_name, serve as user IDs. Other attribute name values can be used in this field. For more information about the value to use, consult your identity provider. Values assigned to this attribute must be unique.
    • Strip the Domain Name from User ID. When this check box is selected, the domain name prefix is automatically cleared from a user ID submitted to the identity provider during the sign-in process. This check box is relevant only to customers who use the domain name\user ID format for their user names and work with an OpenID Connect identity provider that does not accept user IDs with a domain name prefix.
  • Optional Scope Values. Identifies the names of the optional scope identifiers that can be sent to the identity provider in addition to the required scope identifier, openid. Scope identifiers are requests for specific types of information about the end user who is requesting access to the client. Valid scope identifier values include those defined by the Open ID Connect standard such as, email, address, phone, or profile. The email scope identifier appears in this field, by default, but you can delete it if you and your identity provider do not use it.
  • Client Authentication Method. Identifies the HTTP request method that the client authentication message uses to contact the server at the identity provider. The HTTP POST request method is selected, by default. When using this method, client credentials are included in the body of the message. You can also select the HTTP Basic Authentication Scheme request method, in which client credentials are included in the HTTP Authorization Header. We do not recommend that you select the option None, unless your identity provider has advised you to use a different request method not defined in this list.

Configuring OpenID Connect Pre-Authentication with Google

How to:

The Edit OpenID Connect Authentication Settings dialog box is configured with the information required to support pre-authenticated user sign-in requests from Google, by default. Administrators need only add the Client ID and Client Secret, which are provided by Google, and the Attribute Name.

For more information about the Google OpenID Connect API, see https://developers.google.com/identity/protocols/OpenIDConnect

Procedure: How to Configure OpenID Connect Authentication Settings for Google

Before you begin, complete the prerequisites for Pre-Authentication. For more information, see Configuring Pre-Authentication, External Authentication or External Authorization.

We recommend that you use the Export command to back up the Security Settings configuration files before making changes to the Authentication page. For more information, see How to Export Security Configuration Files.

  1. In the Administration Console, click the Security tab.
  2. Under the Security Zones folder, expand the Default Security Zone folder and then click Authentication.
  3. Double-click the OpenID Connect Authentication entry to open the Edit OpenID Connect Authentication Settings dialog box.
  4. Type the name that identifies WebFOCUS as a valid client of the OpenID Connect provider in the Client ID field.

    For example:

    292085223830.apps.googleusercontent.com
  5. Type or copy and paste the Client Secret value provided by Google.

    For example:

    GBAyfVL7YWtP6gudLIjbRZV_N0dW4f3xETiIxqtokEAZ6FAsBtgyIq0MpU1uQ7J08xOTO2zwP0OuO3pMVAUTid
  6. To establish Google as your OpenID provider, accept the default values in the following fields:
    • User Authorization URI. https://accounts.google.com/o/oauth2/auth
    • Access Token URI. https://www.googleapis.com/oauth2/v3/token
    • User Info URI. https://www.googleapis.com/oauth2/v2/userinfo
    • Logout URI. https://www.google.com/accounts/Logout
  7. Type a valid attribute name in the Attribute Name for User ID field.

    Note: You will most likely replace the default value, name, with the value, email. However, other attribute names can be used in this field. For more information about the value to use, consult your identity provider.

  8. If you must ensure that any user ID submitted to the identity provider excludes a domain name prefix, select the Strip the Domain Name from User ID check box. Otherwise, leave this check box clear.

    Note: This check box is relevant only to customers who use the domain name\user ID format for their user names and work with an OpenID Connect identity provider that does not accept user IDs with a domain name prefix.

  9. Accept the default value, email, displayed in the Optional Scope Values field.
  10. Accept the default selection, HTTP POST, displayed in the Client Authentication Method list.
  11. When your configuration is complete, click OK.
  12. Enable the new configuration as described in How to Enable OpenID Connect Authentication in a Security Zone.
  13. Save the new configuration as described in How to Save an OpenID Connect Configuration.

Configuring OpenID Connect Pre-Authentication with Keycloak

How to:

Keycloak is an open source Identity and access management solution that works with WebFOCUS to provide single-sign-on pre-authentication using the OpenID Connect standard. For more information about Keycloak and its features, see https://www.keycloak.org/about.html

For more information and instructions about how to configure an installation of WebFOCUS as a Keycloak client for OpenID Authentication, see the Keycloak Getting Started Guide, located at https://www.keycloak.org/docs/latest/getting_started/index.html

Procedure: How to Configure OpenID Connect Authentication Settings for Keycloak

Before you begin, complete the prerequisites for Pre-Authentication. For more information, see Configuring Pre-Authentication, External Authentication or External Authorization.

We recommend that you use the Export command to back up the Security Settings configuration files before making changes to the Authentication page. For more information, see How to Export Security Configuration Files.

  1. In the Administration Console, click the Security tab.
  2. Under the Security Zones folder, expand the Default Security Zone folder, and then click Authentication.
  3. Double-click the OpenID Connect Authentication entry to open the Edit OpenID Connect Authentication Settings dialog box.
  4. Type the Client ID for WebFOCUS that is identified in the Client ID field of the Settings tab of the Client page for WebFOCUS in Keycloak.

    For example: WebFOCUS-HEAD.

  5. Type or copy and paste the Client Secret value provided by Keycloak. Typically this is a hexadecimal representation of a randomly-generated value.

    For example:

    43b89579-ea9c-4101-b321-56b9dc6ae0f8
  6. In the User Authorization URI field, type:
    http://host:port/auth/realms/realm-name/protocol/openid-connect/auth
    

    where:

    host

    Is the name or IP address of the host used by Keycloak.

    port

    Is the number of the port on which the Keycloak identity provider listens.

    This value is optional, and it should be excluded if the URL uses the default port for the protocol it uses in the scheme, which is port 80 for URLs using the http protocol or port 443 for URLs using the https protocol.

    realm-name

    Is the name of the realm you identified for WebFOCUS in Keycloak. For example, WebFOCUSRealm.

    For example:

    http://server01.ibi.com:8080/auth/realms/WebFOCUSRealm/protocol/openid-connect/auth
  7. In the Access Token URI field, type:
    http://host:port/auth/realms/realm-name/protocol/openid-connect/token

    Where host, port, and realm-name identify the host used by Keycloak as described in step 6.

    For example:

    http://server01.ibi.com:8080/auth/realms/WebFOCUSRealm/protocol/openid-connect/token
    
  8. In the User Info URI field, type:
    http://host:port/auth/realms/realm-name/protocol/openid-connect/userinfo
    

    Where host, port, and realm-name identify the host used by Keycloak as described in step 6.

    For example:

    http://server01.ibi.com:8080/auth/realms/WebFOCUSRealm/protocol/openid-connect/userinfo
  9. In the Logout URI field, type:
    http://host:port/auth/realms/realm-name/protocol/openid-connect/logout?redirect_uri=https://wfhost.ibi.com/context/service/wf_security_logout.jsp

    Where host, port, and realm-name identify the host used by Keycloak as described in step 6, wfhost identifies the name or IP address of the host used by WebFOCUS, and context identifies the context used for your installation of WebFOCUS, typically, \ibi_apps.

    For example:

    http://server01.ibi.com:8080/auth/realms/WebFOCUSRealm/protocol/openid-connect/logout?redirect_uri=https://wfserver01.ibi.com/ibi_apps/service/ wf_security_logout.jsp
    
  10. Type a valid attribute name in the Attribute Name for User ID field.

    Note: You will most likely replace the default value, name, with the value, email. However, other attribute names can be used in this field. For more information about the value to use, consult your identity provider.

  11. If you must ensure that any user ID submitted to the identity provider excludes a domain name prefix, select the Strip the Domain Name from User ID check box. Otherwise, leave this check box clear.

    Note: This check box is relevant only to customers who use the domain name\user ID format for their user names and work with an OpenID Connect identity provider that does not accept user IDs with a domain name prefix.

  12. Accept the default value, email, displayed in the Optional Scope Values field.
  13. Accept the default selection, HTTP POST, displayed in the Client Authentication Method list.
  14. When your configuration is complete, click OK.
  15. Enable the new configuration as described in How to Enable OpenID Connect Authentication in a Security Zone.
  16. Save the new configuration as described in How to Save an OpenID Connect Configuration.

Configuring Pre-Authentication With Other OpenID Connect Identity Providers

How to:

Other third-party OpenID Connect providers can pre-authenticate users for WebFOCUS. Even though the information that must be configured in WebFOCUS and at the identity provider must conform to the OpenID Connect standard, the specific configuration requirements for individual identity providers can vary. For more information, see documentation from your OpenID identity provider.

Procedure: How to Configure OpenID Connect Authentication Settings for Other OpenID Connect Identity Providers

Before you begin, complete the prerequisites for Pre-Authentication. For more information, see Configuring Pre-Authentication, External Authentication or External Authorization.

We recommend that you use the Export command to back up the Security Settings configuration files before making changes to the Authentication page. For more information, see How to Export Security Configuration Files.

  1. In the Administration Console, click the Security tab.
  2. Under the Security Zones folder, expand the Default Security Zone folder, and then click Authentication.
  3. Double-click the OpenID Connect Authentication entry to open the Edit OpenID Connect Authentication Settings dialog box.
  4. If your OpenID Connect identity provider assigned you a Client ID, copy and paste that value in the Client ID field.

    Or

    If you assigned a Client ID to your configuration within the OpenID Connect identity provider, type or copy and paste the value in the Client ID field.

  5. Copy and paste the Client Secret value provided by the identity provider in the Client Secret field.
  6. Type or copy and paste the following URLs in the fields listed below. All of these values must be provided to you by the identity provider.
    • User Authorization URI. The URL for the http endpoint where the identity provider conducts end user authentication.
    • Access Token URI. The URL for the http endpoint where the identity provider issues access tokens.
    • User Info URI. The URL for the http endpoint where the identity provider maintains user information. Requests from the client application for additional information about the current user that also include a valid access token are directed to this endpoint.
    • Logout URI. The URL for the http endpoint to which users must be directed when they choose to sign out of their session.
  7. Type a valid attribute name in the Attribute Name for User ID field.

    Note: You will most likely replace the default value, name, with the value, email. However, other attribute names can be used in this field. For more information about the value to use, consult your identity provider.

  8. If you must ensure that any user ID submitted to the identity provider excludes a domain name prefix, select the Strip the Domain Name from User ID check box. Otherwise, leave this check box clear.

    Note: This check box is relevant only to customers who use the domain name\user ID format for their user names and work with an OpenID Connect identity provider that does not accept user IDs with a domain name prefix.

  9. Enter the names of the optional scope identifiers that you and your identity provider have agreed to use in the Optional Scope Values field. Separate each value with a single space.

    Note: You can clear the value email that appears in this field, by default, if you and your identity provider do not support it.

  10. Accept the default selection of HTTP POST in the Client Authentication Method list or select HTTP Basic Authentication Scheme to identify the HTTP communication method required by your identity provider for end user authentication messages.

    Note: We do not recommend that you select None unless required to do so by your identity provider.

  11. When your configuration is complete, click OK.
  12. Enable the new configuration as described in How to Enable OpenID Connect Authentication in a Security Zone.
  13. Save the new configuration as described in How to Save an OpenID Connect Configuration.

Procedure: How to Enable OpenID Connect Authentication in a Security Zone

Only one OpenID Connect provider can be supported per installation.

When OpenID Connect Authentication is enabled in a security zone, all other methods of authentication in that zone must be disabled.

As with other methods of pre-authentication, we recommend using this method in the Default Security Zone while allowing the Alternate Zone to support Form-Based Authentication for administration activities.

  1. In the Administration Console, on the Security tab, under the Security Zones folder, expand the Default Security Zone folder, and then click Authentication.
  2. On the Authentication page:
    1. Click the Form Based Authentication entry and then click Disable.
    2. Click the Anonymous Authentication entry and then click Disable.
    3. Click the OpenID Connect Authentication entry and then click Enable.
  3. Save the Authentication page with the OpenID Connect configuration as described in How to Save an OpenID Connect Configuration.

Procedure: How to Save an OpenID Connect Configuration

  1. In the Actions section of the Authentication page, click Save.
  2. When you receive a confirmation message, click OK.
  3. When you receive a message advising you to reload the web application, click OK.
  4. Sign out of your current session.
  5. Stop and restart the WebFOCUS Server.
  6. Sign in using a valid ID from your OpenID Connect identity provider to test the new configuration.
Configuring Pre-Authentication With Web Access Management Systems

How to:

Web Access Management Systems, including CA SiteMinder, Oracle Access Manager (formerly Oblix), and IBM Tivoli Access Manager WebSEAL, can be used to enable single sign on (SSO) with WebFOCUS. These systems intercept requests to WebFOCUS, ensure that the user is authenticated and authorized to access WebFOCUS, and then provide an HTTP header in which WebFOCUS can find the pre-authenticated user ID. Because these systems intercept and populate the HTTP header on every request, WebFOCUS can trust that the user ID found in the HTTP header is valid.

Procedure: How to Configure Pre-Authentication With Web Access Management Systems

Before you begin, complete the prerequisites for Pre-Authentication. For more information, see Configuring Pre-Authentication, External Authentication or External Authorization.

We recommend that you use the Export command to back up the Security Settings configuration files before making changes to the Authentication page. For more information, see How to Export Security Configuration Files.

  1. In the Administration Console, click the Security tab.
  2. On the Security tab, under the folder for the Security zone that will support pre-authentication with the Web Access Management System, click Authentication.

    Typically, this is the Default Security zone.

  3. Right-click the Request Header Authentication Entry, and click Edit.
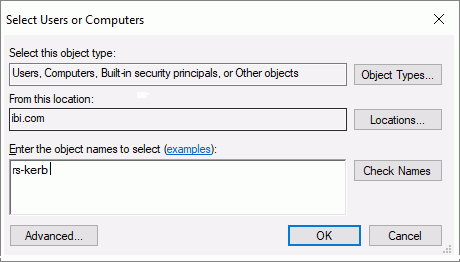
  4. Type the default name provided by the Web Access Management System in The name of the request header that contains the user name field, as shown in the following image.
    The Edit Request Header Authentication dialog box.
    • For CA SiteMinder, the value is typically SM_USER.
    • For IBM Tivoli Access Manager WebSEAL, the value is typically iv-user.
    • For Oracle Access Manager, consult your Oracle Access Manager documentation.
  5. Click OK.
  6. In the Actions section of the Authentication Page, click Options.
  7. In the Authentication Options dialog box, select the Enable custom logout target URL check box.
  8. Type the custom logout target URL for your Web Access Management System as provided by the Web Access Management System.
    • For Siteminder, the value is typically http://siteminder.domain.com/logout.html.
    • For IBM Tivoli Access Manager WebSEAL, the value is typically

      http://webseal.domain.com/pkmslogout.

    • For Oracle Access Manager, consult Web Access Management documentation or the system administrator.
  9. Click OK.
  10. On the Authentication page, right-click Request Header Authentication and then click Enable.
  11. On the Authentication page, in the Security Zones section, click Save.
  12. When you receive a message stating that the web security configuration data was saved successfully, click OK.
  13. When you receive a message advising you to reload the web application in order for these changes to take effect click OK.
  14. Sign out of your current session.
  15. Stop and restart the WebFOCUS Server.
  16. Sign in again as an administrator and test the new configuration.
Procedure: How to Configure Request Header Based Authentication

Before you begin, complete the prerequisites for Pre-Authentication. For more information, see Configuring Pre-Authentication, External Authentication or External Authorization.

We recommend that you use the Export command to back up the Security Settings configuration files before making changes to the Authentication page. For more information, see How to Export Security Configuration Files.

  1. In the Administration Console, click the Security tab.
  2. Under the Security Zones folder, expand the folder for the Security Zone you wish to update and then click Authentication.
  3. Right-click the Request Header Authentication entry, and click Edit.
  4. In the Edit Request Header Authentication Settings dialog box:
    1. If you are using CA Site Minder, accept the default name (SM_USER) as the name of the request header that contains the user name.
    2. If you are using IBM Tivoli Access Manager WebSEAL, type, iv-user.
    3. If you are using Oracle Access Manager, type the value provided to you by your Oracle Access Manager Administrator.
    The value is case-insensitive, but the spelling must match the spelling of the value in the Administration Console spelling.
  5. Leave the Throw an exception if the principal header is missing from the request check box cleared, select it only if you want the authentication process to record an exception when this event occurs.
  6. In The name of the request header that contains the credentials field, type the User ID.

    For example, SM_USER, iv-user.

  7. In the On an unsuccessful authentication section:
    1. To generate an exception for an unsuccessful authentication, click the authentication failure will result in an immediate exception.
    2. To allow the request to proceed in spite of an unsuccessful authentication, accept the default setting, allow the request to proceed after a failed authentication.
  8. To include a check for a change in user name into each authentication request, select the Check for a change in the principal on each request check box.
  9. To invalidate a session if the user name changes, select the Invalidate the existing section on a change in principal check box.
  10. When your configuration is complete, click OK.
  11. Right-click the Request Header Based Authentication entry, and click Enable.
  12. In the Actions section, click Save.
  13. When you receive a message stating that the changes were saved successfully, click OK.
  14. When you receive a message advising you to reload the web application, click OK.
  15. Sign out of your current session.
  16. Stop and restart the WebFOCUS Server.
  17. Sign in as an administrator, and test the new configuration.

Configuring Pre-Authentication With Integrated Windows Authentication

How to:

In pre-authentication using Integrated Windows Authentication, WebFOCUS uses Microsoft Internet Information Services (IIS) with its Windows Authentication or Basic authentication options to pre-authenticate Microsoft Windows users. This configuration requires a plug-in that enables IIS to securely pass user identities to the JEE web application container that hosts WebFOCUS. Additional information about the configuration of IIS with Tomcat and IIS with WebSphere is included at the end of the following procedure.

Procedure: How to Configure Pre-Authentication With Windows Authentication

Before you begin, complete the prerequisites for Pre-Authentication. For more information, see Configuring Pre-Authentication, External Authentication or External Authorization.

We recommend that you use the Export command to back up the Security Settings configuration files before making changes to the Authentication page. For more information, see How to Export Security Configuration Files.

We also recommend that you enable the Alternate Security Zone when using Windows Authentication to continue support for form-based Internal Authentication of those administrators who must bypass Windows Authentication for administrative tasks. For more information, see How to Enable a Security Zone.

  1. In the Administration Console, click the Security tab.
  2. Under the Default Security Zones folder, click Authentication.
  3. In the Actions section of the Authentication Page, click Options.
  4. In the Authentication Options dialog box, select the Enable custom logout target URL check box, accept the default value /signout in the Custom logout target URL field, and click OK.
  5. On the Authentication page, click JEE Container Based Authentication.

    Typically, IIS prepends the name of the Windows Domain to which the user is assigned to the user ID passed to WebFOCUS, using the domain name\user ID format. By default, WebFOCUS strips the domain and backslash (\) from the value, leaving just the user ID, which is then used to complete the sign-in process.

    We recommend that you accept this default behavior, and move to the following step without altering it. If you must modify it, open the Edit JEE Container Based Authentication Settings dialog box, clear the Strip the Domain Name from JEE User Principal Name check box, and click OK to save the change.

  6. With the JEE Container Based Authentication entry highlighted, click Enable.

    All other methods of authentication are disabled automatically.

  7. On the Authentication page, in the Security Zones section, click Save.
  8. When you receive a message stating that the web security configuration data was saved successfully, click OK.
  9. When you receive a message advising you to reload the web application, click OK.
  10. Sign out of your current session.
  11. Enable the JEE container to trust the user ID passed by the connector.
    • For Tomcat, open the server.xml file located at drive:\tomcat\conf in Windows or installdirectory/tomcat/conf in UNIX or Linux, add the tomcatAuthentication keyword in the AJP Connector block, and set it to false, as shown in the following example:
      <!-- Define an AJP 1.3 Connector on port 8009 --> 
      <Connector port="8009" protocol="AJP/1.3"
      tomcatAuthentication="false" redirectPort="8443" />
    • For WebSphere, consult the WebSphere documentation for instructions on using the WebSphere REMOTE_USER variable to expose the user ID that the IIS connector passes to WebFOCUS.
  12. Stop and restart the WebFOCUS Server.
  13. Sign in again as an administrator and test the new configuration.
    • If you enabled the alternate zone, as recommended, you can now use internal authentication to access WebFOCUS when signing in to the WebFOCUS machine. The URL is http://localhost/ibi_apps. Alternatively, pre-authentication allows you to access WebFOCUS by signing in to http://machinename/ibi_apps from any workstation. If the web browser is not configured to use Windows Authentication with the domain automatically, the browser will challenge users for credentials when they sign in using http://machinename.domain.com/ibi_apps.
    • By default, Internet Explorer automatically uses Windows Authentication only with website addresses in the form http://machinename. To enable Windows Authentication for users who access WebFOCUS by http://machinename.domain.com, you may need to reconfigure the local intranet zone settings on the Internet Explorer browsers assigned to user machines.

Configuring Pre-Authentication With Custom Single Sign On (SSO) Solutions

WebFOCUS can be integrated with other applications to provide users with a single sign on (SSO) experience. For example, users may sign in to an existing web application with credentials that are validated by the application. If users click on buttons or links that take them to a portal, you may want them to be signed in to WebFOCUS automatically, rather than requiring them to provide their passwords again.

The best way to accomplish this sort of integration is through the deployment of a custom Java servlet filter inside the WebFOCUS web application. Professional Services team members can develop a custom solution based on the IBIServletFilter. Alternatively, if your users access WebFOCUS through IIS, you can install an HTTP module using ASP.NET into IIS.

Custom solutions generally follow the Shared Secret approach. In this approach, a user initiates a connection to WebFOCUS by clicking a link, button, or tab in the existing web application. The web application sets the user ID, and creates an AES-encrypted token containing the user ID and a timestamp. The web application then passes the token on to WebFOCUS.

Within WebFOCUS, the IBIServletFilter decrypts the token and then compares the timestamp to the current time to determine if the token has exceeded a specified interval. The IBIServletFilter performs this time check to ensure that a replay attack, that is, a fraudulent attempt to authenticate an unauthorized user based on an outdated token, has not occurred.

If the token has not exceeded the specified interval, the IBIServletFilter compares the user ID from the token to the user ID it maintains. If they match, the user ID is trusted. If they do not match, the connection is rejected.

Configuring Kerberos for Single Sign On

In this section:

WebFOCUS supports single sign on (SSO) between a web browser, the WebFOCUS Client, and the WebFOCUS Server in networks that use Kerberos pre-authentication. This includes impersonation support on the WebFOCUS Server, which means that the SSO capability can be extended through RDBMS adapters that support trusted connections, including Microsoft SQL Server.

This topic explains how to configure WebFOCUS within an SSO environment that uses native Kerberos support in Active Directory. This activity requires updates to Windows Active Directory, WebFOCUS, and the browsers assigned to it. Active Directory must be configured to include accounts for the servers that support the WebFOCUS Client and the WebFOCUS Server and to define the method of delegation for Kerberos credentials. WebFOCUS must be configured to support Kerberos authentication for each relevant security zone. Individual browsers assigned to users must be configured to identify the server and client URLs that support the use of Kerberos authentication. These tasks are described in detail in this topic.

Limitations on Pre-authentication Using Kerberos

  • ReportCaster. You can use ReportCaster in a Kerberos environment. For configuration details and additional release level requirements, see Configuring Support for ReportCaster.
  • WebFOCUS Client and WebFOCUS Server on the same machine. When both components are on one machine, you must specify the HOST keyword for the node in computer name format. Using localhost or a fully qualified domain name results in run-time errors. If the components are on different machines, you can use either computer name format or fully qualified domain name format. The HOST keyword is specified in the Remote Services section of the Administration Console.
  • Web browser. Kerberos is not supported between a web browser and WebFOCUS when the two are on the same Windows machine.
  • Users who belong to many groups. The Kerberos implementation stores each group that a user belongs to inside their Kerberos ticket. This can result in large ticket sizes when users belong to hundreds of groups. For configuration details, see Configuring Support for Large Tickets.
  • User ID format. When using Kerberos pre-authentication, you must create WebFOCUS user IDs that match the IDs in the credentials that Kerberos assigns to individual users. Kerberos typically appends the Windows Domain of a user to the ID for that user, but WebFOCUS is configured to strip this domain, by default. Therefore, for most organizations, the Kerberos user ID, without the domain suffix, is all that is required as a WebFOCUS user ID.

    However, if your organization has disabled this default configuration, user IDs must use the format:

    user_ID @ domain.com

    where:

    user_ID

    Is the appropriate user ID passed to WebFOCUS in the Kerberos ticket.

    domain.com

    Is an available domain and extension.

  • Domain suffix. Generally, when Kerberos passes a user ID to WebFOCUS, it appends the Windows Domain of that user to the ID itself, in the format user ID@domain.com. By default, the domain is stripped from this concatenated value, leaving just the user ID. The plain user ID that remains is then used to complete the sign-in process.

    To override this default configuration and prevent WebFOCUS from stripping the domain, clear the Enable Domain Name Suffix Stripping check box in the EDIT KERBEROS/SPNEGO dialog box, which opens from the Authentication Page on the Security tab of the Administration Console.

Understanding Constrained Delegation Versus Unconstrained Delegation

WebFOCUS can support unconstrained delegation and constrained delegation of account credentials granted by Kerberos pre-authentication.

Unconstrained delegation allows account credentials to be delegated to any service in the domain. Constrained delegation limits delegation of account credentials to a specified list of services.

The configuration for either method follows the same basic path. However, in order to establish constrained delegation to the WebFOCUS Server alone or to the WebFOCUS Server and the Database Server, you must add the following configuration tasks:

  • Identify the machines to which accounts are to be delegated with Service Principal Names (SPN).
  • Specify HTTP as the Service Type and identify the specific computer to which Kerberos authentication is to be delegated.

If you must also delegate Kerberos authentication from the WebFOCUS Server to a relational database management server (RDBMS), you must configure a connection that supports this delegation on the WebFOCUS Server. For more information, see the Kerberos configuration and testing procedures content assigned to the Server browser interface Help.

Pre-Installation Steps for Kerberos in Windows Active Directory

In this section:

How to:

The pre-installation steps required to include WebFOCUS in Windows Active Directory vary, depending upon whether you use constrained delegation of Kerberos credentials or unconstrained delegation.

If you use constrained delegation, a network administrator with Domain Administration privileges must perform the following pre-installation steps.

  • Ensure that a Service Principal Name (SPN) is available for the WebFOCUS Server.
  • Create a service account in Active Directory for the WebFOCUS Client.
  • Generate a Kerberos keytab file for the WebFOCUS Client, using the ktpass command in the KTPASS.EXE utility.
  • Configure the Service User Account in Active Directory for constrained delegation.

If you use unconstrained delegation, a network administrator with Domain Administration privileges must perform the following pre-installation steps.

  • Create a service account in Active Directory for the WebFOCUS Client.
  • Generate a Kerberos keytab file for the WebFOCUS Client, using the ktpass command in the KTPASS.EXE utility.
  • Configure the Service User Account in Active Directory for unconstrained delegation.
Note: In either case, if you are running Windows 2008, you may need to install the following Microsoft patch for your domain controller to support the use of a Kerberos keytab file:

              http://support.microsoft.com/kb/951191            

Procedure: How to Check for a Service Principal Name (SPN) on the WebFOCUS Server

If you choose to use unconstrained delegation of Kerberos credentials, you do not need a Service Principal Name for the WebFOCUS Server and can bypass this procedure. Continue with the procedure, How to Create a Service Account User in Windows Active Directory.

If you choose to use constrained delegation of Kerberos credentials, you must have a Service Principal Name (SPN) for the WebFOCUS Server before you can delegate Kerberos credentials to it. You can use this procedure to identify the SPN that has been assigned to the WebFOCUS Server.

However, if you already know the SPN for the WebFOCUS Server, you can bypass this procedure and move on to How to Create a Service Account User in Windows Active Directory.

  1. On the domain controller or another machine that is logged on to the Windows domain, log on as a domain administrator, and then open the Command Prompt window.
  2. Type and run the following command to determine if a Service Principal Name was created for the machine that hosts the WebFOCUS Server:
    setspn -l hostname

    where:

    hostname

    Is the machine name for the WebFOCUS Server. For example, rs-kerb.

  3. If the resulting output returns the message
    Could not find account hostname

    where:

    hostname

    Is the machine name for the WebFOCUS Server. For example, rs-kerb.

    The WebFOCUS Server was not added to the domain.

    For information about how to add a WebFOCUS Server to a domain, see the procedure, Adding Users and Computers to the Active Directory Domain at https://support.microsoft.com/en-us/help/324753/how-to-create-an-active-directory-server-in-windows-server-2003.

  4. If the resulting output returns the message
    Registered ServicePrincipalName...

    but does not include the entry:

    HTTP/hostname.ibi.com

    where:

    hostname.ibi.com

    Is the full SPN name for the WebFOCUS Server, with hostname being the machine name for the WebFOCUS Server, for example, rs-kerb.ibi.com.

    An SPN that will support constrained delegation is not available for the WebFOCUS Server.

    You must create a new SPN for the WebFOCUS Server as described in the procedure, How to Create a Service Principal Name (SPN).

  5. If the resulting output returns the message:
    Registered ServicePrincipalName...

    and includes the entry:

    HTTP/hostname.ibi.com

    where:

    hostname.ibi.com

    Is the full SPN name for the WebFOCUS Server, with hostname being the machine name for the WebFOCUS Server, for example, rs-kerb.ibi.com.

    An SPN that will support constrained delegation is available for the WebFOCUS Server.

    Continue with the topic, How to Create a Service Account User in Windows Active Directory.

Examples of Check Service Principal Name (SPN) Results

The following example of a successful result identifies the Service Principal Names for a WebFOCUS Server named rs-kerb. The second line identifies HTTP/rs-kerb.ibi.com as the full SPN for that WebFOCUS Server.

setspn -l rs-kerb
Registered ServicePrincipalNames for CN=RS-KERB, OU=Workstations,DC=ibi,DC-com:
     HTTP/rs-kerb.ibi.com
     TERMSRV/rs-kerb.ibi.com
     TERMSRV/RS-KERB
     WSMAN/rs-kerb.ibi.com
     WSMAN/rs-kerb
     RestrictedKrbHost/rs-kerb.ibi.com
     RestrictedKrbHost/RS-KERB
     HOST/RS-KERB
     HOST/rs-kerb.ibi.bom

The following example of an unsuccessful result contains a message stating that the setspn statement was unable to find an account with the name rs-kerb.

setspn -l rs-kerb
FindDomainForAccount: Call to DsGetDcNameWithAccountW failed with return value 0x00000525
Could not find account rs-kerb

Procedure: How to Create a Service Principal Name (SPN)

Use the setspn command to create a Service Principal Name (SPN) for the WebFOCUS Server.

  1. On the domain controller or another machine that is logged on to the Windows domain, log on as a domain administrator, and then open the Command Prompt window.
  2. Type and run the following command.

    Note: The value specified for the full SPN name for the WebFOCUS Server must begin with HTTP in uppercase, followed by a slash ( /).

    The command format is:

    setspn -a HTTP/hostname.ibi.com hostname

    where:

    hostname.ibi.com

    Is the full SPN name for the WebFOCUS Server, with hostname being the machine name for the WebFOCUS Server, for example, rs-kerb.ibi.com.

    The resulting output is:

    Registering ServicePrincipalNames for CN=hostname, CN=Computers,DC=ibi,DC=com
            HTTP/hostname.ibi.com
    Updated object

    where:

    hostname

    Is the computer name for the WebFOCUS Server, with hostname being the machine name for the WebFOCUS Server, for example, rs-kerb.ibi.com.

  3. Confirm the presence of the newly-created SPN by typing and running the following command:
    setspn -l hostname

    where

    hostname

    Is the new SPN you just created. For example, rs-kerb.

    If your results were successful, you should see the following message:

    Registered ServicePrincipalNames for CN=hostname,CN=Computers,DC=ibi,DC=com
    

    followed by a list of results that includes the entry:

    HTTP/hostname.ibi.com

    where:

    hostname.ibi.com

    Is the new SPN you just created, with hostname being the machine name for the WebFOCUS Server, for example, rs-kerb.ibi.com. This is the only value that is relevant to Kerberos delegation.

Examples of a Successful Service Principal Name (SPN) Registration

The following example of a successful Service Principal Name registration identifies HTTP/rs-kerb.ibi.com as the new Service Principal Name for the computer name rs-kerb.

Registering ServicePrincipalNames for CN=RS-KERB,CN=Computers,DC=ibi,DC=com
     HTTP/rs-kerb.ibi.com
Updated object

The following example of a response message confirms the presence of the newly-created SPN by listing all of the Registered Service Principal Names for the computer name rs-kerb:

Registered ServicePrincipalNames for CN=RS-KERB,CN=Computers,DC=ibi,DC=com:
     HTTP/rs-kerb.ibi.com
     WSMAN/rs-kerb
     WSMAN/rs-kerb.ibi.com
     TERMSRV/RS-KERB
     TERMSRV/rs-kerb.ibi.com
     RestrictedKrbHost/RS-KERB
     HOST/RS-KERB
     RestrictedKrbHost/rs-kerb.ibi.com

Procedure: How to Create a Service Account User in Windows Active Directory

This procedure creates a service account in Active Directory for the WebFOCUS SSO feature. It identifies the WebFOCUS Client in Kerberos operations.

  1. On the domain controller, open the Windows Active Directory Users and Computers Window.
  2. Navigate to the folder that will contain the new user, and open it.
  3. Right-click anywhere in the user list, and then click New User.
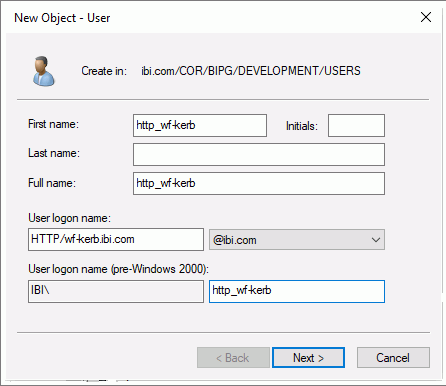
  4. On the first page of the New Object - User wizard, type the name of the machine on which WebFOCUS is installed in the First name field and in the Full name field, as shown in the following image.
    The First Name and Full Name of the New Object-User dialog box containing the hostname of the machine on which WebFOCUS is installed.

    The value specified for the First name and Full name must begin with http in lowercase letters, followed by an underscore character (_). The format is:

    http_hostname

    where:

    hostname

    Is the computer name of the machine on which the WebFOCUS Client is installed. For example, wf-kerb.

  5. Type the name of the machine on which the WebFOCUS Client is installed in the User logon name field, as shown in the following image.
    The User logon Name field in the New Object-User dialog box.

    The value specified for the User logon name must begin with HTTP in uppercase, followed by a slash (/). The format is:

    HTTP/hostname.domain.ext

    where:

    hostname.domain.ext

    Is the fully qualified domain name of the machine on which the WebFOCUS Client is installed.

  6. Type over the automatically-assigned value in the User logon name (pre-Windows 2000) text box with the name of the machine on which the WebFOCUS Client is installed, as shown in the following image.
    The User logon name (pre-Windows 2000) with the name of the WebFOCUS Client machine beginning with http in lowercase and followed by an underscore.

    The value specified for the User logon name must begin with http in lowercase followed by an underscore (_). The format is:

    http_hostname

    where:

    hostname

    Is the name of the machine on which the WebFOCUS Client is installed. For example, wf-kerb.

    The value specified for the User logon name (pre-Windows 2000) becomes the sAMAccountName attribute for the service account.

  7. Review your input, as shown in the following image, and then click Next.

    In this example, the New Object - User dialog box contains values in the recommended format, indicating that the WebFOCUS Client is installed on a machine named wf-kerb.

    The New Object-User dialog box in the Windows Server Administrator interface, showing the User Logon Name and User logon name (pre-Windows 2000)
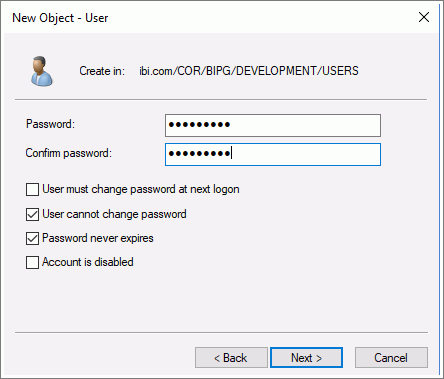
  8. When the second page opens and prompts you for the password, as shown in the following image, do the following:
    1. Type a password for the service account user in the Password and Confirm password fields.
    2. Clear the User must change password at next logon check box.
    3. Select the User cannot change password and Password never expires check boxes, and then click Next.
      The create user password page of the New Object - User wizard.
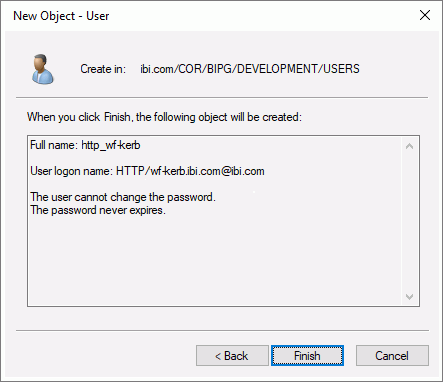
  9. When the confirmation page opens, review the list of properties for the service account user that will be created, as shown in the following image, and then click Finish.
    The final page of the Active Directory New Object - User wizard summarizing the new service account user details.

Procedure: How to Run the ktpass Command for the Service Account User

In order to set the servicePrincipalName (SPN) attribute on your service account and to generate the Kerberos keytab file for WebFOCUS, you must run the ktpass command from the Command Prompt window of the domain controller. Type the command and all arguments and values on a single line. We recommend that you keep a copy of the command syntax you use to support troubleshooting later.

  1. On the domain controller, open the Command Prompt window.
  2. In the Command Prompt window, type the ktpass command using the following format:
    ktpass /out filename /mapuser user_ID /princ principal /crypto encryption /pass password /ptype KRB5_NT_PRINCIPAL

    where:

    filename

    Is the name that ktpass will use to create the Kerberos keytab file. The recommended value is http_hostname.keytab.

    where:

    hostname
    Is the full name of the WebFOCUS Client Service Account. For example, wf-kerb.ibi.com.
    user_ID

    Is the sAMAccountName value provided in the User logon name (pre-Windows 2000) field of the Service Account.

    principal

    Is specified by concatenating the user logon name value provided in the User logon name field of the Service Account with @REALM, where REALM is the Kerberos realm. The Kerberos realm generally uses the same value as the Active Directory DNS suffix, except that the Kerberos realm is typed in uppercase characters.

    encryption

    Is the encryption option that will be used when creating the keytab file. You may need to download the latest Microsoft support tools for a version of the ktpass command that supports the recommended value of All.

    Note: If any of the machines on your network are running Windows 2008 R2, Windows 7, or later, you must choose All for these machines to function properly with Kerberos. Microsoft removed all support for DES in later versions of Windows.

    password

    Is the Windows password associated with the service account, in plain text.

    The following example shows a correctly-formatted ktpass command that applies to the examples provided previously in this section:

    C:\>ktpass /out http_wf-kerb.keytab /mapuser http_wf-kerb /princ
    HTTP/wf-kerb.ibi.com@IBI.COM /crypto All /pass password1
    /ptype KRB5_NT_PRINCIPAL
  3. If the ktpass command is successful, the Command Prompt window displays the Successfully mapped response message, as shown in the following example.
    Targeting domain controller: ibidca.ibi.com
    Successfully mapped HTTP/wf-kerb.ibi.com to http_wf-kerb.
    Key created.
    Output keytab to http_wf-kerb.keytab:
    Keytab version: 0x502
    keysize 63 HTTP/wf-kerb.ibi.com@IBI.COM ptype 1 (KRB5_NT_PRINCIPAL)
    vno 2 etype
    0x17 (RC4-HMAC) keylength 16 (0x0df97e7355555817c828671454137af0)
  4. Open a utility that allows you to view Active Directory Service Account properties and open the properties for the new Service Account.

    Scroll through the property names to confirm that the ktpass command added an attribute named servicePrincipalName (SPN) and modified the sAMAccountName and the userPrincipalName (UPN) attributes, as shown in the following image.

    The client attributes servicePrincipalName, sAMAccountName and userPrincipalName

Procedure: How to Configure the Service Account User in Active Directory for Delegation

You can configure constrained delegation or unconstrained delegation for Kerberos in the Windows Active Directory by using the Delegation tab in the Properties dialog box for the Service Account User.

  1. In the Active Directory Users and Computers Window Users list, right-click the service account user, and then click Properties.
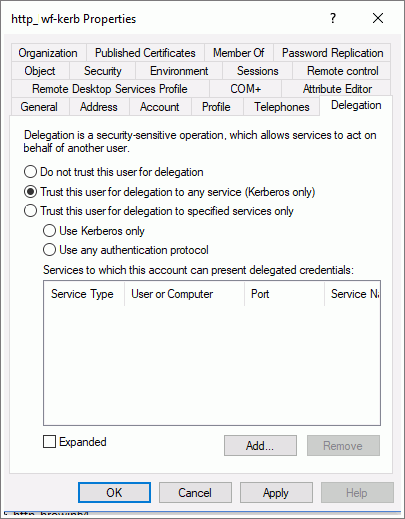
  2. In the Properties dialog box, click the Delegation tab.

    Note: The Delegation tab appears only after you run the ktpass command. For more information, see How to Run the ktpass Command for the Service Account User.

  3. If you want to use unconstrained delegation, accept the default selection of the Trust this user for delegation to any service (Kerberos only) option, as shown in the following image, and continue with step 9.
    The active directory user properties dialog box default configuration for unconstrained delegation.
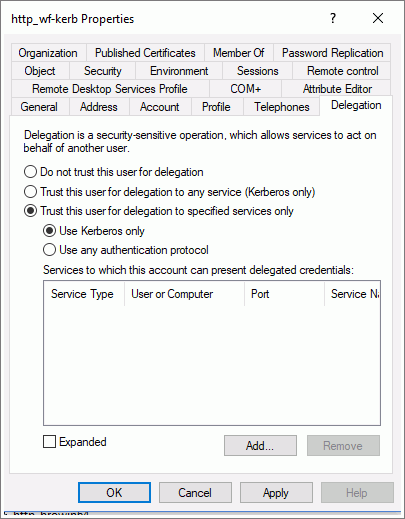
  4. If you want to use constrained delegation, click Trust this user for delegation to specified services only and then click Add, as shown in the following image.

    Note: The Use Kerberos only option is selected, by default

    The user properties dialog box configured for unconstrained delegation.
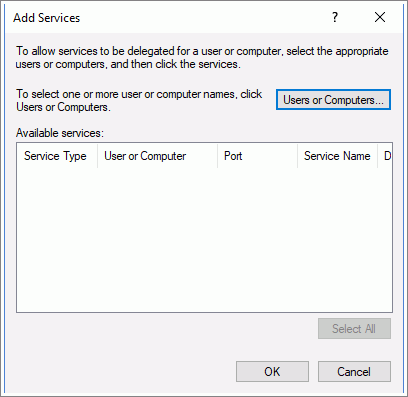
  5. In the Add Services dialog box, click Users or Computers, as shown in the following image.
    The Add Services dialog box for Kerberos delegation in Active Directory.
  6. In the Select Users or Computers dialog box, type the SPN name of the service to which this account can present delegated credentials in the Enter the object names to select text box, as shown in the following image, and then click OK.

    Typically this value is:

    hostname

    where:

    hostname

    Is the SPN name for the WebFOCUS Server to which this account can present delegated credentials.

    The Select Users or Computers dialog box.
  7. In the Add Services dialog box, click HTTP, in the Available Services list Service Type column, as shown in the following image, and then click OK.
    The Add Services dialog box showing HTTP selected from a list of available services.
  8. Confirm that the Service Type and Service Account Name appear in the Services to which this account can present delegated credentials list, as shown in the following image, and then click OK
    The properties dialog box with constrained delegation configured and the service account on the Reporting Server/Server delegated.
  9. If you are not using host headers, copy the resulting keytab file (for example, http_wf-kerb.keytab) to the machine on which you will install WebFOCUS. If you are using host headers, continue with Host Header Support for Kerberos.

Host Header Support for Kerberos

How to:

If you are using one or more host headers, you must perform the following steps.

Procedure: How to Implement Host Header Support for Kerberos

The following procedure assumes that there are two host header names, which are wf-kerb1 and wf-kerb2.

  1. Add A records for each host header in DNS, pointing to the same IP address as the NetBIOS name.

    Note: Do not create C records.

  2. Run a ktpass command for each host header, using the following format:
    ktpass /in filename /out filename /princ principal /crypto encryption/pass password /ptype KRB5_NT_PRINCIPAL
    1. For wf-kerb1, run the following ktpass command:
      ktpass /in c:\keytab\http_wf-kerb.keytab 
      /out c:\keytab\http_wf-kerb.keytab 
      /princ HTTP/wf-kerb1.ibi.com@IBI.COM /crypto All 
      /pass password1 /ptype KRB5_NT_PRINCIPAL

      The resulting output is:

      Existing keytab:
      Keytab version: 0x502
      keysize 63 HTTP/wf-kerb.ibi.com@IBI.COM ptype 1 (KRB5_NT_PRINCIPAL) vno 2 etype
      0x17 (RC4-HMAC) keylength 16 (0x5835048ce94ad0564e29a924a03510ef)
      NOTE: creating a keytab but not mapping principal to any user.
            For the account to work within a Windows domain, the
            principal must be mapped to an account, either at the
            domain level (with /mapuser) or locally (using ksetup)
            If you intend to map HTTP/wf-kerb1.ibi.com@IBI.COM to an
            account through other means or don't need to map the
            user, this message can safely be ignored.
      WARNING: pType and account type do not match. This might cause problems.
      Key created.
      Output keytab to c:\keytab\http_wf-kerb.keytab:
      Keytab version: 0x502
      keysize 63 HTTP/wf-kerb.ibi.com@IBI.COM ptype 1 (KRB5_NT_PRINCIPAL) vno 2 etype
      0x17 (RC4-HMAC) keylength 16 (0x5835048ce94ad0564e29a924a03510ef)
      keysize 64 HTTP/wf-kerb1.ibi.com@IBI.COM ptype 1 (KRB5_NT_PRINCIPAL) vno 1 etype
      0x17 (RC4-HMAC) keylength 16 (0x5835048ce94ad0564e29a924a03510ef)
    2. For wf-kerb2, run the following ktpass command:
      ktpass /in c:\keytab\http_wf-kerb.keytab 
      /out c:\keytab\http_wf-kerb.keytab 
      /princ HTTP/wf-kerb2.ibi.com@IBI.COM /crypto All 
      /pass password1 /ptype KRB5_NT_PRINCIPAL

      The resulting output is:

      Existing keytab:
      Keytab version: 0x502
      keysize 63 HTTP/wf-kerb.ibi.com@IBI.COM ptype 1 (KRB5_NT_PRINCIPAL) vno 2 etype
      0x17 (RC4-HMAC) keylength 16 (0x5835048ce94ad0564e29a924a03510ef)
      keysize 64 HTTP/wf-kerb1.ibi.com@IBI.COM ptype 1 (KRB5_NT_PRINCIPAL) vno 1 etype
      0x17 (RC4-HMAC) keylength 16 (0x5835048ce94ad0564e29a924a03510ef)
      NOTE: creating a keytab but not mapping principal to any user.
            For the account to work within a Windows domain, the
            principal must be mapped to an account, either at the
            domain level (with /mapuser) or locally (using ksetup)
            If you intend to map HTTP/wf-kerb2.ibi.com@IBI.COM to an
            account through other means or don't need to map the
            user, this message can safely be ignored.
      WARNING: pType and account type do not match. This might cause problems.
      Key created.
      Output keytab to c:\keytab\http_wf-kerb.keytab:
      Keytab version: 0x502
      keysize 63 HTTP/wf-kerb.ibi.com@IBI.COM ptype 1 (KRB5_NT_PRINCIPAL) vno 2 etype
      0x17 (RC4-HMAC) keylength 16 (0x5835048ce94ad0564e29a924a03510ef)
      keysize 64 HTTP/wf-kerb1.ibi.com@IBI.COM ptype 1 (KRB5_NT_PRINCIPAL) vno 1 etype
      0x17 (RC4-HMAC) keylength 16 (0x5835048ce94ad0564e29a924a03510ef)
  3. Run the following setspn commands.

    Note: You can refer to each host header in two ways, either by using the fully qualified domain name or by using the one-part name. For example, you can refer to the first host header as wf-kerb1.ibi.com (fully qualified domain name) or as wf-kerb1 (one-part name). As a result, when you run the setspn commands in this step, there are four entries.

    1. Run:
      setspn -A HTTP/wf-kerb1.ibi.com ibi\http_wf-kerb

      The resulting output is:

      Registering ServicePrincipalNames for CN=http_wf-kerb,OU=USERS,OU=DEVELOPMENT,
      O=BIPG,OU=COR,DC=ibi,DC=com
             HTTP/wf-kerb1.ibi.com
      Updated object
    2. Run:
      setspn -A HTTP/wf-kerb1 ibi\http_wf-kerb

      The resulting output is:

      Registering ServicePrincipalNames for CN=http_wf-kerb,OU=USERS,OU=DEVELOPMENT,
      O=BIPG,OU=COR,DC=ibi,DC=com
             HTTP/wf-kerb1
      Updated object
    3. Run:
      setspn -A HTTP/wf-kerb2.ibi.com ibi\http_wf-kerb

      The resulting output is:

      Registering ServicePrincipalNames for CN=http_wf-kerb,OU=USERS,OU=DEVELOPMENT,
      O=BIPG,OU=COR,DC=ibi,DC=com
             HTTP/wf-kerb2.ibi.com
      Updated object
    4. Run:
      setspn -A HTTP/wf-kerb2 ibi\http_wf-kerb

      The resulting output is:

      Registering ServicePrincipalNames for CN=http_wf-kerb,OU=USERS,OU=DEVELOPMENT,
      O=BIPG,OU=COR,DC=ibi,DC=com
             HTTP/wf-kerb2
      Updated object

TIBCO WebFOCUS Server Configuration Requirements for Kerberos Constrained Delegation

If you want to use unconstrained delegation with Kerberos pre-authentication, disregard this section. This configuration is not relevant to unconstrained delegation.

  • If you want to use constrained delegation with Kerberos pre-authentication, you must specify Kerberos as the connection type and configure the WebFOCUS Server to run with Operating System Security.
  • If the WebFOCUS Server runs on the Windows Operating system, you must configure it to run with Operating System Security.
  • If the WebFOCUS Server runs on UNIX or Linux, you must configure it to run with the OPSYS security provider. For more information, see the TIBCO WebFOCUS® Server Administration technical content.

TIBCO WebFOCUS Client Configuration Steps for Kerberos

How to:

The following procedure describes the steps for configuring the WebFOCUS Client for Kerberos pre-authentication.

The Default zone, the Portal Zone, and the Alternate Zone can support Kerberos pre-authentication. However, if you use the Alternate Zone for local administrative access, you must not configure it for Kerberos pre-authentication because Kerberos cannot support authentication when the WebFOCUS Client and the browser are installed on same machine.

When created during the installation process, the administrative user is not typically assigned a valid Kerberos User ID. Therefore, in the first part of the configuration, you replace the existing administrative user with a new administrative user to whom you assign a valid Kerberos User ID. WebFOCUS can then manage Kerberos pre-authentication and all other authentication tasks with this new administrative user.

The ID that you assign to the administrative user, and to all users that are subject to Kerberos pre-authentication, must follow the format conventions for Kerberos User IDs that are established in your product installation. By default, WebFOCUS strips domains from the names of all Kerberos User IDs. If you accept this default configuration, you only need to assign a name to the ID of the administrative user or any other user subject to Kerberos pre-authentication. However, if you deactivate this feature by clearing the Enable Domain Name Suffix Stripping check box in the Edit KERBEROS/SPNEGO Authentication Settings dialog box, User IDs must also include the domain to which the user is assigned as well as the name, and they must follow the required format User ID@domain.com.

For more information about Kerberos user names and their format requirements, see Limitations on Pre-authentication Using Kerberos.

In the second part of the configuration, you identify the name or location of following items:

  • Service principal name
  • The location of the KeyTab
  • The location of the krb5.conf Configuration File

Each of these items represents the name or location of a key component of the Kerberos pre-authentication method, and all of them are required.

Note: The krb5 configuration file is named krb5.ini in Windows or krb5.conf in UNIX.

In order to assign these values to the Security Zone that supports Kerberos pre-authentication, you must type them in the Edit KERBEROS/SPNEGO Authentication settings dialog box, which is located on each of the Security Zone-based Authentication pages of the Administration Console Security tab. Settings for the Default Security Zone, are stored in the securitysettings.xml file. Settings for the Alternate Security Zone are stored in the securitysettings-zone.xml file. Settings for the Portal Zone are stored in the securitysettings-portlet.xml file.

Procedure: How to Create an Administrative User for Kerberos Pre-Authentication

In this procedure you create an account for the administrative user that will replace the default administrator once you convert WebFOCUS from internal authentication to Kerberos pre-authentication.

  1. Sign in as an administrator.
  2. Open the Security Center.
  3. In the Users pane, under the Users folder, click New User.
  4. Type the ID of a valid Kerberos user in the Name field, using one of the following formats:
    • Type only the User ID if your Kerberos configuration automatically strips domains from User IDs.
    • Type the User ID and Domain of the administrative user in the Name field, using the format User ID@domain.com, if your Kerberos configuration does not automatically strip domains from User IDs.
  5. In the Create in Group list, click Administrators, and then click OK.
  6. In the Users pane, under the Users folder, click the previously-created Administrative User, and then click Delete.
  7. Navigate away from the security center.

Procedure: How to Configure the TIBCO WebFOCUS Client for Kerberos

Before you begin, complete the prerequisites for Pre-Authentication. For more information, see Configuring Pre-Authentication, External Authentication or External Authorization.

We recommend that you use the Export command to back up the Security Settings configuration files before making changes to the Authentication page. For more information, see How to Export Security Configuration Files.

  1. Open the Administration Console.
  2. Click the Security tab.
  3. Under the Security Zones folder, expand the folder for the Security Zone you wish to update, and then click Authentication.
  4. Double-click the KERBEROS/SPNEGO Authentication entry.

    or

    Click the KERBEROS/SPNEGO Authentication entry, and then, in the Actions section, click Edit.

    or

    Right-click the KERBEROS/SPENGO Authentication entry, and then click Edit.

  5. In the Edit KERBEROS/SPNEGO Authentication settings dialog box:
    1. Type the Kerberos Service Principal name in the Service principal name field.

      For example, HTTP/wf-kerb.ibi.com.

    2. Type the location of the keytab file in The location of the KeyTab field.

      We recommend that you place this file in the config directory.

      For example:

      drive:/ibi/WebFOCUS82/config/http_wfkerb.keytab

      where:

      drive
      Is the letter of the drive that hosts the WebFOCUS application.
    3. Type the location of the krb5 configuration file in The location of the krb5.conf Configuration File field.

      We recommend that you place this file in the config directory.

      For example:

      drive:/ibi/WebFOCUS82/config/krb5configfilename 

      where:

      drive
      Is the letter of the drive that hosts the WebFOCUS application.
      krb5configfilename
      Is krb5.ini in Windows or krb5.conf in UNIX.

      Note: All of these values are required. These examples represent the typical values for each attribute. If your organization uses a different Kerberos Service provider name, or has placed any of the other components in a different location, type that name or location in these fields instead of the name or location called for in the preceding sub-steps.

    4. Accept the default selection of the Enable Domain Name Suffix Stripping check box and the Enable Fallback to Form Authentication check box.

      When this second check box is selected, Form Based Authentication is also enabled in this Security Zone as a supplemental method of authentication if Kerberos fails.

    5. Click OK.
  6. Right-click the KERBEROS/SPNEGO Authentication entry, and click Enable.

    Or

    Click the KERBEROS/SPNEGO Authentication entry, and then, in the Actions section, click Enable.

  7. In the Actions section, click Save.
  8. When you receive the confirmation message, click OK.
  9. When you receive the message to reload the web application, click OK.
  10. Sign out of your current session.
  11. Stop and restart the WebFOCUS Server.
  12. Sign in as an administrator, and test the configuration.

Web Browser Configuration for Kerberos

In this section:

How to:

The SSO capability requires an Active Directory domain at a Windows 2000 functional level or higher. The following browsers are supported:

  • Microsoft Internet Explorer 10 or higher.
  • Google Chrome ™ 53 (although prior versions may also work).
  • Microsoft Edge 44 or higher
  • Mozilla Firefox® 49 or higher (although prior versions may also work).

Procedure: How to Configure Internet Explorer for Kerberos

  1. Open the Internet Explorer browser menu bar, click Tools, and then click Internet options.
  2. On the Security tab, select the Local intranet zone, then click Sites.
  3. Click Advanced.
  4. Type either a wildcard for all host names in your DNS that will be considered part of the local intranet, or type the name of just one machine where WebFOCUS runs and click Add, as shown in the following image.
  5. Click Close, and then click OK. In the Internet Options dialog box, click OK again to save the change.
  6. Open the Internet Options dialog box again, and click the Advanced tab. Scroll down to the Security section, and make sure that the Enable Integrated Windows Authentication check box is selected.

Procedure: How to Configure Microsoft Edge for Kerberos

  1. Open the Windows Start menu, and enter Internet Options to open the Internet Properties dialog box, as shown in the following image.
    The Internet Properties dialog box, with the default display of the General tab.
  2. Select the Security tab, and then select Local intranet and Sites, as shown in the following image.
    The Security tab of the Internet Properties dialog box, showing the Local intranet option selected and the Sites button.

    The Local intranet dialog box opens.

  3. Select Advanced, as shown in the following image.
    The Local Intranet dialog box with the Advanced button selected.

    A second Local intranet dialog box that contains advanced settings opens.

  4. Enter a wildcard for all host names in your DNS that will be considered part of the local intranet, or enter the name of just one machine where WebFOCUS runs in the Add this website to the zone field, and click Add, as shown in the following image.
    The local intranet dialog box that contains advanced settings with a website name selected for addition to the list of websites included in the local intranet zone.

    Repeat this step for each website you must add to the list.

  5. When your list of permitted websites is complete, click Close to close the Local intranet options dialog box that contains advanced settings, and then click OK to close the first Local intranet options dialog box.
  6. In the Internet Properties dialog box, select OK to close it and save the changes.
  7. Open the Internet Properties dialog box again, and select the Advanced tab.
  8. Scroll down to the Security section, and ensure that the Enable Integrated Windows Authentication check box is selected, as shown in the following image.
    The Internet Properties dialog box, showing the advanced tab with the Enable Integrated Windows Authentication setting check box selected.
  9. When you can confirm that this check box is selected, select OK to close the Internet Properties dialog box.

Procedure: How to Configure Mozilla Firefox for Kerberos

  1. In the Mozilla Firefox address bar, type about:config and press Enter.
  2. If you receive a message warning you that this might void your warranty, click I accept the risk.
  3. Type network.negotiate in the Search box to locate the two trust settings. You will add your domain to these two settings.
  4. Double-click the network.negotiate-auth.delegation-uris entry, as shown in the following image.

    The network.negotiate-auth.delegation-uris entry
  5. Add the domain information, then click OK.
  6. Double-click the network.negotiate-auth.trusted-uris entry, add the domain information for the WebFOCUS Server, and then click OK.

Configuring Google Chrome for Kerberos

The use of Kerberos authentication with the Google Chrome browser requires an Administrator to download and install a Security Policy Template provided by Google.

For browsers hosted on machines that run on Windows, the Security Policy Template adds the following two settings to the Registry.

  • AuthServerWhitelist. Specifies the servers that are whitelisted for integrated authentication. Assign the name and domain of any server you wish to include in the WebFOCUS configuration for integrated authentication to this registry value. For example, webfocus.ibi.com. If you include multiple server names, separate them with commas. Wildcard characters (*) are allowed.
  • AuthNegotiateDelegateWhitelist. Specifies the servers to which Google Chrome may delegate authentication tasks. Assign the name and domain of any server that can support authentication tasks to this registry value. For example, webfocus.ibi.com. If you include multiple server names, separate them with commas. Wildcard characters (*) are allowed.

    If you do not assign data to this value, Chrome responds only to integrated authentication requests from an Intranet server and ignores requests from Internet servers.

The Security Policy Template has a similar impact on browsers hosted on machines that run on Apple macOS or Linux. For more information about downloading the Security Policy Template and deploying it in Apple macOS or Linux, see https://www.chromium.org/administrators/policy-templates.

The configuration of Google Chrome browsers to support Kerberos Authentication in Windows is a three-step process:

  1. Download the appropriate Security Template, or bundle, from the Google Chrome website.
  2. Install the Security Template or policy to the machine that hosts the Google Chrome browser used to access WebFOCUS.
  3. Add all the names and URLs of all servers that are made available by Kerberos Authentication to a whitelist maintained in the Windows Registry.

Procedure: How to Download the Security Policy Template for Google Chrome Kerberos Authentication

For each user who uses a Google Chrome browser to connect to WebFOCUS:

  1. Launch the Google Chrome browser and navigate to the Set Chrome Browser policies on managed PCs Google Chrome Enterprise Help page, located at the following URL: https://support.google.com/chrome/a/answer/187202?hl=en.
  2. Scroll down to the Install and configure Chrome policy templates section heading, and the subheading that matches the operating system of the device hosting the Google Chrome browser, as shown in the following image.

    The Install and configure Chrome policy templates section heading, on the Set Chrome Browser policies on managed PCs Google Chrome Enterprise Help page.

  3. Click the Download Google Chrome Bundle link and follow the steps described on the Get Chrome Browser for Enterprise page to download the Chrome bundle, as described in step 1 under the Windows subheading and shown in the following image.
    The Install and configure Chrome policy templates section heading, on the Set Chrome Browser policies on managed PCs Google Chrome Enterprise Help page.
  4. Select the download link next to the Google Chrome Bundle that supports your operating system, as shown in the following image, and follow the prompts from your browser to complete the download.
    The Download Chrome Bowser Page with the list of Chrome bundles for various operating systems.

Procedure: How to Install the Security Policy Templates for Google Chrome Kerberos Authentication in Windows

  1. Save the Chrome bundle zip file downloaded from the Google Chrome Support site to the local computer, and extract the files stored in it.
  2. Navigate through the extracted files to:
    drive:\path\Configuration\adm\language\chrome.adm

    where:

    drive:\path\
    Is the drive letter and path to the location where you extracted the zip files.
    language

    Is the code name for the language used by the machine hosting the Google Chrome browser.

    For example:

    C:\temp\KerberosUpdatesForEdgeandChrome8207\Configuration\adm\en-US
  3. Open the Local Group Policy Editor by performing one of the following steps.

    Enter Edit Group Policy in the Search Tray of the machine that hosts the browser to open the App panel, and then select Open to see the Local Group Policy Editor.

    Or

    Select Start and Settings, and then enter gpedit.msc in the Find a Setting field. Under the Search Results heading, select Edit Group Policy, and close the Settings window to see the Local Group Policy Editor, as shown in the following image.

    The Local Policy Group Editor dialog box.
  4. In the Local Group Policy Editor, expand Local Computer Policy, Computer Configuration, and Administrative Templates as shown in the following image.
    The Local Group Policy Editor navigation menu with the Administrative Templates folder selected
  5. Right-click Administrative Templates, and select Add/Remove Templates from the shortcut menu to open the Add/Remove Templates dialog box, as shown in the following image.
    The blank Add/Remove Templates dialog box with the Add, Remove and Close buttons.
  6. Select Add and navigate to the network location where you saved the chrome.adm file.
  7. Highlight the file and select Close to close the Add/Remove Templates dialog box and add the Classic Administrative Templates (ADM) folder to the Local Group Policy Editor, as shown in the following image.
    The Add/Remove Templates dialog box with the chrome policy template added to the list of Current Policy templates.
  8. Under the Computer Configuration node in the Local Group Policy Editor navigation tree, expand Administrative Templates, Classic Administrative Templates (ADM), Google, Google Chrome, and Deprecated policies, as shown in the following image.
    The Local Group Policy Editor Navigation tree showing the new Classic Administration Templates (ADM) folder with the Google Chrome Deprecated policies folder.
  9. In the Deprecated policies folder, double-click the Authentication server whitelist setting, as shown in the following image.
    The Local Group Policy Editor list of deprecated privileges showing the authentication server whitelist setting.
  10. In the Authentication server whitelist setting dialog box, select Enabled, and in the Options section, enter the name of the server that is whitelisted for integrated authentication, as shown in the following image.
    The Authentication Server Whitelist Setting dialog box with Enabled selected, and the names of all servers on the white list added.

    The server name typically takes the format, server.domain.com.

    where:

    server
    Is the name of the server to be whitelisted for integrated authentication in the WebFOCUS configuration.
    domain
    Is the name of the domain to be whitelisted for integrated authentication in the WebFOCUS configuration.

    For example:

    adminserver.ibi.com

    The server name format accepts wildcards. If you need to enter multiple server names, separate each one with a comma (,).

  11. Select OK to save your changes and close the dialog box.
  12. In the Deprecated policies folder, select the Kerberos delegation server whitelist setting, as shown in the following image.
    The Local Group Policy Editor list of deprecated privileges with the Kerberos delegation server whitelist setting.
  13. In the Kerberos delegation server whitelist dialog box, select Enabled, and under the Options section enter the name of the server to allow (accepts wildcards), as shown in the following image.
    The Kerberos Delegation Server Whitelist Setting dialog box with Enabled selected, and the names of all servers on the white list added.

    The server name typically takes the format, server.domain.com.

    where:

    server
    Is the name of the whitelisted server to which Google Chrome may delegate authentication tasks.
    domain
    Is the name of the whitelisted domain to which Google Chrome may delegate authentication tasks.

    For example:

    adminserver.ibi.com

    The server name format accepts wildcards. IF you need to enter multiple server names, separate each one with a comma (,).

  14. Click OK to save your changes and close the dialog box.
  15. Select File and Exit to close the Local Policy Editor.
  16. Restart the machine that hosts the user’s browser.

Procedure: How to Confirm That the Google Chrome Browser Accommodates Kerberos Authentication

  1. Open the Chrome browser and enter chrome://policy in the address bar to open the policy page.
  2. Review the listings to confirm that the Authentication Server Whitelist policy and the Kerberos Delegation Server Whitelist policy have been implemented, as shown in the following image.
    The Google Chrome Browser policies page showing entries for the Authentication Server Whitelist policy and the Kerberos Delegation Server Whitelist policy.
  3. Confirm that the Policy Value column lists all URLs that are to be made accessible to Kerberos authentication for both policy entries.
  4. If both policies are present and list the complete set of URLs made accessible by Kerberos authentication, close the browser.
  5. If one or both policies are missing or if one or more URL is missing, close the browser and edit or reinstall the policy as described in previous topics.

Procedure: How to Test the WebFOCUS Configuration for Kerberos

  1. Test your Kerberos single sign on configuration by accessing the Business Intelligence Portal (BIP) through one of your previously configured browsers.

    The syntax is:

    http://server.url.domain:port/context

    If Kerberos is configured correctly and your user ID has been added to Managed Reporting as previously indicated, you should be signed in to BIP using your Kerberos credentials.

  2. Make sure that the WebFOCUS Client can delegate authentication to the WebFOCUS Server by attempting to run a report against the Kerberos-configured node.

    The WebFOCUS Server edaprint log file will record request by cmrpip0000xx for Kerberos connect to agent and reflect your Windows sign-in ID in UPN format.

Configuring Support for ReportCaster for Kerberos

How to:

Kerberos authentication requires a synchronous connection between the WebFOCUS Server and the user browser session, but ReportCaster does not use a browser session while running scheduled reports. Therefore, ReportCaster must provide Kerberos with a user ID and password to enable reports.

In the ReportCaster Server Configuration tool, configure each of the data servers that ReportCaster is set up to communicate with. Set the Run Id Type to User to ensure that end users are prompted for their user IDs and passwords once for each node.

Alternately, set the Run Id Type to Static and provide the user ID and password that will be used for all schedules for that WebFOCUS Server.

Procedure: How to Configure the ReportCaster Data Servers for Kerberos

  1. In the ReportCaster Console, click the Configuration tab and open the Data Servers folder.
  2. Select the desired node and change the following settings.
    1. From the Security Type drop-down list, select User or Static.
    2. If you select Static, click the button to the right of the User box.
    3. In the User dialog box, type the user ID and password and click OK.
    4. Click the Save button to save your changes.

Configuring Support for Large Tickets for Kerberos

The Microsoft Windows implementation of Kerberos puts all the Windows group identifiers inside the Kerberos ticket of each user, which can result in a large ticket for a user who belongs to many groups. The Kerberos ticket is transported in an HTTP header, which leads to several technical issues when the ticket size becomes large. If any users belong to more than 100 groups, you may need to perform some or all of the following special configuration tasks:

  • Expand your Tomcat Server HTTP header buffer size. Do this by adding the setting maxHttpHeaderSize=”xx”, where xx is the number of bytes in multiples of 4096. This setting may need to be as high as 65,536 bytes. Add this setting to the 8080 or 8009 connector block in the server.xml file for Tomcat, depending on which block you are using.
  • On each workstation accessed by users who belong to many groups:
  • You must also set MaxTokenSize for the domain controllers.

Setting Up TIBCO WebFOCUS With Kerberos in a Multi-Domain Environment

How to:

This topic describes the additional steps that are required for Kerberos to work properly in a multi-domain or subdomain environment.

For example, if you have users who are members of SUBA.MYDOMAIN.COM, SUBB.MYDOMAIN.COM, and MYDOMAIN.COM, and all of those users need to access the Kerberos environment, you must follow the directions in this topic.

To handle the additional configuration settings required for Kerberos to work properly in a multi-domain environment, you must create a Kerberos configuration file named krb5.ini. This file contains all the additional information needed for Kerberos to work when you are using more than one domain.

Several versions of Java have a bug that does not allow multiple domains to function properly even with the krb5.ini configuration. As a result, you may need to update your version of Java. For details on the Java bug, go to the following Java bug report:

http://bugs.sun.com/view_bug.do?bug_id=6670362

Procedure: How to Create a krb5.ini File to Handle Kerberos Settings

  1. Create a new text file named krb5.ini.

    You can create this file anywhere on the file system, since you explicitly refer to its location later. For the purpose of this example, create the file in:

    drive:\ibi\WebFOCUS82\config\krb5.ini
  2. At the beginning of the krb5.ini file, insert the following lines of code for the [libdefaults] section.

    Replace the default_realm name, MYDOMAIN.COM, in the last line of the example with the fully qualified DNS name for the domain of the machine that the WebFOCUS Client has joined.

    Type the default_realm name in uppercase letters, as it is case-sensitive.

    [libdefaults]   
        ticket_lifetime = 600   
        default_tgt_enctypes = rc4-hmac   
        default_tgs_enctypes = rc4-hmac   
        default_checksum     = rsa-md5   
        forwardable = true   
        default_realm = MYDOMAIN.COM
  3. After the [libdefaults] section, insert the following lines of code for the [realms] section. Include an entry for every domain and subdomain that you will use, as shown in the following example.

    If the domains and subdomains share domain controllers, you can create a [realms] section here, and refer to the relationships in the next section, [domain_realm]. The [domain_realm] section is described in step 4.

    [realms]
    MYDOMAIN.COM = {   
       kdc = dc1.mydomain.com:88
       kdc = dc2.mydomain.com:88
       kdc = dc3.mydomain.com:88
       default_domain = mydomain.com
    }
    SUBA.MYDOMAIN.COM = {
       kdc = dc1.suba.mydomain.com:88
       kdc = dc2.suba.mydomain.com:88
       default_domain = suba.ibi.com
    }
    SUBB.MYDOMAIN.COM = {
       kdc = dc1.subb.mydomain.com:88
       kdc = dc2.subb.mydomain.com:88
       default_domain = subb.ibi.com
    }

    As in the [libdefaults] section, the values in the [realms] section are case-sensitive. For instance, the first reference name (such as MYDOMAIN.COM in the first block in the example) must be uppercase and the value for default_domain must be lowercase.

    Each entry for kdc must refer to the DNS name of a domain controller for the applicable domain. Only one kdc entry is required per domain listed, but multiple kdc entries allow for redundancy.

  4. This step is optional. To map additional domains or host names to a specific realm, insert the following lines of code in the optional [domain_realm] section.

    A domain maps to the realm of the same name, but the realm name is uppercase. As a result, the following entries are redundant:

    [domain_realm]
       .suba.mydomain.com = SUBA.MYDOMAIN.COM
       .subb.mydomain.com = SUBB.MYDOMAIN.COM
       .mydomain.com = MYDOMAIN.COM

    For more information on the [domain_realm] section, see the MIT Kerberos specifications at the following website:

    http://web.mit.edu/kerberos/krb5-1.4/krb5-1.4.1/doc/krb5-admin/domain_realm.html

  5. This step is optional. If applicable at your site, insert the following lines of code in the optional [capaths] section.

    The [capaths] section is needed only in environments in which the parent domain does not have unilateral trust relationships with all the child domains, or in environments in which multiple domain hierarchies are used.

    In those situations, the Kerberos protocol is not able to determine how to authenticate a user from one domain, for a resource in another domain. As a result, the relationships required to accomplish the authentication need to be mapped so that Kerberos knows which path to take to authenticate a user. The following trust relationships apply:

    • Domain SUBA.MYDOMAIN.COM unilaterally trusts SUBB.MYDOMAIN.COM.
    • Domain SUBB.MYDOMAIN.COM unilaterally trusts MYDOMAIN.COM.
    • Domain SUBA.MYDOMAIN.COM does not trust MYDOMAIN.COM.

    In this example, Kerberos can directly authenticate any user from SUBA.MYDOMAIN.COM, for any resource in SUBB.MYDOMAIN.COM. To authenticate a user in SUBA.MYDOMAIN.COM with MYDOMAIN.COM, you must authenticate that user through SUBB.MYDOMAIN.COM, since SUBA.MYDOMAIN.COM does not have a direct trust relationship with MYDOMAIN.COM.

    [capaths]
    SUBA.MYDOMAIN.COM {
    SUBB.MYDOMAIN.COM = .
    MYDOMAIN.COM = SUBB.MYDOMAIN.COM
    }
    SUBB.MYDOMAIN.COM {
    SUBA.MYDOMAIN.COM = .
    MYDOMAIN.COM = .
    }
    MYDOMAIN.COM {
    SUBB.MYDOMAIN.COM = .
    SUBA.MYDOMAIN.COM = SUBB.MYDOMAIN.COM
    }

    In the first block is the information for authenticating a user from SUBA.MYDOMAIN.COM. Kerberos can directly authenticate a user from SUBA.MYDOMAIN.COM against SUBB.MYDOMAIN.COM, as represented by the period (.). To authenticate a user from SUBA.MYDOMAIN.COM against MYDOMAIN.COM, Kerberos must go against SUBB.MYDOMAIN.COM. That is why the code states MYDOMAIN.COM =SUBB.MYDOMAIN.COM.

    In the second block is the information for authenticating a user from SUBB.MYDOMAIN.COM. Since Kerberos can directly authenticate a user from SUBB.MYDOMAIN.COM against both SUBA.MYDOMAIN.COM and MYDOMAIN.COM, a period (.) is included in both of those columns.

    In the third block is the information for authenticating a user from MYDOMAIN.COM. Kerberos can directly authenticate a user from MYDOMAIN.COM, for resources in SUBB.MYDOMAIN.COM, as represented by a period (.). Kerberos must authenticate a user from SUBA.MYDOMAIN.COM by first going through SUBB.MYDOMAIN.COM.

    For more information on the use of the [capaths] section with the Kerberos protocol, see the following document from MIT:

    http://web.mit.edu/kerberos/krb5-1.5/krb5-1.5.4/doc/krb5-admin/capaths.html

Your krb5.ini file will look similar to the following when you are done:

[libdefaults]
   ticket_lifetime = 600
   default_tgt_enctypes = rc4-hmac
   default_tgs_enctypes = rc4-hmac
   default_checksum = rsa-md5
   forwardable = true
   default_realm = MYDOMAIN.COM
[realms]
MYDOMAIN.COM = {
   kdc = dc1.mydomain.com:88
   kdc = dc2.mydomain.com:88
   kdc = dc3.mydomain.com:88
   default_domain = mydomain.com
}
SUBA.MYDOMAIN.COM = {
   kdc = dc1.suba.mydomain.com:88
   kdc = dc2.suba.mydomain.com:88
   default_domain = suba.ibi.com
}
SUBB.MYDOMAIN.COM = {
   kdc = dc1.subb.mydomain.com:88
   kdc = dc2.subb.mydomain.com:88
   default_domain = subb.ibi.com
}
[domain_realm]
   .suba.mydomain.com = SUBA.MYDOMAIN.COM
   .subb.mydomain.com = SUBB.MYDOMAIN.COM
   .mydomain.com = MYDOMAIN.COM
[capaths]
SUBA.MYDOMAIN.COM {
SUBB.MYDOMAIN.COM = .
MYDOMAIN.COM = SUBB.MYDOMAIN.COM
}
SUBB.MYDOMAIN.COM {
SUBA.MYDOMAIN.COM = .
MYDOMAIN.COM = .
}
MYDOMAIN.COM {
SUBB.MYDOMAIN.COM = .
SUBA.MYDOMAIN.COM = SUBB.MYDOMAIN.COM
}

Procedure: How to Specify the Location of krb5.ini in Apache Tomcat

For WebFOCUS Kerberos configurations, the krb5.ini is typically required. You must refer to the location of the file using the following Java™ option. You can specify the -Djava.security.krb5.conf option in Tomcat, as described in the following procedure.

  1. Navigate to the bin directory of Tomcat.

    Typically, the bin directory is in the following location:

    drive:\ibi\tomcat\bin\
  2. Double-click tomcat8WFw.exe to open the Tomcat configuration dialog box.
  3. Select the Java tab and add the following entry to the end of the list of Java Options.
    -Djava.security.krb5.conf=drive:\ibi\WebFOCUS82\config\krb5.ini

    If you chose another location in which to store your krb5.ini file, you must refer to that location, instead of the location in the preceding example.

  4. Click Apply to save the setting.
  5. Stop Tomcat and then restart it for the setting to take effect.

Configuring Pre-Authentication with SAML

In this section:

How to:

Security Assertion Markup Language (SAML) authentication relies on the use of a third-party identity provider to assert the authentication of a user requesting services from a service provider. When a principal, such as a WebFOCUS user, requests services from a service provider, such as WebFOCUS, the service provider relays the request to the identity provider, who then authenticates the principal and allows the requests. SAML pre-authentication allows administrators to transfer the burden of user account maintenance to an independent provider dedicated to this task, and frees users from having to sign in multiple times during a work session, in order to open WebFOCUS and other applications. WebFOCUS supports a variety of identity providers with varying requirements for internal security and credential-based authentication. You can obtain additional information about any specialized support requirements for them by contacting Customer Support.

The complete configuration for SAML Authentication includes the following activities:

  1. Create a customized keystore.

    Note: This step is optional but recommended.

    You can use the default keystore delivered with WebFOCUS to support SAML authentication, or you can create a customized keystore. You can limit the keystore to SAML authentication support, or you can use it to support other security features that require the use of a keystore, such as trusted ticket authentication. If you create a customized keystore, you need to add it to the Key Management dialog box, and add the values you assign to it to the SAML Service Provider metadata defined in the Edit SAML Authentication dialog box

  2. Enable the Alternate Security Zone

    After establishing SAML authentication in the Default Security Zone, administrators will still need to bypass SAML authentication for configuration and maintenance activities. By enabling the Alternate Security Zone, which is configured to use form-based authentication by default, administrators can continue to sign in from their machines, and authenticate themselves appropriately while bypassing SAML authentication.

  3. Assign the customized keystore to WebFOCUS.

    Note: This step is optional but recommended.

    If you create a customized keystore, you must make it available to WebFOCUS by adding it to the Certificate Alias and Password Map in the Key Management dialog box, and replacing the location and password of the default keystore with those of the customized keystore. However, you can skip this activity if you use the default keystore. It is already configured within this dialog box.

  4. Download and configure the SAML service provider metadata file

    Add the keystore certificate alias and password to the SAML Service Provider metadata in the Edit SAML Authentication dialog box. Use these values, along with the Entity ID and Entity Base URL, to generate a metadata file that identifies WebFOCUS as a trusted service provider to the identity provider that supports SAML authentication.

  5. Download and configure the identity provider metadata file to WebFOCUS

    Add the metadata file provided by the identity provider to the WebFOCUS configuration in order to enable it to use that provider to authenticate user identities.

  6. Enable SAML authentication in the Default Security Zone

    To establish SAML authentication as the default method of authentication for WebFOCUS users, you must disable all other forms of authentication in the Default Security Zone and enable SAML authentication.

  7. Save the SAML authentication configuration

    Save the settings configured in the Edit SAML Authentication Settings dialog box by clicking the Save link on the Authentication Page. Sign out and recycle the WebFOCUS Server to complete the implementation of SAML authentication.

    Even when you establish SAML Authentication as the principal method of authentication for the production environment, we recommend that you retain the use of form-based authentication by enabling the Alternate Security Zone and leaving it configured to use form-based authentication. You can continue to use the Alternate Security Zone for system maintenance tasks under a form based sign in.

Notes:

SAML Authentication Prerequisites

Before you begin, complete the prerequisites for Pre-Authentication. For more information, see Configuring Pre-Authentication, External Authentication or External Authorization.

There may be additional prerequisites, such as configuring WebFOCUS for SSL. For an introduction to the steps required by the SSL configuration, see Configuring WebFOCUS for SSL. For information about other prerequisites, contact Customer Support.

We recommend that you use the Export command to back up the Security Settings configuration files before making changes to the Authentication page. For more information, see How to Export Security Configuration Files.

Procedure: How to Create a Customized Keystore

This procedure is optional. You can use the default keystore, wfKeystore.jks, and the default alias within it to support SAML Authentication operations.

  • To use the default keystore and alias, skip this procedure. Use the default settings in the Key Management dialog box and the Edit SAML Authentication Settings dialog box.
  • To use a customized keystore and alias, follow this procedure. You must also add settings for the new keystore to the Key Management dialog box and replace the default settings in the Edit SAML Authentication Settings dialog box with those you use to create the customized keystore.
  1. Open the command prompt window and redirect the command prompt to the drive:\ibi\WebFOCUS82\config\was directory.
  2. Type the Java keytool command and values as shown in the following example:
    keytool -genkey -alias aliasname -keyalg RSA -keysize 2048 -keypass keypass -storepass storepass -validity 3650 -keystore keystorename.jks

    where:

    aliasname
    Is the unique alias assigned to the private key contained within the keystore.
    RSA
    Is the algorithm assigned to the keystore.
    2048
    Is the keysize.
    keypass
    Is the password assigned to the private key alias.
    storepass
    Is the password assigned to the keystore file.
    3650
    Is the number of days the key is valid.
    keystorename.jks
    Is the name assigned to keystore file.

    Note: keytool is a Java command typically found in the Java bin directory.

  3. Press the Enter key.

    The command prompt displays the first in a series of questions.

  4. Respond to each question as follows:
    • "What is your first and last name?" Type the first and last name of the certificate holder.

      For example, John Doe

    • "What is the name of your organizational unit?" Type the name of the organizational unit of the certificate holder.

      For example, Technical Content Management

    • "What is the name of your organization?" Type the name of the organization of the certificate holder.

      For example, TIBCO

    • "What is the name of your City or Locality?" Type the name of the city or locality of the certificate holder.

      For example, New York

    • "What is the name of your State or Province?" Type the two-letter abbreviation for the state in which the certificate holder is located.

      For example, NY

    • "What is the two-letter country code for this unit?" Type the two-letter abbreviation for the country in which the certificate holder is located.

      For example, US

  5. When the command prompt displays the question, "Is CN=__, OU=__, O=__, L=__, ST=__,C=__ correct?" review the values and type y if they are correct.

    For example, Is CN= John Doe, OU= Technical Content Management, O= TIBCO, L= New York, ST= NY, C= US correct?

    If they are not correct, type n and retype the keytool command from step 2.

    If they are correct, the new keystore is ready for use.

  6. Type the keytool command again to review and confirm the details of the new keystore, as shown in the following example:
    keytool -list -v -keystore keystorename.jks -storepass storepass

    where:

    keystorename.jks
    Is the name assigned to the keystore file.
    storepass
    Is the password assigned to the keystore file.
  7. Ensure that the new keystore file is saved to the following directory:
    drive:\ibi\WebFOCUS82\config\was

Procedure: How to Assign a Customized Keystore to TIBCO WebFOCUS

You can use the default keystore, wfKeystore.jks, and the default alias to sign and encrypt WebFOCUS certificates for the identity provider. You can substitute a customized keystore and alias if your identity provider requires.

  • To use the default keystore and alias, skip this procedure and use the default settings in the Key Management dialog box.
  • To use a customized keystore and alias, follow this procedure, and replace the default settings in the Key Management dialog box with those you used to create the customized keystore.
  1. In the Administration Console, on the Security tab, under the Security Zones folder, expand the Default Security Zone folder, and then click Authentication.
  2. On the Authentication page, click Key Management.
  3. In the Key Management dialog box, accept the default value in The Location of the Keystore File field.

    This location corresponds to the location where you placed the keystore when you created it, drive:\ibi\WebFOCUS82\config\was.

  4. Type the password you assigned to the keystore in The Password for the Keystore field.

    This is the password you assigned to the storepass option when you created the keystore.

  5. Click Add.
  6. Type the alias you assigned to the keystore in the Certificate Alias in the Keystore field.
  7. Type the password you assigned to the keystore alias in the Password field.
  8. Select the Default Certificate Alias check box.
  9. Click OK.

    The entry for the new keystore appears in The Certificate Alias and Password Map box.

  10. Click OK.

Procedure: How to Configure and Generate TIBCO WebFOCUS Metadata for a SAML Authentication Provider

Before you begin this configuration, ensure that a keystore is available in the following directory:

drive:\ibi\WebFOCUS82\config\was

You can use the default keystore, wfKeystore.jks, and the default alias to sign and encrypt WebFOCUS certificates for the identity provider, or you can substitute a customized keystore and alias, if your identity provider requires.

  • To use the default keystore and alias, use the default settings in the Edit SAML Authentication Settings dialog box.
  • To use a customized keystore and alias, replace the default settings in the Edit SAML Authentication Settings dialog box with those you used to create the customized keystore.
  1. In the Administration Console, on the Security tab, under the Security Zones folder, expand the Default Security Zone folder and then click Authentication.
  2. Double-click the SAML Authentication entry.

    The Edit SAML Authentication Settings dialog box opens.

  3. On the Service Provider (SP) Metadata tab, in the Location of the Metadata File field, accept the default location and file name, or type the path name to an alternate location and file name if you must use one for your installation of WebFOCUS.

    The default location is:

    file:{IBI_CONFIGURATION_DIRECTORY}/was/saml/wfspMetadata.xml

    where:

    IBI_CONFIGURATION_DIRECTORY

    Is the value that identifies the path from the root directory to the sub-folders that follow this setting. For example:

    drive:\ibi\WebFOCUS82\config\
  4. In the Entity Alias field, type over the default value with an easily recognizable name, such as the host name, that uses only alphanumeric characters.
  5. If you are using the default keystore provided in the product installation, accept the default values in the Signing Certificate Alias field and Encryption Certificate Alias field. Otherwise, type the alias you added to the customized keystore in these fields.

    These values identify the WebFOCUS alias as the presenter of the Signing Certificate and the Encryption Certificate to the SAML identity provider.

  6. Accept the default values assigned to the SSL/TLS Certificate Alias, Security Profile, and SSL/TLS Security Profile fields.
  7. The Sign Metadata check box is cleared, by default. Select this check box only if there is a need to digitally sign WebFOCUS metadata you submit to the Identity Provider.
  8. Accept the default settings assigned to the Support Single Logout check box and the Require Signed Logout Request check box.
  9. The Require Signed Logout Response check box is cleared, by default. Select this check box only if you need to authenticate responses from the identity provider.
  10. Click Generate Metadata.

    The Service Provider (SP) Metadata Generation dialog box opens.

  11. In the Entity ID field, accept the default URL, or type the URL that the Service Provider will use when communicating with the WebFOCUS Client.

    Note: If the value localhost appears in this field, you must replace it with the fully-qualified URL that is used to access WebFOCUS. For example:

    https://SERVER.DOMAIN.COM/ibi_apps/sp
  12. In the Entity Base URL field, accept the default URL, or type the base of the URL that the Service Provider will use when communicating with the WebFOCUS Client.

    Note: If you are configuring SAML Authentication for the Alternate Security Zone, and the value localhost appears in this field, you must replace it with a fully-qualified URL that is used to access WebFOCUS. For example:

    https://SERVER.DOMAIN.COM/ibi_apps
  13. Bypass the remaining unavailable settings. If you need to update or change the values assigned to them, close the Service Provider (SP) Metadata Generation dialog box and update the corresponding fields in the Edit SAML Authentication Settings dialog box.
  14. Accept the default selection of The Service Signs Authentication Requests check box and the Require Signed Authentication Assertion check box.
  15. Accept the default selections in the Single Sign-on Bindings section and in the Supported Name IDs section.
  16. Click Generate.
  17. Follow the directions in your browser to download the wfspMetadata.xml file to your desktop.
  18. Copy the wfspMetadata.xml file from your desktop to the following directory on the WebFOCUS machine:
    drive:\ibi\WebFOCUS82\config\was\saml
  19. Click Cancel to close the Service Provider (SP) Metadata Generation dialog box.
  20. Transfer the wfspMetadata.xml file to your identity provider for use in establishing a trusted relationship with your WebFOCUS environment.
  21. Continue with the addition of the identification service provider metadata file to the Edit SAML Authentication Settings dialog box.

    In the rare event that no metadata file is available from the identification service provider, click OK to close the Edit SAML Authentication Settings dialog box and save the Authentication page, as described in, How to Save a SAML Configuration.

Procedure: How to Download and Configure the Identity Provider Metadata File to the SAML Configuration

Before you begin this configuration, ensure that the SAML Identity provider has delivered a metadata file to you.

  1. Download the metadata file delivered to you from the SAML identity provider.
  2. Copy the metadata file from the identity provider to the following location:
    drive:\ibi\WebFOCUS82\config\was\saml
  3. Open the Edit SAML Authentication Settings dialog box, and click the Identity Provider (IDP) Metadata tab.
  4. On the Identity Provider (IDP) Metadata tab, in the Location of the Metadata File field, type the name of the metadata file from the identity provider.

    Use the following format:

    file:{IBI_CONFIGURATION_DIRECTORY}/was/saml/idpMetadata.xml

    where:

    IBI_CONFIGURATION_DIRECTORY

    Is the value that identifies the path from the root directory to the sub-folders that follow this setting, for example:

    drive:\ibi\WebFOCUS82\config\
  5. Accept the default value for all of the remaining settings on the Identity Provider (IDP) Metadata tab.

    Change these settings only if required by your identity provider.

  6. Click the Advanced tab.

    Note: Settings on the Advanced tab are configured automatically when you generate a metafile. Typically, there is no need to adjust these settings. However, you can clear or select the following check boxes, if required.

    1. By default, the Retrieve User Name from SAML Assertion Attribute check box is cleared. If your authentication provider supports this feature, you can activate it by selecting this check box and entering the name of the SAML assertion attribute that contains the user name.

      The user name retrieved from this attribute can be used to support external authorization. For more information, see Understanding External Authorization.

    2. By default, the Retrieve User Groups from SAML Assertion Attribute check box is cleared. If your authentication provider supports this feature, you can activate it by selecting this check box and accepting the member-of default value or entering the name of the SAML assertion attribute that contains the user group name.

      The group name retrieved from this attribute can be used to support external authorization. For more information, see Group Mapping.

    3. By default, the Use SHA256withRSA for Signature Algorithm and SHA-256 for Digest Algorithm check box is cleared. Select this check box if your identity provider either supports the SHA256 hash algorithm, or is configured to use it for the relying party trust.
    4. By default, the Disable Service Provider Initialized Single Sign-On check box is cleared. Select this check box only if you must block single sign-on authentication requests initiated by WebFOCUS, the service provider.
    5. By default, the Redirect to RelayState URL after Successful Sign-On check box is cleared. Select this check box if users are to be redirected automatically to a valid URL identified by their identity provider after a successful sign-in.
  7. Click OK to close the Edit SAML Authentication Settings dialog box, and save your changes.

Procedure: How to Enable SAML Authentication in the Default Zone

When SAML Authentication is enabled in a security zone, all other methods of authentication in that zone must be disabled.

  1. In the Administration Console, on the Security tab, under the Security Zones folder, expand the Default Security Zone folder, and then click Authentication.
  2. On the Authentication page:
    1. Click the Form Based Authentication entry, and then click Disable.
    2. Click the Anonymous Authentication entry, and then click Disable.
    3. Click the SAML Authentication entry, and then click Enable.
  3. Save the Authentication page with the SAML Configuration as described in, How to Save a SAML Configuration.

Procedure: How to Enable the Alternate Security Zone

Enabling the Alternate Security Zone makes form based authentication accessible to administrators when they must bypass SAML authentication for configuration and administration tasks.

  1. In the Administration Console, on the Security tab, click the Security Zones folder.
  2. On the Security Zones page, click the Alternate Security Zone entry, and then, in the Actions section, click Enable.

    The status changes from Disabled to Enabled, and the Alternate Security Zone is ready for use.

Procedure: How to Save a SAML Configuration

  1. In the Actions section of the Authentication page, click Save.
  2. When you receive a confirmation message, click OK.
  3. When you receive a message to reload the web application, click OK.
  4. Sign out of your current session.
  5. Stop and restart the WebFOCUS Server.
  6. Sign in as an administrator, and test the new configuration.
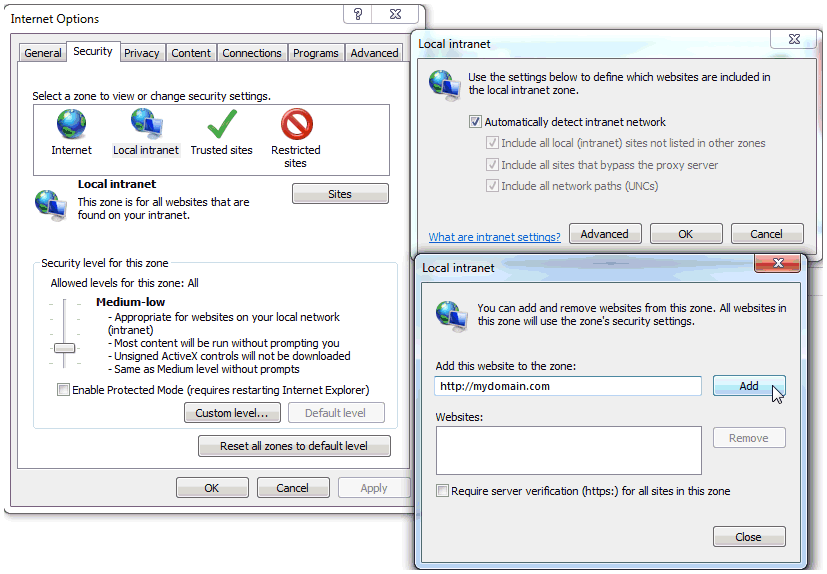
Configuring Trusted Ticket Authentication for Embedded BI Applications

In this section:

How to:

Trusted ticket pre-authentication uses a trusted ticket to authenticate the identity of a user requesting access to WebFOCUS content and resources that are embedded in a trusted Embedded BI (Business Intelligence) Application. WebFOCUS provides this trusted ticket to an Embedded BI Application during the sign-in process.

Trusted ticket authentication makes it possible for users of an Embedded BI Application to take advantage of the single sign on (SSO) capability. It also protects WebFOCUS by ensuring that the resources it provides are only made available to known users who maintain defined roles and access privileges.

To support this method, both the Embedded BI Application and WebFOCUS must maintain records of Embedded BI Application users, and these users must be assigned to groups in the domains that contain the content and resources embedded in the external application. The Embedded BI Application must be configured to send the variables that support trusted ticket authentication, and WebFOCUS must be configured to accept these variables in the Security Zone that supports Embedded BI Applications.

Tracing the Trusted Ticket Authentication Workflow

Trusted ticket authentication requires three exchanges of messages, as shown in the following image.

The trusted ticket workflow from the Web browser user authentication in the Embedded BI Application, to the back channel request for a trusted ticket in WebFOCUS to the trusted sign on request from the external application to WebFOCUS using the trusted ticket.

User Sign-In to the Embedded BI Application

In the first exchange, users sign in to an Embedded BI Application. To sign in, users present credentials, such as a User ID and Password, that identify them as valid users with the authority to work within that application. The Embedded BI Application authenticates their credentials, and begins the work session.

Trusted Ticket Request

In the second exchange, the Embedded BI Application submits an HTTP GET or POST request message for a trusted ticket from WebFOCUS. For example:

GET http://host:port/ibi_apps/service/wf_security_trusted.jsp?IBIB_userid=userone

Note: You can use http:// or https:// for this request.

This second exchange of messages between the Embedded BI Application and WebFOCUS is typically referred to as a back channel request because the connection is established directly between the server hosting the Embedded BI Application and the server hosting WebFOCUS. Therefore, the connection is not seen by the network that runs the web browser of the user.

This trusted ticket request includes one required parameter and two optional parameters.
  • The IBIB_userid parameter is required. It contains the ID of the newly-authenticated user.
  • The IBIB_appname parameter is optional. It contains the name of one of the applications identified in the Application List of the Trusted Ticket Authentication Settings dialog box. It can be included in the trusted ticket request, but if it is not included, and a default application has been identified for the security zone, WebFOCUS uses the default application name specified in the Trusted Ticket Authentication Settings dialog box.
  • The IBIB_useripaddr parameter is also optional. It is required only if the Enable Client IP Matching check box is selected in the Application Settings for Trusted Ticket dialog box for the Embedded BI Application. This parameter contains the IP address of the browser of the user who initiated the sign-on request.

When WebFOCUS receives a trusted ticket request, it determines if the request includes an IBIB_appname parameter. If the request includes this parameter, WebFOCUS ensures that the application is one of the valid applications on the Application List of the Trusted Ticket Authentication Settings dialog box.

If there is no match for the application name in the IBIB_appname parameter, the trusted ticket request is rejected.

If there is a match for the application name, WebFOCUS then compares the IP address of the application requesting the trusted ticket to the list of Accepted IP Addresses for that application. If the IP address is not included in that list, the request is rejected. If the IP address is included in that list, the trusted ticket is created.

If the IBIB_appname parameter is not included in the trusted ticket request, WebFOCUS determines if any of the applications in the list are identified as the default application.

If there is no default application, the request is rejected.

If there is a default application, WebFOCUS determines if the IP Address of the application requesting the trusted ticket is included in the IP Accepted Address list for the default application. If it is not included in the list, the request is rejected. If it is included in the list, a trusted ticket is created.

The trusted ticket contains encrypted information that is utilized by WebFOCUS for the subsequent trusted sign-on request. The trusted ticket takes values from the parameters in the trusted ticket request, including the required IBIB_userid parameter, the optional IBIB_appname and IBIB_useripaddr parameters, and the time at which the ticket was created. Later, in the trusted sign-on request, WebFOCUS uses the encrypted values from these parameters to validate the authenticity of the user and the trusted sign-on request itself. The trusted ticket must be returned to WebFOCUS as part of a trusted sign-on request within the time specified by the ticket validity period for that application. The length of this period is defined in The ticket validity period (seconds) field in the Application Settings for Trusted Ticket dialog box for each Embedded BI Application.

When the trusted ticket is created, WebFOCUS returns it to the Embedded BI Application. This application then returns the trusted ticket to the browser of the user who initiated the sign-on request.

Trusted Sign-on Request

In the third exchange, the browser of the user of the Embedded BI Application submits a trusted sign-on request to WebFOCUS. This request takes the form of an HTTP GET or POST request message to WebFOCUS. For example:

GET http://host:port/ibi_apps/service/wf_security_trusted.jsp

where:

host

Is the name or IP address of the host used to access WebFOCUS.

port

Is the number of the port on which the Web Server or Application Server listens.

This value is optional, and it should be excluded if the URL uses the default port for the protocol it uses in the scheme, which is port 80 for URLs using the http protocol or port 443 for URLs using the https protocol.

Note: You can use http:// or https:// for this request.

This trusted ticket sign-on request includes one required parameter and two optional parameters.

  • The IBIB_ticket parameter is required. It contains the trusted ticket value obtained from the Embedded BI application.
  • The IBIB_appname parameter is optional. It contains the name of one of the applications identified in the Application List of the Trusted Ticket Authentication Settings dialog box. It can be included in the trusted sign-on request, but if it is not included, and a default application has been identified for the security zone, WebFOCUS uses the default application name specified in the Trusted Ticket Authentication Settings dialog box.
  • The IBIB_Destination parameter is also optional. It contains the URL to which WebFOCUS will redirect the user after signing in. This destination can be the WebFOCUS Home Page or a portal that is identified by a relative URL.

When WebFOCUS receives a trusted sign-on request, it ensures that the request arrived within the ticket validity time period defined for the Embedded BI Application of the user that initiated the trusted sign-on request, and that the user making the request exists within WebFOCUS. If the trusted sign-on request occurs after the ticket validity period expires, the request is rejected.

If the request arrived within the ticket validity period, WebFOCUS validates the name of the requesting application, as described in the trusted ticket request validation. If the name provided by the IBIB_appname parameter is not on the Application List, the trusted sign-on request is rejected. If the trusted sign-on request does not include the IBIB_appname parameter, and no default application is identified, the request is rejected.

If the trusted sign-on request passes the validation, WebFOCUS retrieves and decrypts the IBIB_userid, IBIB_appname, and IBIB_useripaddr parameters from the trusted ticket.

If WebFOCUS cannot find an existing account for the user ID identified in the IBIB_userid parameter, it identifies the value in the Account Creation on Sign In setting. If this value is All, a new account for the user is created automatically. This setting can also use the value Off, or Mapped External Groups. For additional information on these configuration options, see AUTOADD.

If the trusted ticket includes the IP Address of the user in the IBIB_useripaddr parameter, and the Client IP Matching check box for the Embedded BI Application is selected, WebFOCUS ensures that the IP address from the trusted ticket matches the IP address of the browser of the Embedded BI Application user who initiated the trusted ticket request. If the IP addresses do not match, the trusted sign-on request is rejected. If the IP addresses match, the trusted sign-on request is accepted.

If WebFOCUS accepts the trusted sign-on request, it opens a session for the user, and directs that user to the destination identified in the IBIB_Destination parameter. The Embedded BI Application can then request content and resources on behalf of this user from WebFOCUS through URL requests or the WebFOCUS RESTful Web Services API.

If the Embedded BI Application must make POST requests that create or update WebFOCUS resources, a Cross-Site Request Forgery (CSRF) token must be obtained from WebFOCUS and submitted with these requests. Typically, the response to a Trusted Sign On Request returns XML that contains a CSRF token name and value pair that can be used for the session.

Using the Alternate Security Zone for Trusted Ticket Authentication

In general, there is no requirement to enable the Alternate Security Zone to support the deployment of Embedded BI Applications. If it is not required, the Alternate Security Zone should remain disabled because it can complicate troubleshooting for trusted ticket authentication configurations.

However, if the Alternate Security Zone must be enabled while supporting trusted ticket authentication, WebFOCUS will first determine if a client request should be processed by the Alternate Security Zone configuration. By default, the Alternate Security Zone is configured to capture requests made to the localhost IP addresses 127.0.0.1 and 0:0:0:0:0:0::1. To create this configuration, enable trusted ticket authentication on the Alternate Security zone, and add the IP address of the host where the Embedded BI Application resides.

Trusted Ticket Authentication Configuration Overview

In this section:

The configuration of trusted ticket authentication requires administrators to configure the Embedded BI application and WebFOCUS to exchange information and authenticate Trusted Ticket requests and Trusted Sign-On requests.

To prepare the Embedded BI Application to support trusted ticket authentication, an Embedded BI Application developer must:

  1. Configure the Embedded BI Application to issue a backchannel request for a trusted ticket to WebFOCUS that includes required identification information for that application.
  2. Configure the Embedded BI Application to issue a front channel sign-on request using the trusted ticket by identifying the address of the WebFOCUS host.

For more information about how to configure the Embedded BI Application to make a trusted ticket request and a trusted sign-on request, see the TIBCO WebFOCUS® Embedded Business Intelligence User's Guide.

This configuration and the information identification delivered by the Embedded BI Application must be available before an administrator can add the external application to the Trusted Ticket configuration within WebFOCUS.

To prepare WebFOCUS to support trusted ticket authentication, an administrator must:

  1. Enable and configure trusted ticket authentication for the Security Zones that will support the Embedded BI Application.
  2. If the Embedded BI Application and WebFOCUS are accessed from different origins, configure Cross-Origin settings for the security zone that will support Embedded BI Applications. For more information, see Configuring Cross-Origin Settings.
  3. When the configuration is complete, restart Tomcat to enable WebFOCUS to accept trusted ticket connections.

Evaluating Trusted Ticket Authentication

The Fintoso Embedded BI demo, which you must install in drive:\ibi\WebFOCUS82\samples\embedded_demo, includes the following two pages that can help you evaluate the Trusted Ticket feature:

  • Create a Trusted Ticket Page:
    http(s):/host:port/embeddemo/tester/create_trusted_ticket.jsp
  • Test a Trusted Ticket Sign-on Request:
    http(s):/host:port/embeddemo/tester/test_trusted_ticket.jsp

where:

host

Is the name or IP address of the host used to access WebFOCUS.

port

Is the number of the port on which the Web Server or Application Server listens.

This value is optional, and it should be excluded if the URL uses the default port for the protocol it uses in the scheme, which is port 80 for URLs using the http protocol or port 443 for URLs using the https protocol.

These pages identify the required and optional fields for each of the two transactions.

For more information about these two pages, see theTIBCO WebFOCUS® Embedded Business Intelligence User's Guide. .

Note: The address of the machine that hosts the browser that issues the request to the create_trusted_ticket.jsp page must appear in the Application List of the Edit Trusted Ticket Authentication Settings dialog box. If this address does not appear, the Create a Trusted Ticket page will not accept the request to create a trusted ticket. For more information about adding the address to this list, see How to Configure Trusted Ticket Authentication.

Procedure: How to Configure Trusted Ticket Authentication

Before you begin, complete the prerequisites for Pre-Authentication. For more information, see Configuring Pre-Authentication, External Authentication or External Authorization.

There may be additional prerequisites, such as configuring WebFOCUS for SSL. For an introduction to the steps required by this configuration, see Configuring WebFOCUS for SSL. For information about other prerequisites, contact Customer Support.

Work with the developer of the Embedded BI Application to configure it to support a trusted ticket request and a trusted sign-on request. For more information, see the TIBCO WebFOCUS® Embedded Business Intelligence User's Guide.

We also recommend that you use the Export command to back up the Security Settings configuration files before making changes to the Authentication page. For more information, see How to Export Security Configuration Files.

  1. In the Administration Console, click the Security tab.
  2. On the Security page, under the Security Zones folder:
    1. If you support Embedded BI Applications in the Default Security Zone, under the Default Security Zones folder, click Authentication, and go to the next step.
    2. If you support Embedded BI Applications in the Alternate Security Zone, under the Alternate Security Zones folder, click Authentication, and go to the next step.

    Note: If you support Embedded BI Applications in both zones, configure trusted ticket authentication for the Default Security Zone first and then configure it for the Alternate Security Zone.

  3. Click the Trusted Ticket Authentication entry, and in the Actions section, click Edit.

    or

    Right-click the Trusted Ticket Authentication entry, and then click Edit.

  4. In the Edit Trusted Ticket Authentication Settings dialog box, accept the default selection of the Check for a change in the principal on each request check box and the Invalidate the existing session based on a change of principal check box.

    These settings are configured to minimize the number of concurrent sessions by signing out an existing user when a new Trusted Ticket sign on request arrives during an open session and signing in the user that sent the new sign on request. We do not recommend that you clear these check boxes.

  5. Click Add, as shown in the following image.
    The Edit Trusted Ticket Authentication Settings dialog box, displaying the Add button next to the Application List.
  6. In the Application Settings for Trusted Ticket dialog box, type the name of the Embedded BI Application in the Application Name field, as shown in the following image.
    The Application Settings for Trusted Ticket dialog box, displaying a new application name.

    Use the same spelling and capitalization as that of the application name that will be delivered in the HTTP Request message.

    Note: To provide increased security, you can create a new certificate, add it to the WebFOCUS keystore, make an alias for it, and then click the name of that alias in the Alias of the Certificate list.

  7. Click Add.
  8. In the Add IP Address Pattern dialog box, type the IP address of the Embedded BI Application in the IP Address Pattern field.

    You can use the IPv4 format, as shown in the following image.

    The Add IP Address Pattern dialog box containing an IP Address in IPv4 format in the IP Address Pattern field.

    Or you can use the IPv6 format, as shown in the following image.

    The Add IP Address Pattern dialog box containing an IP Address in IPv6 format in the IP Address Pattern field.

    Type only one address in the IP Address Pattern field.

  9. When you have entered your address, click OK.
  10. If you need to add additional IP Addresses for the same application, repeat steps 7 through 9.
  11. When you have entered all of the addresses you need, in the Application Settings for Trusted Ticket dialog box, click OK.

    The new embedded application appears in the Application List, as shown in the following image.

    The Edit Trusted Ticket Authentication Settings dialog box with the new application in the Application List.
  12. If you need to add additional applications, repeat steps 5 through 11.
  13. When you have entered all of the applications, in the Edit Trusted Ticket Authentication Settings dialog box, click OK.
  14. On the Authentication page, in the Actions section, click Save.
  15. When you receive a confirmation message, click OK.
  16. When you receive the message to reload the web application, click OK.
  17. Sign out of your current session.
  18. Stop and restart the WebFOCUS Server.
  19. Sign in again as an administrator and test the new configuration.
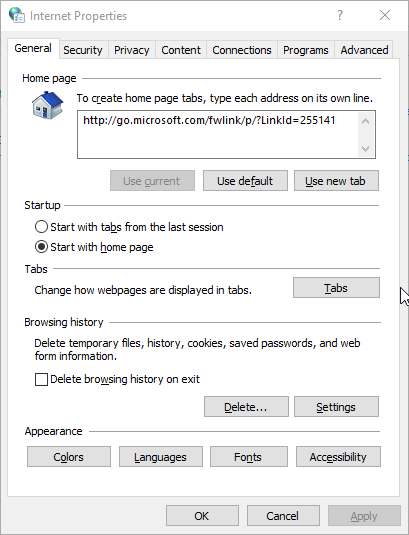
    If the Embedded BI Application and WebFOCUS are deployed on two separate servers, configure WebFOCUS to Allow Embedding for the zones that support Embedded BI Applications. For more information, see How to Allow Embedding for a Security Zone.
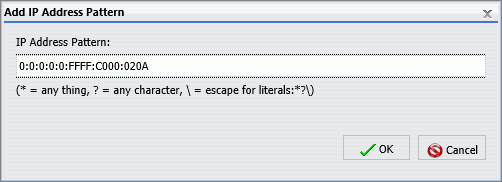
    If the Embedded BI Application must make POST requests that create or update WebFOCUS resources, establish cross-origin resource sharing for the zones that support Embedded BI Applications. For more information, see How to Allow Cross-Origin Resource Sharing for a Security Zone.

Procedure: How to Change the Name of the Cross-Site Request Forgery Token

  1. In the Administration Console, on the Configuration tab, under the Application Settings folder, click Filters.
  2. On the Filters page, ensure that the Cross Site Request Forgery Protection check box is selected.
  3. Ensure that the Cross Site Request Forgery Security Token field contains the value, IBIWF_SES_AUTH_TOKEN.
  4. Click Save.
  5. In the Administration Console menu bar, click Clear Cache.
  6. When you receive a confirmation message, click OK.