Creating a Change Management Package

In this section:

How to:

Reference:

Many organizations do not grant developers write access to the user acceptance test and production environments. Access to these environments is strictly controlled and granted only to administrators, production control personnel, or automated change management processes.

Only developers know which changes are ready to be moved into the test environment. The Change Management Export facility presents developers with a graphical view of the resources they manage and allows them to build a change management package. This package is then loaded into another environment by production control personnel or automated processes.

A user must be authorized to create a change management package. The privilege to do so is Resource Export (opExport), a hybrid privilege, located in the Application Development privilege category. This privilege is assigned to members of the administrators group, by default.

The steps required to create a change management package are:

  1. Create a Scenario. Using the Change Management Export facility, create a Change Management scenario by selecting the resources to export. A scenario is a description of all the resources included in a change management export package.

  2. Export a Scenario. After creating a scenario, export it to the change management export directory as a change management package. The export process produces the package in two formats: a folder and a CM zip file. The folder contains the expanded contents of the change management package. The CM zip file contains the compressed contents of that package in a format that is ready to download and transfer to target environments.

    The change management export directory is located within the file system of the machine that hosts WebFOCUS. The specific path varies by the type of installation used for your instance of WebFOCUS. Typically, this path is drive:\ibi\context\cm\export, where context represents the folders located between the ibi root directory and the cm directory.

  3. Download a Scenario. For convenience, the CM zip file can be downloaded, using a web browser, from the export directory to a location outside of the change management directory. From this external location, the change management zip file is available for transfer to the import directory of the target WebFOCUS environment, where its content can be imported and accessed.

Working With CM Zip Files

The zip file format compresses the resources that make up a change management package into a single file, delivering the advantages of speed and security to change management packages. They are especially useful when you must transfer change management packages from one physical location to another. Their compressed and consolidated format captures all files included in a change management package into a single file that can be emailed, copied, or moved from a source folder on one network component to a target folder on another.

Change management zip files, called CM zip files, are created, by default. To disable this feature, clear the Zip Change Management Package (IBI_CM_ZIP) check box, which is found on the Change Management page of the Configuration tab in the Administration Console. When this feature is disabled, change management packages use the uncompressed CM file format.

The default CM zip file name format is NAME_DATE_TIME_USERID, which combines the name of the change management package, with the date and time on which it was created, and the ID of the user who created it.

For example, retail_samples_20160504_161133_administrator.zip.

To specify an alternative format for CM zip file names, select a template from the Name format of Zip export files (IBI_CM_ZIP_FILE_FORMAT) setting, which is found on the Change Management page of the Configuration tab in the Administration Console.

Including Collaborative Portals in a Change Management Package

If your version of WebFOCUS supports collaborative portals, and the Collaborative Portal option is enabled, the change management process, from scenario creation to final import, readily accommodates collaborative portals. All of the topics that describe how to create, export, download, upload, and import change management packages support those that include collaborative portals as well as basic portals. However, there are a few issues to keep in mind when including collaborative portals.

When selecting a collaborative portal:

When importing a collaborative portal:

Both private and published portals and focexec files can be included in the import package.

Procedure: How to Create a Scenario Using the Change Management Facility

If your browser blocks pop-up windows, disable this feature before you begin using the change management facility, to ensure that you are able to see the dialog boxes that open during this procedure.

  1. On the start page side navigation pane, select Management Center and Export Packages.

    Or

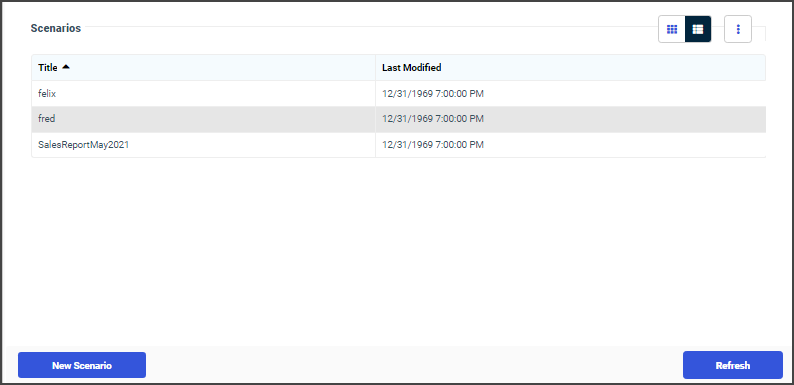
    On the WebFOCUS Home Page, in the banner, open the Utilities menu, and select Change Management and Export to open the Scenarios dialog box, as shown in the following image.
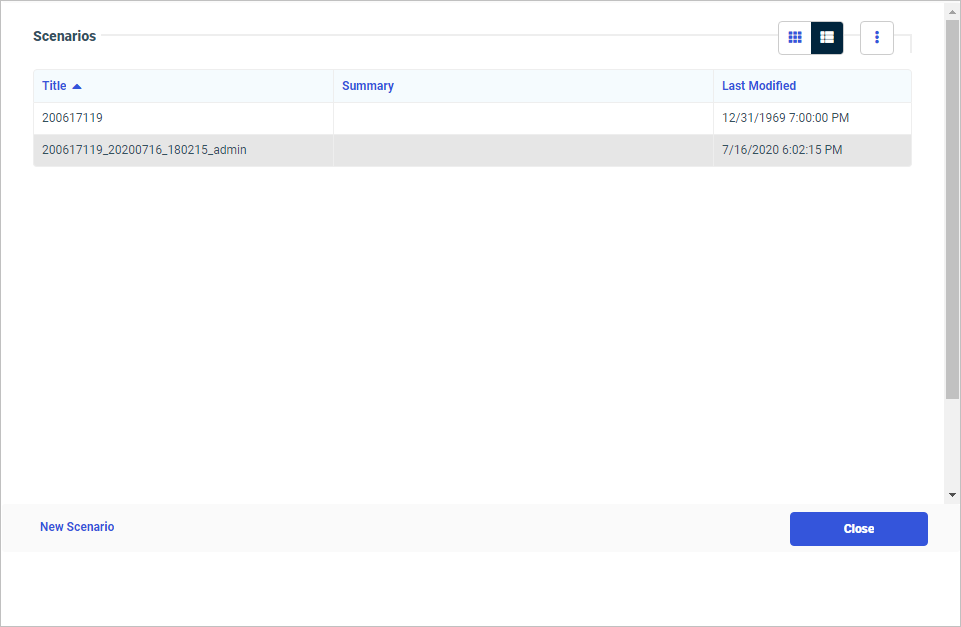
    The Scenarios dialog box, containing a list of existing change management scenarios and the New Scenario link.
  2. Select New Scenario to open the New Scenario dialog box, as shown in the following image.
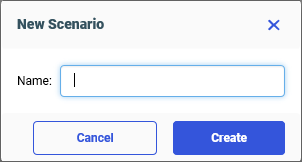
    The New Scenario dialog box with the Name field and the Create button.
  3. In the New Scenario dialog box, enter a name for the scenario, and then select Create to open the Scenario dialog box, as shown in the following image.
    The Scenario dialog box tools bar with the With Rules, Retain Handles, and With Library check boxes.

    The With Rules check box is selected, by default. Clear it only if this change management package should not include all rules associated with the resources you select.

    Note: If you receive an alert in your browser stating that the pop-up window is blocked, reset your browser to allow all pop-up windows from this website, and try again.

  4. To include content that has been migrated from WebFOCUS 7.7 to WebFOCUS 8 or ReportCaster schedules created in WebFOCUS 7.7 that reference procedures through an internal handle in the change management package, select the Retain Handles check box.
  5. To include ReportCaster library content with any folder added to the scenario, select the With Library check box.

    For more information about these three check boxes, see Understanding Change Management Export Options.

  6. In the list of available resources, expand the node that contains the resource you want to include.
  7. Right-click the resource you want to include, and perform the following steps:
    1. Click Select with Sub-Tree to include a folder with all subfolders and their contents, or to include a group with all subgroups in your selection.

      When selecting a collaborative portal that references external pages, you must also select the folder that contains the pages referenced by that portal, and then transfer them into the scenario by clicking the Select with Sub-Tree command.

    2. Click Select Folder Only to include a specific folder, with no content. Typically, this is done to move rules on the folder.
    3. Click Select to include a role, a portal, or an individual resource within a folder.
    4. Click Select Rules Only to include rules from a Group or a WebFOCUS Server node.
    5. You can also select resources by dragging them from the Resources tree and dropping them in the right pane. When you do so, the With Subtree check box is selected, by default, and you must clear it if you wish to exclude subfolders and content from your selection.

    When your selection is complete, an entry for it appears in the right pane, and a strikethrough line appears on the entry under the Resources tree.

    • If you select a private resource, the With Private Content check box is automatically selected and can't be cleared.
    • If you select private content, it will only be imported if the owner of that private content already exists in the target environment.
    • If you select a published folder, you can include private content within it by selecting the With Private Content check box for that resource. This selection exports all of the private content in that folder and its subfolders, including those My Content folders that are assigned to individual users, even if you do not have the privileges necessary to view that private content.
    • If you select a subfolder without a parent folder, the Import process will recreate the parent folder in the target environment. A connection to the same metadata must exist within the target environment as well as the source environment.
    • When selecting a collaborative portal and pages that reference external content, be sure to include that content in the change management package.
    • If the rules on the source and target environments are different, users may have access to private content in the source environment, but be denied access in the target environment. This occurs if users have access to the published folder that contains the private content in the source environment, but do not have it in the target environment.
    • Even if the With Library check box is cleared, you can still include individual Report Libraries in a scenario by selecting them as described in this step.
    • The list of available roles does not include locked roles. Only unlocked roles are available for export in a change management scenario.
  8. Repeat the previous step for any additional resources you want to include in the change management scenario.
  9. To clear your unsaved selections, in the New Scenario dialog box, on the toolbar, click Reset Scenario.
  10. When you have selected all resources, click Save.

    An entry for the new scenario appears beneath the Export node.

    If the new scenario does not appear, right-click the Export node, and then click Refresh.

    To export the change management scenario using command line scripts, navigate to the following location and double-click one of the following commands:

    WebFOCUS82/utilities/cm/cm_export.bat
    WebFOCUS82/utilities/cm/cm_export.sh
Procedure: How to Transfer an Individual Collaborative Portal Page Using the Change Management Interface

If your version of WebFOCUS supports collaborative portals, and the Collaborative Portal option is enabled, you can use the Change Management Interface to transfer a page created for a collaborative portal in one environment to another environment where the same collaborative portal already exists. This procedure applies only to pages created for collaborative portals. It does not apply to pages created for basic portals.

  1. On the start page side navigation pane, select Management Center and Export Packages.

    Or

    On the WebFOCUS Home Page, in the banner, open the Utilities menu, and select Change Management and Export to open the Scenarios dialog box, as shown in the following image.

    The Scenarios dialog box, containing a list of existing change management scenarios and the New Scenario link.
  2. Select New Scenario to open the New Scenario dialog box, as shown in the following image.
    The New Scenario dialog box with the Name field and the Create button.
  3. In the New Scenario dialog box, enter a name for the scenario, and then select Create to open the Scenario dialog box, as shown in the following image.
    The Scenario dialog box tools bar with the With Rules, Retain Handles, and With Library check boxes.

    The With Rules check box is selected, by default. Clear it only if this change management package should not include all rules associated with the resources you select.

    Note: If you receive an alert in your browser stating that the pop-up window is blocked, reset your browser to allow all pop-up windows from this website, and try again.

  4. Right-click the collaborative portal page that you want to transfer to the new environment, and then click Select with Sub-Tree.
  5. Click Save.

    An entry for the new scenario appears beneath the Export node.

    If the new scenario does not appear, right-click the Export node, and then click Refresh.

  6. Complete the transfer of the change management package as described in the remaining topics.

Procedure: How to Open a New Change Management Scenario from the Change Management Scenario Dialog Box

  1. In the Change Management Scenario dialog box, on the toolbar, click Create a new Scenario.
  2. If you receive a message that asks if you want to save the changes you made, click Yes.
  3. Type the name of the new scenario, and click OK.

    A new Change Management Scenario dialog box opens. The current Change Management Scenario dialog box also remains open.

  4. Create the new scenario. For more information see, How to Create a Scenario Using the Change Management Facility.

Procedure: How to Open an Existing Change Management Scenario from the Change Management Scenario Dialog Box

  1. In the Change Management Scenario dialog box, on the toolbar, click Open existing Scenario.
  2. If you receive a message that asks if you want to save the changes you made, click Yes.
  3. In the Open Scenario dialog box, navigate to the existing scenario you want to open and double-click it, or click it and then click Open.

    Your selected Change Management Scenario dialog box opens and replaces the Change Management Scenario dialog box that was on display.

Procedure: How to Export a Saved Change Management Scenario Using the Change Management Facility

Before you can export a change management scenario, you must make sure that you have saved it. You can't export an unsaved change management scenario.

  1. In the Change Management Scenario dialog box Quick Access Toolbar, click Export.
  2. When the confirmation message opens, click OK.

    The new scenario appears in the Resources tree under the Change Management, Export node.

    If the new scenario does not appear, right-click the Export node, and then click Refresh.

Procedure: How to Download a Change Management Package Zip File

The export process saves a CM zip file to the change management export directory, located at drive:\ibi\context\cm\export, where context represents the folders located between the ibi root directory and the cm directory. The download process takes that CM zip file, and downloads it to your local machine. You can then transfer the copy of that CM zip file to another WebFOCUS environment for use as a change management import package.

  1. On the start page side navigation pane, select Management Center and Export Packages

    Or

    On the WebFOCUS Home Page, in the banner, open the Utilities menu, and select Change Management and Export to open the Scenarios dialog box, as shown in the following image.

    The Scenarios dialog box, containing a list of existing change management scenarios and the New Scenario link.

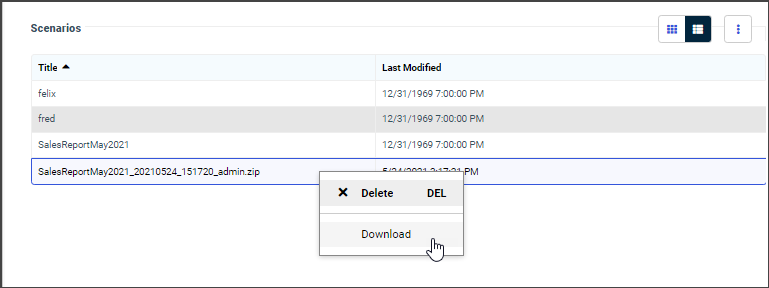
  2. Right-click the CM zip file you want to download and then click Download, as shown in the following image.
    The Scenario shortcut menu with the Download command selected.

    Note: When choosing between two list entries that include the same name, you can distinguish the full change management package from the zip file version by remembering that the name assigned to the zip file includes the name of the change management package from which it was taken, the date and time on which the package was created, and the ID of the user who created it. The name assigned to the full change management package does not contain any of these additional details.

  3. Save the CM zip file to an external location as directed by your browser.
  4. Close the Scenarios dialog box.

Reference: Understanding Change Management Export Options

The following export options are available from the Scenario Creation dialog box:

With Rules. Unselected, by default. When selected, this applies to the entire scenario and exports all rules associated with all of the selected resources. This will include all of the security components of those rules (groups, roles, and potentially users, if the subject of a rule). For example, if a single published folder of Sales is selected and there are rules on that folder for the subject of Sales/Dev Group, that particular folder of Sales will be exported, as well as all the constituent components of the rules on that folder and its subfolders.

Retain Handles. This option is necessary when you want to move content, such as content that has been migrated from WebFOCUS 7.7 to WebFOCUS 8, and ReportCaster schedules, using change management. When selected, this option specifies that the change management package uses the hrefs from WebFOCUS 7.7 as handles in WebFOCUS 8. It also ensures that ReportCaster schedules that were created in WebFOCUS 7.7, which reference procedures through the internal handle, continue to work. This allows the earlier code for -INCLUDEs and drill downs to continue to work with the WebFOCUS 7.7 syntax. ReportCaster schedules created in WebFOCUS 8 use the IBFS location of the Schedule object instead of the Handle and do not need the Retain Handles feature.

The default value for Retain Handles is specified by the Retain Handles (IBI_CM_Retain_Handles) setting.

The following types of resources can be moved:

  • Any folder or item from the /WFC/Repository or what is shown in the user interface as Content, including procedures (FOCEXECs), style sheets, images, HTML files, Schedules, Access Lists, and Distribution Lists.
  • Any group or subgroup. Note that moving a group does NOT move user/group membership, and a subgroup can be moved without moving its parents.
  • Any application or specific files from the WebFOCUS Server node on the tree. The File Types Included in Export Package (IBI_CM_EXPORT_WFRS_FILE_EXTENSIONS) setting specifies which server content is visible and can therefore be exported. This value can be updated to add file extensions that are not included in the default list. The setting is intended only for application content, and not large data files, for performance reasons. If you need to move large data files, it is recommended that you do this by copying the files over from your source to target environment.
  • Business Intelligence Portals.

With Library. When selected, the change management export scenario includes Report Library content in all folders you add to the export scenario. When cleared, the scenario does not include Report Library content in the folders you add to the export scenario. Even when this check box is cleared, you can still select individual Report Libraries for inclusion in a scenario. This check box is cleared, by default.

The Report Library is a secure facility that contains reports distributed to it by ReportCaster. For more information about the Report Library, see the WebFOCUS ReportCaster technical content.

Procedure: How to Run a Change Management Export Scenario Using the Command-Line Interface

Now that you have created a scenario, that scenario can be exported. You can export a scenario through the Change Management User Interface or through an automated process, executed by running one of the cm_export scripts, which are located in the cm folder of the utilities directory, located at drive:\ibi\context\utilities\cm, where context represents the folders located between the ibi root directory and the cm directory.

As part of your preparations, ensure that the code page specified by the value in the ENCODING parameter in the cm_export script matches the encoding value assigned to the Application Server. If there is a mismatch, characters with a hexadecimal value greater than x7F may be corrupted during the export.

To export a scenario from the Create Scenario window, select a saved scenario from the Resources tree and click Save.

To export a scenario using an automated cm_export script, follow the steps in this procedure.

  1. Navigate to the directory containing the cm export utility, typically drive:\ibi\context\utilities\cm, where context represents the folders located between the ibi root directory and the cm directory, and then double-click cm_export.bat for Windows or cm_export.sh for UNIX.
  2. When prompted, type the ID of an administrator who is authorized to export scenarios, and then type the password for that administrator ID.
  3. When prompted, type the name of the change management package you want to export.

    The utility displays the relevant parameters for this job and runs the export.

  4. When prompted, press any key.

    The command prompt window closes and the export process is complete.

As an alternative, you can run the export by creating a command file that contains the following parameter name values:

USERNAME. A WebFOCUS administrator ID.

PASSWORD. The password for the WebFOCUS administrator ID. If you are using a trusted authentication method, leave the password blank.

EXPORTTO. The name of the export folder or the name of the export package. The default name is export.

LOGLEVEL. Optional. The log level for the export. Possible values are:
  • info. Captures only information messages. The default log level is info.
  • debug. Produces maximum tracing.

ENCODING. Optional. A value that represents the code page used by a Change Management Export Scenario to support Java-based character encoding. In order to prevent characters with a hexadecimal value greater than x7F from being corrupted during the export, this value must match the encoding value assigned to the Application Server. The default value for this parameter is UTF-8. If your Application Server uses a different encoding value, you must replace this value with the value used by your server. For a list of client code pages and corresponding encoding value names, review the remarks in the file, cm_export.bat.

For example, the following change management export scenario was written for the Windows operating system. It is named ACWorkspace, and it contains the USERNAME, PASSWORD, and EXPORTTO parameters and their associated values.

C:\ibi\WebFOCUS82\utilities\cm>type cmbatch.bat
cm_export USERNAME=admin PASSWORD=admin EXPORTTO=ACWorkspace
C:\ibi\WebFOCUS82\utilities\cm>

Procedure: How to Upload a Change Management Package Zip File

The zip file upload process saves a copy of a CM zip file stored on your local machine to the change management import directory on the server, located at drive:\ibi\context\cm\import, where context represents the folders located between the ibi root directory and the cm directory. You can then import the copy of that CM zip file to WebFOCUS.

  1. On the start page side navigation pane, select Management Center and Import Packages

    Or

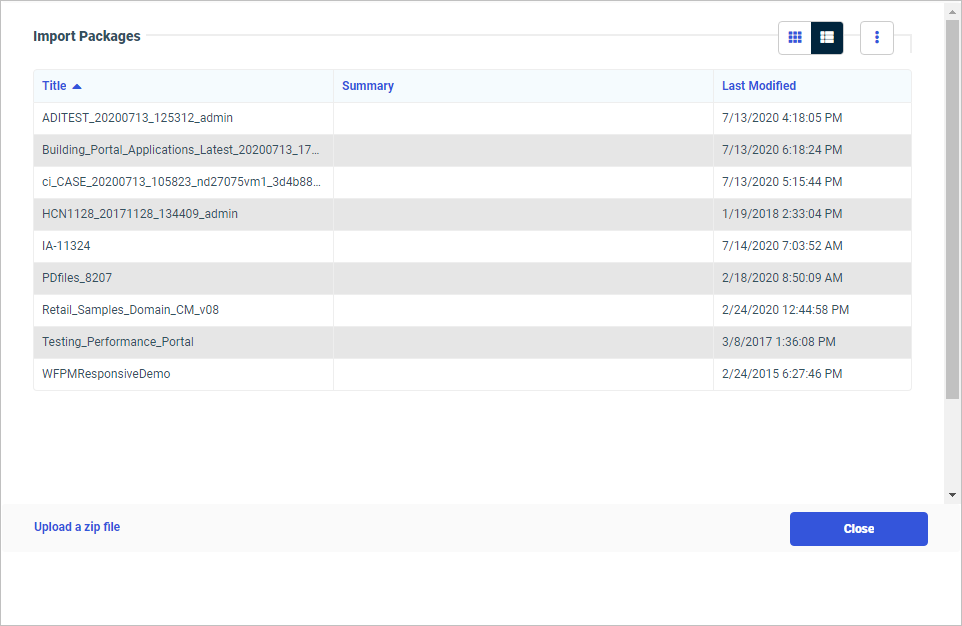
    On the WebFOCUS Home Page, in the banner, open the Utilities menu, and select Change Management and Import to open the Import Packages dialog box, as shown in the following image.

    The Import Packages dialog box with the Upload a Zip File link
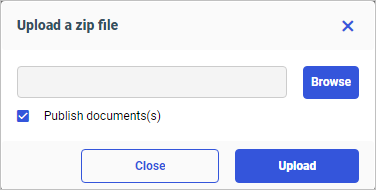
  2. Select Upload a zip file to open the Upload a Zip File dialog box, as shown in the following image.
    The Upload a zip file dialog box with the Name field and the Upload button.
  3. In the Upload a Zip File dialog box, click Browse, navigate to the location where you have saved the change management package, click the CM zip file you want to upload, and then click Open.
  4. Ensure that the correct CM zip file appears in the File to Upload field, and decide whether or not to import files from the package as published or unpublished files.
    • To establish the contents taken from the CM zip file as published after the upload is complete, select the Publish Documents check box. This is the default setting.
    • To establish the contents taken from the CM zip file as private after the upload is complete, clear the Publish Documents check box.
  5. Click Upload.

    A confirmation dialog box opens. Click OK to complete the upload.

  6. When you receive a message confirming that the zip file was uploaded correctly, click OK to complete the upload.
  7. In the Upload a Zip File dialog box, click Close.

    An entry for the new CM zip file appears in the Import Packages dialog box list.

Procedure: How to Import a Change Management Package Using the Change Management Import Facility

  1. On the start page side navigation pane, select Management Center and Import Packages

    Or

    On the WebFOCUS Home Page, in the banner, open the Utilities menu, and select Change Management and Import to open the Import Packages dialog box, as shown in the following image.

    The Import Packages dialog box with the Upload a Zip File link
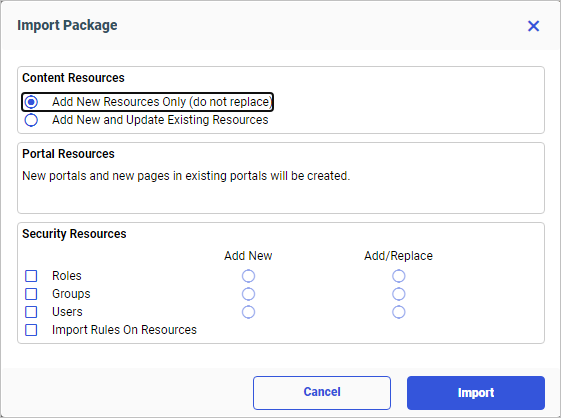
  2. Right-click the CM Zip file you want to import, and then click Import to open the Import Package dialog box, as shown in the following image.
    The Import Package dialog box showing the two Content Resources, Portal Resources, and Security Resources sections.
  3. In the Content Resources group, accept the default selection, Add New Resource Only (do not replace), to limit the change management import to new content resources.

    or

    Select Add New and Update Existing Resources, to enable the change management import to include updates to existing content resources as well as new content resources.

  4. In the Security Resources group:
    1. Select the Roles check box to include Roles in the Change Management Import package.
    2. Select the Groups check box to include groups in the Change Management Import package.
    3. Select the Users check box to include the individual users in the Change Management Import package.

      For each security resource, accept the default selection, Add New, to limit the Change Management Import to new security resources.

      or

      Click Add/Replace, to enable the Change Management Import to include updates to existing security resources as well as new security resources.

    4. Select the Rules on Resources check box to include any new rules assigned to the security resources included in the Change Management Import package.
  5. When the configuration is complete, click Import.

    The import process loads content from the change management package into the folders that match the name and spelling of the corresponding folders in the old environment. If the resources in the change management package are assigned to the same folders and locations as in the existing environment, there are no visible changes.

    However, if you do not see your expected changes, right-click the Workspaces entry in the Resources tree and select Refresh.

Understanding Change Management Import Options

The following import options are available from the Import Package dialog box:

Content Resources

Options in this group define the scope of content resources included in the Change Management Import. Content resources include workspaces, portals, reports, charts, and other features located under the Workspaces node and the Portals node of the Resources tree.

Add New Resource Only (do not replace). This option limits the import to content resources in the Change Management package that do not already exist in the target environment. The import process assigns the date and time of the import to the Created On and Last Modified On fields of all new content resources created as a result of the import. To view the Created On and Last Modified On fields, right-click an item and click Properties.

Resources in the change management package that already exist in the target environment are not included in the import. As a result, the resources in the target environment are not affected by the import, and the import does not update the value assigned to the Last Modified On field.

Add New and Update Existing Resources. This option permits the import to add new resources to the target environment and update existing resources. The import process assigns the date and time of the import to the Created On and Last Modified On fields of all new content resources created as a result of the import. The import also assigns the date and time of the import to the Last Modified on field of all existing items updated by the import, but retains the original values in the Created On field.

Security Resources

Options in this group specify the actions to take if the change management package includes the security resources Roles, Groups, or Users. A change management package includes a security resource if it is selected explicitly, or if the Selecting With Rules check box is selected for another type of resource.

Roles. Groups of user privileges. When included in a Change Management Import package, they add to or update the list of roles maintained in the repository and visible in the Security Center on the Roles tab.

Groups. Collections of users or subgroups that require similar capabilities or access to the same resources. When included in a change management Import package, they add to or update the list of existing groups maintained in the repository and visible in the Security Center on the Users & Groups tab.

Users. Those individuals who have access to WebFOCUS. When included in a change management package, they add to or update the list of existing users maintained in the repository and visible in the Security Center on the Users & Groups tab.

For each of the Security resource categories, there are two options governing the scope of the import:

Import Rules On Resources. This option specifies whether rules are imported from the current change management package, and is only relevant if the package contains exported rules.

As long as none of the security resource options are selected, the rules are imported using the components of the rules that exist in the target environment.

For example, if you select Add New Resources Only (do not replace) and Import Rules On Resources, the only rules that will be imported are the rules where all the components (groups, roles, and, if necessary, users) exist in the target environment.

If you select Add New Resources Only (do not replace) and Import Rules On Resources, and then select Roles (Add New), the resources selected and the rules on those resources will be imported. In this case, the roles will be added only if they do not exist in the target environment and other components of the rules do exist in the target environment.

Procedure: How to Run a Change Management Import Scenario Using the Command-Line Interface

You can import a scenario through the Change Management User Interface, or through an automated process executed by running one of the cm_import scripts, which are located in the drive:\ibi\context\utilities\cm directory, where context represents the folders located between the ibi root directory and the cm directory.

-

As part of your preparations, ensure that the code page specified by the value in the ENCODING parameter in the cm_import script matches the encoding value assigned to the Application Server. If there is a mismatch, characters with a hexadecimal value greater than x7F may be corrupted during the import.

  1. Navigate to the directory containing the cm import utility, typically, drive:\ibi\context\utilities\cm, where context represents the folders located between the ibi root directory and the cm directory, and double-click cm_import.bat for Windows or cm_import.sh for UNIX.
  2. When prompted, type the ID of an administrator who is authorized to import scenarios, and then type the password for that administrator ID.
  3. When prompted, type the name of the import package.
  4. When prompted, select the type of content resources to be imported. The available options are:
    • 1 to Add New Resources Only (do not replace). This is the default.
    • 2 to Add New and Update Existing Resources.
    • Q to quit the import process.
  5. When prompted, select a role import method. The available options are:
    • 1 Skip Roles.
    • 2 Add Roles.
    • 3 Add/Replace Roles.
    • Q to quit the import process.
  6. When prompted, select a group import method. The available options are:
    • 1 Skip Groups.
    • 2 Add Groups.
    • 3 Add/Replace Groups.
    • Q to quit the import process.
  7. When prompted, select a user import method. The available options are:
    • 1 Skips Users.
    • 2 Add Users.
    • 3 Add/Replace Users.
    • Q to quit the import process.
  8. When prompted, select a Rules On Resources import method. The available options are:
    • 1 No.
    • 2 Yes.
    • Q to quit the import process.

    The utility displays the relevant parameters for this job and runs the import.

  9. When prompted, press any key.

    The command prompt window closes and the import process is complete.

Alternatively, you can run the import by creating a command file that contains the following parameter name values.

USERNAME. A WebFOCUS administrator ID.

PASSWORD. The password for the WebFOCUS administrator ID.

IMPORTFROM. Optional. The name of the import folder or the name of the import package. The default name is export.

LOGLEVEL. Optional. The log level for the import. Possible values are:
  • info. Captures only information messages. The default log level is info.
  • debug. Produces maximum tracing.

ENCODING. Optional. A value that represents the code page used by a Change Management Import Scenario to support Java-based character encoding. In order to prevent characters with a hexadecimal value greater than x7F from being corrupted during the import, this value must match the encoding value assigned to the Application Server. The default value for this parameter is UTF-8. If your Application Server uses a different encoding value, you must replace this value with the value used by your server. For a list of client code pages, and corresponding encoding value names, review the remarks in the file, cm_import.bat.

resOverwrite. Optional. Indicates whether to import content resources. The default is not to import content resources.

importRoles. Optional. Indicates whether to import roles. The default is not to import roles.

importGroups. Optional. Indicates whether to import groups. The default is not to import groups.

importUsers. Optional. Indicates whether to import users. The default is not to import user.

importRules. Optional. Indicates whether to import rules on resources. The default is not to import rules.

For example, the following change management import scenario was written for the Windows operating system. It is named ACWorkspace, and it contains the USERNAME, PASSWORD, and IMPORTFROM parameters and their associated values.

C:\ibi\WebFOCUS82\utilities\cm>type cmbatch.bat
cm_import USERNAME=admin PASSWORD=admin IMPORTFROM=ACWorkspace
C:\ibi\WebFOCUS82\utilities\cm>