Configuring a Security Provider on the TIBCO WebFOCUS Server

In this section:

Reference:

When you configure pre-authentication, external authentication, or external authorization, the WebFOCUS Client uses the security providers configured on the WebFOCUS Server (WFRS) to query the external source for information about users. The security provider may be LDAP or Active Directory, or it may use a custom method of authentication or authorization, such as authenticating users to a web service or authorizing them based on information stored in a table in a relational database management system (RDBMS).

The WebFOCUS Server supports multiple concurrent security providers. You must always configure a primary provider and may optionally configure one or more secondary providers. It is recommended that you authorize WebFOCUS users through the primary provider.

When you install the WebFOCUS Server, PTH (internal authentication) is automatically configured as the default security provider. In order to see this default configuration in the Server browser interface, you must start the WebFOCUS Server with the Start Security ON command. You can use the PTH Server Administrator that is automatically created during installation to configure the external sources that you plan to use for pre-authentication or external authentication. Once you have configured your preferred method of authentication, it is recommended that you configure PTH as a secondary security provider. This ensures that you can access the Server browser interface even if the primary provider is unavailable.

PTH can also be useful as the security provider for the WebFOCUS Server service account used to communicate with the WebFOCUS Client. Governance policies often require that passwords in the external source be changed on a regular basis and never be stored in configuration files, prohibiting the use of a non-expiring password for an account that belongs to the primary service provider. To avoid the necessity of managing updates to the service account password, you can specify a PTH account that does not exist in the external source and give the account the Server Administrator role and a password that is set never to expire.

Note: When you do not specify the provider for a user account, it is treated as an account from the primary provider. To use multiple WebFOCUS Server security providers for authentication, prefix the WebFOCUS user ID with the secondary security provider name for any individuals associated with it. For example, if the WebFOCUS Server has two LDAP providers, a primary provider named ldap01 and a secondary provider named ldap02, then the user accounts ldap01\user1 and ldap02\user2 must be created in WebFOCUS as user1 and ldap02\user2, respectively.

Configuring an LDAP or Active Directory Security Provider on the TIBCO WebFOCUS Server

In this section:

How to:

To configure a new LDAP or Active Directory security provider, you create the provider, set up user search and group search, and configure the security provider to allow trusted connection from other applications. You may also want to change its status to primary provider or secondary provider, since new providers are automatically configured as inactive.

Note: You can change properties by right-clicking the provider name to access the Security Configuration pane.

Procedure: How to Configure an LDAP Security Provider on the TIBCO WebFOCUS Server

  1. Open the Access Control page of the Server browser interface. If prompted, sign in with a valid Server Administrator User ID, Password. and select a Security Provider, if the Security Provider list appears on the Sign in page.
  2. Under Security Providers, right-click LDAP, and then click New.

    Or

    On the banner, select Security Providers, New Provider, and LDAP.

    The LDAP Security Configuration tab opens.

  3. Click Continue, and then type your provider name in the LDAP_PROVIDER field.

    This name appears as the vendor name in the Access Control navigation pane.

  4. Complete the Connection section fields as follows:
    • In the ldap_host field, type the name of the LDAP host.
    • In the ldap_port field, accept the default value or type the dedicated LDAP port number.
    • In the Security list, accept the Anonymous or Windows security - NEGOTIATE option, which appears by default, if you use an anonymous bind or if you use a Windows-specific API to authenticate your connection to the LDAP Security provider.

      Select Explicit if you use an explicit bind to authenticate your connection to the LDAP Security provider. This bind is performed under the account that is defined by the configuration parameters ldap_principal and ldap_credentials. Type the name of the service account in the ldap_principal field and its nonexpiring password in the ldap_credentials field.

      Note: The Explicit option is recommended when integrating the WebFOCUS Reporting Server with WebFOCUS Client security.

    • In the ldap_search_timeout field, accept the default value of 60 seconds or type the number of seconds duration for LDAP searches.
  5. Click Next.

    The page refreshes and expands the User Search section. The Group Search, Trusted Connections, and Environment sections also appear in collapsed form.

  6. The WebFOCUS Server connects to the user directory and determines its vendor and version number, then fills in the typical default values for that directory in the User Search window and the Group Search window.
    Note:
    • If the fields for a specific window are not visible, click the down arrow on the separator bar for that window to open.

    • If your directory does not use the default values for its type, consult your AD or LDAP administrator for the appropriate settings.

  7. When the values for the User Search configuration and the Group Search configuration are entered, click Test User Authentication.

    The Testing LDAP Security dialog box opens.

  8. Type the LDAP user name and password of any account in the external directory, then click Continue.

    If the credentials are successfully authenticated, the WebFOCUS Server displays the list of LDAP or Active Directory groups found for the user. If you are using a custom attribute, the WebFOCUS Server displays the attribute values for this user.

    If the credentials are not successfully authenticated, you receive an error message that provides details.

    Note: The test typically finishes within a second. If the results are slow to appear, check with your directory and network administrators to ensure that the connection, user, and group configuration settings are optimal for your environment.

  9. Close the Test Results dialog box. If you would like to configure this security provider to accept trusted connections, click the Trusted Connections separator bar and set trust_ext to y.
  10. Click Save.

The Activate Providers pane appears. The new provider appears in the list of security providers as an inactive provider.

Understanding LDAP Security Provider Properties

Reference:

You must specify connection properties, user properties, and group properties for each LDAP provider configured.

Reference: Understanding LDAP Connection Properties

LDAP_PROVIDER

Specifies a name for the LDAP provider.

ldap_host

Is a host identifier consisting of a host name or an IPv4 dotted string representing the IP address of the host running the LDAP server.

Alternatively, the entry for the ldap_host field may consist of a list of space-delimited host identifiers. Each host identifier may include a trailing colon and port number. When more than one host identifier is specified, each host identifier will be contacted in turn until a successful connection is established.

The following examples are all valid values for the ldap_host setting:

directory.example.com
192.0.2.0
directory.example.com:1050 people.catalog.com 192.0.2.0
ldap_secure_connection

Specifies whether the WebFOCUS Server uses a Secure Socket Layer (SSL) connection to the LDAP server. The default value is No.

An LDAP security provider supports SSL API calls to establish an SSL/TLS connection. Using Server authentication only, the WebFOCUS Server initiates API calls to verify that the LDAP server being connected to is the same server that provided certification.

If you select IBM, Sun, or Novell as your ldap_lib_vendor and specify an SSL connection, additional options appear:

  • For Sun and IBM, ldap_ssl_certificate appears.
  • For Novell, ldap_ssl_certificate and ldap_ssl_certification_encoding appear.
ldap_ssl_certificate

Specifies the LDAP attribute that the API uses to establish the SSL/TLS connection. Values depend on the LDAP vendor, as follows:

  • Novell API. Specifies the file name, including the path, of the Trusted Root Certificate that the LDAP server provides for authentication.
  • Sun/Netscape API. Specifies the path to cert7.db, the Netscape certificate database, excluding the file name, that the LDAP server provides for authentication.
  • IBM API. Specifies the file name, including the path, for ldapkey.kdb (the IBM database file that the LDAP server provides for authentication). The ldapkey.sth password stash file should be in the same directory.

    Note: SSL requires Global Security Kit (GSK) libraries in addition to IBM LDAP client libraries. GSK must be installed on Windows machines.

  • Microsoft API. Ignores the ldap_ssl_certificate configuration, which is not used in an Active Directory. The server certificate should be installed in a certificate store.
ldap_ssl_certification_encoding

For Novell, specifies the standard used to encode the certificate. Encryption and file format depend on API vendor specifications. The options are B64 and DER.

ldap_port

Is a positive integer that defines the TCP port number used to connect to the LDAP server. Note that ldap_port is ignored for any host identifier which includes a colon and port number. The default port is 389 or 636 (for SSL connections).

security
Determines the type of bind used.
  • Anonymous or Windows security - NEGOTIATE

    No credentials are required. This is the default value.

    If the Server is installed on a Windows machine, the bind defaults to NEGOTIATE when this option is selected. Otherwise, the bind is anonymous.

    In negotiation, a Windows-specific API authenticates WebFOCUS Server connections against Active Directory. The bind is performed by the current Windows user (the Windows account that started the Server). The Windows machine that hosts the WebFOCUS Server should be in the same domain as the Active Directory server.

  • Explicit

    The bind is performed by the account defined by the ldap_principal and ldap_credentials settings.

Note:
  • The Explicit option is recommended when integrating the WebFOCUS Reporting Server with WebFOCUS Client security.

  • When connecting to Active Directory using Explicit or Anonymous or Windows security - NEGOTIATE, the default value for ldap_user_attribute is sAMAccountName. You can customize this as desired.

ldap_principal

Specifies the name of the service account.

Note: This setting is visible only when the security setting is Explicit.

ldap_credentials

Specifies the password of the service account. It is recommended that this password be nonexpiring.

Note: This setting is visible only when the security setting is Explicit.

ldap_search_timeout

Specifies how long (in seconds) LDAP searches can last before they time out.

ldap_referrals

Specifies if child domains should be searched following the referrals returned by the root domain. The default value is No.

ldap_gchost

Specifies the Active Directory Global Catalog host name.

ldap_gcport

Specifies the Active Directory Global Catalog port. Note that ldap_gcport should be chosen in pair with ldap_port. Either a non ssl-pair(389/3268) should be used or an ssl pair(636/3269). If a value is assigned to this field, it must be a positive integer.

If you select OpenLDAP on LINUX, the additional properties of ldap_libldap and ldap_liblber also appear. Both properties specify the names of OpenLDAP libraries that the Server loads at run time. The path to the libraries must be available to the Server at run time, when you will be prompted to specify the library names. If you do not supply names at that time, the library names entered in ldap_libldap and ldap_liblber will be used.

Reference: Understanding LDAP User Properties

ldap_user_base

Specifies the DN of the entry that serves as the starting point for the LDAP server search for users.

ldap_user_scope

Specifies where the WebFOCUS Server starts to search through the LDAP directory for users. Options are:

Subtree. Search everything under the base DN. This is the default value.

Onelevel. Search only entries one level down from the base DN.

Base. Search only the base DN.

ldap_user_class

Specifies the object class used when searching for user entries.

ldap_user_attribute

Specifies the attribute used when searching for user entries. A common reason to change the default value is to allow users to sign in with an email address instead of a user ID. To do this, you would set the LDAP_user_attribute to mail or userPrincipalName (if this corresponds with the name of the appropriate attribute in your directory).

ldap_user_group_attribute

Specifies the attribute used to identify a group in a user object.

ldap_user_description

Specifies the attribute whose value contains the description of an object (user, group).

ldap_user_email

Specifies the attribute that contains the email address of the user.

Ldap_user_class, ldap_user_attribute, ldap_group_class, ldap_group_attribute are parameters that form a search filter. The search filter standard syntax conforms to the following structure:

 (&(Property_Name=Property_Value)(Property_Name=Property_Value))

If you change the value of the ldap_user_class and ldap_group_class parameters to an asterisk (*), the search filter syntax can be reduced to the following simplified form (although group support will not work properly):

(Property_Name=Property_Value)

By specifying an asterisk for these parameters, you achieve a simplified search filter syntax, but disable group support.

Reference: Understanding LDAP Group Properties

ldap_group_base

Specifies the DN of the entry that serves as the starting point for the LDAP server search for groups. Ldap_group_base consists of name-value pairs separated by commas.

ldap_group_scope

Specifies where the WebFOCUS Server starts to search through the LDAP directory for groups. Options are:

Subtree. Search everything under the base DN. This is the default value.

Onelevel. Search only entries one level down from the base DN.

Base. Search only the base DN.

ldap_group_class

Specifies the object class used when searching for group entries. The default value for LDAP is groupofuniquenames. The default value for Active Directory is group.

ldap_group_attribute

Specifies the attribute used to identify the name of the group. The default is cn.

ldap_member_attribute

Specifies the attribute used to identify users in a group. The default value is uniqueMember. The default value for Active Directory is Member.

ldap_nested_groups

Enables LDAP nested groups support. The default value is No, which disables nested group support.

ldap_group_description

Contains additional information about the ldap group.

Configuring a Custom RDBMS Security Provider on the TIBCO WebFOCUS Server

How to:

Reference:

User information can be retrieved from a relational database management system (RDBMS). For example, you may want to retrieve email addresses, descriptions, and user authorizations from an existing database, rather than re-creating them in WebFOCUS. The information can be retrieved with SQL queries or with SQL stored procedures, but in either case, you create custom FOCUS procedures to get the information.

External authorization from an RDBMS table requires two FOCUS procedures. A third procedure is required if you will be authenticating users against information in the RDBMS as well. If the RDBMS does not contain user authentication information, configure the WebFOCUS Client to pre-authenticate users to identify them for external authorization. For more information about pre-authentication, see Configuring Pre-Authentication.

To enable the custom server security provider, you need to provide code that allows the WebFOCUS Server to perform the following tasks:

Synonyms used by custom provider procedures should be moved to the directory EDACONF/catalog/custom. The WebFOCUS Server will protect adapter connections used by custom procedures by denying access to these connections by users who are not Server Administrators.

Procedure: How to Configure a Custom RDBMS Security Provider on the TIBCO WebFOCUS Server

  1. Open the Access Control page of the Server browser interface. If prompted, sign in with a valid Server Administrator User ID, Password. and select a Security Provider, if the Security Provider list appears on the Sign in page.
  2. In the Access Control navigation pane, under Security Providers, right-click CUSTOM, and then click New.

    Or

    In the banner, select Security Providers, New Provider, and CUSTOM.

    The CUSTOM Security Provider Configuration tab opens.

  3. Type the custom security provider name in the CUSTOM_PROVIDER field.

    Note: We recommend that this name be all lowercase.

  4. Specify the procedures that the WebFOCUS Server will use to retrieve information.
    1. If the custom provider will support authentication, type the fully qualified name of the procedure that will authenticate users in the cust_authenticateuser box, for example, _edaconf/catalog/custom/wfsqlauthn. If WebFOCUS will be pre-authenticating users, leave the box blank.
    2. Type the fully qualified name of a procedure that will return information about users in the cust_usersbygroup box, for example, _edaconf/catalog/custom/wfsqlusers.
    3. Type the fully qualified name of a procedure that will return information about groups in the cust_groupsbyuser box, for example, _edaconf/catalog/custom/wfsqlgroups.
    4. In the cust_service list, click the WebFOCUS Server data service under which the procedures that return user information will run.
    5. To configure this security provider to accept trusted connections, click y in the trust_ext list.
  5. Click Test and enter the name and password of any user whose information is stored in the database, then click Test again.

    If the procedure retrieves the information successfully, the WebFOCUS Server responds that the user information is valid.

    If the credentials are not successfully authenticated, an error message provides details.

    Note: The test typically finishes within a second. If the results are slow to appear, check with your directory and network administrators to ensure that the connection, user, and group configuration settings are optimal for your environment.

  6. Close the Test Results dialog box and click Save.

The Activate Providers pane appears. The new custom provider appears in the list of security providers as an inactive provider.

Reference: Custom Security Provider Properties

When you configure a new custom security provider, you enter values for the following properties:

CUSTOM_PROVIDER

Specifies a name for the custom provider. By default, this setting displays the value custnn

Where:

nn

Is the two-digit sequence number of the provider.

cust_authenticateuser

Is the name of the procedure that authenticates users.

If you prefer, you can specify a default Server Administrator user ID and password to use when connecting to the WebFOCUS Server, instead of using an authentication procedure.

For information about creating an authentication procedure, see the TIBCO WebFOCUS® Reporting Server Administration manual.

cust_usersbygroup

Is the name of the procedure that returns the list of all users or, if the group name is passed to the procedure, the list of all users in the group.

For information about creating a procedure that returns users, see the TIBCO WebFOCUS® Reporting Server Administration manual.

cust_groupsbyuser

Is the name of the procedure that returns the list of all groups or, if a user ID is passed to the procedure, the list of all groups for the user ID. For information about creating a procedure that returns groups, see the TIBCO WebFOCUS® Reporting Server Administration manual.

cust_service

Is the name of the WebFOCUS Server data service under which the procedure used to retrieve user information runs. This can be a service that already exists or a custom service you create in the Data Services tab.

cust_hashpsswrd

Specifies whether the custom provider requires the use of a hash password to authenticate the connection. The default value is no.

trust_ext

Specifies whether the WebFOCUS Server accepts trusted connections. The default value is no.

Changing the Security Provider Configuration

How to:

A Server security provider can be assigned a primary, secondary, or inactive status. Only one security provider can be identified as a primary security provider. All other active security providers are identified as secondary. Any other security providers that are configured but not in use are inactive. When you do not specify a security provider for a user account, it is treated as an account from the primary provider.

When you change the status of the primary security provider, one of the other secondary security providers must be identified as the new primary security provider. If you do not select a new security provider to replace the existing primary provider the WebFOCUS Server identifies a new primary security provider automatically.

When changing security providers, we recommend that you always retain PTH<Internal> as a secondary security provider. This practice ensures that administrators can obtain access to the WebFOCUS Server, even if the primary security provider becomes unavailable.

We also recommend that you maintain a backup copy of the current version of the admin.cfg file, located in drive:\ibi\profiles\. This file contains PTH user information. You can use the backup copy to restore the PTH security provider if the main admin.cfg file becomes corrupted.

Procedure: How to Register a User Account as a Server Administrator

WebFOCUS registers a Server Administrator account for the PTH (Internal) security provider during installation. You may wish to register additional users or groups as Server Administrators, either for those providers or for other providers you add later.

At least one of the active security providers in your configuration must have a registered Server Administrator account. However, you can designate any security provider to be the primary security provider even if no Server Administrator account is registered to it.

  1. Open the Access Control page of the Server browser interface. If prompted, sign in with a valid Server Administrator User ID, Password. and select a Security Provider, if the Security Provider list appears on the Sign in page.
  2. On the Access Control page, select Register and Register User to open the User Registration tab, as shown in the following image.
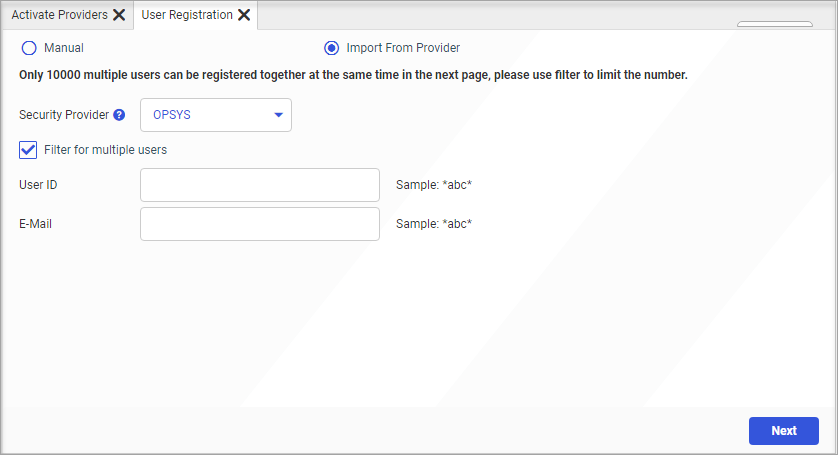
    The User Registration page, displaying the Provider, the User ID, and the Password fields.
  3. Select Manual to open the manual version of the User Registration tab, as shown in the following image.
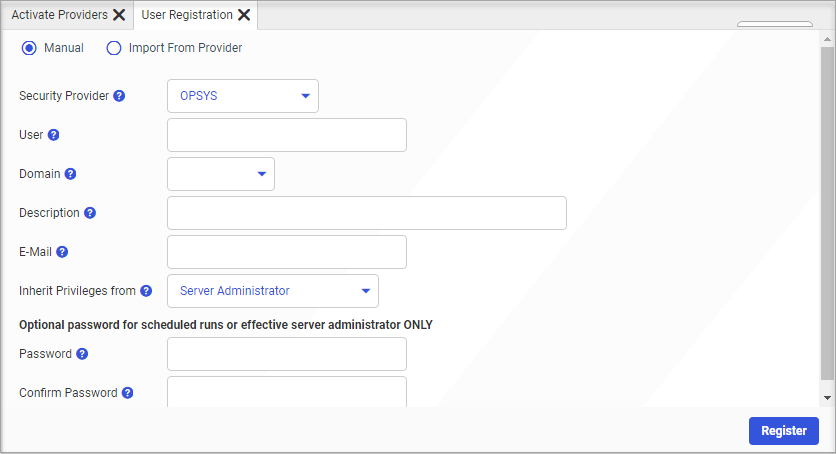
    The manual version of the User Registration tab for the PTH Internal security provider.
  4. Select the Security Provider to which the new Server Administrator will be assigned.

    The page refreshes to conform to the layout for your selected provider. This layout is the same for each provider with a few minor variations as noted in the following steps.

  5. Enter the User ID of the new Server Administrator.

    Note: Use the domain name\user ID format if required.

  6. If you selected the OPSYS Security Provider, select a Domain name for the user.
  7. Enter an optional Description for the Server Administrator if you wish.
  8. Enter the email address where notifications for this user are to be delivered.
  9. Accept the default value of Server Administrator in the Inherit Privileges from list.

    Select a different Server Role only if required to do so. For more information about Server Roles, see the Server Administration technical content.

  10. If you selected the PTH<Internal> security provider, enter a password for this administrator in the Password and Confirm Password fields. If you selected a different security provider, this password is optional.

    Note: The WebFOCUS Server uses this password when conducting scheduled report distribution runs.

  11. When your configuration is complete, select Add and Register, in the PTH<Internal> Security Provider version of the dialog box, or select Register, in any other version.
  12. When you receive a message saying the New User will be added, select OK.
  13. After the User Registration page refreshes, confirm that the ID and additional information of the newly-registered user appears on the page.

Procedure: How to Configure a New Primary Security Provider

Before you begin: Ensure that you have created a security administrator for the new primary security provider as described in How to Register a User Account as a Server Administrator. You will be unable to access the Reporting Server browser interface after designating a new primary security provider if you do not have an administrator for it.

  1. Open the Access Control page of the Server browser interface. If prompted, sign in with a valid Server Administrator User ID, Password, and Security Provider, if the Security Provider list appears on the Sign in page.
  2. Identify the entry for the new primary security provider, select Primary in the Status list, as shown in the following image.
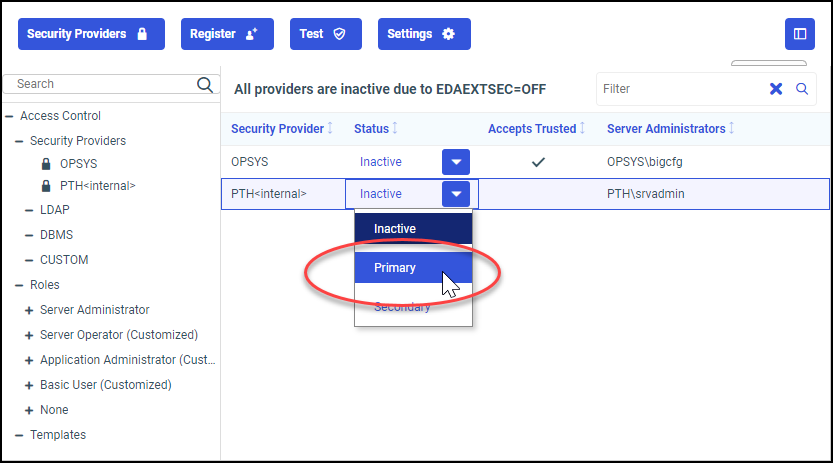
    The Security Providers tab with the Status Selection list displayed and the Primary value selected.

    If you previously selected a Primary security provider, the status of that provider automatically changes to Secondary.

  3. Review your revised configuration, and select Save, as shown in the following image.
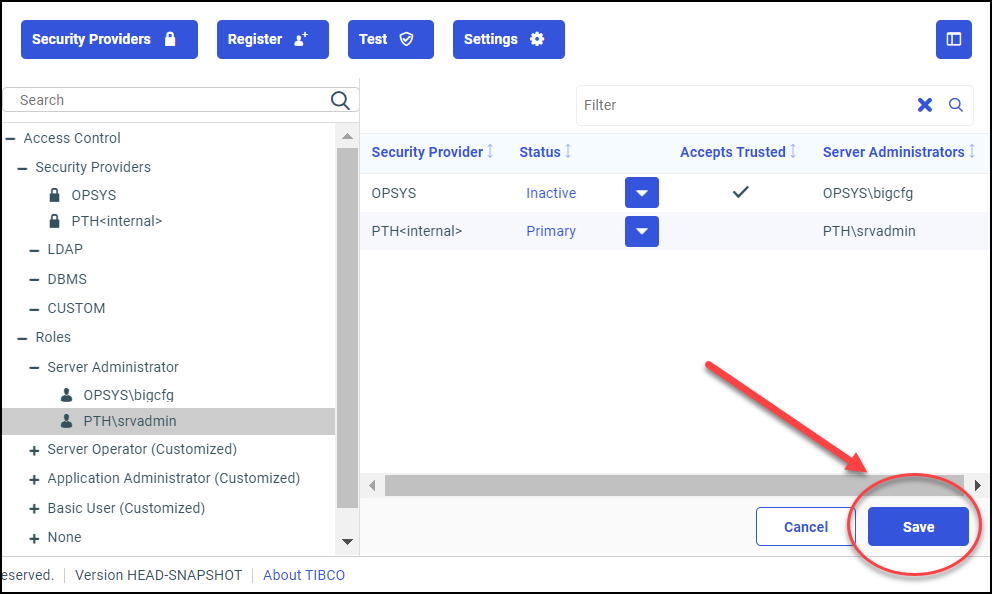
    The Security Providers tab displaying the Save button and Cancel button.
  4. Review the confirmation page, and select Apply and Restart Server, as shown in the following image.
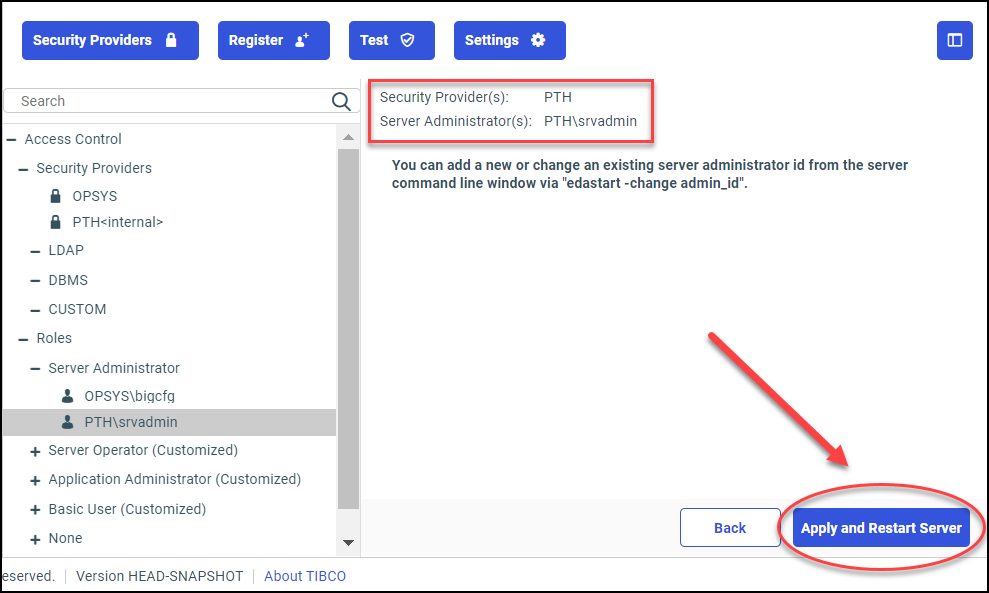
    The confirmation page for the new primary security provider including an identification of the Security Administrator.

    The WebFOCUS Server displays a message notifying you that it is restarting.

    Note:
    • The WebFOCUS Server must always be restarted manually when you make OPSYS the primary provider.
    • If the browser displays the Workspace restarting message for more than 30 seconds, close and re-open the browser. You should now be able to sign in to the Server browser interface.
    • If the new primary provider did not identify a Server Administrator, the WebFOCUS Server notifies you that it is adding a new provider and asks you to register a Server Administrator for the provider. You can register the new Server Administrator as described in How to Register a User Account as a Server Administrator.
  5. After the WebFOCUS Server restarts, sign in with the user ID and password of the Server Administrator of the new primary security provider. The Applications page opens in response.
  6. Perform one of the following steps to navigate to the Access Control page.
    • If you are on the Hub, refresh the browser to redisplay the Access Control Page.
    • If you are in the Server browser interface, select Tools and Access Control to return to the Access Control page.
  7. In the list of Security Providers on the Access Control page, confirm that the new status appears next to the Security Provider name, as shown in the following image.
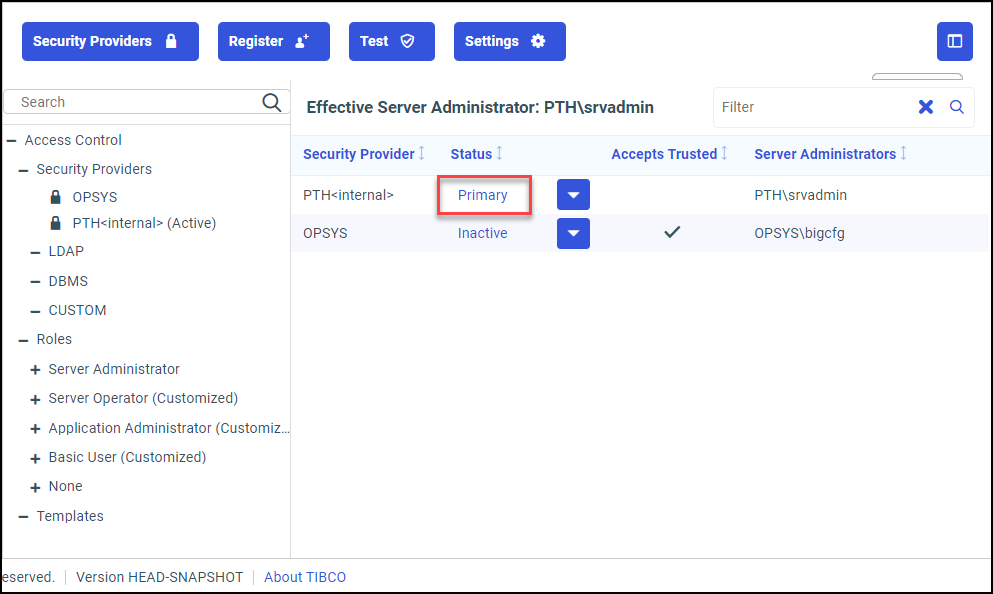
    The Security providers tab showing PTH<Internal> as the new primary provider and OPSYS as an inactive provider.

Procedure: How to Change the Status of a Security Provider

Before you begin: Ensure that you have created a security administrator for the new primary security provider as described in How to Register a User Account as a Server Administrator. You will be unable to access the Reporting Server browser interface after designating a new primary security provider if you do not have an administrator for it.

Only one Security Provider can be identified as the Primary Security Provider within the WebFOCUS Server configuration. Therefore, when you replace an existing primary security provider with a different security provider, the existing primary security provider automatically becomes a secondary security provider.

When changing security providers, we recommend that you always retain PTH<internal> as a secondary security provider. This practice ensures that you can continue to access the WebFOCUS Server, even if the primary security provider becomes unavailable.

  1. Navigate to the Access Control page of the Server browser interface. If prompted, sign in with a valid Server Administrator User ID, Password. and select a Security Provider, if the Security Provider list appears on the Sign in page.
  2. For each security provider you want to change, perform one of the following steps:
    1. Select Primary to activate the provider as the primary security provider.

      Note: If another security provider is already identified as the primary security provider, the status of that security provider automatically changes to Secondary.

    2. Select Secondary to activate the provider as an alternative security provider.
    3. Select Inactive to deactivate the provider.

    The tab refreshes after each selection.

  3. When the tab refreshes, click Save.
  4. Review the confirmation message prompting you to confirm that the designated security administrator ID is valid within your newly chosen Primary Security provider, and select Apply and Restart Server.

    Note: If you have activated the OPSYS security provider but have not yet identified a Server Administrator for OPSYS, you receive a message prompting you to register a Server Administrator for the OPSYS security provider, follow the steps described in How to Register a User Account as a Server Administrator.

    If you do not receive this message, continue with the following step.

    The WebFOCUS Server displays a message notifying you that it is restarting.

  5. When you receive a message that the WebFOCUS Server is restarting, wait until the WebFOCUS Server has started again.
    Notes:
    • The WebFOCUS Server must always be restarted manually when you make OPSYS the primary provider.
    • If the browser displays the Workspace restarting message for more than 30 seconds, close and re-open the browser. You should now be able to sign in to the Server browser interface.
  6. If prompted, sign in to the WebFOCUS Server again with a valid Server Administrator User ID, Password, and Security Provider.
  7. On the Home Page of the Server browser interface, select Tools and Access Control to open the Access Control page.
  8. In the list of Security Providers on the Access Control page, confirm that the new status appears next to the updated Security Provider names.

Reference: Security Provider Calls

The following table lists the requests that are used to retrieve security information from the WebFOCUS Server.

WebFOCUS Request

(shown in event.log)

Corresponding Server Message

Definition

getProviders()

get all providers

Retrieves the security providers configured on the WebFOCUS Server node that is used for external authentication or authorization.

authConnect

authenticate and get user info, u=userid

When your installation is configured to use external authentication, authenticates users and retrieves user descriptions and email addresses from the security provider.

getGroupsForUser()

get groups, u=userid

Retrieves external group memberships or other external authorization information for a user. Also generates group membership reports for users in the Security Center.

getUsersForGroup()

get users, g=group

Retrieves the users who belong to a mapped group.

getGroups() [mask:searchstring]

get groups, [g=searchstring,] provider=providerName

Retrieves external groups or other attributes used for external authorization when you click the Browse button in the Edit Group dialog box.

getUsers()

get user info, u=userid, provider=providerName

Retrieves the user description and email in pre-authenticated configurations.