Launching a Portal with Parameters

How to:

You can launch a Designer portal with an added benefit of passing parameters to its content across all pages. This feature is useful when you need to narrow large sets of data or in cases when a focus on a specific element is needed. Furthermore, you can save your modified parameterized portal as a URL in your repository for easy reference, or you can display this URL in other pages or portals. You can also build in access to your parameterized portal into drill-down links within a chart or report.

Procedure: How to Launch a Portal with Parameters

  1. In the Workspaces area of the Hub, create a portal, as described in Creating Portals.

    Note: It is recommended to create an alias for your portal. This will ensure a shorter URL, which is easier to reference and modify.

  2. Inside your newly created portal, assemble parameterized content into pages, as described in Creating Pages in WebFOCUS Designer, and add filters to your pages.

    Note: If you want to pass the same parameter across two or more pages of the portal, be sure to include parameterized content and filters for this parameter in every page.

  3. Run your portal.
  4. In the browser address bar, add the following syntax to your existing portal or alias URL and press Enter.
    ?&PARAMETER_NAME=PARAMETER_VALUE

    where:

    PARAMETER_NAME

    Is the name of the parameter you want to pass.

    Note: To confirm the exact name of your parameter, open the page in WebFOCUS Designer, click the Info button and note the parameter listed in the Parameters/Fields category.

    PARAMETER_VALUE

    Is the value of the parameter you are passing.

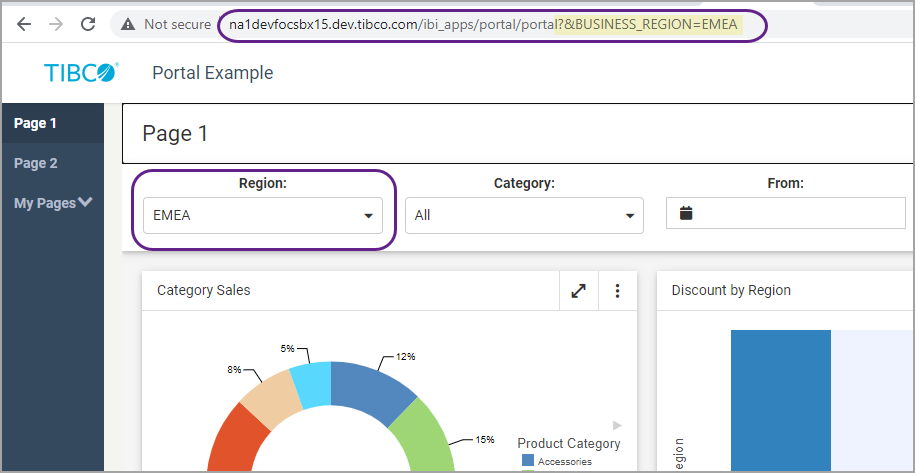
    In our example, we are specifying the EMEA value for the Region filter, as displayed in the following image.
    If you want to pass multiple parameters, simply repeat the syntax for each new parameter at the end of the URL. In our example, we are specifying the EMEA value of the Region filter, and the Accessories and Computers values for the Category filter, as shown in the following image.
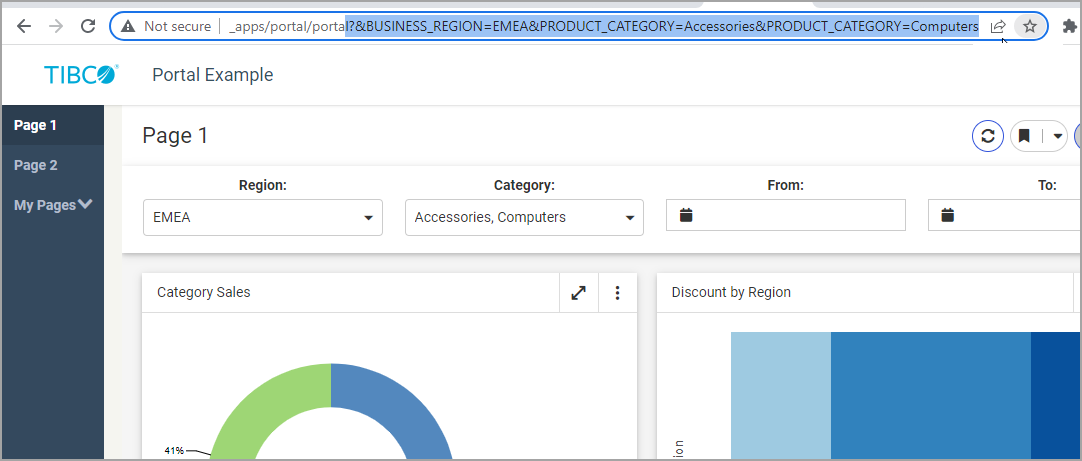
    Note: When you are specifying multiple values of the same parameter, make sure this filter supports multiple selection of values.

  5. Once you are happy with your modified portal URL, you can save it in your browser and share it with other users in your organization.
Procedure: How to Save a Parameterized Portal as a URL

You can save your parameterized portal as a standalone URL content item in your repository.

  1. Create a portal and modify its URL to pass the desired parameters, as described in the previous procedure.
  2. Copy the modified URL.
  3. In the Workspaces area of the Hub, from the +Content menu, point to Other, and then click URL.

    The New URL dialog box opens.

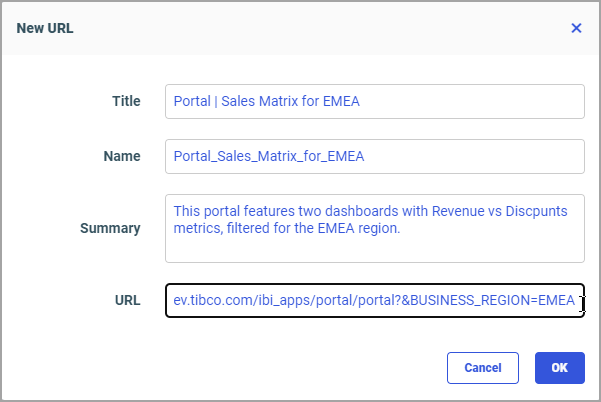
  4. Paste the modified portal URL into the URL field and populate the Title field.
  5. Optionally, populate the Summary field, adding a description of your portal.

    An example of a fully populated New URL dialog box is shown in the following image.

  6. Click OK.

    The URL item displays in your repository. You can now run it, share it, and include it in other portals or pages as a content item.

Procedure: How to Configure Drill-Down Links to Launch a Portal With Parameters

You can create a report or chart with hyperlinks that launch a portal with parameters.

  1. On the WebFOCUS Hub, click the plus menu and then click Create Visualizations.

    WebFOCUS Designer opens.

  2. Select the same data source that you used to create content in the pages of your portal.

    After you select a data source, the WebFOCUS Designer canvas loads.

  3. Optionally, change the content type by selecting an option from the Content picker.

    In this example, we will create a report, since drill-down links in reports appear as easily identifiable hyperlinked text values. Therefore, we will select either the grid or standard report content type. However, you can add drilldowns to any standard chart type as well. Drilldowns added to charts are available from tooltips when you point to an area of the chart.

  4. Drag fields from the Field list into the appropriate buckets in the report. Add dimension fields to the Rows and Column Groups buckets, and measure fields to the Summaries bucket.

    Make sure to add the field by which the content in the portal is filtered when you pass the parameter.

  5. Right-click the aforementioned common field in the Rows bucket and click Configure drill downs.

    The Configure Drill Downs dialog box opens.

  6. Click the plus sign (+) button to create a new drilldown.
  7. Select the URL radio button to create a URL drilldown.
  8. In the URL field paste the original un-modified URL of your portal or alias.
  9. Specify the Load In option for your portal. The available options are: New Window, Current Window, and Window/Frame.
  10. Click the plus button in the Parameters section to add a parameter.
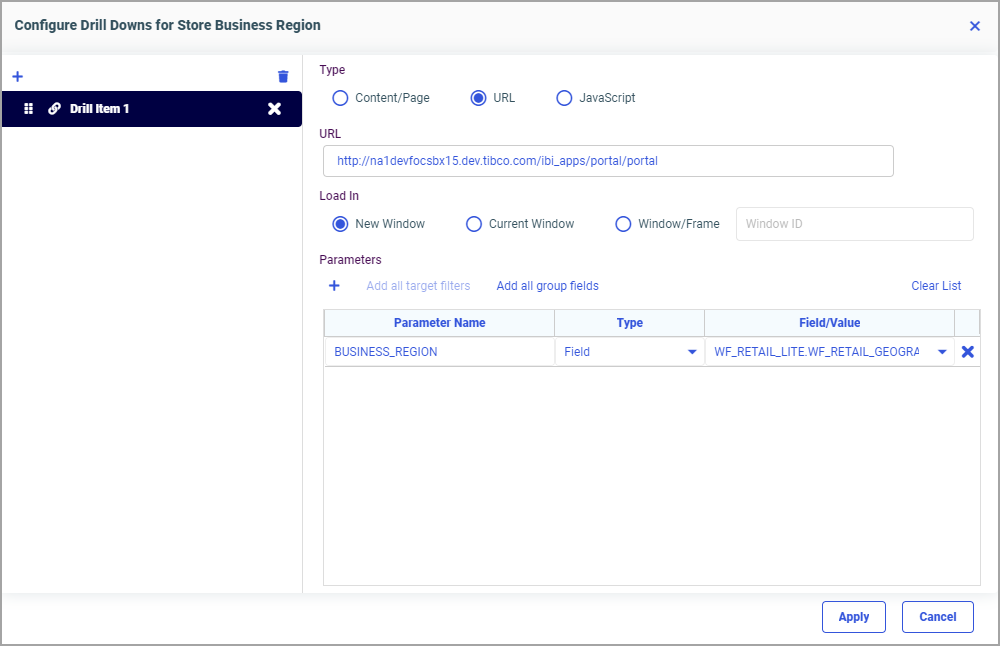
  11. In the Parameter Name column, type the name of the parameter you want to pass, leave the Type column as Field, and, in the Field/Value column, select the parameter that corresponds to the name you typed.

    An example of the populated Configure Drill Downs dialog box is shown in the following image.

  12. Click Apply.

    The hyperlinks are added to the entries of the selected field.

  13. Try clicking the hyperlinks to test the behavior.

    The portal loads and the parameter corresponding to the clicked hyperlink is passed.

  14. Save your report and exit WebFOCUS Designer.