Running a Portal

How to:

When users run a portal, they have either view-only access or the ability to customize a portal and its content. If they have the ability to customize, all actions are saved as they are performed unless a portal page is locked. For example, any time they move content around, the new positions of the content are saved. Any content added, hidden, or removed is saved as well.

New portal pages are saved, too. If the Portal Designer adds or removes portal pages or content, the user sees this, along with their customization each time that they load the portal. They lose their customization only if a portal page that they have customized is deleted by the Portal Designer or if they use the Remove My Customizations option. To learn more about removing customizations, see Removing Customizations.

When working with a collaborative portal, users can create an alias and run a portal from a specific URL. This feature prevents collaborative portal URLs from becoming unnecessarily complicated.

Note: Only administrators can create aliases, because they have the ability to see across workspaces and can prevent conflicts.

You can also create and share a URL to a specific page in a portal allowing users to navigate to it directly. This feature is especially useful in a portal with multiple portal pages or as a way to supersede the Default Page setting.

Procedure: How to Manage and Use an Alias in a Collaborative Portal

  1. Access the Manage Alias option in one of the following ways:
    • On the Home Page, in the Content view, in the Resources tree, right-click a collaborative portal, and then click Manage Alias.
    • On the Home Page, in the Portals view, right-click a collaborative portal, and then click Manage Alias.
    • On the Legacy Home Page, in the Resources tree, right-click a collaborative portal, and then click Manage Alias.

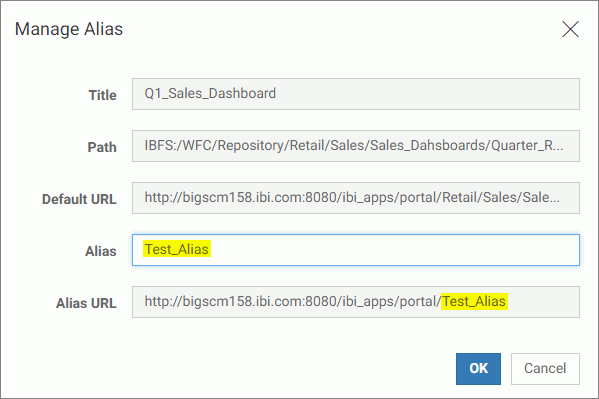
    The Manage Alias dialog box opens.

  2. In the Alias field, type the alias you want to use for the portal URL.

    The Alias URL entry updates with the name of your alias, as shown in the following image.
  3. Copy the Alias URL.

    Note: To copy an inactive field, select an entry and press CTRL+C on your keyboard.

  4. Click OK.
  5. Paste the alias URL in a new browser window and run it.

    The portal runs from the alias URL.

Procedure: How to Target a Specific Portal Page While Running a Portal

  1. Create a portal as described in Creating a Portal.
  2. In the Portal Designer, create a portal page to which you want to navigate directly, and make a note of its name.

    The Page Name field can be found in the following locations:

    • Basic Portal. In a page properties panel.
    • Collaborative Portal. In the New Page Information section of the Add Page dialog box.
  3. Save and close the portal.
  4. In a desktop browser, type one of the addresses below.

    For a basic portal:

    http://server:port/ibi_apps/bip/portal/Portal_Name?page=page_name

    For a collaborative portal:

    http://server:port/ibi_apps/portal/Portal_Name?page=page_name

    where:

    server

    Is the name of the server on which WebFOCUS is installed.

    port

    Is the port number on which the server is listening.

    Portal_Name

    Is the name of your portal.

    Note: You can find the name of a portal by hovering over this portal in the Resources tree and viewing the tooltip.

    page_name

    Is the name of your designated portal page.

    The portal runs, and the portal page that you specified displays.