Localizing Portals

How to:

WebFOCUS is a fully internationalized platform that supports the Unicode/UTF-8 standard, enabling operating systems, browsers, and applications to process and display information in virtually any spoken or written language. In addition to these default localization capabilities, users can also localize their own interface customizations. You can localize custom components in WebFOCUS in one of two ways:

Procedure: How to Localize Custom Components Using a Translation File

  1. On the Legacy Home Page, in the Resources tree, right-click a basic portal, and then click Translations.

    The Translations file opens. The syntax contains the identification number for every component in the portal, its name, and language reference, as shown in the following image.

    <translations>
    	<viewid value="EMBEDDED_PORTAL_1-1WEIVNL07X8" />
    	<translation id="EMBEDDED_PORTAL_1-1WEIVNL07X8" language="en_US" key="name" value="Embedded Portal 1"/>
    	<translation id="VIEW-3U1SPSUGZUREZ" language="en_US" key="description" value=""/>
    	<translation id="PAGE1-JB1X9O9F5FGX9" language="en_US" key="name" value="Page 1"/>
    	<translation id="PAGE1-JB1X9O9F5FGX9" language="en_US" key="description" value=""/>
    	<translation id="CONTAINER1-JT1SO4V1I13KL" language="en_US" key="name" value="Panel 1"/>
    	<translation id="CONTAINER2-JZ156JV9OZQM7" language="en_US" key="name" value="Product Line Sales"/>
    	<translation id="PANEL11-K41N5OL9ZDRPS" language="en_US" key="text" value="By Product"/>
    	<translation id="PANEL8-KD1A7FGQK9F7R" language="en_US" key="text" value="Overall"/>
    	<translation id="PANEL9-KS1UQOXUF2L3A" language="en_US" key="text" value="By Regional"/>
    	<translation id="TITLEBAR2-L612GN2S7S1CZ" language="en_US" key="text" value="Product Line Sales"/>
    	<translation id="TITLEBAR2-L612GN2S7S1CZ" language="en_US" key="text_base" value="Panel 2"/>
    <translations>
    
  2. Copy and paste the sections of syntax that you want to translate, and account for as many translations as you need. For example, if you want to translate a basic portal to Spanish, you would only copy and paste the syntax once. If you want to translate a basic portal to Spanish and French, you would copy and paste the syntax twice.

    In this example, we only use English and Spanish.

  3. In the copied portion of the syntax, change every instance of en_US to the language that you want to translate. In this example, we use es_ES for Spanish.
  4. In the copied portion of the syntax, change the name of every component that appears in quotes after the word value, to the equivalent word in the language you are translating.

    The modified syntax should look similar to this:

    <translations>
    <viewid value="EMBEDDED_PORTAL_1-1WEIVNL07X8" />
    	<translation id="EMBEDDED_PORTAL_1-1WEIVNL07X8" language="en_US" key="name" value="Embedded Portal 1"/>
    	<translation id="VIEW-3U1SPSUGZUREZ" language="en_US" key="description" value=""/>
    	<translation id="PAGE1-JB1X9O9F5FGX9" language="en_US" key="name" value="Page 1"/>
    	<translation id="PAGE1-JB1X9O9F5FGX9" language="en_US" key="description" value=""/>
    	<translation id="CONTAINER1-JT1SO4V1I13KL" language="en_US" key="name" value="Panel 1"/>
    	<translation id="CONTAINER2-JZ156JV9OZQM7" language="en_US" key="name" value="Product Line Sales"/>
    	<translation id="PANEL11-K41N5OL9ZDRPS" language="en_US" key="text" value="By Product"/>
    	<translation id="PANEL8-KD1A7FGQK9F7R" language="en_US" key="text" value="Overall"/>
    	<translation id="PANEL9-KS1UQOXUF2L3A" language="en_US" key="text" value="By Regional"/>
    	<translation id="TITLEBAR2-L612GN2S7S1CZ" language="en_US" key="text" value="Product Line Sales"/>
    	<translation id="TITLEBAR2-L612GN2S7S1CZ" language="en_US" key="text_base" value="Panel 2"/>
    <translation id="EMBEDDED_PORTAL_1-1WEIVNL07X8" language="es_ES" key="name" value="Portal incrustado 1"/>
    	<translation id="VIEW-3U1SPSUGZUREZ" language="es_ES" key="description" value=""/>
    	<translation id="PAGE1-JB1X9O9F5FGX9" language="es_ES" key="name" value=" Página 1"/>
    	<translation id="PAGE1-JB1X9O9F5FGX9" language="es_ES" key="description" value=""/>
    	<translation id="CONTAINER1-JT1SO4V1I13KL" language="es_ES" key="name" value="Panel 1"/>
    	<translation id="CONTAINER2-JZ156JV9OZQM7" language="es_ES" key="name" value=" Línea de productos Ventas "/>
    	<translation id="PANEL11-K41N5OL9ZDRPS" language="es_ES" key="text" value=" Por Producto "/>
    	<translation id="PANEL8-KD1A7FGQK9F7R" language="es_ES" key="text" value=" En general "/>
    	<translation id="PANEL9-KS1UQOXUF2L3A" language="es_ES" key="text" value=" Por Regional "/>
    	<translation id="TITLEBAR2-L612GN2S7S1CZ" language="es_ES" key="text" value=" Línea de productos Ventas "/>
    	<translation id="TITLEBAR2-L612GN2S7S1CZ" language="es_ES" key="text_base" value="Panel 2"/>
    <translations>
    
  5. Optionally, repeat steps 2-4 to add a translation to another language.
  6. Save and close the Translations file.

    Your translation is complete.

Procedure: How to Localize Custom Components Using Symbolic References

This procedure requires a Java development tool, such as Eclipse, NetBeans, or Java Development Kit (JDK). In this example, we are using Eclipse Java EE IDE.

  1. If using Eclipse, follow the steps below:
    1. Launch Eclipse.
    2. Click File, point to New, and then click Java Project.

      The New Java Project dialog box opens.

    3. In the Project name field, type the name of your project and click Finish.
    4. Right-click your new project, point to New, and then click Package.

      The New Java Package dialog box opens.

    5. In the Name field, type the following name:
       com.ibi.desired_name.intl.templates

      where:

      desired_name

      Is any identifiable name that you want to use for your localized data.

    6. Click Finish.
    7. Right-click the package that you just created, point to New and then click File.

      The New File dialog box opens.

    8. In the File Name field, type BIP_PageComponentTemplate.properties and click Finish.
    9. Double-click the file that you just created.

      The editor opens in the right pane.

    10. Type a symbolic reference of your choice, followed by the equal sign, and the value for that symbolic reference.

      An example of the simple symbolic reference syntax is shown in the following image.

      Example of simple symbolic reference syntax
    11. Repeat Steps g and h to create a PROPERTIES file for a different language. In this example, we create a file for the Spanish translation and name it BIP_PageComponentTemplate_es.properties.
    12. Double-click the PROPERTIES file for the language you are translating.
    13. Type the same symbolic reference as you did in the BIP_PageComponentTemplate.properties file, followed by the equal sign, and the Spanish translation of the value.

      An example of the Spanish version of the syntax is shown in the following image.

      Example of Spanish syntax
    14. Save and close both PROPERTIES files.
    15. Right-click the project and then click Export.

      The Export wizard opens.

    16. Under the Java folder, select JAR file and click Next.

      The JAR Export window opens.

    17. Make sure all your elements, such as the project, package, and translated PROPERTIES files, are selected, and click Browse.

      The Save As dialog box opens.

    18. Point to a location in your environment where you want to export the JAR file.
    19. In the File name field, type the same custom name that you used as part of the package name and click Save.

      An example of a completed JAR export window is shown in the following image.
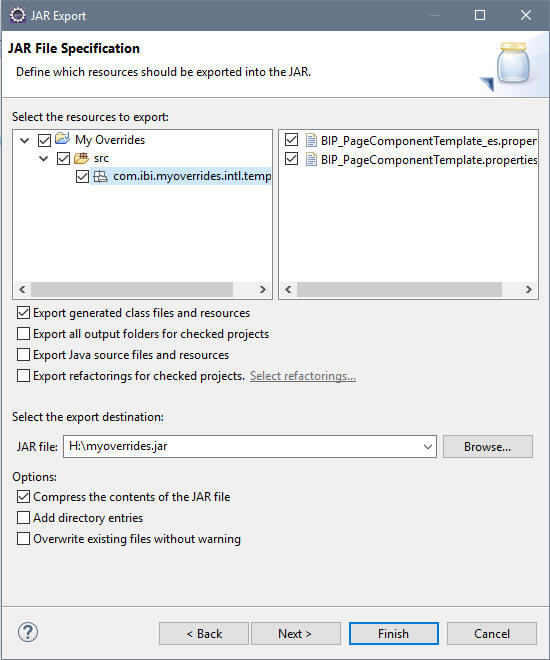
      JAR Export dialog box
    20. Click Finish and close Eclipse.
  2. If using JDK, follow the steps below:
    1. In your environment, create the following directory structure:
       com\ibi\desired_name\intl\templates

      where:

      desired_name

      Is any identifiable name that you want to use for your localized data.

    2. Make sure there is one higher level directory above the com folder. In our example the higher level directory is called Localization.
    3. Inside the templates folder, create the BIP_PageComponentTemplate.properties file and its versions for the languages that you want to use.
    4. Create custom symbolic references inside each PROPERTIES file, as described in the previous example.
    5. Save and close PROPERTIES files.
    6. Open the Command Prompt.
    7. Type the following string:
      Disk:\PROGRA~1\path to JDK\jar cvf jar-file-name.jar -C higher level directory name/ .

      where:

      Disk:

      The disk where the JDK is located.

      path to JDK

      The path to the JDK inside your Program Files directory.

      jar-file-name.jar

      The name of your JAR file. Use the same name that you used as part of the directory structure in Step a.

      higher level directory name

      The name of the directory where the com folder resides.

    8. Press Enter.

      The JAR file is created.

      The following image shows an example of a completed command.
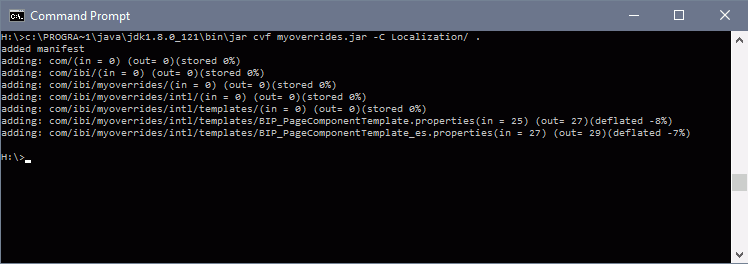
      Completed command example
  3. Navigate to the location of your JAR file, copy the file and paste it into a folder in the Application Server classpath.
  4. Login to WebFOCUS as an administrator.
  5. Launch the Administration Console.
  6. On the Configuration tab, under the Application Settings folder, click Other.
  7. Select the Enable Custom Strings check box, and type the following name in the Custom Strings field:
    com.ibi.desired_name

    where:

    desired_name

    Is the name of your JAR file.

    The following image shows the completed configuration.

    Enable custom strings example
  8. Click Save and close the Administration Console.
  9. Restart your Application Server.
  10. Relaunch WebFOCUS.
  11. Create a new collaborative or basic portal.

    For more information on creating portals, see Creating a Portal.

  12. Use your custom symbolic reference to name an element in your portal. In this example, we are using it as a page title. In the page Properties panel, in the Title field, type:
    ${value}

    where:

    value

    Is the name of your symbolic reference.

    An example of a symbolic reference applied in the portal is shown in the following image.
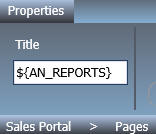
  13. Save and close the portal.
  14. Run your portal.

    The symbolic reference value displays, as shown in the following image.
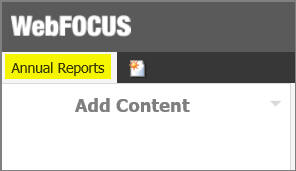
  15. In the portal, on the Menu Bar, click Language and select the language you used for your symbolic reference, in this example, select Spanish.

    The symbolic reference value changes to its equivalent in the set language, as shown in the following image.

    Note: If the Language option is disabled in your WebFOCUS environment, you can enable it in the Administration Console. Under the Dynamic Language Switch settings, select the Enable Dynamic Language check box, select the languages that you want to use in your portal from the table, and click Save.