Creating and Maintaining Library Access Lists

How to:

A Library Access List defines the groups and users authorized to view report output distributed by a schedule to the Report Library. A Library Access List can be used with single or multiple schedules.

A Library Access List is created as a private item owned by a user and can be shared to authorize other groups and users to select it for their schedules. Users authorized to use a shared Library Access List will be able to share the report distributed to the Report Library by their schedule with the groups and users they are authorized to share with.

Note: Changes to an Access List are applied to a Library report that is protected by the Access List at the next execution of the schedule that creates the Library report.

The following image shows the Library Access List tab.

Users authorized to access the Library Access List tool and save to a folder in the Resources tree can:

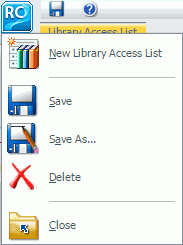
From the Library Access List toolbar, you can create a New Library Access List or Save, Save As, Delete, or Close the current list. You can also access help information.
From the ribbon, you can save and close the Library Access List, delete the Library Access List, show members, show summary, add new members to the Library Access List, select members to add to the Library Access List, and remove members from the Library Access List. The ribbon displays, as shown in the following image.

Procedure: How to Create a New Library Access List

To create a new Library Access List:

  1. From the Workspaces area of the start page or the WebFOCUS Home Page, choose the workspace in which you want to create your Library Access List.
  2. On the Actions bar, click Schedule, and then click the Access List button.

    The Library Access List dialog box opens.

  3. In the Title field of the Members dialog box, enter a descriptive name for the Library Access List.
  4. Click the Add New or the Select Members tab to add a new member to the Library Access List.
    • Add New displays the groups and users with whom you are authorized to share. Adding a group or user to the Library Access List will enable that group or user to see any Library report protected by the Library Access List. These users will also need the Access Library Content privilege to view the contents of a Library report.
    • Select Members displays existing Library Access Lists from which you are authorized to access and select members.
  5. In the Burst Value column, type an optional burst value to specify the report section to distribute to the group or user. This value is case-sensitive. The schedule for which the Library Access List is specified must have the Burst report option selected to limit the report distribution to the burst value specified in the Library Access List. For more information on burst values, see Bursting a Report.
  6. If you would like to provide users with a description to understand the purpose of the Library Access List, click the Summary tab and enter a description for the Library Access List.

    Note: To create another Library Access List without leaving the Library Access List tool, select the ReportCaster (RC) button on the toolbar and select New Library Access List.

  7. Click Save & Close to save the Library Access List.
    Note:
    • To create another Library Access List, you must close the current New Library Access List window and return to Step 1. Alternatively, click the ReportCaster (RC) button in the Library Access List toolbar and select New Library Access List.
    • The maximum length of a title value for a file is 256 characters.
    • If the title of your file has the same name of an existing file in the folder, you will receive a message asking if you wish to replace the file.

Procedure: How to Edit a Library Access List

You can edit the Library Access Lists you own or are authorized to manage from the Resources tree or the ReportCaster Explorer interface by performing the following steps.

  1. Select the Library Access List you want to edit.
  2. Right-click the Library Access List and select Edit.

    The Library Access List interface displays.

  3. Make any necessary changes to the Library Access List and select Save & Close. Note that if you change the Title of the Library Access List, the internal name that uniquely identifies the Library Access List is not changed.
  4. To remove a member from the Library Access List, select the member and click the Remove tab.
  5. If you are editing the Library Access List, make the necessary changes and click Save & Close.

Procedure: How to Copy a Library Access List

You can create a copy of an existing Library Access List you own or are authorized to manage from the Resources tree or the ReportCaster Explorer interface using the Duplicate or Copy and Paste options.

The following steps allow you to quickly and easily create a copy of an existing Library Access List within the same folder.

  1. From the Workspaces area of the Hub, the WebFOCUS Home Page, or the ReportCaster Explorer, with items filtered by Access List, select the Library Access List you want to copy.
  2. Right-click the Library Access List and select Duplicate. A copy of the Library Access List is created in the same folder with a number sequence appended to the end of the file name.

    For example, if you duplicate a Library Access List with the Title value Products, the Title assigned to the duplicate copy and displayed in the Resources tree is Products_1. Alternatively, the Copy and Paste options can be used to make a copy of the Library Access List in the same folder. See How to Copy an Existing Library Access List in a Different Folder and select the same folder as the Library Access List you selected to copy when selecting the folder in which to create the copy of the Library Access List.

Procedure: How to Copy an Existing Library Access List in a Different Folder

The following steps allow you to create a copy of an existing Library Access List in a different folder in which you are authorized to write and create content.

  1. From the WebFOCUS Home pageFrom the Workspaces area of the Hub, the WebFOCUS Home Page, or the ReportCaster Explorer, with items filtered by Library Access List, select the Library Access List you want to copy.
  2. Right-click the Library Access List and select Copy.
  3. In the Resources tree, select the folder in which to create the copy of the Library Access List.
  4. Right-click and select Paste.

Procedure: How to Move a Library Access List to a Different Folder

You can move a Library Access List that you own (or are authorized to manage) from the Resources tree or the ReportCaster Explorer interface, to a different folder location by using the Cut and Paste options.

Important: When moving a Library Access List to a different folder, the Library schedules that reference the Library Access List must be updated so that they reference the Library Access List in the folder location to which it has been moved. This is required because the path and name of the Library Access List is stored in the Library schedule information to obtain the Library Access List information when the schedule is run.

The following steps allow you to move a Library Access List to a different folder in which you are authorized to write to and create content.

  1. From the WebFOCUS Home pageFrom the Workspaces area of the Hub, the WebFOCUS Home Page, or the ReportCaster Explorer, with items filtered by Library Access List, select the Library Access List you want to move to a different folder.
  2. Right-click the Library Access List and select Cut.
  3. In the Resources tree, select the folder in which to place the moved Library Access List.
  4. Right-click and select Paste.

    Note: You must be authorized to write to and create content in the folder into which you are pasting the Library Access List. A message will display informing you if the Title of the Library Access List already exists in the selected folder. When the Paste operation is completed, be sure to update the Library schedules that use this Library Access List to reference the new folder location.

Procedure: How to Delete a Library Access List

From the Workspaces area of the Hub, the WebFOCUS Home page or the ReportCaster Explorer Interface, you can delete the Library Access Lists you own and those that you are authorized to manage by performing the following steps.

Important: Schedules that reference deleted Library Access Lists will not run successfully. Evaluate whether there are any schedules utilizing the Library Access List prior to deleting it.

  1. From the Workspaces area of the Hub or the WebFOCUS Home Page, select the Library Access List you want to delete.
  2. Right-click the Library Access List and select Delete.
  3. If you are deleting the Library Access List, a message appears asking to confirm that you want to delete the Library Access List. Click OK to delete the Library Access List.

Procedure: How to Change the Title or Summary for a Library Access List

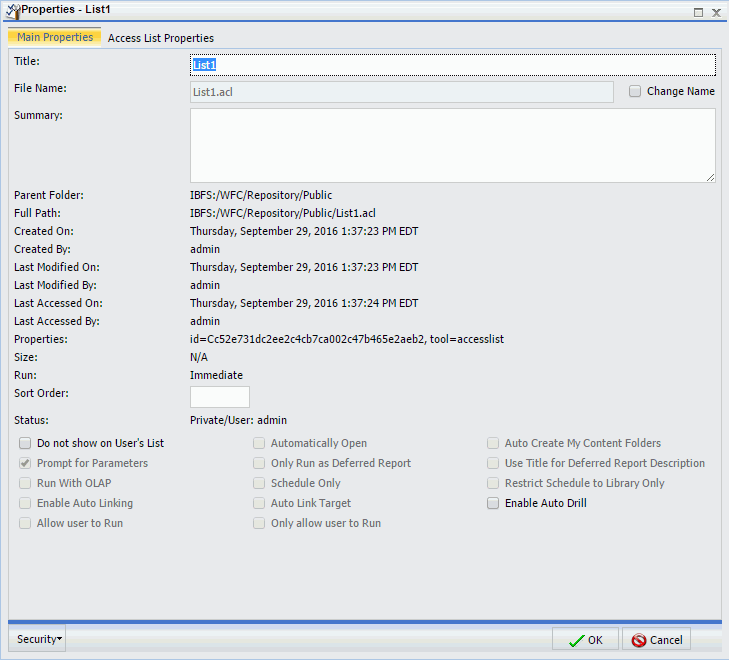
You can change the Title or Summary for a Library Access List you own or are authorized to manage from the Resources tree Properties option or within the Library Access List tool. The following steps explain how to change the Title or Summary using the Properties option.

  1. From the Workspaces area of the Hub, the WebFOCUS Home Page or ReportCaster Explorer, right-click the Library Access List you want to change the Title or Summary for and select Properties, as shown in the following image.
  2. Select the Title field and enter the new title.
  3. Select the Summary field and enter the new summary value. This is an optional field.
  4. Select OK when you have completed entering the Title and Summary values.

Procedure: How to Change the Title and Summary From the Library Access List Tool

The following steps allow you to change the Title and Summary of a Library Access List from the Library Access List tool.

  1. From the Workspaces area of the start page, the WebFOCUS Home Page or ReportCaster Explorer, right-click the Library Access List you want to change the Title or Summary for and select Edit.
  2. Select the Title field and enter the new title.
  3. To enter an optional summary value, click the Summary tab and enter the summary value.
  4. Click the Save & Close tab when you have completed entering the Summary value.