Creating Reports Using the Report Canvas

In this section:

In WebFOCUS App Studio a report is a WebFOCUS procedure (with a .fex extension) that returns data from a selected data source, and displays it in a column/row format. You create an WebFOCUS App Studio report using the Report Wizard. The wizard lets you specify the location where the report is saved and the data source. It then opens the Report canvas. The Report canvas includes the Object Inspector pane that contains the measures and dimensions of the selected data source. You can drag and drop objects from the Object Inspector to populate the columns and rows of your report.

When you make selections in the Report Wizard, WebFOCUS syntax is automatically generated to produce the report output. You can create reports easily, with no knowledge of the syntax. However, for a summary of WebFOCUS reporting syntax, see Reporting Syntax Summary.

Creating a Tabular Report

How to:

The following image shows a tabular report, which displays cost of goods and revenue sorted across brand types and by product category, creating a matrix report. When you include both BY and ACROSS sort phrases in a report request, information is sorted vertically and horizontally, turning the report into a matrix of information that you read like a grid. A matrix report can have multiple BY and ACROSS sort fields.
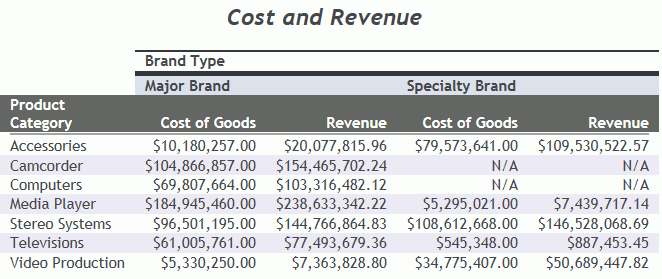
Note: The default StyleSheet is used to format the report. You can create your own StyleSheet or choose from other StyleSheets that are available in the product.

Procedure: How to Create a Tabular Report Using the Report Canvas

  1. On the Home tab, in the Content group, click Report or in the Environments Tree panel, right-click the desired folder, point to New, and click Report.

    The Report Wizard opens.

  2. Click Create Report.
  3. Navigate to where you want to create the new procedure and select a data source. For this example, click wf_retail.mas.

    The Report canvas opens.

  4. Add the following fields to your report in the following order. You can double-click the fields in the Object Inspector, or drag them to the Report canvas.
    • PRODUCT_CATEGORY
    • BRANDTYPE
    • COGS_US
    • REVENUE_US
  5. Select the BRANDTYPE field and from the Column Type group, select Sort Across to sort the report across brand type values.
  6. To add a heading to the report, on the Report tab, click Header & Footer and select Report Header.
  7. Type Cost and Revenue in the Heading text box.
  8. In the Procedure View panel, right-click the Comment component, point to New, and click Set.

    The Set canvas opens.

  9. In the Available Settings area, use the scrollbar to locate the NODATA setting.
  10. Double-click NODATA or select NODATA and click Add.

    The NODATA setting now appears in the Used Settings area.

  11. Type N/A in the Current Value area to change the default missing data character from a period (.) to N/A to indicate the missing data in the report.
  12. Run the report.

Procedure: How to Create a Tabular Report Using WebFOCUS Syntax

You can create the tabular report using the following WebFOCUS syntax, which you can type into a procedure using the Text Editor.

TABLE FILE WF_RETAIL
HEADING
"Cost and Revenue"
SUM COGS_US REVENUE_US 
BY PRODUCT_CATEGORY
ACROSS BRANDTYPE
ON TABLE SET NODATA N/A
END
Creating an Analytic Document

How to:

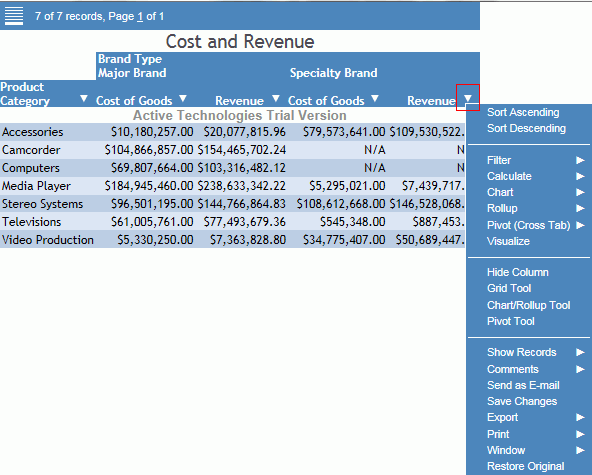
The following image shows an Analytic Document designed for offline analysis. The request uses the ON TABLE PCHOLD FORMAT AHTML command to create the HTML Analytic Document. Analysis options include filtering, sorting, charting, and much more. You click an arrow next to a column heading to gain access to the analytic options. For more information on In-Document Analytics, see the TIBCO WebFOCUS® Active Technologies User's Guide.

Active Report Example

Procedure: How to Create an Using the Report Canvas

  1. Create the tabular report outlined in How to Create a Tabular Report Using the Report Canvas.
  2. On the Format tab, click .
  3. Run the report.

Procedure: How to Create an Using WebFOCUS Syntax

You can create the using the following WebFOCUS syntax, which you can type into a procedure using the Text Editor.

TABLE FILE WF_RETAIL
HEADING CENTER
"Cost and Revenue"
SUM COGS_US REVENUE_US 
BY PRODUCT_CATEGORY
ACROSS BRANDTYPE
ON TABLE PCHOLD FORMAT AHTML
ON TABLE SET NODATA N/A
END

Procedure: How to Select the Sort Order for a Control for In-Document Analytic Formats

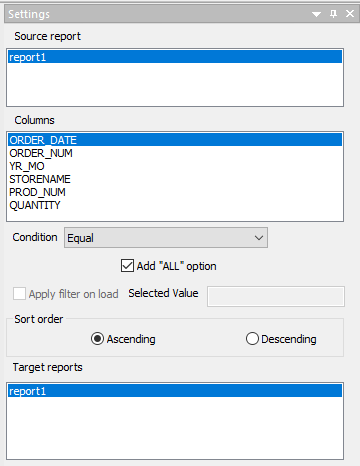
You can select the sort order of display for a control for In-Document Analytic formats in the HTML and Document canvas. You can select Ascending or Descending from the Sort order option in the Settings panel. Ascending is the default value selected. At run time, the values will be sorted based on the sort order selected.

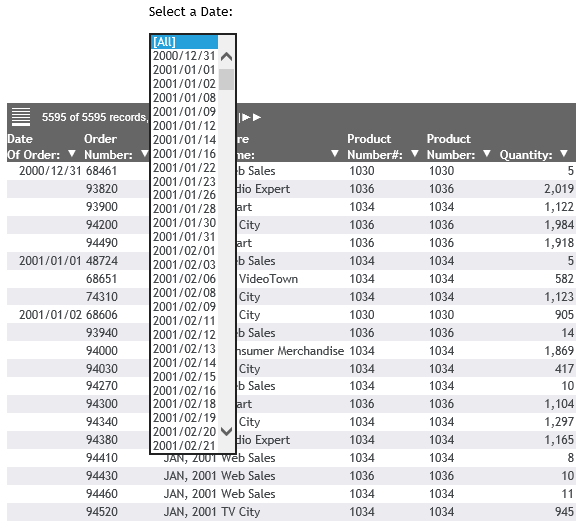
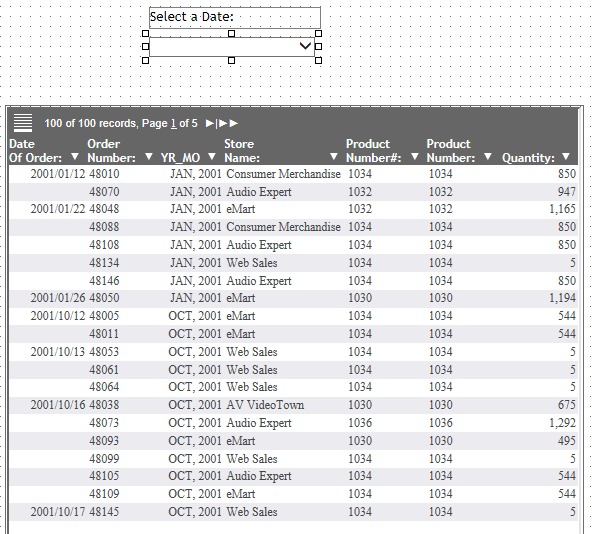
  1. Create an that includes a filter control (for example, a date filter).

    When you run the report, as shown in the following image, notice that date values are sorted in ascending order. Ascending is the default value.

  2. Open the report and select the control, as shown in the following image.
  3. From the Settings panel, select Descending for the sort order, as shown in the following image.

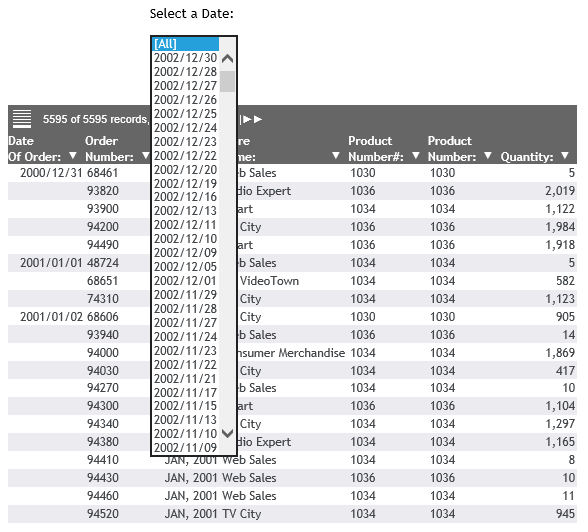
    When you run the report, as shown in the following image, notice that the date values for the control are now sorted in the descending order.

Creating an Excel FORMULA Table of Contents Report

How to:

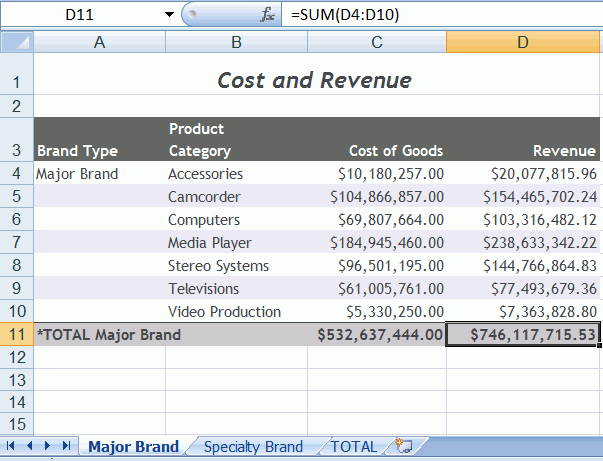
The following image shows an Excel Workbook with multiple worksheets (tabs) for each value of the major sort field (BY) and with formulas for the column totals. The request uses the ON TABLE PCHOLD FORMAT XLSX FORMULA BYTOC command to create the multiple worksheets.

Procedure: How to Create an Excel Formula Table of Contents Report Using the Report Canvas

  1. Create the tabular report outlined in How to Create a Tabular Report Using the Report Canvas.
  2. Select the Brand Type field and from the Column Type group, select Sort Down to change the field from an Across field to a By field.
  3. Drag the Brand Type field before the Product Category field so that Brand Type is the first By sort field.
  4. From the Report group, click Column Total and select Column Totals to create totals for each of the numeric columns (Cost of Goods, Revenue) and to show the formula capability.
  5. On the Format tab, in the Output Types group, click Excel and select Excel XLSX Formula.

    The Output Format Options dialog box opens.

  6. Select On for the Create separate worksheets for each primary sort value option.
  7. Run the report.

Procedure: How to Create an Excel Formula Table of Contents Report Using WebFOCUS Syntax

You can create the Excel Formula Table of Contents report using the following WebFOCUS syntax, which you can type into a procedure using the Text Editor.

TABLE FILE WF_RETAIL
HEADING
"Cost and Revenue"
SUM COGS_US REVENUE_US 
BY BRANDTYPE
BY PRODUCT_CATEGORY
ON TABLE SUBTOTAL
ON TABLE PCHOLD FORMAT XLSX FORMULA BYTOC
END

Creating a Financial Report

How to:

In a financial report, specific rows can be placed anywhere in the report.

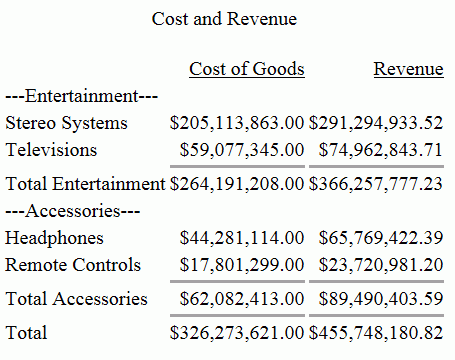
The following image shows a financial report with cost and revenue for specific products.

Procedure: How to Create a Financial Report Using the Report Canvas and Matrix Tab

  1. On the Home tab, in the Content group, click Report or in the Environments Tree panel, right-click the desired folder, point to New, and click Report.

    The Report Wizard opens.

  2. Click Create Report.
  3. Navigate to where you want to create the new procedure and select a data source. For this example, click wf_retail_sales.mas.

    The Report canvas opens.

  4. Add the following fields to your report in the following order. You can double-click the fields in the Object Inspector, or drag them to the Report canvas.
    • ID_PRODUCT
    • COGS_US
    • REVENUE_US
  5. To add a heading to the report, on the Report tab, click Header & Footer and select Report Header.
  6. Type Cost and Revenue in the Heading text box.
  7. Change the StyleSheet of the report. Reports that use cell borders or gridlines will not show bars in the financial report when run.

    On the Report tab, in the Style group, click Change Theme. In the Open File dialog box, navigate to the Legacy Style Templates folder, select ENblack_theme.sty, and click OK.

  8. Select the ID_PRODUCT field, and from the Column Type group, select For Row.
  9. Click the Matrix tab, to open the Matrix canvas.

    Note: The Matrix view tab is only visible when a FOR field exists.

  10. Create a text row to introduce the Entertainment group:
    1. Click Text from the Insert group to make the row a text row, or right-click row R1 (except on the label) and select Change Type to, and then select Text.

      The TEXT dialog box opens.

    2. Type the following in the text box:
      Entertainment:
    3. Click OK.

      Entertainment appears in the Title column on the matrix.

  11. Create a row for the Stereo Systems product codes:
    1. In the For field values panel, multi-select 2001 to 2167 and drag the values to row R2 in the ID_PRODUCT column.

      Notice that the TAG row type is entered in the Row Type column. You can also select Tag from the Insert group and type the tag values into the dialog box.

      By default, for a tag row, the tag values will display in the left on the report. However, you can change the row title on the report. In addition, if you want to use this row in calculations in the report, you can assign it a label to use as a name in the calculations.

    2. Right-click 2001 TO 2167 in the ID_PRODUCT column and select Row Properties.

      The TAG dialog box opens.

    3. On the General tab, type an optional title and label for the 2001 TO 2167 ID_PRODUCT values, for example Stereo Systems and SS, respectively.
    4. Click OK to return to the matrix.
  12. Create a row for the Televisions product codes:
    1. In the For field values panel, multi-select 4012 to 4018 and drag the values to row R3 in the ID_PRODUCT column.

      Notice that the TAG row type is entered in the Row Type column. You can also select Tag from the Insert group and type the tag values into the dialog box.

    2. Right-click 4012 TO 4018 and select Row Properties.

      The TAG dialog box opens.

    3. On the General tab, type an optional title and label for the 4012 TO 4018 ID_PRODUCT values, for example Televisions and TV, respectively.
    4. Click OK to return to the matrix.
  13. Place an underscore under the Entertainment rows:
    1. Click Bar from the Insert group to make the row a bar row, or right-click row R4 (except on the label) and select Change row type to, and then select Bar.

      The BAR dialog box opens.

    2. Click OK to accept the default underline character.
  14. Add a row that totals the Entertainment products:
    1. Click Recap from the Insert group to make the row a recap row, or right-click row R5 (except on the label) and select Change Type to, and then select Recap.

      The RECAP dialog box opens at the Options tab.

    2. Type SS + TV in the Recap text box. You can also select SS('Stereo Systems') and TV('Televisions') from the Labels drop-down menu to add them to the Recap text box.
    3. Click the General tab and type the title and label for the Recap calculation, for example, Total Entertainment and TOTENT, respectively.
  15. Create a text row to introduce the Accessories group:
    1. Click Text from the Insert group to make the row a text row, or right-click row R6 (except on the label) and select Change Row Type to, and then select Text.

      The TEXT dialog box opens.

    2. Type the following in the text box:
      Accessories:
    3. Click OK.

      Accessories: appears in the Title column on the matrix.

  16. Create a row for the Headphones product codes:
    1. In the For field values panel, multi-select 5001 to 5007 and drag the values to row R7 in the ID_PRODUCT column.

      Notice that the TAG row type is entered in the Row Type column. You can also select Tag from the Insert group and type the tag values into the dialog box.

    2. Right-click 5001 TO 5007 and select Row Properties.

      The TAG dialog box opens.

    3. On the General tab, type an optional title and label for the 5001 TO 5007 ID_PRODUCT values, for example Headphones and HP, respectively.
    4. Click OK to return to the matrix.
  17. Create a row for the Remote Controls product codes:
    1. In the For field values panel, multi-select 5008 to 5009 and drag the values to row R8 in the ID_PRODUCT column.

      Notice that the TAG row type is entered in the Row Type column. You can also select Tag from the Insert group and type the tag values into the dialog box.

    2. Right-click 5008 TO 5009 and select Row Properties.

      The TAG dialog box opens.

    3. On the General tab, type an optional title and label for the 5008 TO 5009 ID_PRODUCT values, for example Remote Controls and RC, respectively.
    4. Click OK to return to the matrix.
  18. Place an underscore under the Accessories rows:
    1. Click Bar from the Insert group to make the row a bar row, or right-click row R9 (except on the label) and select Change Type to, and then select Bar.

      The BAR dialog box opens.

    2. Click OK to accept the default underline character.
  19. Add a row that totals the Accessories products:
    1. Click Recap from the Insert group to make the row a recap row, or right-click row R10 (except on the label) and select Change Type to, and then select Recap.

      The RECAP dialog box opens at the Options tab.

    2. Type HP + RC in the Recap text box. You can also select HP('Headphones') and RC('Remote Controls') to add them to the Recap text box.
    3. Click the General tab and type the title and label for the Recap calculation, for example, Total Accessories and TOTACC, respectively.
  20. Place an underscore under the Total Accessories row:
    1. Click Bar from the Insert group to make the row a bar row, or right-click row R11 (except on the label) and select Change row type to, and then select Bar.

      The BAR dialog box opens.

    2. Click OK to accept the default underline character.
  21. Add a row that totals both the Entertainment and Accessories products:
    1. Click Recap from the Insert group to make the row a recap row, or right-click row R12 (except on the label) and select Change Type to, and then select Recap.

      The RECAP dialog box opens at the Options tab.

    2. Type TOTENT + TOTACC in the Recap box.
    3. Click the General tab and type the title and label for the Recap calculation, for example, Total and TOTAL.
  22. Run the report.

The syntax of the resulting financial report is shown in the following example.

Note: The page width of this document may cause the syntax to wrap onto multiple lines in the example below. In order to run the example, you must remove any line breaks in the name of the StyleSheet referenced by the INCLUDE statement.

TABLE FILE WF_RETAIL_SALES
HEADING CENTER
"Cost and Revenue"
" "
SUM COGS_US REVENUE_US
FOR ID_PRODUCT
"Entertainment:" OVER
'2001' TO '2167' AS 'Stereo Systems' LABEL SS     OVER
'4012' TO '4018' AS 'Televisions' LABEL TV        OVER
BAR                                               OVER
RECAP TOTENT=SS + TV; AS 'Total Entertainment' OVER
"Accessories:"                               OVER
'5001' TO '5007' AS 'Headphones' LABEL HP         OVER
'5008' TO '5009' AS 'Remote Controls' LABEL RC    OVER
BAR                                               OVER
RECAP TOTACC=HP+RC; AS 'Total Accessories'        OVER
BAR                                               OVER
RECAP TOTAL=TOTENT+TOTACC; AS 'Total'
ON TABLE NOTOTAL
ON TABLE SET STYLE *
INCLUDE = IBFS:/FILE/IBI_HTML_DIR/javaassist/intl/EN/combine_templates/ENblack_theme.sty,
$
ENDSTYLE
END

Creating a Precision Report

How to:

The precision report is a report type that gives you an additional set of tools that make it easy to control the precise placement of objects and data in the report output. For example, with a precision report, you can quickly create a layout that is perfectly aligned for a preprinted form (like a Bill of Sale or a tax form) and that automatically breaks out one record per report page. Other benefits of precision reports include:

You can convert an existing report into a precision report or you can create a new precision report.

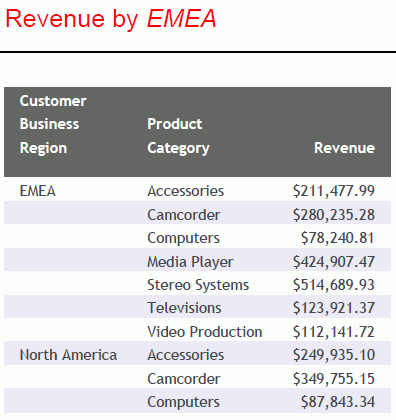
The following image shows an example of a precision report. Precision reports are built in the Precision Report canvas. You can output them in PDF, DHTML, and PostScript formats.

For more information on creating a precision report using the Precision Report canvas, see Accessing the Precision Reports Canvas.

Procedure: How to Create a Precision Report Using the Precision Report Canvas

The following example shows how to create a precision report showing Revenue by Vendor and Product Category.

  1. On the Home tab, in the Content group, click Report or in the Environments Tree panel, right-click the desired folder, point to New, and click Report.

    The Report Wizard opens.

  2. Click Create Report.
  3. Navigate to where you want to create the new procedure and select a data source. For this example, click wf_retail.mas.

    The Report canvas opens.

  4. On the Report tab, in the Report group, click Precision Report.

    A styling warning message appears indicating that the report will be converted to a precision report. Click Yes to close the message and open the Precision Report canvas.

  5. Create a report in the Data Matrix layer:
    1. In the Layers tab, under the Data Matrix layer, click REGION. The region object is displayed as a highlighted square in the Precision Reports canvas.
    2. Click the Fields tab. In the Dimensions folder, expand the Product cube. Expand the Product hierarchy and click Product,Category. Drag it into the region object.
    3. In the Dimensions folder, Product cube, expand the Vendor hierarchy and click Vendor,Business,Region. Drag it into the region object.
    4. In the Measures folder, expand the Sales hierarchy and click Revenue. Drag it into the region object.
    5. Drag the region placeholder to resize the region.
  6. Add a Where clause filter in the report to show only non-zero revenue amounts:
    1. On the Report tab, in the Filter group, click Filter. The Filter drop-down menu opens.
    2. From the drop-down menu, click Where. The Expression Builder opens.
    3. In the Measures folder, expand the Sales hierarchy and double-click Revenue. It now displays in the Column to filter field.
    4. In the Logical Relation drop-down list, click is greater than.
    5. In the Compare Type drop-down list, click Value.
    6. In the Compare Value field, type 0. The filter criteria appears as follows.


    7. Click OK to save the filter and close the Expression Builder. The report will now suppress all rows with zero revenue.
  7. Add a Report Heading layer to the report with text and an embedded field:
    1. Select the Report Heading layer from the Layers tab.
    2. On the Tools tab, in the Objects group, click Add Text. The pointer becomes an arrow over a letter T .
    3. Click the canvas to add a text box. You can also drag the pointer on the canvas to create a text box in the size that you want.

      Note: Use the options in the Default Style group of the Tools tab to select the desired font, size, and style of the text.

    4. Type Revenue by and place the pointer after by.
    5. In the Fields tab, in the Dimensions folder, Product cube, expand the Vendor hierarchy and double-click Vendor,Business,Region. The field is added to the text object as <Vendor,Business,Region.
  8. Add a Page Header layer to the report:
    1. Click the Page Header layer from the Layers tab.
    2. On the Tools tab, in the Objects group, click Add Line. The pointer changes to an arrow over a line segment .
    3. Drag the pointer on the canvas to create a line below the text added in step 7.
  9. Click Save.

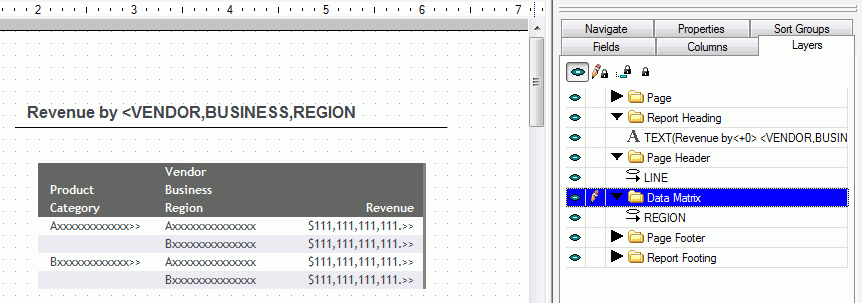
    The Precision Report canvas will appear similar to the following image.

    Precision Report canvas

Procedure: How to Create a Precision Report Using the WebFOCUS Language

You can create the precision report using the following WebFOCUS syntax, which you can type into a procedure using the Text Editor.

TABLE FILE WF_RETAIL
SUM REVENUE_US
BY BUSINESS_REGION 
BY PRODUCT_CATEGORY
WHERE REVENUE_US GT 0;
ON TABLE SUBHEAD 
"Revenue by <12 <BUSINESS_REGION "
ON TABLE SET NEWLAYOUT ON
ON TABLE PCHOLD FORMAT PDF
ON TABLE SET STYLE *
     INCLUDE = endeflt,
$
TYPE=TABHEADING,
     LINE=1,
     POSITION=(1.1 1),
     WRAP=ON,
     DIMENSION=(6 1),
     NAME=TEXT, FONT='ARIAL', COLOR='RED', 
$
TYPE=TABHEADING, OBJECT=TEXT, SIZE=15, STYLE=NORMAL ,$
TYPE=TABHEADING, OBJECT=FIELD, SIZE=15, STYLE=ITALIC ,$
$
TYPE=HEADING,
     OBJECT=Line,
     POSITION=(1.055556 1.402778),
     ENDPOINT=(4.3 1.4),
     NAME=LINE,
     BORDER-TOP=1.00,
$
TYPE=DATAMATRIX,
     NAME=Data Matrix,
     POSITION=(1.1 1.5),
     DIMENSION=(5 3),$
ENDSTYLE
END

Creating a Tabular Report Using an SQL Request

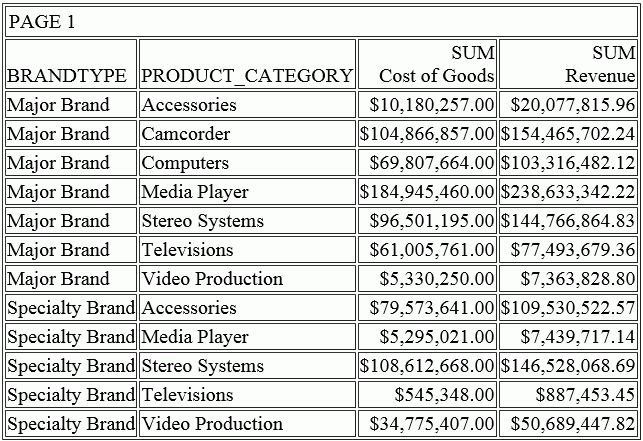
You can retrieve information using the SQL reporting language, and can directly incorporate WebFOCUS formatting commands into the procedure. The following request uses the SQL SELECT statement to create a simple tabular report.

SQL
SELECT BRANDTYPE, PRODUCT_CATEGORY, SUM(COGS_US), SUM(REVENUE_US)
FROM WF_RETAIL
GROUP BY BRANDTYPE, PRODUCT_CATEGORY;
END

The output is:

Generating an SQL Script as a Subquery to Another Request

The following request uses the ON TABLE HOLD FORMAT SQL_SCRIPT command to automatically generate a file containing an SQL SELECT statement that can be used as a subquery in another request. The request includes a WHERE phrase to exclude the Accessories product category.

TABLE FILE WF_RETAIL
SUM MSRP_US
BY PRODUCT_CATEGORY
WHERE PRODUCT_CATEGORY NE 'Accessories'
ON TABLE HOLD AS app1/sql1 FORMAT SQL_SCRIPT
END 

The following is the Master File that is generated by the ON TABLE HOLD FORMAT SQL_SCRIPT command:

FILENAME=SQL1, SUFFIX=SQLMSS  , $
  SEGMENT=SQL1, SEGTYPE=S0, $
    FIELDNAME=PRODUCT_CATEGORY, ALIAS=E01, USAGE=A40V, ACTUAL=A40V,
      MISSING=ON,
      TITLE='Product,Category', $
    FIELDNAME=MSRP_US, ALIAS=E02, USAGE=D20.2, ACTUAL=D8,
      MISSING=ON,
      TITLE='MSRP', $

The following is the Access File that is generated by the ON TABLE HOLD FORMAT SQL_SCRIPT command:

SEGNAME=SQL1, 
   CONNECTION=wfretail, 
   DATASET=APP1/SQL1.SQL, 
   KEY=PRODUCT_CATEGORY, 
   SUBQUERY=Y, $

The following is the SQL SELECT statement that is generated by the ON TABLE HOLD FORMAT SQL_SCRIPT command and that you can use as a subquery:

SELECT T18."PRODUCT_CATEGORY" AS "E01", SUM(T1."REVENUE_US") AS "E02",
SUM(T1."COGS_US") AS "E03 FROM (wrd_wf_retail_sales T1 LEFT OUTER JOIN
  wrd_wf_retail_product T18 ON T18."ID_PRODUCT" = T1."ID_PRODUCT")
GROUP BY T18."PRODUCT_CATEGORY"

The following is a TABLE request that uses the sql1 file:

TABLE FILE wf_retail
SUM REVENUE_US
BY PRODUCT_CATEGORY WHERE DB_INFILE(sql1, PRODUCT_CATEGORY, PRODUCT_CATEGORY) 
END

The following is the generated SQL request in which the sql1 file is used as a subquery:

SELECT
  T18."PRODUCT_CATEGORY",
   SUM(T1."REVENUE_US")
   FROM 
  wrd_wf_retail_sales T1,
  wrd_wf_retail_product T18
   WHERE
  (T18."ID_PRODUCT" = T1."ID_PRODUCT") AND 
  (T18."PRODUCT_CATEGORY" IN (SELECT "E01" 
   FROM 
  (SELECT T18."PRODUCT_CATEGORY" AS "E01",
   SUM(T1."MSRP_US") AS "E02
   FROM
  wrd_wf_retail_sales T1,
  wrd_wf_retail_product T18
   WHERE 
  (T18."ID_PRODUCT" = T1."ID_PRODUCT") AND 
  (T18."PRODUCT_CATEGORY" <> 'Accessories')
   GROUP BY 
  T18."PRODUCT_CATEGORY") S1))
   GROUP BY
  T18."PRODUCT_CATEGORY
   ORDER BY
  T18."PRODUCT_CATEGORY";

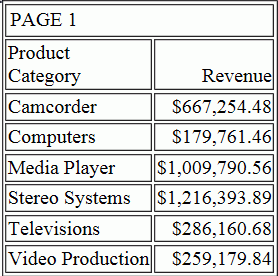
The output is shown in the following image. Note that the Accessories product category is omitted from the report because of the subquery.