Using Print Display Formats: PDF, PS

In this section:

PDF (Adobe Acrobat Portable Document Format) is most often used to distribute and share electronic documents through the web. It is especially useful if you want a report to maintain its presentation and layout regardless of a browser or printer type. For details, see Using PDF Display Format.

PS (PostScript format), a print-oriented page description language, is most often used to send a report directly to a printer. While used less frequently as an online display format, you can display PS report output on your monitor before printing it. For details, see Using PostScript (PS) Display Format.

With the exception of drill-downs, all of the report formatting features that are supported for PDF are also supported for PostScript output.

You can specify that a report display as a PDF or PS document when you run the report. You can use either:

You can combine multiple styled reports into a single PDF or PS file. For details, see Laying Out the Report Page.

PDF and PS reports, including compound reports, can be distributed using ReportCaster. See the TIBCO WebFOCUS® ReportCaster Guide for details.

Using PDF Display Format

In this section:

How to:

You can display a report as a PDF document. PDF (Adobe Acrobat Portable Document Format) supports most StyleSheet attributes, allowing for full report formatting. The wide range of StyleSheet features supported for PDF are described throughout this documentation.

PDF prints and displays a document consistently, regardless of the application software, hardware, and operating system used to create or display the document.

The report opens in Adobe Acrobat or Acrobat Reader within a web browser. To display a PDF report, a computer must have Adobe Acrobat Reader installed. For free downloads of Acrobat Reader, go to http://www.adobe.com.

Limit: Adobe Acrobat PDF format limits the number of pages, hyperlinks, and images in a document. For information about what limits this creates for a WebFOCUS report in PDF format, see Saving and Reusing Your Report Output.

Other print-oriented display formats. You can also display a report as a PostScript document. For more information, see Using PostScript (PS) Display Format.

Syntax: How to Compress a PDF Output File

File compression can be used to minimize the physical size of the PDF output file. Using this PDF-specific feature, you can generate smaller PDF files, making them easier to store and distribute, while having no visible effect on the formatting or content of the reports they contain.

SET FILECOMPRESS = {ON|OFF}

where:

ON
Compresses PDF output files.
OFF
Does not compress PDF output files. OFF is the default value.

This command applies to PDF output only. It is ignored by all other output formats, such as HTML and Excel.

Displaying Watermarks in PDF Output

In this section:

Reference:

Watermarks are images or text strings that are placed on the bottom layer of a document and displayed through the transparent layered content.

WebFOCUS backcolor does not support transparency. Therefore, standard images placed below it on the page may be obscured. To resolve this, in PDF reports, WebFOCUS mirrors the approach taken by standard printers, and places an opaque image on the top of the document layers. With this approach, the layers of the document will be visible beneath the transparent watermark image.

Watermark images are provided by the report developer. When creating a transparent image, the image needs to be created in GIF format with a transparent background.

Reference: Inserting Images in PDF Reports With Backcolor

Watermarks are supported for PDF output in compound reports and in single TABLE requests. Each document supports a single active watermark image. This image is designated as the watermark image, by defining the placement order within the Z-INDEX attribute.

The first image with a Z-INDEX value will be considered the active watermark for the current document. Any subsequent images, defined with style sheet attributes for Z-INDEX or OPACITY, will be displayed as standard WebFOCUS images.

Watermark images are designated by defining the following attributes in the style sheet for the transparent GIF.

Z-INDEX=TOP

Designates that the image is to be handled as a watermark image and should always be placed on top of all other objects on the page. This value will be respected as the topmost layer and will be supported with other layers in future releases.

OPACITY=n

Where n represents the percent (%) of OPACITY to be applied to the image. The greater the OPACITY, the less transparent the image. Less of the underlying report will be visible below the image. The value for n can be any number from 0 through 100. If a value is not specified, it defaults to 100%, presenting a fully opaque image.

Within a single TABLE request:

TYPE=<REPORT|HEADING>, OBJECT=IMAGE, IMAGE=<image.gif>,
Z-INDEX=TOP, OPACITY=15, POSITION=(.25 .25), DIMENSION=(8 10.5),$

Within compound syntax:

On Page Master

PAGELAYOUT=ALL, NAME='Page Master', $
OBJECT=IMAGE, IMAGE= internalonlyport.GIF, Z-INDEX=TOP, OPACITY=15,
POSITION=(.25 .25), DIMENSION=(8 10.5),$

On Page Layout

PAGELAYOUT=1, NAME='Page Layout1', $
OBJECT=IMAGE, IMAGE= internalonlyport.GIF, Z-INDEX=TOP, OPACITY=15,
POSITION=(.25 .25), DIMENSION=(8 10.5),$
Example: Inserting Transparent Images Into a PDF Report

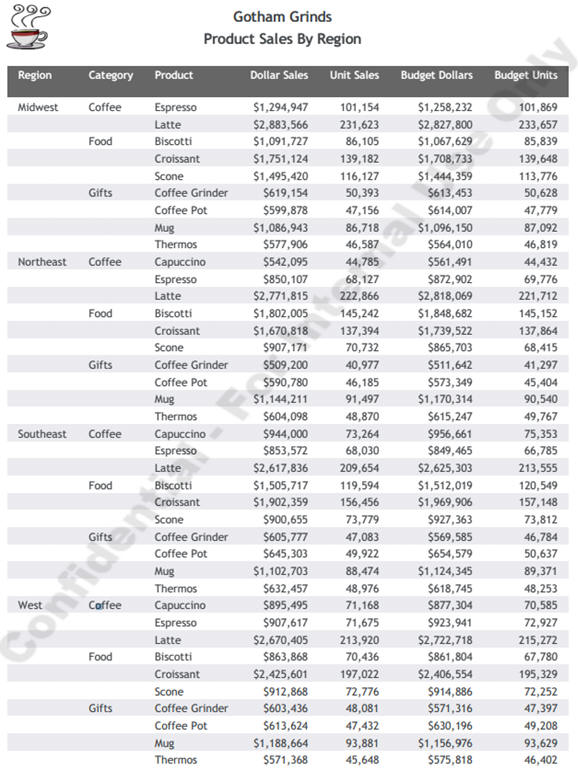
The following request against the GGSALES data source places the coffee image (coffee.gif) on the page and layers the watermark image (internalonlyport.gif) on top. These images are displayed on every page of the report.

TABLE FILE GGSALES
SUM
     GGSALES.SALES01.DOLLARS/D12CM
     GGSALES.SALES01.UNITS/D12C
     GGSALES.SALES01.BUDDOLLARS/D12CM
     GGSALES.SALES01.BUDUNITS/D12C
BY GGSALES.SALES01.REGION
BY GGSALES.SALES01.CATEGORY
BY GGSALES.SALES01.PRODUCT
HEADING
"Gotham Grinds"
"Product Sales By Region"
ON TABLE SET PAGE-NUM NOLEAD
ON TABLE NOTOTAL
ON TABLE PCHOLD FORMAT PDF
ON TABLE SET HTMLCSS ON
ON TABLE SET STYLE *
   INCLUDE = endeflt,
   TOPMARGIN=.5,
   BOTTOMMARGIN=.5,
   LEFTMARGIN=1,
   RIGHTMARGIN=1,
$
TYPE=REPORT,
    OBJECT=IMAGE,
    IMAGE=internalonlyport.gif,
    POSITION=(+0.70000 +0.70000), 
    SIZE=(7 7.5),
    Z-INDEX=TOP, OPACITY=15,  
$
TYPE=REPORT,
    OBJECT=IMAGE,
    IMAGE=coffee.gif,
    POSITION=(+1.0 +0.5),
    SIZE=(.5 .5),
$ENDSTYLE
END

The output is:
Features Supported

The following core PDF features are supported with watermarks:

  • Standard TABLE requests, including reports with paneling
  • Compound report (MERGE=OFF)
  • Coordinated compound report (MERGE=ON)
  • Old compound syntax (OPEN/CLOSE)
  • Drilldown
  • Drillthrough
  • Bookmarks
  • Borders/backcolor

Limits

  • OPACITY must be between 0 and 100, inclusive.
  • A single watermark image is supported for a single document.

Usage Notes

  • For new compound syntax, the first watermark image found in the syntax will be used for the report. Any other watermark images found in the code will be ignored or displayed as standard WebFOCUS images.
  • For old compound syntax, the watermark image must be in the first report. If it is not in the first report, a FOC3362 message is generated.
  • The embedded PDF viewer for a browser may not display NLS characters correctly. If NLS characters do not display correctly, use font embedding, as described in Adding PostScript Type 1 Fonts for PS and PDF Formats, or configure your browser to use Adobe Reader.

Scaling PDF Report Output to Fit the Page Width

Reference:

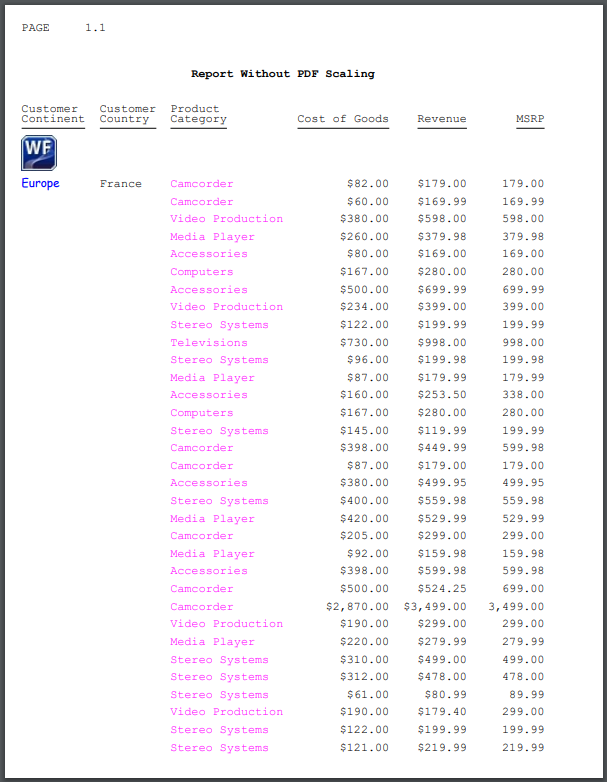
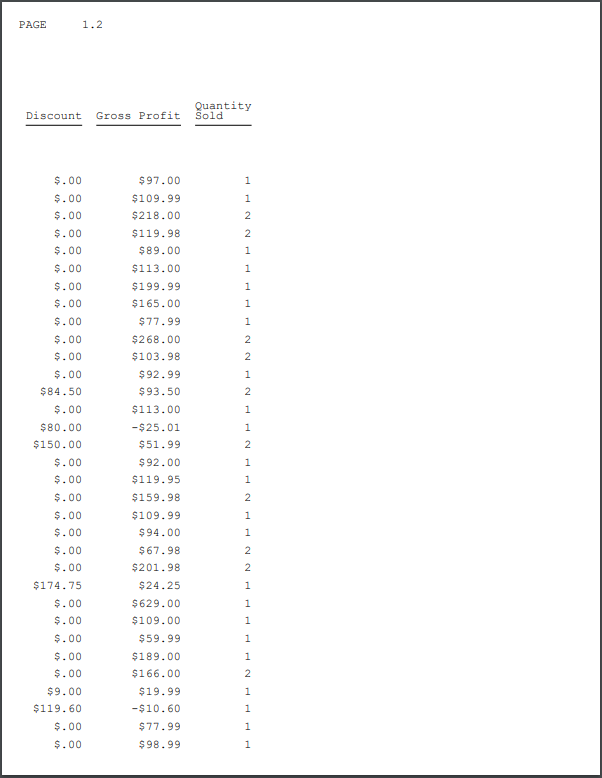
By default, if PDF report output is too wide to fit on a single page, the report generates multiple panels of the same page for the columns that do not fit. The page numbers specify the page and panel numbers. For example, page numbers 1.1 and 1.2 represent page 1/panel 1 and page 1/panel 2.

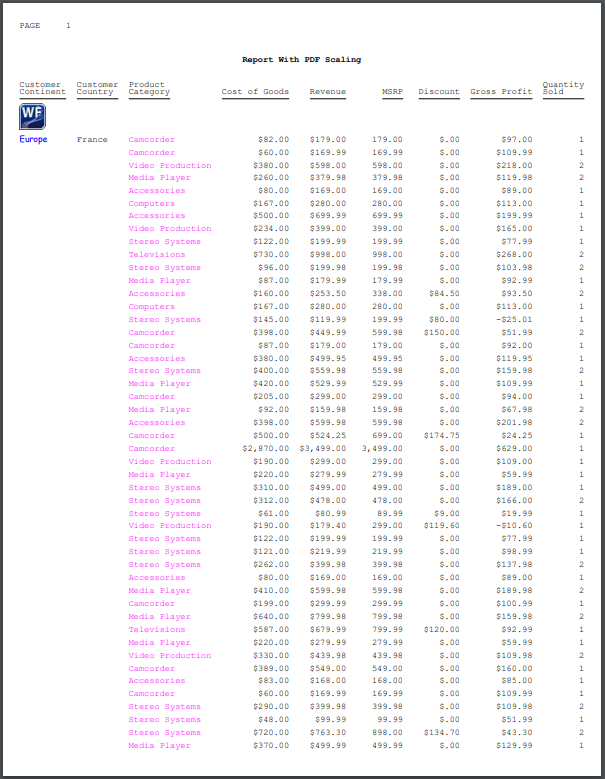
You can scale the output to fit across the width of the page using the PAGE-SCALE StyleSheet attribute or the PAGE-SCALE SET parameter.

Reference: Usage Notes for PAGE-SCALE

  • PAGE-SCALE is supported for PDF report output only.
  • When a page is scaled to fit more content on the page horizontally, fewer vertical pages may be generated, as well.
Example: Scaling PDF Report Output to Fit the Page Width

The following request generates PDF report output without using page scaling.

SET SQUEEZE=ON
DEFINE FILE WF_RETAIL_LITE
SHOWPIC/A100='C:\ibi\WebFOCUS82\samples\web_resource\signin\images\favicon.jpg';
END

TABLE FILE WF_RETAIL_LITE
PRINT  PRODUCT_CATEGORY
COGS_US REVENUE_US MSRP_US DISCOUNT_US GROSS_PROFIT_US QUANTITY_SOLD
BY SHOWPIC NOPRINT
BY CONTINENT_NAME
BY COUNTRY_NAME
WHERE COUNTRY_NAME EQ 'FRANCE' OR 'ITALY'
WHERE RECORDLIMIT=3000;
ON TABLE SUBHEAD
" "
" "
" Report Without PDF Scaling "
" "
" "
ON COUNTRY_NAME SUBHEAD
" "
" "
ON TABLE PCHOLD FORMAT PDF

ON TABLE SET STYLE *
TYPE=DATA, COLUMN=CONTINENT_NAME, FONT=COMIC SANS MS,
  COLOR=BLUE, STYLE=BOLD+ITALIC, $
TYPE=DATA, COLUMN=PRODUCT_CATEGORY, COLOR=FUSCHIA, $
TYPE=HEADING, STYLE=BOLD, COLOR=RGB(0 35 95), SIZE=12, JUSTIFY=CENTER, $
TYPE=SUBHEAD, SIZE=18, STYLE=BOLD, COLOR=RED, $
TYPE=SUBHEAD, IMAGE=(SHOWPIC), SIZE=(.5 .5), $
TYPE=TABHEADING, SIZE=12, STYLE=BOLD, JUSTIFY=CENTER, $
ENDSTYLE
END

Note: The image displayed in the subheading is distributed with WebFOCUS. The path to the image is dependent on your platform and installation options. The path in the request uses the default installation directory on Windows.

The output is too wide for the page and is paneled. Page 1.1 has the columns that fit across the width of the page, as shown in the following image.
Page 1.2 has the remaining columns, as shown in the following image.
The following version of the request uses page scaling.

SET SQUEEZE=ON
DEFINE FILE WF_RETAIL_LITE
SHOWPIC/A100='C:\ibi\WebFOCUS82\samples\web_resource\signin\images\favicon.jpg';
END

TABLE FILE WF_RETAIL_LITE
PRINT  PRODUCT_CATEGORY
COGS_US REVENUE_US MSRP_US DISCOUNT_US GROSS_PROFIT_US QUANTITY_SOLD
BY SHOWPIC NOPRINT
BY CONTINENT_NAME
BY COUNTRY_NAME
WHERE COUNTRY_NAME EQ 'FRANCE' OR 'ITALY'
WHERE RECORDLIMIT=3000;
ON TABLE SUBHEAD
" "
" "
" Report With PDF Scaling "
" "
" "
ON COUNTRY_NAME SUBHEAD
" "
" "
ON TABLE PCHOLD FORMAT PDF

ON TABLE SET STYLE *
TYPE=REPORT, PAGE-SCALE=AUTO, $
TYPE=DATA, COLUMN=CONTINENT_NAME, FONT=COMIC SANS MS,
  COLOR=BLUE, STYLE=BOLD+ITALIC, $
TYPE=DATA, COLUMN=PRODUCT_CATEGORY, COLOR=FUSCHIA, $
TYPE=HEADING, STYLE=BOLD, COLOR=RGB(0 35 95), SIZE=12, JUSTIFY=CENTER, $
TYPE=SUBHEAD, SIZE=18, STYLE=BOLD, COLOR=RED, $
TYPE=SUBHEAD, IMAGE=(SHOWPIC), SIZE=(.5 .5), $
TYPE=TABHEADING, SIZE=12, STYLE=BOLD, JUSTIFY=CENTER, $
ENDSTYLE
END

The output is shown in the following image. All of the columns fit across the width of the page, with no paneling.
Aligning a PDF Report Within a Page

You can left-align, center, or right-align an entire PDF report within a page by using the JUSTIFYREPORT StyleSheet attribute.

To left-align, center, or right-align a PDF report, include the following syntax in your procedure.

TYPE=REPORT, JUSTIFYREPORT={LEFT|CENTER|RIGHT},$

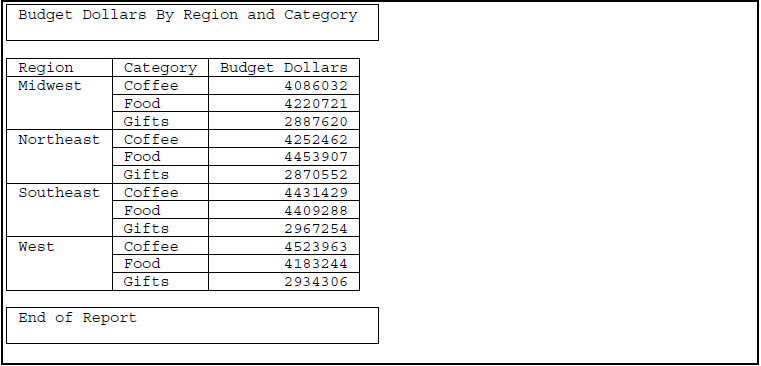
Example: Left-Aligning a PDF Report Within a Page

To left-align a PDF report, include the TYPE=REPORT, JUSTIFYREPORT=LEFT attribute, as shown in the following procedure.

TABLE FILE GGSALES
SUM BUDDOLLARS
BY REGION
BY CATEGORY

HEADING
"Budget Dollars By Region and Product Category "
" "
FOOTING
"End of Report "
" "
ON TABLE SET PAGE-NUM NOLEAD
ON TABLE PCHOLD FORMAT PDF

ON TABLE SET STYLE *
SQUEEZE=ON, GRID=ON, $
TYPE=REPORT, JUSTIFYREPORT=LEFT,$
ENDSTYLE

END

The output is:
Example: Centering a PDF Report Within a Page

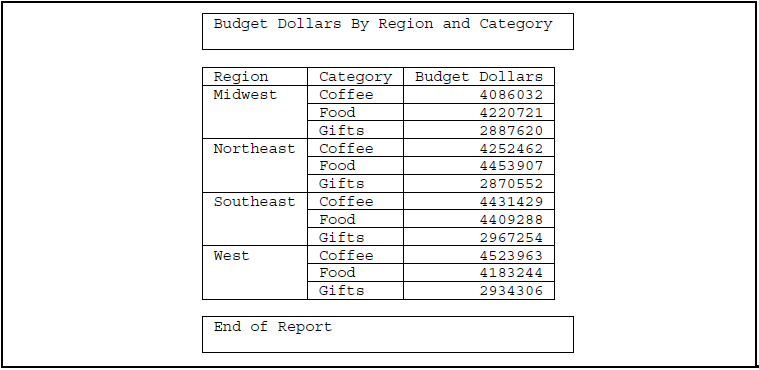
To center a PDF report, include the TYPE=REPORT, JUSTIFYREPORT=CENTER attribute, as shown in the following procedure.

TABLE FILE GGSALES
SUM BUDDOLLARS
BY REGION
BY CATEGORY

HEADING
"Budget Dollars By Region and Product Category "
" "
FOOTING
"End of Report "
" "
ON TABLE SET PAGE-NUM NOLEAD
ON TABLE PCHOLD FORMAT PDF

ON TABLE SET STYLE *
SQUEEZE=ON, GRID=ON, $
TYPE=REPORT, JUSTIFYREPORT=CENTER,$
ENDSTYLE

END

The output is:
Example: Right-Aligning a PDF Report Within a Page

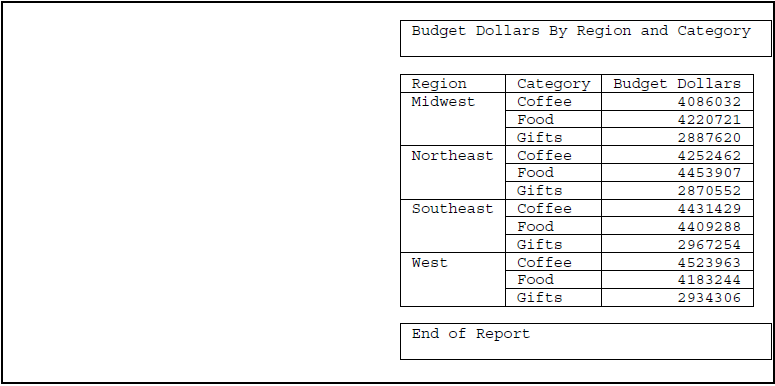
To right-align a PDF report, include the TYPE=REPORT, JUSTIFYREPORT=RIGHT attribute, as shown in the following procedure.

TABLE FILE GGSALES
SUM BUDDOLLARS
BY REGION
BY CATEGORY

HEADING
"Budget Dollars By Region and Product Category "
" "
FOOTING
"End of Report "
" "
ON TABLE SET PAGE-NUM NOLEAD
ON TABLE PCHOLD FORMAT PDF

ON TABLE SET STYLE *
SQUEEZE=ON, GRID=ON, $
TYPE=REPORT, JUSTIFYREPORT=RIGHT,$
ENDSTYLE

END

The output is:
WebFOCUS PDF Report Accessibility Support

In this section:

WebFOCUS PDF report accessibility provides support for assistive technologies, such as screen readers.

Note: For information on accessibility principles and font types and usage, see the WebAIM website at https://webaim.org/techniques/fonts/#intro.

WebFOCUS PDF report output complies with accessibility requirements as a result of the following features:

  • A SET command that activates accessibility changes to WebFOCUS PDF output code.
  • As of Release 8206, a DisplayOn=DOC-HEADING StyleSheet attribute that identifies the main document heading in a compound report.
    • In a single standalone report (non-compound document), the first ON TABLE SUBHEAD string is automatically tagged as <H1>. Other page headings and footings, as many as there are available, are tagged as <H2>.
    • In a compound report, the DisplayOn=DOC-HEADING attribute should be added to a single fixed-positioned component that will contain the ON TABLE SUBHEAD string. The DOC-HEADING attribute indicates that the ON TABLE SUBHEAD string entered in the fixed-positioned component will be tagged as <H1> and represent the main document heading, which will be displayed once on the first physical page of the document. Other page headings and footings, as many as there are available, are tagged as <H2>.
  • A USEASTITLES StyleSheet attribute that places and aligns custom column titles in a heading.
  • A BOOKMARK StyleSheet attribute that enables you to go directly to a destination in a document.
  • An ALT StyleSheet attribute that describes an image embedded in a report.
  • An ALT StyleSheet attribute that provides a description of a drill-down component.
  • A LANG attribute that identifies the default language of the document.
  • Report output, with the SET ACCESSPDF command enabled, is created with BYDISPLAY=ON, which produces a value in each cell for sort (BY) fields.

Note: It is the responsibility of the report developer to follow general accessibility standards in order for the report to be 508 compliant.

Controlling PDF Code For Accessibility

How to:

The SET ACCESSPDF command enables accessibility for PDF reports.

Syntax: How to Control PDF Code Accessibility
  • For all requests in a procedure or in a profile:
    SET ACCESSPDF = {508|OFF}
  • For a single request:
    ON TABLE SET ACCESSPDF {508|OFF}

where:

508

Generates a PDF file compliant with Section 508 accessibility requirements.

OFF

Generates a PDF file that is non-compliant with Section 508 accessibility requirements. This value is the default.

Example: Controlling PDF Code for Accessibility

The following request generates accessible PDF report output. The SET and SUBHEAD commands that enable accessibility appear in boldface.

TABLE FILE GGSALES
SUM
   DOLLARS/D12M
BY REGION
BY CATEGORY
ON REGION SUBTOTAL AS 'Total for '
HEADING
" "
"Sales Report"
" "
ON TABLE SET ACCESSPDF 508 
ON TABLE SET PAGE-NUM OFF
ON TABLE COLUMN-TOTAL AS 'Grand Total'
ON TABLE SUBHEAD "Regional Totals by Category"
ON TABLE PCHOLD FORMAT PDF
ON TABLE SET STYLE *
TYPE=REPORT, FONT='ARIAL',$
TYPE=TITLE,  COLUMN=N1, FONT='ARIAL', STYLE=BOLD,$
TYPE=TITLE,  COLUMN=N2, FONT='ARIAL', STYLE=BOLD,$
TYPE=TITLE,  COLUMN=N3, FONT='ARIAL', STYLE=BOLD,$
TYPE=HEADING, SIZE=14, STYLE=BOLD,$ 
TYPE=TABHEADING, SIZE=16, STYLE=BOLD,$
TYPE=SUBTOTAL, BY=1, STYLE=BOLD,$
TYPE=GRANDTOTAL, FONT='ARIAL', STYLE=BOLD,$
ENDSTYLE
END

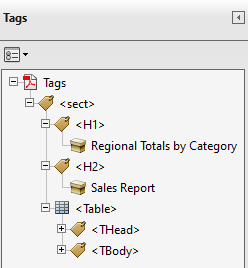
WebFOCUS generates the following tags when SET ACCESSPDF is set to 508.

Page Heading

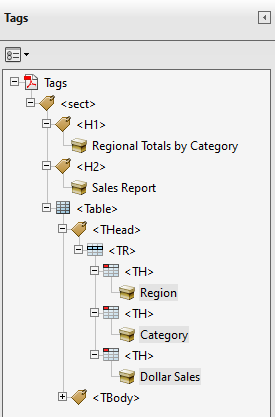
Heading tags <H1> and <H2> and are automatically generated by WebFOCUS.
Column Titles

Row tags <TR> and header cell tags <TH> are generated by WebFOCUS. The column title is aligned with the appropriate data columns.
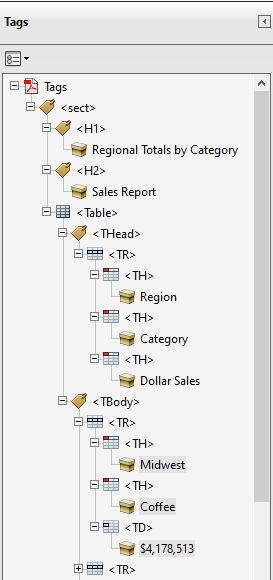
Data Cells

Row tags <TR> and header cell tags <TH> are generated by WebFOCUS.
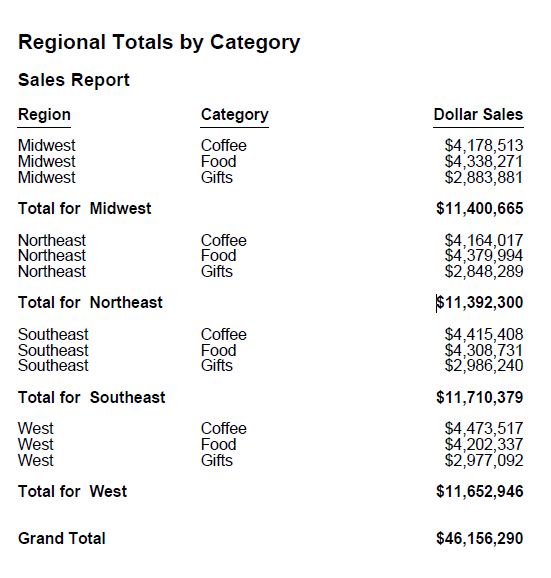
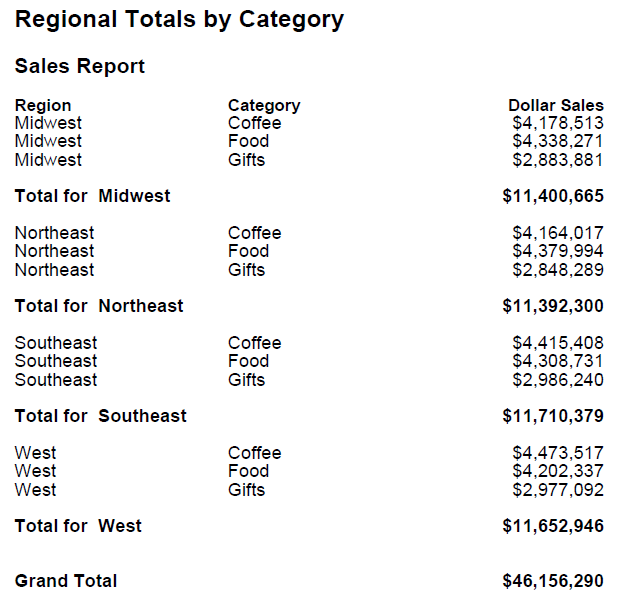
The output is:
Aligning Elements in a Page Heading With Column Data

How to:

The USEASTITLES StyleSheet attribute for PDF reports enables you to place and align custom column titles (AS='text') in the heading, rather than use the default column titles. The USEASTITLES attribute associates column titles in the heading with the appropriate data column.

Syntax: How to Align Elements in a Page Heading With Column Data
TYPE=HEADING, USEASTITLES=ON, HEADALIGN=BODY,$

USEASTITLES=ON can only be set for the entire HEADING. HEADALIGN=BODY must also be set for the HEADING.

To use this attribute in App Studio:

  • The Report Output Format is PDF.
  • The Alignment Grid is enabled for the Page Heading.
    • Add a Page Heading to the report.
    • Right-click the Page Heading and select Alignment Grid.
    • On the Insert Alignment Grid dialog box, select the Align with Data option and click OK.
    • In the Page Heading, right-click the alignment grid and select Align column title (Section 508).
Example: Aligning Elements in a Page Heading to Column Data

The USEASTITLES attribute that enables the alignment of the heading elements is in bold. Note that the HEADALIGN=BODY attribute is also in bold.

TABLE FILE GGSALES
SUM 
   DOLLARS/D12M AS ''
BY REGION AS ''
BY CATEGORY AS ''
ON REGION SUBTOTAL AS 'Total for '
HEADING
" "
"Sales Report"
" <+0> <+0> "
"Region<+0>Category<+0>Dollar Sales"
ON TABLE SET ACCESSPDF 508
ON TABLE SET PAGE-NUM OFF 
ON TABLE COLUMN-TOTAL AS 'Grand Total'
ON TABLE SUBHEAD "Regional Totals by Category <+1"
ON TABLE PCHOLD FORMAT PDF
ON TABLE SET STYLE *
$
TYPE=REPORT, FONT='ARIAL',$
TYPE=TITLE, COLUMN=N1, FONT='ARIAL', STYLE=BOLD,$
TYPE=TITLE, COLUMN=N2, FONT='ARIAL', STYLE=BOLD,$
TYPE=TITLE, COLUMN=N3, FONT='ARIAL', STYLE=BOLD,$
TYPE=HEADING, SIZE=14, STYLE=BOLD,
HEADALIGN=BODY, USEASTITLES=ON,$ 
TYPE=HEADING, LINE=2, OBJECT=TEXT, ITEM=1, COLSPAN=3, JUSTIFY=LEFT,$
TYPE=HEADING, LINE=3, OBJECT=TEXT, ITEM=1, COLSPAN=1, JUSTIFY=LEFT,$
TYPE=HEADING, LINE=3, OBJECT=TEXT, ITEM=2, SIZE=10, COLSPAN=1,
     JUSTIFY=RIGHT,$
TYPE=HEADING, LINE=3, OBJECT=TEXT, ITEM=3, SIZE=10, COLSPAN=1,
     JUSTIFY=RIGHT,$
TYPE=HEADING, LINE=4, OBJECT=TEXT, ITEM=1, SIZE=11, COLSPAN=1,
     JUSTIFY=LEFT,$
TYPE=HEADING, LINE=4, OBJECT=TEXT, ITEM=2, SIZE=11, COLSPAN=1,
     JUSTIFY=LEFT,$
TYPE=HEADING, LINE=4, OBJECT=TEXT, ITEM=3, SIZE=11, COLSPAN=1,
     JUSTIFY=RIGHT,$
TYPE=TABHEADING, SIZE=16, STYLE=BOLD,$
TYPE=SUBTOTAL, BY=1, STYLE=BOLD,$
TYPE=GRANDTOTAL, FONT='ARIAL', STYLE=BOLD,$
ENDSTYLE
END

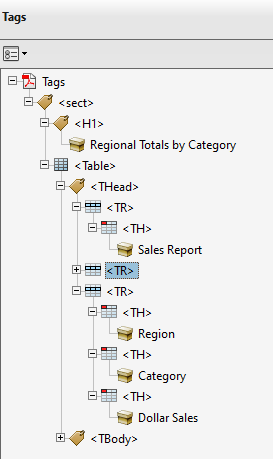
WebFOCUS generates the following tags when the USEASTITLES attribute is used.

Page Heading and Column Titles

Row tags <TR> and header cell tags <TH> are generated by WebFOCUS. Along with the Page Heading, the column titles are also tagged as header cells <TH>.
The output is:
Adding Bookmarks

Bookmarks are links in the navigation pane that enable you to go directly to a destination in the document. Using bookmarks enables you to jump from the tagged items in the navigation pane directly to the page where the item is located. The benefit of using bookmarks in conjunction with a screen reader is that you will be able to navigate a defined hierarchy without having to listen to the reading of the entire document. For more information about navigating PDF Bookmarks, see the Adobe documentation on the Adobe Web site, www.adobe.com.

Note:

  • Since a PDF document is a complete file, you can use bookmarks and scrolling to navigate through the file. You can easily navigate through a document, especially documents that are two or more pages in length.
  • You can generate bookmarks within WebFOCUS by including the BOOKMARKS and/or TOC object in the compound layout syntax. Then, in the component definitions, specify the Table of Contents level and description. You can also optionally specify the BYTOC levels.
  • For 508 compliance, it is recommended that the Bookmark object be used.
Example: Adding Bookmarks to the Compound Layout

The BOOKMARK attribute that enables the alignment is in bold. The TOC-LEVEL=1 and BYTOC=2 attributes for both reports are also in bold. These attributes are explained below:

  • TOC-LEVEL=n

    Defines n as the Table of Contents level for the report layout object. This option defines the hierarchical order of objects within the Table of Contents.

    0 = the object is not shown in the Table of Contents.

    1 = the object is shown as a first-level item in the Table of Contents.

    2 = the object is shown as a second-level item in the Table of Contents, and so on.

  • BYTOC=m

    Specifies the number of BY fields to be included within the current component entry (m).

The following request adds bookmarks and specifies the main document heading for the compound report. The report0 component uses the DisplayOn=DOC-HEADING attribute to indicate that the ON TABLE SUBHEAD string from the report0 component should be tagged as the main document heading in the PDF output.

SET ACCESSPDF = 508
COMPOUND LAYOUT PCHOLD FORMAT PDF
OBJECT=BOOKMARKS,$ 
SECTION=S1, LAYOUT=ON, MERGE=OFF, ORIENTATION=PORTRAIT,$
PAGELAYOUT=1,$
COMPONENT=report0, position=(1 0.5), Dimension=(* *),
DisplayOn=DOC-HEADING, $
COMPONENT=report1, TEXT='This is the Title for Report 1',
TOC-LEVEL=1,
BYTOC=2, 
POSITION=(1 1), DIMENSION=(* *),$
COMPONENT=report2, TEXT='Sales By Region',
TOC-LEVEL=1, 
BYTOC=2, 
POSITION=(+0.00 +0.519), DIMENSION=(* *), RELATIVE-TO='report1',
REQUIRED-SPACE=(*3.5), RELATIVE-POINT=BOTTOM-LEFT, POSITION-POINT=TOP-LEFT,$
END
SET COMPONENT=report0
TABLE FILE GGSALES
BY CATEGORY NOPRINT
ON TABLE SUBHEAD
" "
"DOLLAR SALES REPORT"
" "
" "
ON TABLE SET PAGE-NUM OFF
ON TABLE HOLD FORMAT PDF
ON TABLE SET STYLE *
TYPE=TABHEADING , SIZE=18, FONT=ARIAL, STYLE=BOLD, JUSTIFY=CENTER,$
ENDSTYLE
END

SET COMPONENT=report1
TABLE FILE GGSALES
SUM DOLLARS/F8M
BY CATEGORY
BY PRODUCT
BY REGION
BY ST
ON CATEGORY PAGE-BREAK
WHERE PRODUCT NE 'Capuccino'
ON CATEGORY SUBTOTAL AS 'Subtotal for: '
HEADING
"Sales by Category"
" "
ON TABLE HOLD FORMAT PDF
ON TABLE SET PAGE-NUM OFF
ON TABLE NOTOTAL
ON TABLE SET STYLE *
TYPE=REPORT, SIZE=10, FONT=ARIAL,$
TYPE=HEADING, SIZE=14, FONT=ARIAL, STYLE=BOLD, JUSTIFY=CENTER,$
TYPE=SUBTOTAL, SIZE=10, STYLE=BOLD,$
ENDSTYLE
END
SET COMPONENT=report2
TABLE FILE GGSALES
SUM DOLLARS/F8M
BY REGION
BY ST
BY CATEGORY
BY PRODUCT
ON REGION PAGE-BREAK
WHERE PRODUCT NE 'Capuccino'
ON REGION SUBTOTAL AS 'Subtotal for: '
HEADING
"Sales by Region"
" "
ON TABLE HOLD FORMAT PDF
ON TABLE SET PAGE-NUM OFF
ON TABLE NOTOTAL
ON TABLE SET STYLE *
TYPE=REPORT, SIZE=10, FONT=ARIAL,$
TYPE=HEADING, SIZE=14, FONT=ARIAL, STYLE=BOLD, JUSTIFY=CENTER,$
TYPE=SUBTOTAL, SIZE=10, STYLE=BOLD,$
ENDSTYLE
END
COMPOUND END

The report output, with bookmarks, is shown below.
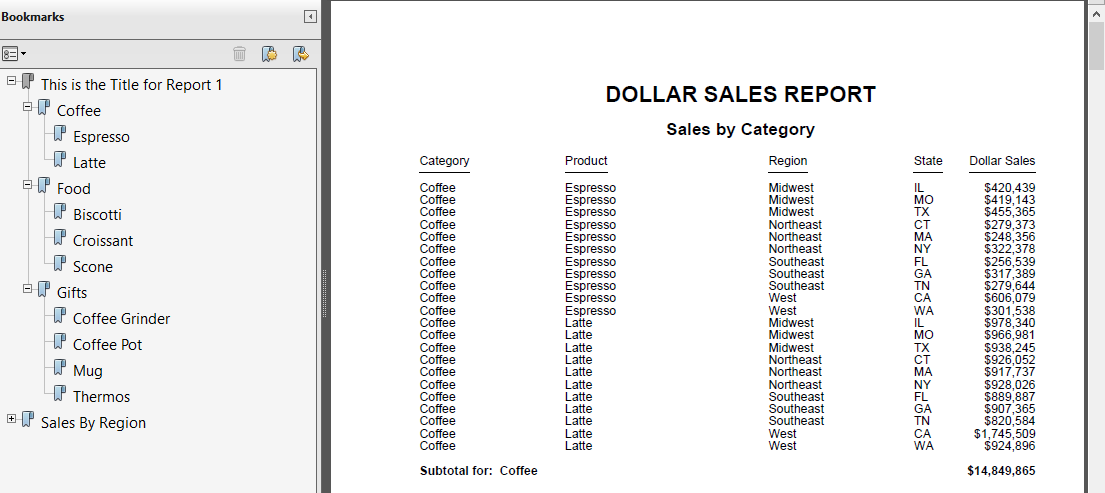
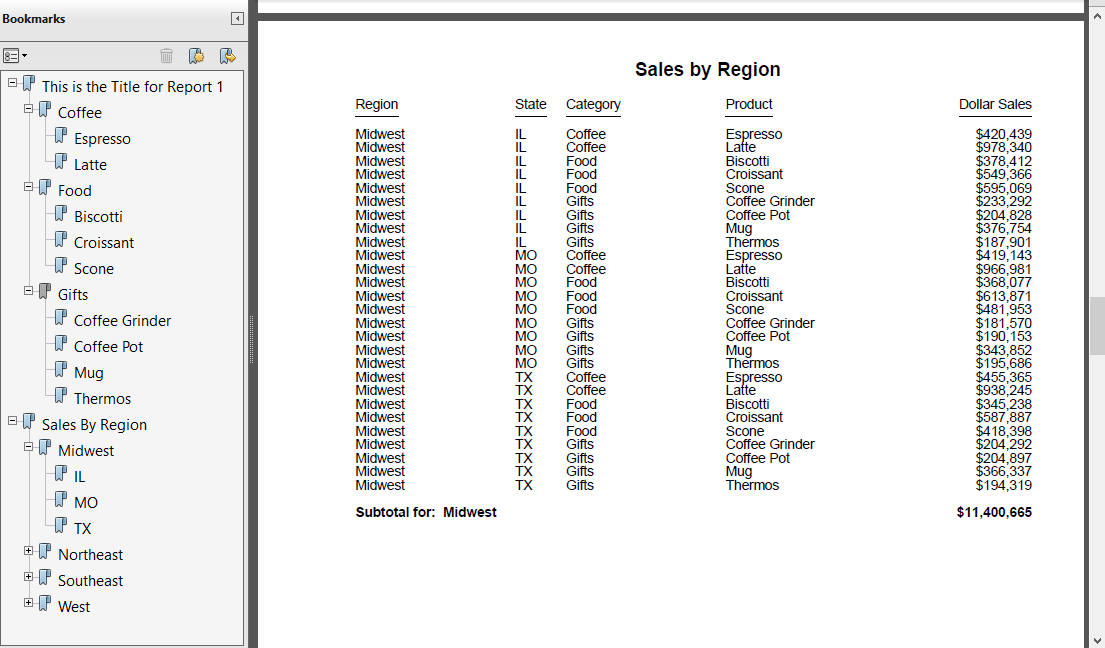
Notice that the hierarchy tree in the Bookmarks pane has two levels for each report and is determined with the BYTOC attribute. The title for each report in the Bookmarks tree is determined with the TEXT attribute, as shown in the following image.
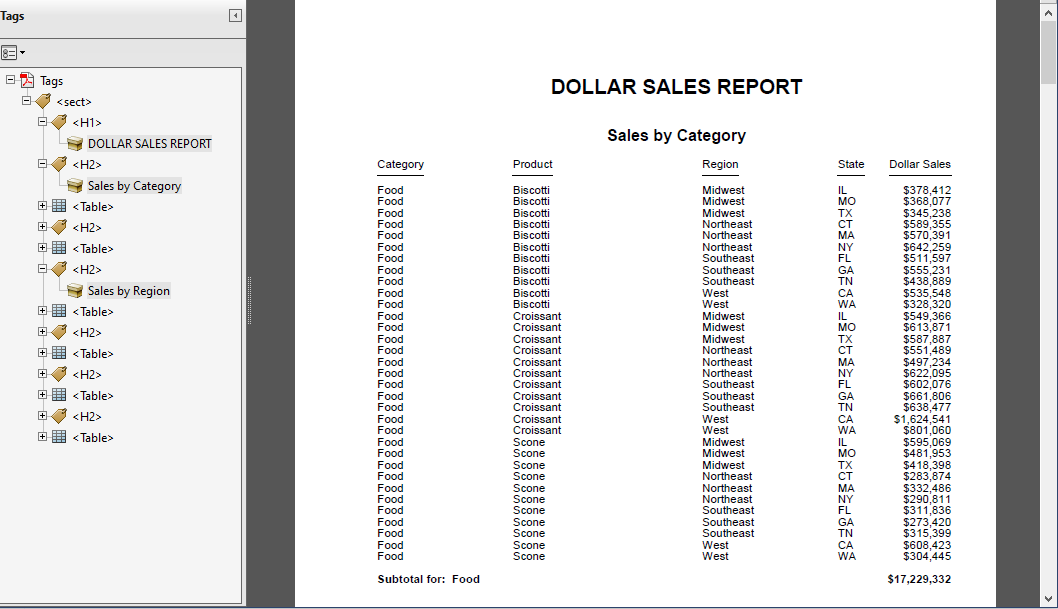
The first three pages of the PDF output, with the Tags panel, are shown in the following images. Note that only the first page of output contains the <H1> heading, DOLLAR SALES REPORT. The other headings are tagged as <H2>.

Page 1
Page 2
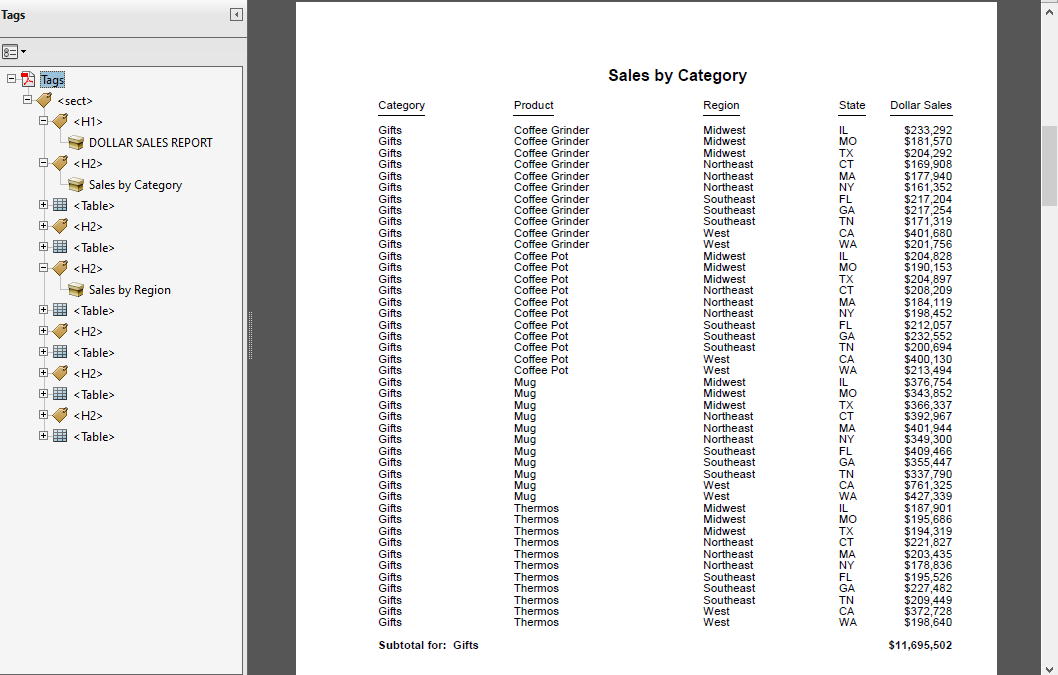
Page 3
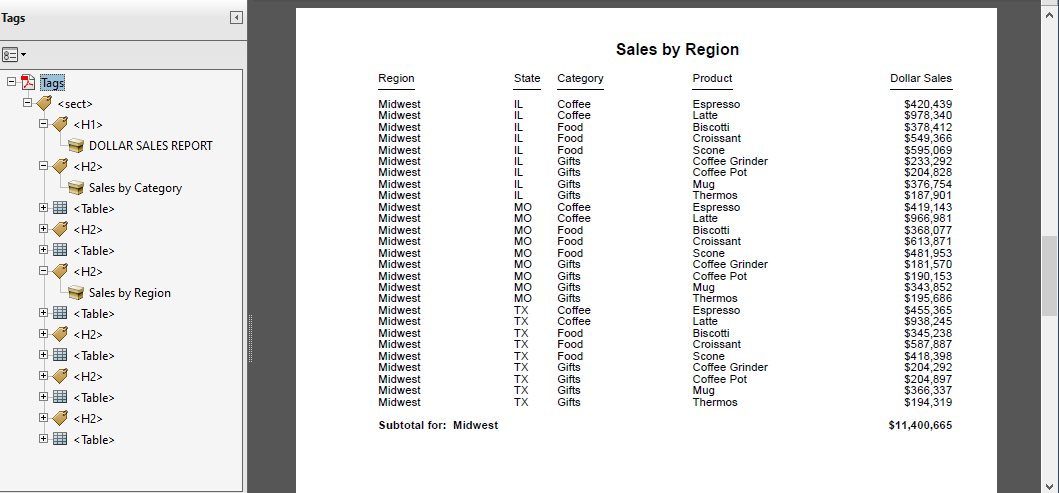
Adding Descriptive Text to an Image

How to:

The ALT attribute in a WebFOCUS StyleSheet adds descriptive text to an embedded image in a PDF report. The ALT attribute in the StyleSheet generates a PDF ALT attribute on the <IMG> tag.

The ALT tag is displayed in the PDF when you hover the mouse over the image.

Procedure: How to Add Descriptive Text to an Image
ALT='description'

where:

description

Is a brief description of the image, enclosed in single quotation marks (‘). The length can be a maximum of 256 characters.

For details on the StyleSheet syntax for adding an image, see Adding an Image to a Report.

Example: Adding Descriptive Text to an Image

This request adds the TIBCO® logo to a report heading. It uses the WebFOCUS StyleSheet ALT attribute to add descriptive text (TIBCO logo) that identifies the image.

TABLE FILE GGSALES
SUM
   DOLLARS/D12N
BY REGION
BY CATEGORY
ON REGION SUBTOTAL AS 'Total sales: '
ON REGION PAGE-BREAK
HEADING
"Sales Report"
" "
" "
" "
" "
" "
ON TABLE SET ACCESSPDF 508
ON TABLE SET PAGE-NUM OFF
ON TABLE NOTOTAL
ON TABLE PCHOLD FORMAT PDF
ON TABLE SUBHEAD "Regional Totals by Category"
ON TABLE SET STYLE *
     UNITS=IN,
     SQUEEZE=ON,
     ORIENTATION=PORTRAIT,
$
TYPE=REPORT, GRID=OFF, FONT='ARIAL', SIZE=9,$
TYPE=TITLE, STYLE=BOLD,$
TYPE=HEADING, SIZE=12, STYLE=BOLD, JUSTIFY=CENTER,$
TYPE=TABHEADING, SIZE=14, STYLE=BOLD, JUSTIFY=CENTER,$
TYPE=SUBTOTAL, BACKCOLOR=RGB(210 210 210), STYLE=BOLD,$
TYPE=REPORT, IMAGE=tibco.png, ALT='TIBCO logo',
POSITION=(0 .5),$
ENDSTYLE
END

The report is:
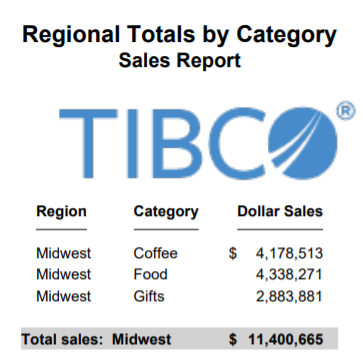
When the request is run, hovering the mouse over the image displays the descriptive text. This text is read by accessibility tools, such as JAWS.

Describing Drill Down Information

How to:

When ACCESSPDF is enabled, the developer can provide a description of the Drill Down using the ALT attribute in a WebFOCUS StyleSheet. In the PDF report, JAWS will read the value of the Drill Down component along with the ALT text.

Including a description of the detail component of a Drill Down report supports accessibility.

Syntax: How to Add Descriptive Drill Down Information
ALT='description'

where:

description

Is the description of the Drill Down information in a report, enclosed in single quotation marks (‘). The length can be a maximum of 256 characters.

For details on the StyleSheet syntax for Drill Down reports, see Linking a Report to Other Resources.

TABLE FILE GGSALES
SUM
   DOLLARS/D12N
BY REGION
BY CATEGORY
ON REGION SUBTOTAL AS 'Total sales: '
HEADING
" "
ON TABLE SET ACCESSPDF 508
ON TABLE SET PAGE-NUM OFF
ON TABLE NOTOTAL
ON TABLE SUBHEAD "Sales Report"
ON TABLE PCHOLD FORMAT PDF
ON TABLE SET STYLE *
     UNITS=IN,
     SQUEEZE=ON,
     ORIENTATION=PORTRAIT,
     SUMMARY='508 Sales report example',
     TITLETEXT='508 Sales report example',
$
TYPE=REPORT, GRID=OFF, FONT='ARIAL', SIZE=9,$
TYPE=DATA, COLUMN=N2,
ALT='Drill Down to detail report.', \
     FOCEXEC=508drill01detail( REGION=N1 CATEGORY=N2 ),$
TYPE=TITLE, STYLE=BOLD,$
TYPE=TABHEADING, SIZE=12, STYLE=BOLD, JUSTIFY=CENTER,$
TYPE=HEADING, SIZE=12, STYLE=BOLD, JUSTIFY=CENTER,$
TYPE=SUBTOTAL, BACKCOLOR=RGB(210 210 210), STYLE=BOLD,$
ENDSTYLE
END

Note the ALT attribute and associated text in BOLD.

The report is:
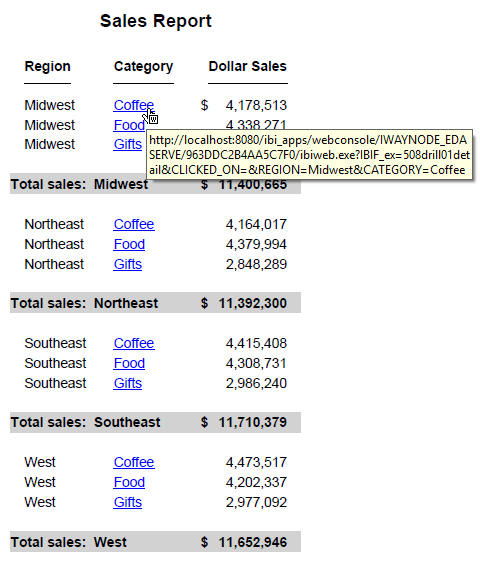
When you hover the mouse over Coffee for the Midwest region, the URL information for the Drill Down appears in the box. Screen readers, such as JAWS, will not read hover text. With ACCESSPDF enabled, the ALT text or 'Drill Down to detail report' is appended to the value for the Drill Down or 'Coffee' in this example. When you navigate to Coffee, the screen reader will respond with Coffee Drill Down to detail report.

Note:

  • Users that use screen readers, such as JAWS, may need more information regarding the Drill Down link. In the above example, notice that there are multiple hyperlinks for the value Coffee. This functionality, along with the 'read current cell' command, allows the user to understand the difference in those values. The screen reader command to 'read current cell' in JAWS is the Ctrl+Alt+Num5 shortcut. In this example, JAWS would respond to the 'read current cell' command with column two, row two, region Midwest, link Coffee Drill Down to detail report.
  • If you are opening the output in Adobe Reader, make sure you specify the FOCEXURL setting to provide the URL context of the WebFOCUS environment the Drill Down is to call back to. In addition, the FOCEXURL value has to have the parameter to specify that the request is a Drill Down request. For example:
    -SET &FOCEXURL='http://host:port/ibi_apps/WFServlet?IBIF_webapp=
       /ibi_apps' | '&';
    -SET &FOCEXURL=&FOCEXURL | 'IBIMR_drill=IBFS,RUNFEX,IBIF_ex,true' | '&';
    -SET &FOCEXURL=&FOCEXURL | 'IBIC_server=EDASERVE' | '&';
    -SET &FOCEXURL=&FOCEXURL | 'IBIAPP_app=ibisamp' | '&';
    SET FOCEXURL='&FOCEXURL'
    

Accessibility Limitations

Reports using the following elements are not accessible:

  • If a procedure does not contain the SET PAGE-NUM=OFF or ON TABLE SET PAGE-NUM OFF command, the page number will be announced two times by the screen reader.
  • ACROSS and OVER reports.
  • Financial Modeling Language (FML).
  • FOLD-LINE. Accessibility is disabled when FOLD-LINE is used in a report.
  • Fixed monetary edit options (N, !d, !e, !l and !y) including the Credit Negative (CR). A unique cell is created for the noted monetary options or CR option.
  • Text included or designed in FOOTING, SUBHEAD, SUBFOOT, RECAP, SUMMARIZE, and RECOMPUTE commands do not generate row header tags.
Using PostScript (PS) Display Format

How to:

You can display a report as a PostScript document. PostScript (format PS) is a print-oriented page description language. As a display format, it may be helpful if you wish to see the report output on your monitor before printing it using PostScript.

To display a PostScript report, a computer must have a third-party PostScript application installed, such as GSview (a graphical interface for Ghostscript).

If you are sending a PS report to a printer from WebFOCUS or from ReportCaster, you can select the size of the paper on which to print the output. The PostScript code that is generated works on PS printers that support Language Level 2 or above. It is ignored, without harmful effects, on Level 1 printers. For details, see How to Select Paper Size in a PostScript (PS) Report. This capability is only supported for the PostScript format.

Other print-oriented display formats. You can also display a report as a PDF document. For more information, see Using PDF Display Format.

Procedure: How to Select Paper Size in a PostScript (PS) Report

PAGESIZE and ORIENTATION are two WebFOCUS StyleSheet options that are used to display a report. You can enable these features in printed documents using the SET parameter PSPAGESETUP. You can then select the size of the paper on which to print a PostScript report by selecting a PAGESIZE option.

Complete these steps:

  1. Place the following SET parameter before or within your request
    SET PSPAGESETUP= ON

    or

    ON TABLE SET PSPAGESETUP ON

    OFF is the default setting.

  2. Include your PAGESIZE specification in a SET command or StyleSheet declaration in the request
    SET PAGESIZE= option

    or

    ON TABLE SET PAGESIZE option

    or

    PAGESIZE=option, $

    where:

    option
    Can be any paper size supported for your printer. LETTER is the default setting.

Note: If you send a job to a printer that does not have the requested paper size loaded, the printer may stop and instruct its operator to load the specified paper. To ensure control over your printing, it is best to set paper size in individual requests (rather than as an installation-wide default) so that you can load paper as required.

Example: Selecting Paper Size Using SET Command in a PostScript Report

This example automatically prints a document on legal paper as specified in the two SET commands that precede the report request. The referenced printer is a PostScript Level 2 or higher printer, which will automatically select legal paper and print the document in landscape mode.

SET PSPAGESETUP=ON
SET PAGESIZE=LEGAL 
SET ORIENTATION=LANDSCAPE
SET PAGE-NUM=OFF
TABLE FILE CENTORD
HEADING
"Sales Report"
" "
SUM LINEPRICE
BY PRODCAT
ON TABLE SET STYLE *
TYPE=HEADING, SIZE=18, $
ENDSTYLE
ON TABLE HOLD FORMAT PS
END
-RUN
DOS COPY HOLD.PS \\IBIPRINTA\28C2

Selecting Paper Size Using a SET Command and a StyleSheet

This request automatically prints a document on legal paper based on the paper size and orientation specifications in the StyleSheet declaration. The referenced printer is a PostScript Level 2 or higher printer, which will automatically select legal paper and print the document in landscape mode.

SET PSPAGESETUP=ON 
TABLE FILE CAR
SUM RC DC SALES BY COUNTRY BY CAR BY MODEL
ON TABLE HOLD FORMAT PS
ON TABLE SET STYLE *
UNITS=IN,
     PAGESIZE='Legal', 
     LEFTMARGIN=1.000000,
     RIGHTMARGIN=0.500000,
     TOPMARGIN=1.500000,
     BOTTOMMARGIN=0.500000,
     SQUEEZE=ON,
     ORIENTATION=LANDSCAPE,$
GRAPHTYPE=DATA, COLUMN=RC, GRAPHPATTERN=EMPTY, $
GRAPHTYPE=DATA, COLUMN=DC, GRAPHPATTERN=SLANT, $
GRAPHTYPE=DATA, COLUMN=SALES, 
GRAPHPATTERN=HORIZONTAL, $
ENDSTYLE
END
-RUN
DOS COPY HOLD.PS \\IBIPRINTA\28C2

WebFOCUS Font Support

In this section:

Reference:

You can add and configure PostScript Type 1 fonts to significantly expand your options for displaying and printing PS and PDF reports, beyond those provided by the basic set of fonts distributed with Adobe Reader. Thousands of PostScript fonts are available to make your reports more stylish and useful, including some that support symbols and bar codes.

The font map files for Type 1 fonts are stored as XML files (fontmap.xml and fontuser.xml). All font mappings in these files are used for both PDF and PostScript report output.

The font definitions for DHTML also cover PowerPoint (PPT and PPTX). For XLSX, you can define a new default font in the fontuser.xml file. This allows ease in customizing the look and feel of XLSX workbooks. WebFOCUS uses Arial as the default font. However, you can change the default font to match the Microsoft Office standard font, Calibri, or your corporate standard.

You can also add and configure a set of TrueType or OpenType fonts to be embedded in PDF output files.

Note: You can use OpenType font files (OTF) only with content in Compact Font Format (CFF).

Reference: Support for the Symbol Font

To use the Symbol font, specify font=symbol in your WebFOCUS StyleSheet:

  • Some versions of Firefox 3 do not support the Symbol font and will substitute it with another font. For information about Firefox support for the Symbol font, refer to Firefox sources.
  • The Euro character displays in PDF output because the Adobe Symbol character set includes the Euro character.
  • The Euro character does not display in DHTML, PPT, and PPTX report output because the Windows Symbol character set does not include the Euro character.
  • The following style options can be rendered with the Symbol font:
    • DHTML, PPT, and PPTX support style=normal, bold, italic, and bold+italic.
    • PDF supports only style=normal. Any other style specified in the StyleSheet will be mapped to normal.

How WebFOCUS Uses Type 1 Fonts

WebFOCUS generates a PDF or PS document from scratch. In order to do that, it must physically embed all the objects it displays or prints, including images and fonts, in the document itself.

When you execute a report and specify one of these formats as your display format, the WebFOCUS Reporting Server retrieves the data and begins to format the report. Fonts and images specified in the StyleSheet must be available to the Reporting Server to create the output file. It reads the font information from the font files and embeds that information into the document. The font itself is stored on the Reporting Server.

To ensure that the Reporting Server can locate the required information, you must define and map it in the following files:

  • Font file, usually a PFB (Printer Font Binary) file. This file contains the information about the shape to draw for each character of the font. The information in the font file is scalable, which means that a single font file can be used to generate characters of any size. Note, however, that bold and italic variations of the typeface are separate fonts. An alternative ASCII format, PFA, can also be used by WebFOCUS. In addition to PFB and PFA font files, you can use OTF font files to enable more flexibility in customizing PDF files, such as support for expanded character sets and layout features, and cross-platform compatibility.
  • Adobe Font Metrics (AFM) file. This file is distributed with all Adobe fonts. It contains information about the size of each character in each font. WebFOCUS uses this information to lay out the report on the page. Note that the three built-in fonts also have AFM files, which are distributed with WebFOCUS. However, these fonts do not require font files, since the fonts are built in to Adobe Reader.

    Note: A Printer Font Metrics (PFM) file is also available. This file is used by applications such as Adobe Reader for laying out text, however it is not supported by WebFOCUS. You must use the AFM file.

  • WebFOCUS Font Map files. These configuration files map the name of a font to the appropriate font metrics and font files (AFM, PFB (or PFA), or OTF). The mapping determines which actual font is used when you specify a font using the FONT attribute in a WebFOCUS StyleSheet. For example, if your StyleSheet contains the following declaration, WebFOCUS will search the font map for a font mapping with a matching name and style, and use the font specified by the mapping:
    TYPE=REPORT, FONT=HELVETICA, STYLE=ITALIC, $

There are two files WebFOCUS uses for mapping fonts, both in an XML-based format:

  • The default font map file, fontmap.xml, contains the font definitions for all output formats that are supported with WebFOCUS, as originally installed. Users should not modify this file.
  • The user font map file, fontuser.xml, contains font definitions added by the user. The following sections describe how to add your fonts to this file.

The user font map is searched before the default font map, so font definitions in the user map will override definitions of the same font in the default map.

You can also use a variety of utilities to convert Windows True Type fonts (such as Arial and Tahoma) into Type 1 fonts. Then, after you convert them, you can define and map these fonts for use by WebFOCUS.

One such utility is TTF2PT1.

For information about the Windows version, go to:

http://gnuwin32.sourceforge.net/packages/ttf2pt1.htm

For information about UNIX versions, go to: http://ttf2pt1.sourceforge.net/download.html

Adding PostScript Type 1 Fonts for PS and PDF Formats

Procedure: How to Configure Type 1 PostScript Fonts on the Windows and UNIX Platforms

Locate the necessary font files (AFM, PFB (or PFA), or OTF). These files should be available in the location where the fonts were originally installed. You will be copying these files to a location from which they can be accessed by the WebFOCUS Reporting Server.

Tip:

  • You may need to run an installer program to install these in a directory on your Windows or UNIX machine. Note that the fonts do not have to be installed on a client machine in order to be used, since they will be embedded in the PDF or PostScript files created by WebFOCUS. PDF files with these embedded fonts can be displayed on any machine that has Adobe Reader (or a similar PDF viewer), and PostScript files with these embedded fonts can be printed on any PostScript printer (or displayed in a PostScript viewer such as GhostView).
  • Note that PFB files are binary, so if they are FTPed from another machine, they must be FTPed in BINARY mode.
  • The maximum number of embedded fonts supported in a PDF report is 63.

After you have located the font files you wish to add, you can set up WebFOCUS to use one or more Type 1 fonts.

  1. For each font you wish to add, copy the AFM, PFB (or PFA), and OTF files into the etc subdirectory of your WebFOCUS configuration directory. On a Windows machine, the location is usually:
    drive:\ibi\srv82\wfs\etc

    where:

    wfs

    Is your WebFOCUS configuration directory (it may have a different name depending on installation options, but should always be a directory directly under drive:\ibi\srv82). Note that home is the other directory directly under drive:\ibi\srv82.

    Under Unix, the location is /ibi/srv82/wfs/etc, assuming that the Reporting Server was installed in /ibi/srv82.

    Keeping user font files in this directory allows user font files to remain separate from the default font files (under \ibi\srv82\home) so they can be easily preserved if WebFOCUS is updated to a new release.

    After you copy these files, you can rename them to any descriptive name.

  2. The user font map file, fontuser.xml, is created by the installer in the same directory. Using a text editor, add your font definitions to this file using the syntax described in the following section, Add Fonts to the Font Map.

Procedure: How to Configure Type 1 PostScript Fonts on z/OS Under PDS Deployment

After you have located the font files you wish to add, you can configure WebFOCUS to use one or more Type 1 fonts.

  1. Copy the AFM (font metrics) file into the PDS allocated to DDNAME EDACCFG in the Reporting Server JCL. You can copy this file from another machine using FTP in standard ASCII (text) mode. The member name of the AFM file in this PDS will match the metricsfile value in the font map file.

    Note: If the Windows font file names contain underscore characters or are longer than eight characters, you must rename them, since these are not valid for z/OS member names.

  2. You can use either PFB (binary) fonts or PFA (ASCII) fonts:
    • If you are using PFB (binary) fonts, create a partitioned data set, put the PFB file in it (for example, using FTP in BINARY mode), and concatenate this data set to the data set already allocated to DDNAME EDAHBIN in the WebFOCUS Reporting Server JCL.

      This PDS should be created with the following DCB attributes:

      RECFM: VB    LRECL: 1028    BLKSIZE: 27998

      The member name in this PDS should match the fontfile name in the font map file.

      If you copy the PFB font file into the PDS using FTP, you must use BINARY mode. The member name of the PFB file in this PDS will match the fontfile value in the font map file.

    • If you are using PFA (ASCII) font files, create a PDS (separate from the one you use for PFB fonts), put the PFA file in it (for example, using FTP in regular, ASCII mode), and concatenate this data set to the data set already allocated to DDNAME EDAHETC in the Reporting Server JCL. This PDS should be created with the following DCB attributes:
      RECFM: VB    LRECL: 2044    BLKSIZE: 27998

      The member name in this PDS should match the fontfile value in the font map file. Note that you can use PFB and PFA files simultaneously. The fonttype attribute in the font map file (PFB or PFA) tells WebFOCUS which PDS to search for the specified member name.

  3. The user font map file is in member FONTUSER in the data set allocated to DDNAME EDACCFG. Using a text editor, add your font definition to the user font map using the syntax described in Add Fonts to the Font Map.

Syntax: How to Add Fonts to the Font Map

The Type 1 PostScript fonts used with the PostScript and PDF output formats use separate font files for each variant of the font: normal, bold, italic, and bold-italic. This grouping of related fonts is called a font family.

The XML font map syntax uses two XML tags, <family> and <font>, to represent this structure. The example uses the family name Garamond. For example:

<family name="garamond">
  <font style="normal"
        metricsfile="gdrg" fontfile="gdrg" fonttype="PFB" />
  <font style="bold"
        metricsfile="gdb"  fontfile="gdb" fonttype="PFB" />
  <font style="italic"
        metricsfile="gdi"  fontfile="gdi" fonttype="PFB" />
  <font style="bold+italic"
        metricsfile="gdbi" fontfile="gdbi" fonttype="PFB" />
</family>

The following example uses the family name otf. For example:

<family name="otf">
  <font style="normal"
        metricsfile="otfn"  fontfile="otfn" fonttype="OTF" />
  <font style="bold"
        metricsfile="otfb"  fontfile="otfb" fonttype="OTF" />
  <font style="italic"
        metricsfile="otfi"  fontfile="otfi" fonttype="OTF" />
  <font style="bold+italic"
        metricsfile="otfbi" fontfile="otfbi" fonttype="OTF" />
</family>

The basics of the XML syntax are:

  • Tag names (such as family and font) and attribute names (such as style or metricsfile) must be in lowercase. Attribute values, such as font file names, are case-insensitive.
  • Attribute values, which is the text after the equal sign (=), must be in double quotation marks (for example, "bold")
  • Elements that have no explicit end-tag must end with />. (For example, the family tag has the closing tag </family>, but the font tag has no closing tag, so it ends with />.)
  • Comments are enclosed in special delimiters:
    <!-- This is a comment -->
  • Line breaks may be placed between attribute-value pairs.

A more complete description of XML syntax can be found here:

http://en.wikipedia.org/wiki/Xml

The family element

The family element specifies the name of a font family. This family name, specified in the name attribute of the family element, is the name by which the font will be referenced in a StyleSheet. It corresponds to the value of the FONT attribute in the StyleSheet. The end-tag </family> closes the family element, and any number of additional family elements may follow.

Font family names should be composed of letters (A-Z, a-z), digits, and limited special characters, such as a minus sign (-), underscore (_), and blank. Font family names should have a maximum length of 40 characters. Since the font name is only a reference to a mapping in the font map, it does not need to be related to the actual name of the font (which WebFOCUS obtains from the mapped AFM file) or the file name of the font.

Font elements

Nested within each family element are one or more font elements that specify the font files for each font in the family. For example, there may be one font element for the font Garamond Regular (normal), one for Garamond Italic (italic). Since a font element has no child elements, it is closed with "/>".

The actual name of the font as used in the PDF or PostScript document is taken from the font metric file.

Fonts defined in the user font file (fontuser.xml) can override default font definitions in fontmap.xml. Thus, you should be careful to choose family names that do not conflict with existing definitions, unless you actually wish to override these definitions (which should generally not be done).

Each font element contains the following attributes:

  • style: This attribute specifies the style of the font and corresponds to the STYLE attribute in the StyleSheet. The allowed values are "normal", "bold", "italic", and "bold+italic". For example, the font defined in the following bold italic font element:
    <font style="bold+italic" metricsfile="gdbi" fontfile="gdbi" fonttype="PFB" />

    could be referenced in the StyleSheet like this:

    TYPE=REPORT, FONT=GARAMOND, STYLE=BOLD+ITALIC, $

    Although most fonts have a font file for each of the four styles, some specialized fonts such as bar code fonts might only have a single style (usually "normal"). Only the styles that exist for a particular font need to be specified in the font map file.

    The actual names of the fonts may vary. Some fonts may be called "oblique" rather than "italic", or "heavy" rather than "bold". However, the font map and StyleSheet always use the keywords "normal", "bold", "italic" and "bold+italic".

  • metricsfile: This attribute specifies the name of the Adobe Font Metrics (AFM) file that provides the measurements of the font. You should only use the base name of the file (for example, "gdrg", not "gdrg.afm"). On Windows and UNIX systems, the file is assumed to have the extension .afm and reside in the wfs/etc directory. On z/OS with PDS deployment, the name refers to a member in the PDS allocated to EDACCFG. For information about file locations, see How to Configure Type 1 PostScript Fonts on the Windows and UNIX Platforms orHow to Configure Type 1 PostScript Fonts on z/OS Under PDS Deployment.

    File names should be composed of letters and numbers, and should not contain blanks. On Windows and UNIX systems, the file names may also contain underscore characters. On UNIX systems, the file names should not contain uppercase letters. Since the files must be located in specific directories, no directory paths or drive letters are allowed.

  • fonttype: This attribute specifies the type of the font file. The allowed values are "PFA", "PFB", or "OTF".
  • fontfile: This attribute specifies the name of the PFB or PFA file that contains the font itself. As with metricsfile, the value specifies only the base file name (the fonttype attribute specifies the type). On Windows and UNIX, the file is assumed to have the extension .pfb for binary (PFB) font files or .pfa for ASCII (PFA) font files, and should reside in the same directory as the AFM files (wfs/etc). On z/OS with PDS deployment, the name refers to a member in the appropriate PDS.

Additional items of XML syntax include the XML header on the first line of the file and the <fontmap> and <when> elements that enclose all of the family elements. The <when> tag allows the same font mappings to be used for both PDF and PostScript reports across output formats. These can include PDF, PS, and DHTML. PPT and PPTX formats will use fonts specified for DHTML. If no <when> is specified, the font will be available for all formats.

The following is a complete example of a user font map:

<?xml version="1.0" encoding="UTF-8" ?>
<!-- Example of a user font map file with two font families. -->
<fontmap version="1">
    <when format="PDF PS">
        <family name="garamond">
            <font style="normal"
                  metricsfile="gdrg" fontfile="gdrg" fonttype="PFB" />
            <font style="bold"
                  metricsfile="gdb"  fontfile="gdb"  fonttype="PFB" />
            <font style="italic"
                  metricsfile="gdi"  fontfile="gdi"  fonttype="PFB" />
            <font style="bold+italic"
                  metricsfile="gdbi" fontfile="gdbi" fonttype="PFB" />
        </family>
        <!-- This font only has a "normal" style, others omitted. -->
        <family name="ocra">
            <font style="normal"
                  metricsfile="ocra" fontfile="ocra" fonttype="PFB" />
        </family>
    </when>
</fontmap>
Example: WebFOCUS StyleSheet Declaration

Once the font map files have been set up, the newly mapped fonts can be used in a WebFOCUS StyleSheet. For example, to use the Garamond fonts:

ON TABLE SET STYLE *
type=report, font=garamond, size=12, $
type=title, font=garamond, style=bold, color=blue, $
ENDSTYLE

Since the style attribute has been omitted for the report font in the StyleSheet, it defaults to normal. Attributes such as size and color can also be applied.

Reference: Editing the Font Map File

There is a byte order mark (BOM) at the beginning of the user font map file (fontuser.xml), which must be preserved for this file to be read correctly.

If you are using a Unicode-aware editor, such as Notepad on Windows, to edit the file, the BOM will not be visible, but you can preserve it by making sure that you select an encoding of UTF-8 in the Save-As dialog. In most other editors, such as vi on UNIX or the ISPF editor under z/OS, the BOM will display as three or four strange-looking characters at the beginning of the file. As long as you do not delete or modify these characters, the BOM will be preserved.

Reference: The WebFOCUS Default Font Map

Since the user font map is searched before the WebFOCUS default font map, font definitions in the user font map file will override mappings of the same font in the default font map file. Since you usually would not want to override existing font mappings, you can check which font names are already used by WebFOCUS by examining the default font map file.

On Windows platforms, it can be found in

drive:\ibi\srv82\home\etc\style\fontmap.xml

On UNIX, it can be found in a similarly named directory.

On z/OS with PDS deployment, the default font map file is in the FONTMAP member of the prefix.P.HOME.ERR partitioned data set. Unlike the user font map file, this file has separate sections containing definitions for PS, PDF, and DHTML formats.

Note: The DHTML mappings are used for the DHTML and PowerPoint output formats, which do not support user-added fonts.

Since the font mappings in the default font map file are for fonts that are already assumed to exist on the user machines (for example, built-in Adobe Reader fonts, standard PostScript printer fonts, or standard Windows fonts), they do not reference font files, only font metrics files. Fonts provided by the user should reference both font files and metrics files.

AFM files for the default fonts can be found in drive:\ibi\srv82\home\etc\style (or members of prefix.P.HOME.ERR with z/OS under PDS deployment).

Procedure: How to Define a Default Font in the Font Map

An individual default font can be set for each output type and/or language setting within an output type. This setting should be defined in the fontuser.xml file rather than the fontmap.xml file. Fontmap.xml may be updated by a future release installation, so customizations may be lost. Additionally, the settings in fontuser.xml override settings in fontmap.xml.

Note:

  • Fontmap.xml can be found in ..\ibi\srvXX\home\etc\style, where XX is your server release.
  • Fontuser.xml can be found in ..\ibi\srvXX\wfs\etc, where XX is your server release.

To designate the default font use the following steps:

  1. Copy the selected font entry from frontmap.xml to fontuser xml.
    1. Within fontmap.xml, find the entry for the font family within the desired output format to be designated as the default.
    2. Copy the entire entry into the appropriate format area within fontuser.xml.
  2. In fontuser.xml, within the entry for the font to be designated as the default font and style, add the following attribute:
    default="yes"

    For example, the following code defines the default fonts to be Helvetica bold for PDF, Calibri for XLSX, and Arial Italic for DHTML:

    <fontmap version="1">
    <when format="PDF PS">
      <family name="Helvetica" htmlfont="Arial">
         <font style="normal" metricsfile="pdhelv"   />
         <font style="bold"   metricsfile="pdhelvb"  default="yes"  />
         <font style="italic"  metricsfile="pdhelvi"  />
         <font style="bold+italic" metricsfile="pdhelvbi" />
      </family>
    </when>
    <when format="XLSX">
      <family name="Calibri" htmlfont="Calibri">
         <font style="normal"      metricsfile="ttcali"  default="yes" />
         <font style="bold"        metricsfile="ttcalib"  />
         <font style="italic"      metricsfile="ttcalii"  />
         <font style="bold+italic" metricsfile="ttcalibi" />
      </family>
    </when>
    <when format="DHTML">
      <family name="Arial">
         <font style="normal"  metricsfile="ttarial"  />
         <font style="bold"    metricsfile="ttarialb" />
         <font style="italic"  metricsfile="ttariali" default="yes"  />
         <font style="bold+italic" metricsfile="ttariabi" />
      </family>
    </when>
    </fontmap>

    If multiple fonts in a font map family, such as PDF, have the default="yes" attribute, the last font with that attribute becomes the default font. Fonts in fontuser.xml are processed after those in fontmap.xml, so a default font set in fontuser.xml can override the one set in fontmap.xml.

    A default font set in the PDF section of the font map does not affect a default in the DHTML section, and a default for one specific language does not override the default for other languages.

Embedding TrueType Fonts Into WebFOCUS PDF Reports Generated in Windows

How to:

You can have WebFOCUS embed the following TrueType fonts into PDF output files generated in Windows:

  • Arial Unicode MS
  • Courier New
  • Lucida Sans Unicode
  • Tahoma
  • Times New Roman
  • Trebuchet MS

Note:

  • Custom TrueType font embedding is supported, as long as you provide the AFM and TTF files. Only TTF fonts that have format 4 layer with platform ID 3 and platform specific ID 1 are supported.
  • The addition of the font file and font type attributes activates the embedding feature. To use any of these fonts and font styles without embedding, do not add the font file and font style attributes into the font map definition for each individual style.

Procedure: How to Add TrueType Fonts for Embedding Into PDF Output Files

  1. Make the fonts available to the Reporting Server by copying the TrueType font files from the Windows font directory (C:\Windows\fonts) to the WebFOCUS server configuration directory:
    drive:\ibi\srv82\wfs\etc

    where:

    drive

    Is the drive on which the Reporting Server is installed.

    wfs

    Is your WebFOCUS configuration directory (it may have a different name depending on installation options, but should always be a directory directly under drive:\ibi\srv82). Note that home is the other directory directly under drive:\ibi\srv82.

    For each of the supported fonts, you will need to copy the following font files. You will also need to know the metrics file name associated with each font file:

    Arial Unicode MS

    Style

    Metrics File Name

    Font File Name

    Normal

    pdarum.afm

    arialuni.ttf

    Bold

    pdarumb.afm

    arialuni.ttf

    Italic

    pdarumi.afm

    arialuni.ttf

    Bold Italic

    pdarumbi.afm

    arialuni.ttf

    Courier New

    Style

    Metrics File Name

    Font File Name

    Normal

    pdconu.afm

    cour.ttf

    Bold

    pdconub.afm

    courbd.ttf

    Italic

    pdconui.afm

    couri.ttf

    Bold Italic

    pdconubi.afm

    courbi.ttf

    Lucida Sans Unicode

    Style

    Metrics File Name

    Font File Name

    Normal

    pdlusu.afm

    l_10646.ttf

    Bold

    pdlusub.afm

    l_10646.ttf

    Italic

    pdlusui.afm

    l_10646.ttf

    Bold Italic

    pdlusubi.afm

    l_10646.ttf

    Tahoma

    Style

    Metrics File Name

    Font File Name

    Normal

    pdtaho.afm

    tahoma.ttf

    Bold

    pdtahob.afm

    tahomabd.ttf

    Italic

    pdtahoi.afm

    tahoma.ttf

    Bold italic

    pdtahobi.afm

    tahomabd.ttf

    Times New Roman

    Style

    Metrics File Name

    Font File Name

    Normal

    pdtimu.afm

    times.ttf

    Bold

    pdtimub.afm

    timesbd.ttf

    Italic

    pdtimui.afm

    timesi.ttf

    Bold Italic

    pdtimubi.afm

    timesbi.ttf

    Trebuchet MS

    Style

    Metrics File Name

    Font File Name

    Normal

    pdtrbu.afm

    trebuc.ttf

    Bold

    pdtrbub.afm

    trebucbd.ttf

    Italic

    pdtrbui.afm

    trebucit.ttf

    Bold Italic

    pdtrbubi.afm

    trebucbi.ttf

  2. Add the fonts to the user font map file, fontuser.xml. This file is also located in the Reporting Server configuration directory drive:\ibi\srv82\wfs\etc.

    The fontuser.xml file has a sample family tag. Copy the sample family tag between <when format="PDF PS"> and </when>, then edit it for the font you are adding. For more information on editing font map syntax, see Add Fonts to the Font Map.

    The following shows a user font map file with the Arial Unicode MS font added:

    <?xml version="1.0" encoding="UTF-8" ?>
    <!-- Example of a user font map file defining Arial Unicode MS true type fonts -->
    <fontmap version="1">
    <when format="PDF">
        <family name = "Arial Unicode MS">
           <font style="normal" metricsfile="pdarum"
              fontfile="arialuni" fonttype="TTF" />
           <font style="bold" metricsfile="pdarumb" 
              fontfile="arialuni" fonttype="TTF" />
           <font style="bold+italic" metricsfile="pdarumbi"
              fontfile="arialuni" fonttype="TTF" />
           <font style="italic" metricsfile="pdarumi" 
              fontfile="arialuni" fonttype="TTF" />
       </family>    
     </when>
    </fontmap>

    Note that the font file name does not include the extension. The extension, TTF, is entered as the fonttype attribute.

  3. In a report request, specify the font family names and the style attributes in the stylesheet, and hold the report output in PDF format.

An example follows of the contents of a fontuser.xml file with all of the supported embedded fonts defined. You can select only the ones you need for your environment:

<fontmap version="1">
  <when format="PDF PS">
<family name = "Arial Unicode MS">
    <font style="normal"
          metricsfile="pdarum"   fontfile="arialuni" fonttype="TTF" />
    <font style="bold"
          metricsfile="pdarumb"  fontfile="arialuni" fonttype="TTF" />
    <font style="bold+italic"
          metricsfile="pdarumbi" fontfile="arialuni" fonttype="TTF" />
    <font style="italic"
          metricsfile="pdarumi"  fontfile="arialuni" fonttype="TTF" />
  </family>    
<family name="Trebuchet MS">
    <font style="normal"
          metricsfile="pdtrbu"   fontfile="trebuc"   fonttype="TTF" />
    <font style="bold"
          metricsfile="pdtrbub"  fontfile="trebucbd"  fonttype="TTF" />
    <font style="italic"
          metricsfile="pdtrbui"  fontfile="trebucit"  fonttype="TTF" />
    <font style="bold+italic"
          metricsfile="pdtrbubi" fontfile="trebucbi" fonttype="TTF" />
  </family>
<family name="Times New Roman">
    <font style="normal"
          metricsfile="pdtimu"   fontfile="times"   fonttype="TTF" />
    <font style="bold"
          metricsfile="pdtimub"  fontfile="timesbd" fonttype="TTF" />
    <font style="italic"
          metricsfile="pdtimui"  fontfile="timesi"  fonttype="TTF" />
    <font style="bold+italic"
          metricsfile="pdtimubi" fontfile="timesbi" fonttype="TTF" />
  </family>
<family name="Lucida Sans Unicode">
    <font style="normal"
          metricsfile="pdlusu"   fontfile="L_10646"   fonttype="TTF" />
    <font style="bold"
          metricsfile="pdlusub"  fontfile="L_10646"  fonttype="TTF" />
    <font style="italic"
          metricsfile="pdlusui"  fontfile="L_10646"  fonttype="TTF" />
    <font style="bold+italic"
          metricsfile="pdlusubi" fontfile="L_10646"  fonttype="TTF" />
  </family>
<family name = "Courier New">
    <font style="normal"
          metricsfile="pdconu"   fontfile="cour" fonttype="TTF" />
    <font style="bold"
          metricsfile="pdconub"  fontfile="courbd" fonttype="TTF" />
    <font style="bold+italic"
          metricsfile="pdconubi" fontfile="courbi" fonttype="TTF" />
    <font style="italic"
          metricsfile="pdconui"  fontfile="couri" fonttype="TTF" />
  </family>
<family name = "Tahoma">
    <font style="normal"
          metricsfile="pdtaho" fontfile="tahoma" fonttype="TTF" />
    <font style="bold"
          metricsfile="pdtahob" fontfile="tahomabd" fonttype="TTF" />
    <font style="bold+italic"
          metricsfile="pdtahobi" fontfile="tahomabd" fonttype="TTF" />
    <font style="italic"
          metricsfile="pdtahoi" fontfile="tahoma" fonttype="TTF" />
  </family>
  </when>  
</fontmap>
Example: Embedding TrueType Fonts in a PDF Output File

The font files trebuc.ttf, trebudbd.ttf, trebucit.ttf, trebucbi.ttf, tahoma.ttf, and tahomabd.ttf have been copied to the Reporting Server configuration directory, drive:\ibi\srv82\wfs\etc. In addition, the Trebuchet MS and Tahoma fonts have been added to the fontuser.xml file:

<fontmap version="1">
  <when format="PDF PS">
    <!-- family/font tags should be added here -->
    <family name="Trebuchet MS">
      <font style="normal"
          metricsfile="pdtrbu"   fontfile="trebuc"   fonttype="TTF" />
      <font style="bold"
          metricsfile="pdtrbub"  fontfile="trebucbd"  fonttype="TTF" />
      <font style="italic"
          metricsfile="pdtrbui"  fontfile="trebucit"  fonttype="TTF" />
      <font style="bold+italic"
          metricsfile="pdtrbubi" fontfile="trebucbi" fonttype="TTF" />
    </family>
    <family name="Tahoma">
      <font style="normal"
          metricsfile="pdtaho"   fontfile="tahoma"   fonttype="TTF" />
      <font style="bold"
          metricsfile="pdtahob"  fontfile="tahomabd"  fonttype="TTF" />
    </family>
  </when>
</fontmap>

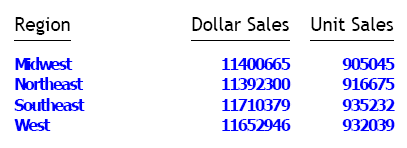
The following request against the GGSALES data source specifies the Trebuchet MS font for the column headings and the bold style of Tahoma for the data in the PDF report output:

TABLE FILE GGSALES
SUM DOLLARS UNITS
BY REGION
ON TABLE PCHOLD FORMAT PDF
ON TABLE SET PAGE NOPAGE
ON TABLE SET STYLE *
TYPE = TITLE, FONT='Trebuchet MS',$
TYPE = DATA, FONT='Tahoma', style=bold, size=10, color=blue, $
END

The output is:

Note: Except for OpenType fonts, in order to reduce the size of a generated PDF document, only the subset of used characters of a font are included into the PDF document.

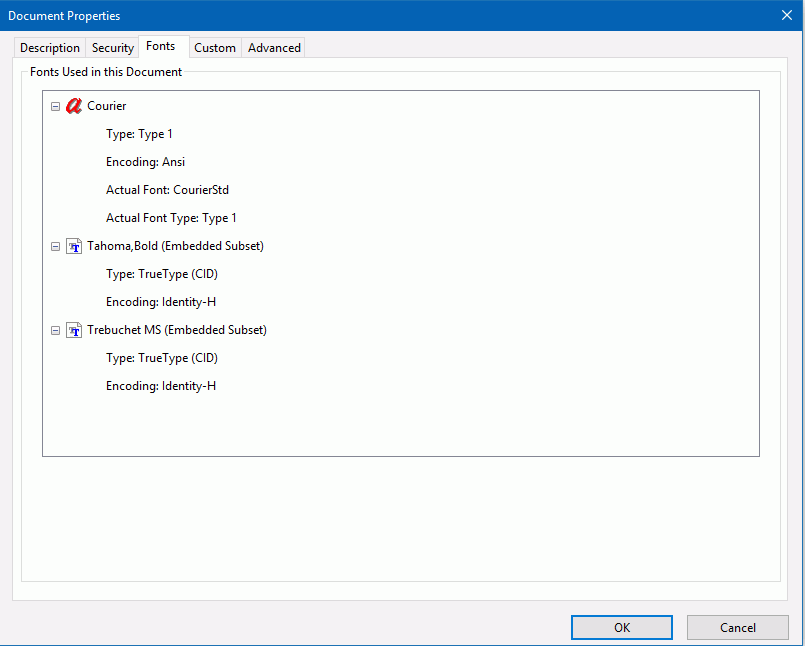
To confirm that a subset of the font is embedded, save a copy of the PDF file and open it in Adobe Reader. On the File menu, select Properties. In the Font tab, look for the words Embedded Subset next to the font name, as shown in the following image for the Tahoma and Trebuchet MS fonts.

Creating PDF Files on z/OS for Use With UNIX Systems

How to:

Reference:

PDF files created with HOLD FORMAT PDF present a challenge if you work in a z/OS environment and use UNIX-based systems as the server for Adobe or as an intermediate transfer point.

The end of each PDF file has a table containing the byte offset, including line termination characters, of each PDF object in the file. The offsets indicate that each line is terminated by two characters, a carriage return and a line feed, which is the standard Windows text file format. However, records in a UNIX text file are terminated by one character, a line feed only. When using default settings, the offsets in a PDF file will be incorrect, causing an error when Acrobat attempts to open the file. If the file is then transferred in BINARY mode to Windows, it cannot be opened in Acrobat for Windows, as the carriage-return character was not inserted.

One solution has been to transfer the file to the UNIX system in text mode and then transfer in text mode to the Windows system, as the carriage return is added by the transfer facility when transferring to Windows.

If that is not possible or desirable, you can use the SET PDFLINETERM=SPACE command to facilitate binary transfer to Windows from an ASCII-based UNIX system. This command causes an extra space character to be appended to each record of the PDF output file. This extra space acts as a placeholder for the expected carriage return character and makes the object offsets in the file correct when it is transferred from z/OS to a UNIX system. This enables a UNIX server to open a PDF file in that environment.

Note: A text mode transfer is always required when transferring a text file from a mainframe to any other environment (Windows, ASCII Unix, or EBCDIC Unix).

Syntax: How to Specify Line Termination Characters When Creating a PDF File

In a profile, a FOCEXEC, or from the command line, issue the following command:

SET PDFLINETERM={STANDARD|SPACE}

In a TABLE request, issue the following command

ON TABLE SET PDFLINETERM {STANDARD|SPACE}

where:

STANDARD

Creates a PDF file without any extra characters. This file will be a valid PDF file if transferred in text mode to a Windows machine, but not to a UNIX machine. If subsequently transferred from a UNIX machine to a Windows machine in text mode, it will be a valid PDF file on the Windows machine.

SPACE

Creates a PDF file with an extra space character appended to each record. This file will be a valid PDF file if transferred in text mode to a UNIX machine, but not to a Windows machine. If subsequently transferred from an ASCII UNIX machine to a Windows machine in binary mode, it will be a valid PDF file on the Windows machine.

Reference: Required PDFLINETERM Settings Based on Environment

The following chart will assist you in determining the correct setting to use, based on your environment:

Transferring from z/OS to:

SET PDFLINETERM=

EBCDIC UNIX (text transfer)

SPACE

ASCII UNIX (text transfer)

SPACE

ASCII UNIX (text); then to Windows (binary)

SPACE

UNIX (text); then to Windows (text)

STANDARD

Directly to Windows (text)

STANDARD