Viewing and Editing Resource Attributes for Multiple Resources

This procedure shows how to view or edit resource attributes for multiple resources.

Procedure

  1. Display the list of resources that contains the resources whose resource attributes you want to view or edit.

    You can do this by either displaying the resources in an LDAP container (see Viewing the Resources in a Container), or the resources already mapped to a position or group (see Viewing Resources Mapped to a Position or Group).

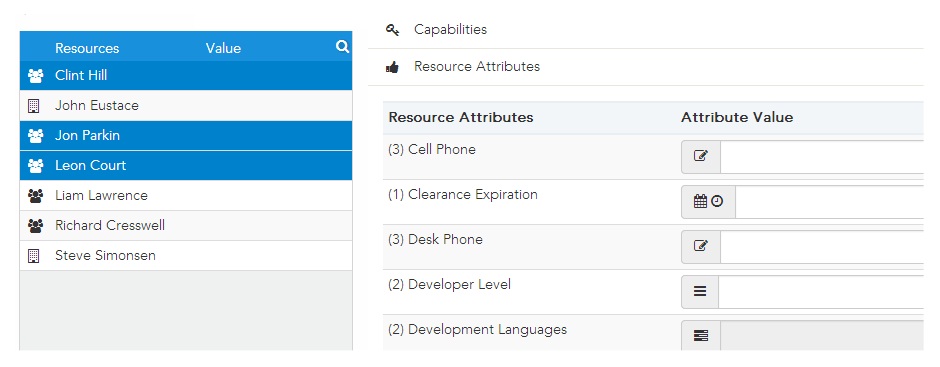
  2. Select the desired resources.
    Select only BPM resources (resources that have a icon next to their resource name).
  3. Click the Details tab in the right pane.
  4. In the right pane, click the Edit link next to the "Resources Selected" message.
  5. Click the Resource Attributes header.
    All of the resource attributes that are defined in the organization model are listed.

    If a number in parentheses appears to the left of a resource attribute name, it means that that number of the selected resources have a value assigned to that resource attribute. In the following example, all three of the selected resources have a value assigned to the "Cell Phone" resource attribute, one of the selected resources has a value assigned to the "Clearance Expiration" resource attribute, and so:

    Also note that if the resource attribute has been mapped to an LDAP attribute (see Mapping Resource Attributes), the value of the resource attribute cannot be changed or deleted using this procedure. The value is obtained from an attribute in the LDAP source. You can tell if a resource attribute is mapped to an LDAP attribute by "LDAP Attr" shown in parentheses to the right of the resource attribute name. For example:

    The values mapped from the LDAP attribute to the resource attribute are not shown when multiple resources are selected.

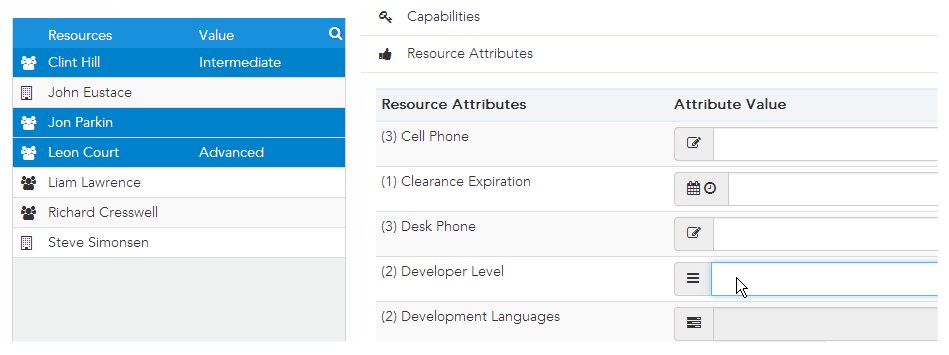
  6. To determine which of the selected resources have a value assigned to a particular resource attribute, click in the Attribute Value field for the resource attribute.
    The resource attribute value for each resource is shown in the Value column in the resource list. For example, clicking in the Developer Level field shows that Clint Hill has "Intermediate" assigned to that resource attribute, and Leon Court has "Advanced" assigned to that resource attribute:

  7. To assign a value to a resource attribute for the selected resources, or to edit a value already assigned to the resources, use the check boxes or fields in the Attribute Value column.

    The Attribute Value column provides various methods of specifying resource attribute values: check boxes, date and time pickers, lists from which you can select one or more values, and fields in which you enter a value.

    You can also un-assign a resource attribute value by clicking the X to the right of the desired resource attribute. Note that this actually removes the resource attribute from the display, but it reappears if you edit the resource's resource attributes at a later time.

    Be aware that assigning or editing resource attribute values when multiple resources are selected assigns the value to all selected resources.

    Note: Both capabilities and resource attributes can be edited in a single session, that is, without saving in-between editing those two items. While you are editing capabilities and resource attributes, you can revert to the previous settings for each of those using the Reset Capabilities or Reset Attributes selections on the Actions menu. These allow you to reset one, but not the other. You can also use the Actions > Reset All selection to reset both capabilities and resource attributes to their previous settings.
  8. After you have made the desired changes to the resource's resource attributes, click Save (or also edit the resource's capabilities, if desired, as described in the note above, then click Save).
  9. Click the Resource Attributes header again to collapse the list of resource attributes.