Editing Resource Attributes
To manually edit data in resource attributes, you must use the Organization Browser Resource Editor.
For information about accessing the Resource Editor, see Accessing the Resource Editor.
Procedure
-
In the right pane of the Resource Editor, scroll down to the
Resource Attributes
section:
This section lists all of the available resource attributes, as well as any values that have been assigned to those attributes for the resource(s) selected in the upper-left pane.
If you have multiple resources selected, and there is a mixture of values in the attribute among the selected resources, “(multiple values)” is shown in the Value column. For example:

If you have multiple resources selected, and there is a value shown in the Value column, it means that all of the selected resources have that same value in that resource attribute (although some of the values may come from an LDAP source, and some of them may have been entered locally using the Organization Browser). If the values come from both LDAP sources and locally, and you change the value using the Organization Browser, it changes the value only for the selected resources who did not obtain it from an LDAP source.
Note: LDAP attributes can be defined to store a sequence of values where the order is always preserved. A multi-line mailing address is one example of this. For storage, LDAP combines the data into one block of text with delimiters between the values. The dollar symbol is commonly used as a delimiter.Tools that are used to maintain the LDAP may display this type of multi-line, delimited data in a different manner. For example, it might substitute each delimiter with a comma and a space. For editing, it may display the information in a multi-line text area, with each value on a separate line.
If an attribute in your LDAP contains this type of multi-line, delimited data, and you map that LDAP attribute to a resource attribute, when that data is viewed in the Resource Editor, it is shown separated by the delimiters stored in the LDAP source (i.e., the delimiters are not substituted with other characters). The following is an example:
The icon that appears in the Value column also provides information about the type of data that is stored in the resource attribute, as follows:
-
Edit the resource attribute for the selected resources in one of the following ways:
Grant the resource attribute by either clicking the
 icon on the toolbar, or selecting
Grant the selected setting(s) from the
Tools menu. This is selectable only if at least one of the selected resources does not currently have the resource attribute specified.
icon on the toolbar, or selecting
Grant the selected setting(s) from the
Tools menu. This is selectable only if at least one of the selected resources does not currently have the resource attribute specified.
This allows you to grant the resource attribute without actually entering a value. Having the resource attribute with an empty value may have a special meaning, depending on how the process is defined.
Note: Also see Resource Editor Status Icons for information about all of the possible status icons when editing resource attributes.Remove the resource attribute by either clicking the
 icon on the toolbar, or selecting
Remove the selected setting(s) from the
Tools menu. This is selectable only if at least one of the selected resources currently has the resource attribute specified.
icon on the toolbar, or selecting
Remove the selected setting(s) from the
Tools menu. This is selectable only if at least one of the selected resources currently has the resource attribute specified.
When you remove a resource attribute setting in this way, it also removes any value that had been set for the resource attribute.
- Set the value for the resource attribute by clicking to the right of the resource attribute icon that indicates the type of data stored in the resource attribute (for information about the icons, see the table on
page 31):
Note: You cannot edit resource attributes in the Resource Editor if the resource attribute is mapped to an LDAP attribute.
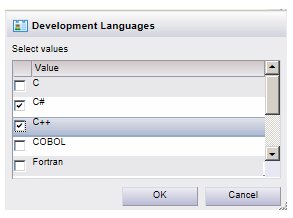
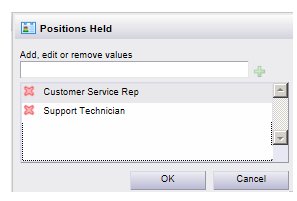
A pop-up dialog is displayed, in which you can specify the resource attribute value(s):
The pop-up will differ depending on the type of data stored in the resource attribute; some will have a text field, others will have radio buttons or check boxes, etc.
Enter the value for the resource attribute in the pop-up, then click OK to save it and close the pop-up.
When you specify the value for a resource attribute, the
icon is shown for that resource attribute, indicating that a change is being made. For example:

The resource attribute value is also shown to the right of the resource name when the resource attribute is selected. For example:

Note that once you edit a resource attribute, you can reset it to its original setting by selecting the resource attribute, then clicking the
 icon on the toolbar, or choosing the
Reset changes to the selected setting(s) selection on the
Tools menu.
icon on the toolbar, or choosing the
Reset changes to the selected setting(s) selection on the
Tools menu.
You can also select Reset Attributes from the Tools menu to reset all of the resource attributes you have changed during this editing session.
- Set the value for the resource attribute by clicking to the right of the resource attribute icon that indicates the type of data stored in the resource attribute (for information about the icons, see the table on
page 31):