Deploying an Application After Customizing
After customizing and testing a non-deployed application in your development environment, you can deploy the application to a node using a provided WAR-file creation utility.
Procedure
-
Execute the following command script:
StudioHome\wcc\version\WCCProjectName.create.war.cmd
where:
- StudioHome is the directory in which TIBCO Business Studio was installed.
- version is the version number of Workspace that was installed with TIBCO Business Studio.
- WCCProjectName is the name of the General Interface Builder project that contains your custom application. If you are working with the Workspace application, this is “workspace”.
This command file was created when you saved your custom WCC project in TIBCO General Interface Builder.
A WCCProjectName.war file is created in the same directory containing the command file. This WAR file, which contains the entire custom application, including the Workspace framework, will be used to create a deployment DAA file.
Note that this can take a few minutes to complete.
- Start TIBCO Business Studio.
- From the File menu, select New > TIBCO SOA Resources.
-
From the
Select a wizard dialog, select "TIBCO SOA Project", then click
Next.
Note - Throughout these steps, "CreateDAAExample" is used as the project name; you can substitute this with the desired name, where applicable.
- In the Project Name field, enter "CreateDAAExample", then click Next.
- Accept the defaults on the Asset Type Selection dialog, and click Next.
- On the Composite Project dialog, select "Empty SOA Project", then click Next.
- On the Composite File Name dialog, the Composite File field will be prefilled with project name ("CreateDAAExample")—click Next.
- On the Set Special Folders dialog, click Finish.
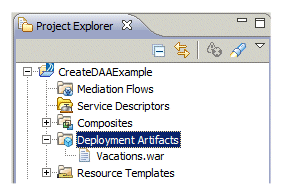
- Copy the WAR file you created in step 1 into Business Studio by doing the following:
- Select the WAR file under Deployment Artifacts and drag and drop it into the composite canvas in the right pane.
-
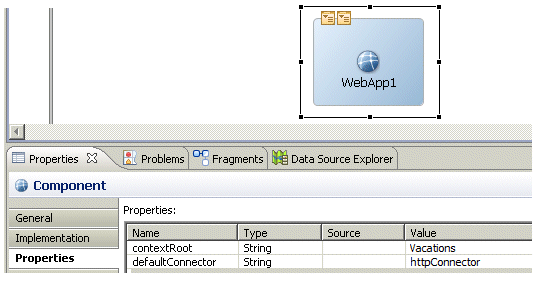
Select the component in the composite, then set the following properties on the
Properties tab in the
Properties view:
- contextRoot: The value you enter in this property is the root of the URL used to launch the application after deployment; it is the part of the URL between the host name / port number, and the launch fragment. For example, the contextRoot in the following URL is “inventory”:
http(s)://eastern:8088/inventory/launch.html
The contextRoot you enter in the contextRoot property must be a simple string (it cannot contain slashes).
For more information, see Launching a WCC Application.
- defaultConnector: The defaultConnector must be the same HTTP connector used by the BPM runtime (which can be seen in TIBCO Administrator; the default is “httpConnector”).
For example:
- contextRoot: The value you enter in this property is the root of the URL used to launch the application after deployment; it is the part of the URL between the host name / port number, and the launch fragment. For example, the contextRoot in the following URL is “inventory”:
- Save your project.
-
[Optional step] This step describes how to add an extension point to the composite. This extension point can be used at a later time to add
resource files, that have been manually localized, to your deployed application. Without an extension point, which allows dynamic update of files in a deployed application, you would need to undeploy the application, add the resource files, then re-deploy the application (resulting in application downtime). For more information, see
Localization.
To add an extension point:
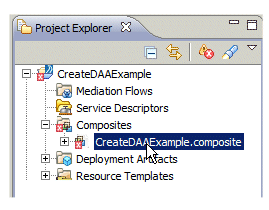
- In the Project Explorer, right click the composite, then select Open With > Text Editor from the context menu:
-
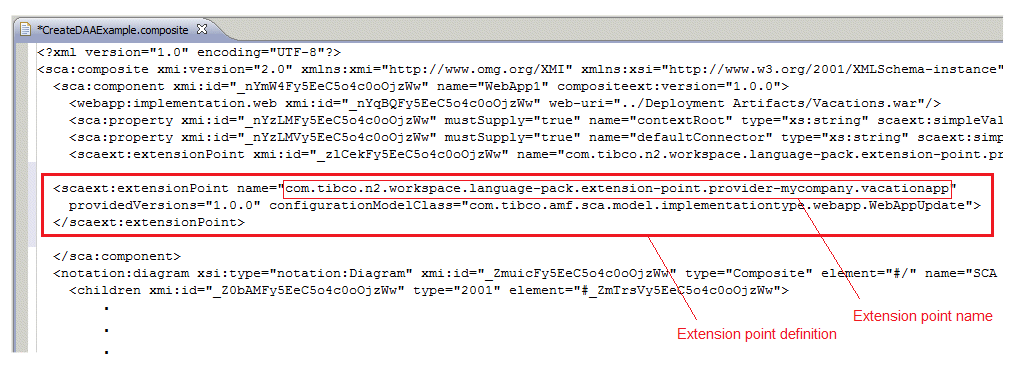
Add an extension point definition to the composite file, inside of the <sca:Componentelement> element, as follows:
Use the following text for the extension point definition, substituting the desired extension point name in the name attribute:
<scaext:extensionPoint name="com.tibco.n2.workspace.language-pack.extension-point.provider-<customerId > .<appId" providedVersions="1.0.0" configurationModelClass="com.tibco.amf.sca.model.implementationtype.webapp.WebAppUpdate"> </scaext:extensionPoint>The recommended convention for the extension point name is to use the value shown in the text above, substituting a customer ID and an application ID in the <customerId> and <appId> parts of the value. For example:
com.tibco.n2.workspace.language-pack.extension-point.provider-megacorporation.loanapp
Note, however, any value in the name attribute is acceptable. Whatever is specified as the name of the extension point must be used when referencing that extension point to dynamically add resource files to the application at a later time. For information about adding resource files using an extension point, see Deploying Language Resource Files.
Also note that multiple WCC applications can define the same extension point. Then if resource files are deployed at a later time to that extension point (as described in Deploying Language Resource Files), all applications that defined that extension point are updated with those resource files.
If you have multiple applications and you expect them to use different translations, you should define a different extension point for each application.
- Save your project.
- In the Project Explorer, expand Composites, then right-click CreateDAAExample.composite and select Create DAA....
- On the Select Archive Location dialog, accept the default location (CreateDAAExample/Deployment Artifacts) and the default file name (CreateDAAExample.daa)—click Next.
- On the Select Distribution dialog, ensure the Do not use a distribution file option is selected (the default), then click Next.
-
On the
DAA Specification dialog, ensure the
Save DAA Spec option is selected (the default), then click
Finish.
The DAA file can now be found on your file system in the following directory:
workspaceName\CreateDAAExample\Deployment Artifacts
where workspaceName is the workspace name you specified when starting Business Studio.
-
Using TIBCO Administrator, deploy the DAA file to the appropriate node.
For information about deploying applications using TIBCO Administrator, see the TIBCO Administration guide. (For a tutorial of deploying applications using TIBCO Administrator, see How to Implement and Deploy the WelcomeUsers Application.)
Result
After the application is deployed, you can run it using the description in Launching a WCC Application.


