Mapping Resources
Mapping resources is an administrative task that will typically be performed before users start using the BPM application.
Mapping resources can then be performed on an ongoing basis as resources are added or removed from the system, or if the organization model is revised (new positions, groups, etc.).
Mapping resources involves assigning resources to specific groups and/or positions in an organization model, which results in the resources receiving work items that are sent to the groups/positions to which the resources have been mapped.
Resources can be mapped to groups and/or positions:
- A
group represents a job type within the organization. It allows resources to be grouped by their job characteristics.
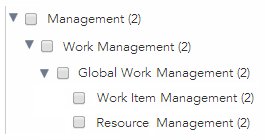
Groups are hierarchical, that is, you can have parent groups with sub groups. Typically, sub-groups are specializations of the parent group. For example:
If a group has sub-groups, you can assign resources to either the parent group or the sub-group. Resources that belong to sub-groups receive work items that are offered to their parent groups, as well as to the sub-group to which they belong. Using the example above, resources in the Work Item Management and Resource Management groups will also receive work items offered to the Global Work Management group.
For information about the inheritance of privileges and capabilities assigned to groups, see Privileges and Capabilities.
- A
position represents a set of responsibilities for a job within an organization unit. It allows resources to be grouped by job responsibility.
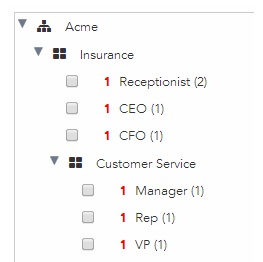
Positions are subordinate to an organization unit in the organization model. An organization unit can have many positions. Positions cannot be nested, although organization units can. In the following example, Acme Insurance and Acme Customer Service are organization units under the Acme organization. Each of the organization units have three positions.
Resources can be mapped to positions, but not organizations or organization units.
Resources that belong to a position receive work items offered to the position, as well as work items offered to the organization unit that is the immediate parent of the position.
For information about the inheritance of privileges and capabilities assigned to positions, see Privileges and Capabilities.
Procedure
-
Select one or more resources in the list.
- As you select resources in the list, previously selected resources remain selected. Clicking on a selected resource unselects it.
- Use the Shift key to select a group of resources.
- Use the
Select All button (
 ) to select all of the resources in the list.
- Use the
Clear Selected button (
 ) to unselect all resources.
-
If required, drill down into the group or position hierarchy to expose the groups or positions to which you want to map the selected resources.
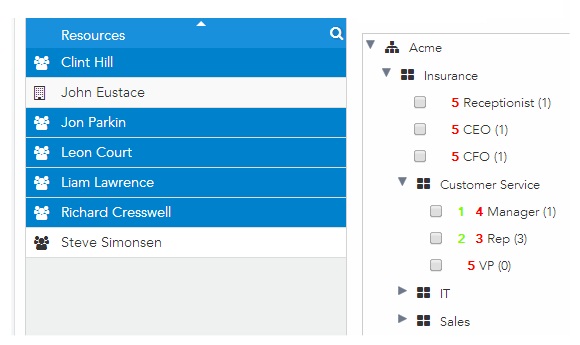
"Counts" are displayed next to each group or position:
The counts have the following meanings:- The number to the right of the group or position name in parentheses is the number of resources that are currently mapped to the group/position.
- The green-colored number tells you how many of the currently selected resources are already mapped to that group/position.
- The red-colored number tells you how many of the currently selected resource are not yet mapped to the group/position.
If only a green-colored number is displayed, it means all of the selected resources are already mapped to that group/position.
If only a red-colored number is displayed, it means none of the selected resources are mapped to that group/position.
-
Select the groups/positions to which you want to map the selected resources.
There are a number of ways in which you can select groups and/or positions, as follows:
- Click in the check box to the left of the group or position name to select it.
- Click anywhere on the line for the desired group/position, then press Enter or the space bar to select it.
- Press and hold the Ctrl key, then click a organization unit or position to select it and all subordinate positions or groups.
- Click the
button to select all groups or positions, depending which is currently displayed.
- Click the
button to unselect all currently selected groups or positions, depending which is currently displayed.
And note that you can use the up/down/left/right arrow keys on the keyboard to navigate the tree/column view.
Note: You can also click the Actions link and select Grant all Groups memberships, Grant all Positions memberships, or Grant all Groups and Positions to assign the selected resources to all groups or positions. If you choose to use one of those options, you do not need to click the Grant link as described in the next step. -
Select the
Grant link in the upper-right part of the dialog.
If one or more of the selected resources was not yet a BPM resource, the Create Selected Resources dialog is displayed. If this dialog is displayed, optionally specify a different name in the Resource Name field for each resource listed, then click Create. The resource name is the name the user must use to log into BPM applications. If the resource is already a BPM resource in another LDAP container, you must provide a different resource name, otherwise a message is displayed when you click Create, stating that the name already exists. (Note that only one case variation of a resource name is allowed across all LDAP containers. For example, if there is already a resource with the name "Clint Hill", you cannot create a resource with the name of "clint hill".
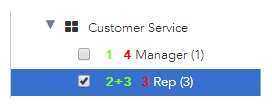
Numbers appear to the left of the selected groups or positions to reflect the number of resources that will be added to the group/position if you save the changes. For example:The "+3" that was added indicates that three of the currently selected resources will be added to the Customer Service > Rep position when you select Save. The green "2" means that two of the selected resources are already mapped to that position; the red "3" means that three of the selected resources are not currently mapped to that position.
-
Optionally choose different resources in the resource list and select groups or positions to which you want to map those resources.
You can map various resources to various groups and positions within a single "mapping session" without saving changes between selections. The Organization Browser remembers the resource and group/position selections as you select various resources and group/positions.
Be aware, however, that the green and red numbers showing the pending changes (granted or removed memberships) only reflect changes that apply to the currently selected resources. It may be advisable to always click Save (which is the last step in this procedure) after each grant when close tracking of pending changes is required.
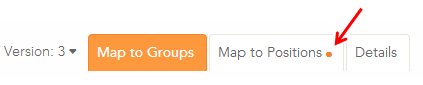
Also note that if there are pending changes to memberships, a "dot" appears on the right of the applicable tab, indicating that the changes have not been saved yet. For example:
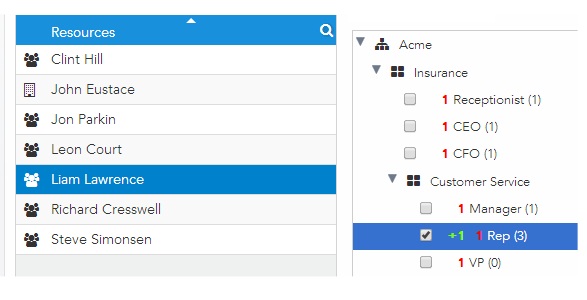
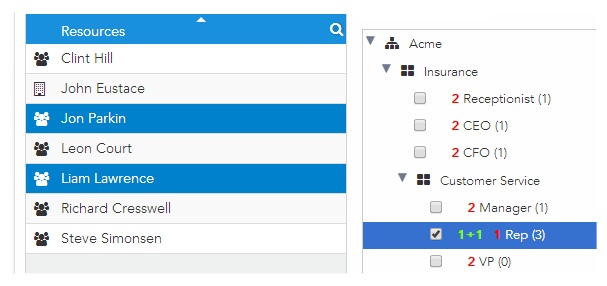
If you choose different resources, the green- and red-colored numbers to the left of the groups/positions change to reflect the currently selected resources. For example, assume the selections were made in the preceding steps, and Grant was selected (but Save was not clicked yet), but now only Liam Lawrence is selected. The Customer Service > Rep position will now appear as follows:
The "+1" indicates that the mapping of Liam Lawrence to the Customer Service > Rep position is pending.
And if you now selected Jon Parkin in addition to Liam Lawrence, the following is displayed:
The addition of the green-colored "1" indicates that Jon Parkin is already mapped to the Customer Service > Rep position. Also notice that the red number to the left of all of the other positions increased to "2" to indicate that neither of the selected two resources are a member of those positions.