Mapping Resources Using the Resource Editor
Resources can be mapped to groups and positions using the Resource Editor.
Procedure
-
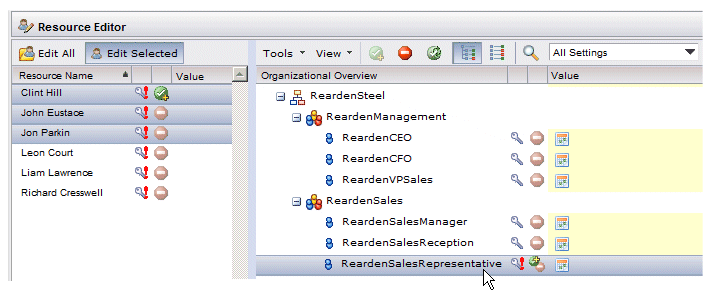
Select one or more resources in the left pane of the Resource Editor.
The group/position assignments you make will apply to all of the currently selected resources.
Note: If you accessed the Resource Editor by mapping resources from the main Organization Browser window, the Resource Editor opens with the selected resources and memberships highlighted and brought into view. If the Resource Editor is accessed in this way, you are free to make additional changes before committing. For more information, see Mapping Resources From the Resource List . -
Select one or more groups and/or positions to which you are mapping the selected resources.
When a single group or position is selected, the icon to the right of each resource name indicates that resource’s status in relation to the selected group or position.
Note, however, if you select multiple groups/positions, status icons do not appear to the right of the resource names — those icons appear only when a single position or group is selected.
The icon to the right of the selected groups or positions indicate the membership status for all of the selected resources.
For information about the possible icons, see Resource Editor Status Icons.
Also note that if a capability alert
 icon is showing to the right of a resource name, it means the resource doesn’t have the required capabilities for at least one of the groups or positions to which they have been mapped. If the capability alert icon is shown to the right of a group or position name, it means that a resource mapped to that group/position does not have the required capabilities.
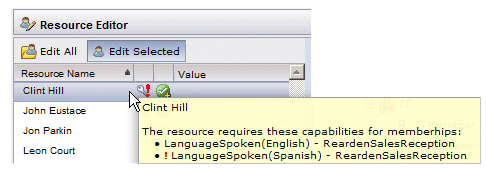
You can hover the mouse over a resource in the resource list to display a pop-up that lists the capabilities required by that resource, based on the groups/positions to which the resource has been mapped:

The name following the capability is the name of the group or position to which the resource has been mapped, that requires the capability. If the capability is qualified, the qualifier is shown in parentheses.
If there is a red exclamation character in front of the capability name it means the resource is missing that capability.
In the example above, Clint Hill has the LanguageSpoken capability with a qualifier of English, which is required for the ReardenSalesReception position; he does not have the LanguageSpoken capability with a qualifier of Spanish, which is also required by the ReardenSalesReception position.
You can also hover the mouse over a group or position to display a pop-up that lists the capabilities required for membership to that group/position (it also shows the privileges granted by membership to that group/position):

If the capability has a qualifying value, it is shown in parentheses.
If there is a red exclamation character in front of the capability name it means that a resource is mapped to that group or position who does not have that required capability. (Clicking on that capability name further down in the right pane of the Resource Editor allows you to see which of the resources in the left pane have that capability.)
-
Add or remove membership, as follows:
To add the selected resources to the selected group/position, click the
 icon, or select
Grant the selected setting(s) from the resource list
Tools menu.
To remove the selected resources from the selected group/position, click the
 icon, or select
Remove the selected setting(s) from the resource list
Tools menu.
- To add the selected resources to all groups and positions, select Grant All Memberships from the resource list Tools menu.
- To
remove the selected resources from
all
groups and positions, select
Remove All Memberships
from the resource list
Tools menu.
Note that the
 icon is enabled only if at least one of the selected resources is not already a member, and the
 icon is enabled only if at least one of the selected resources is already a member.
As you add or remove membership, the icons in the resource list, as well as those next to the group or position, change to reflect the addition or removal. For a description of all of the possible icons, see Resource Editor Status Icons.
-
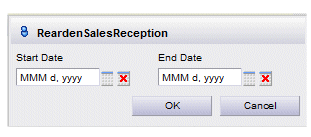
Optionally specify start and end dates for the desired memberships.
- For the group or position for which you want to specify a start/end date, click to the right of the calendar icon:
-
Enter the dates on which you would like the membership to start and end.
Note that changes made to one date may cause it to update the other date to keep the definition valid. For instance, it makes sure the start date precedes the end date. Also, since an end date is not allowed without a start date, clearing the start date will clear the end date.
-
Click
OK to save the start/end dates and close the dialog.
Start and end dates are shown in the resource list when the group or position for which it was set is selected. For example:

It is also shown to the right of the group/position name when it is selected, assuming all selected resources have the same start/end dates:

Note that if multiple resources are selected in the resource list (the left pane), and those resources have different start/end dates defined for a particular group or position, the following is shown in the right pane if you select that group or position:

In this situation, you can determine the start/end dates for an individual resource by selecting that individual resource in the resource list.
Result
Note that once you edit a membership, you can reset it to its original setting by selecting the group or position, then clicking the
![]() icon on the toolbar, or choosing the
Reset changes to the selected setting(s) selection on the
Tools menu.
icon on the toolbar, or choosing the
Reset changes to the selected setting(s) selection on the
Tools menu.
You can also select Reset Memberships from the Tools menu to reset all of the memberships you have changed during this editing session.


