Defining a Secondary Source Using an LDAP Group

This procedure describes defining a secondary source for an LDAP container whose primary source locates resources using an LDAP group.

Prerequisites

Create an LDAP container whose primary source locates resources using an LDAP group -- see Defining the Primary Source Using an LDAP Group.

You can optionally define one or more secondary sources for an LDAP container. For more information, see Primary and Secondary Sources.

Procedure

  1. Open the Organization Browser (Access to the Organization Browser) and select LDAP Containers.
  2. From the Container Name list, select the LDAP container to which you want to add a secondary LDAP source, then click the Edit link in the lower right part of the dialog.
  3. On the Edit LDAP Container dialog, click the New Group Source button.
    Note: After an LDAP container is created, and resources have been created in that container, you cannot delete or change the secondary LDAP sources defined for that container, nor add additional secondary LDAP sources to the container. (The only exception is that you can change the value of the Resource Name Attribute for an existing LDAP source.)
  4. From the Alias field drop down list, select the secondary LDAP source you would like to add to the LDAP container. (Note that when choosing a secondary source, the alias that was chosen for the primary source is omitted from the Alias field drop-down list.)

    The names in the Alias drop-down list are user-readable names that an administrator has assigned to each of the LDAP Servers available in the enterprise.

  5. Optional: In the Base DN field, enter the branch (e.g., an organization unit) in which you would like to limit the search in the LDAP directory structure. This increases the efficiency of the search if the LDAP contains a large number of branches.
  6. In the Group DN Query field, identify the objectClass of the LDAP directory whose entries are group entries.

    This field defaults to "(objectClass=group)". To change the value, select the box to the left of the field. Note that the value must be enclosed in parentheses.

    For information about objectClasses, see LDAP Group Sources.

  7. Using the Search Scope options, specify the depth to perform the search in the LDAP directory structure, as follows:
    • ONE LEVEL - Only the elements directly within the Base-DN level are searched.
    • SUBTREE - Elements directly within, and below, the Base-DN level are searched.
  8. In the Group DN field, enter the LDAP directory that contains the group entries.
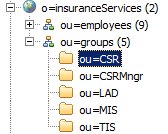
    For example, if the LDAP directory shown in the following illustration identifies the group, the group-DN is "ou=CSR,ou=groups,o=insuranceServices":

    You can either manually type in the group DN if you know it, or you can click the Fetch Group DN button, then click the arrow button to the right of the field and select one of the DNs listed. The Fetch Group DN button causes the Organization Browser to retrieve all of the group DNs whose objectClass matches the one specified in the Group DN Query field.

    Note: The Resource Attribute(s) field has no meaning when you are defining a secondary LDAP source.
  9. In the Member Attribute field, enter the attribute within the LDAP group entry that holds the collection of DNs that identifies the candidate resources.
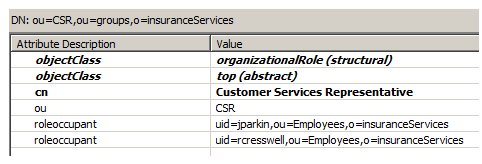
    The illustration below shows an example DN from an external LDAP browser. If the DN specified in the Group DN field contains the following attributes, where the roleoccupant attribute contains the DNs of the group members, you would specify "roleoccupant" as the member attribute:

    You can either manually type in the member attribute name if you know it, or you can click the Fetch button to the left of the field, then click the arrow button to the right of the field and select one of the attributes listed. The Fetch button causes the Organization Browser to retrieve all of the attributes from the DN specified in the Group DN field.

  10. Click the Get Sample Values button.
    A list of the group members DNs are returned and displayed.

    Also notice that when you clicked the Get Sample Values button,two Mapping fields (Primary Attribute and (Secondary) Ldap Attribute) appear under the Get Sample Values button. These are used to choose related LDAP attributes.

  11. At this point, you need to make a determination which attributes in the secondary LDAP source will be compared to attributes in the primary LDAP source.

    The goal of comparing primary / secondary attributes is to ensure that data from the secondary LDAP source is only merged together with the appropriate candidate resource from the primary LDAP source.

    Where a match cannot be found, or where it is not one-to-one, the candidate resource will not have a complete, accurate set of information, and it will be either omitted (where no match is found) or marked as "multiple entries" (where the match isn't one-to-one).

    For example, if there are several resources with the same last name, you need to check more than just the last name; maybe checking first name too will be enough, or maybe you need to check more attributes (because there may be multiple resources in the secondary LDAP source with the same first and last name — it would not know which to include). Maybe there are other types of data, such as an employee ID that would work better and would avoid inconsistencies in data entry (typos, nicknames, abbreviations, etc.).

    You may need to also go back and view the data in the attributes in the primary LDAP source.

    For this example, if you know that the “ou” attribute in the primary LDAP source contains the complete name of the resources (Clint Hill, John Eustace, etc.), and the “displayname” attribute in the secondary LDAP source contains the same information, those attributes would be prime candidates to link.

    Note: If you choose attributes that contain names, always be aware that there may be differences in the way those names were entered in the different LDAP sources, for example, Bob vs. Robert, Mike vs. Michael, or simple misspellings. Things like employee numbers tend to make good attributes to link.

    For additional information, see Primary and Secondary Sources.

  12. Using the Mapping fields that appeared when you clicked the Get Sample Values button, choose the related LDAP attributes, as follows:
    1. In the Primary Attribute field, choose the primary LDAP source attribute (for example, "ou") that contains data you want to compare to the data in the attribute you will choose in the next sub-step.
    2. In the (Secondary) Ldap Attribute field, choose the secondary LDAP source attribute (for example, "displayname") that contains data you want to compare to the data in the attribute you chose in the previous sub-step.
      Note: After an LDAP container is created, and resources have been created in that container, you cannot modify the "related primary/secondary attributes" that had been defined for the container.
  13. Optional: Click the icon above the Primary Attribute field to add additional related primary/secondary attributes.

    This would be done if there are additional attributes you want to match to ensure it's the same resource whose attribute data is being obtained from the secondary source.

  14. When you are finished linking attributes, click Save.
  15. If you are finished defining LDAP sources for the container, click the Save button.