This section discusses node administration. Node administration can
be done using TIBCO BusinessEvents® Extreme
Administrator, JMX consoles, or
administrator.
The following information is needed to perform a node installation on a host.
Host name
TIBCO BusinessEvents® Extreme installation path on host (e.g.
/opt/tibco-home/<version>)
Installation can be done remotely using TIBCO BusinessEvents® Extreme Administrator as long as the TIBCO BusinessEvents® Extreme installation is accessible from the host on which the node is being installed. The node installation screen is shown in Figure 3.1, “Node installation screen”.
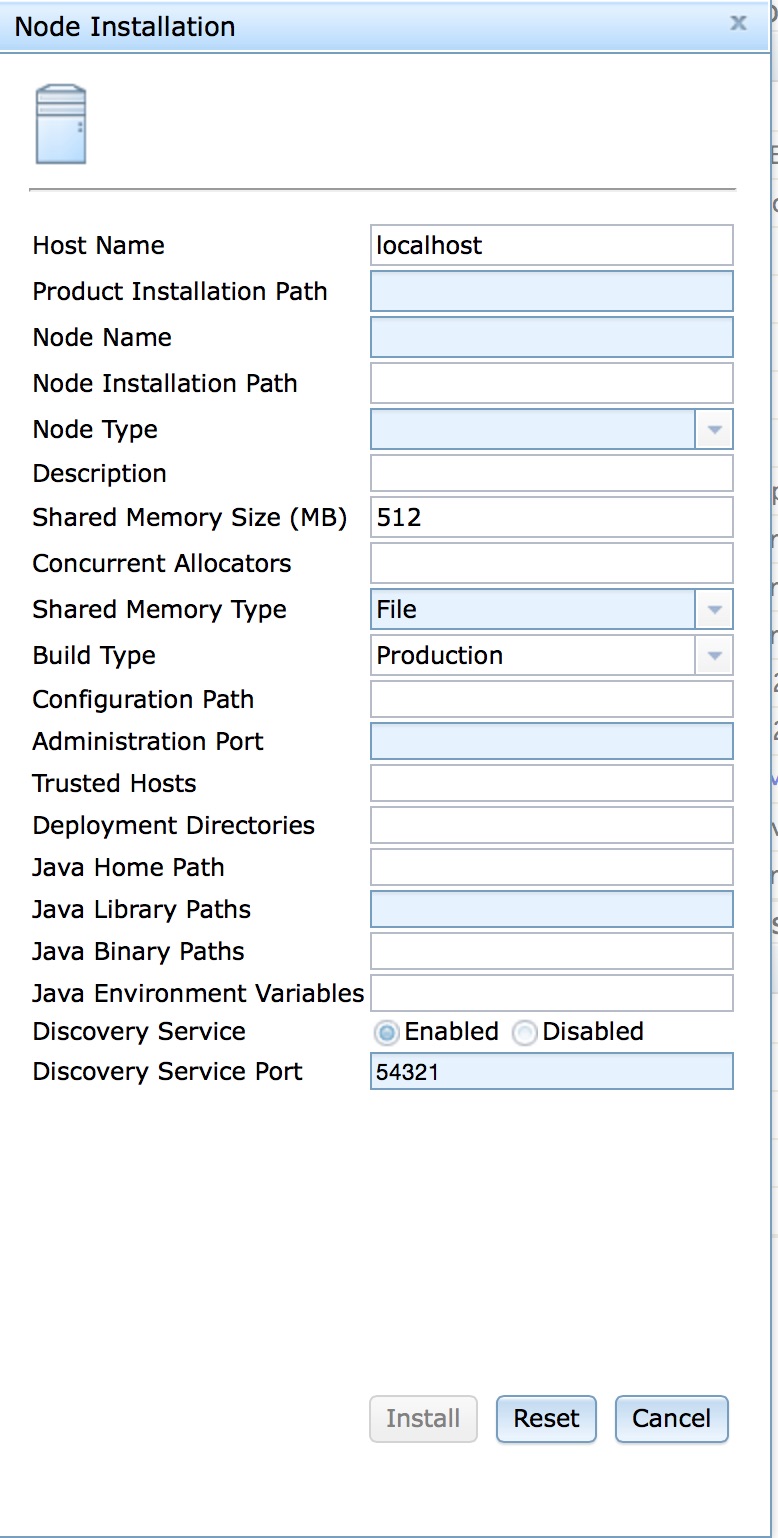
This fields in this dialog are described in Table 3.1, “Node installation options”.
Table 3.1. Node installation options
| Option | Description |
| Host Name | Host name on which to perform node installation. This is a required field. |
| Product Installation Path | Path to TIBCO BusinessEvents® Extreme installation on host. This must be an absolute path name. This is a required field. |
| Node Name | Node name. Node names cannot contain any spaces. This is a required field. |
| Node Installation Path | Installation path on host where node should be installed. This must be an absolute path name. This is a required field. |
| Node Type | One of Application or Domain
Manager. Application installs a
node for hosting applications. Domain Manager
installs a Domain Manager. |
| Description | An optional node description. |
| Shared Memory Size (MB) | Shared memory size in megabytes. Default value is 512 MB. |
| Concurrent Allocators | Number of concurrent shared memory allocators. Default value is based on the number of cores on the system and the configured shared memory size, up to a maximum value of 64. |
| Shared Memory Type | One of File or System
V. File causes the node to use file
backed shared memory. System V causes the
node to use System V shared memory. |
| Build Type | Controls the mode in which the TIBCO BusinessEvents® Extreme
runtime
executes. One of Production or
Development. Production
should be used for production deployments.
Development mode generates additional tracing
and diagnostics and should only be used for development
nodes. |
| Configuration Path | Path for default configuration files. This can be an
absolute or relative path. If a relative path is specified, it
is relative to the node installation directory. The default
value is <installation
path>/../configuration/<node
name>. |
| Administration Port | Administration port. Default value is random. |
| Trusted Hosts | An optional comma separated list of host names to define as trusted hosts for this node. |
| Deployment Directories | An optional : separated list of directories where
application JAR files can be installed. The directory names can
be absolute or relative. All non-absolute paths are relative to
the node Installation Path directory. If the directories do not
exist, they are created during node installation. If a directory
cannot be created, a warning message is generated, but node
installation continues. The default value is
<installation
path>/../deploy. See the section called “Deployment directories” for further details about deployment directories. |
| Java Home Path | Optional location of the JRE or JDK to be used by the node. This must be an absolute path to the Java Home to use. The default value is the shipped default JRE. |
| Java Library Paths | An optional list of JRE/JDK directories to add to the
node's library search path. Relative paths are relative to the
directory specified in the Java Home Path
parameter. Use the : character to separate
directories in the list. If this parameter is specified then the
Java Home Path parameter must also be
specified. The default value is configured to work the shipped
default JRE. |
| Java Binary Paths | An optional list of JRE/JDK directories to add to the
node's binary search path. Relative paths are relative to the
directory specified in the Java Home Path
parameter. Use the : character to separate
directories in the list. If this parameter is specified then the
Java Home Path parameter must also be
specified. The default value is configured to work the shipped
default JRE. |
| Java Environment Variables | An optional comma-separated list of
<name>=<value>
pairs specifying the environment variables to add to the node's
environment for the JRE/JDK specified by the Java Home
Path parameter. If this parameter is specified then
the Java Home Path parameter must also be
specified. Default value is an empty string. |
| Discovery Service | Enable or disable the discovery service. Default value is enabled. |
| Discovery Service Port | Discovery service port. Default value is 54321. |
Figure 3.2, “Installation of node MyApplication” shows the
installation of a node named MyApplication.
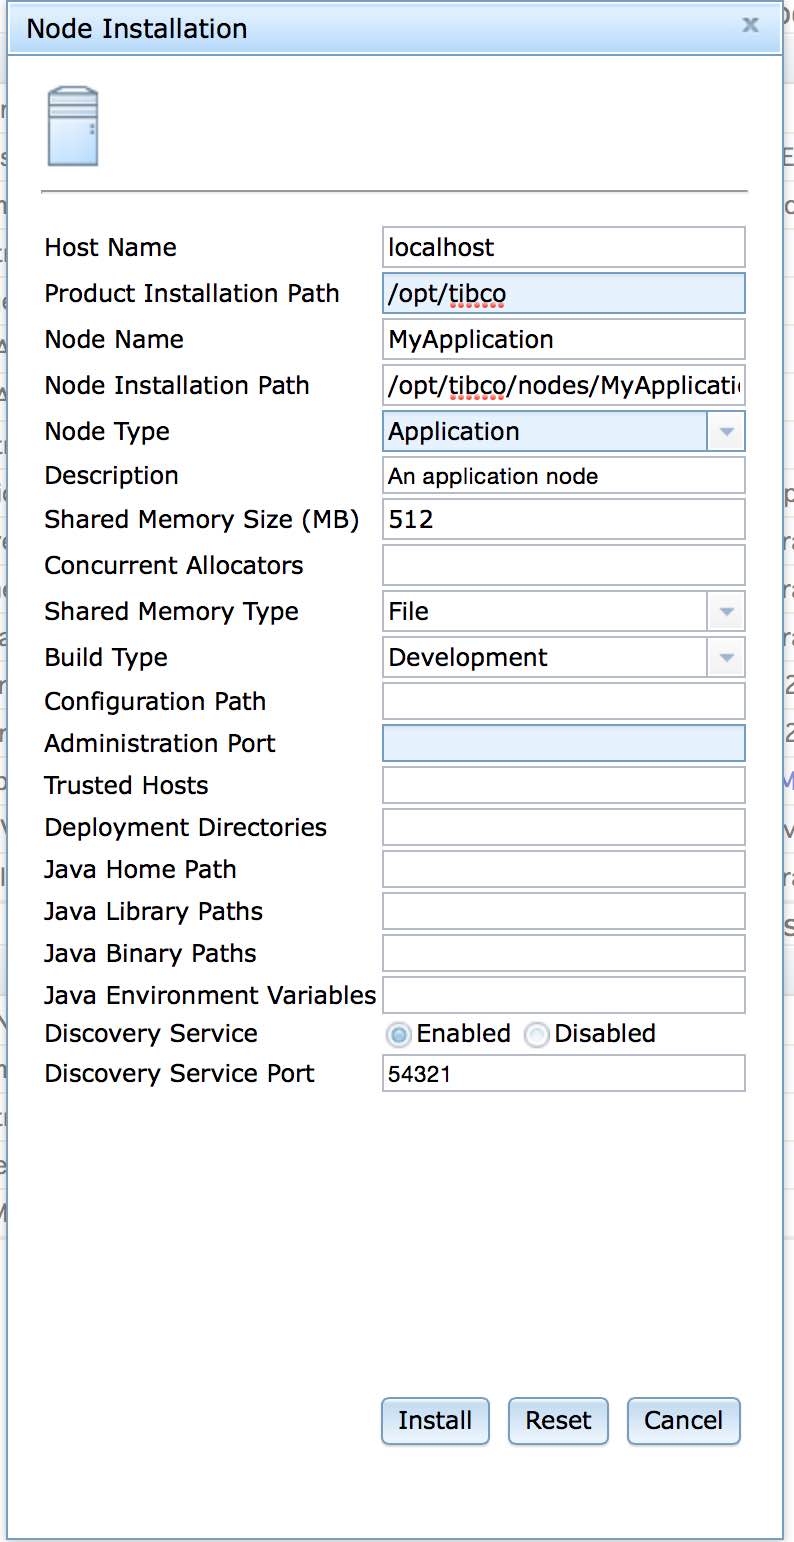
The node can also be installed using this command on the machine
orion with the SW_HOME environment
variable set to /opt/tibco.
administrator install node nodename=MyApplication installpath=/opt/tibco/deploy/nodes description="an application node"
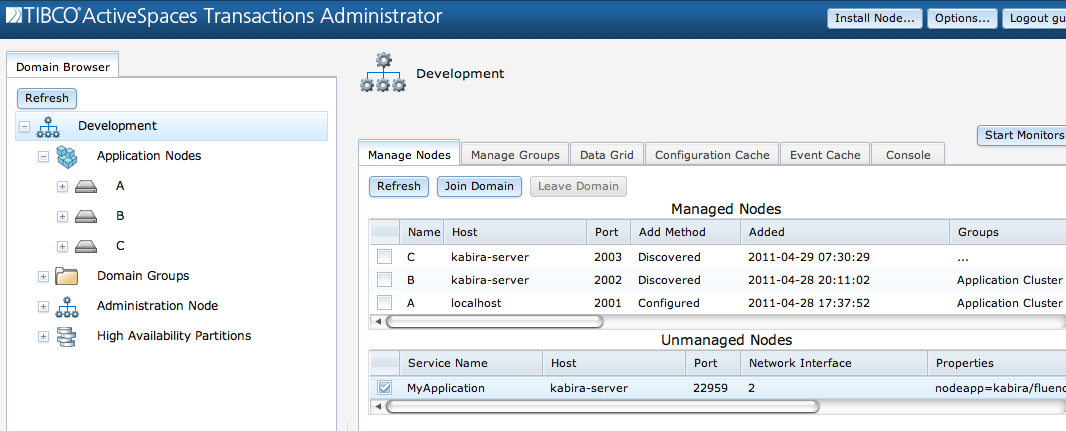
After the installation completes, the node shows up as unmanaged in the domain as show in Figure 3.3, “After installing MyApplication node”.
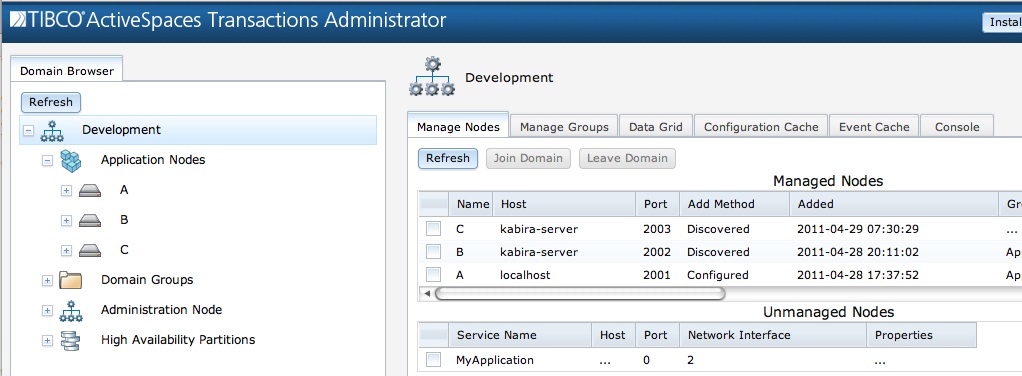
The node must be added to the domain to perform any further
management functions. This is done by selecting the node in the
Unmanaged Nodes table and clicking on the
Join Domain button.
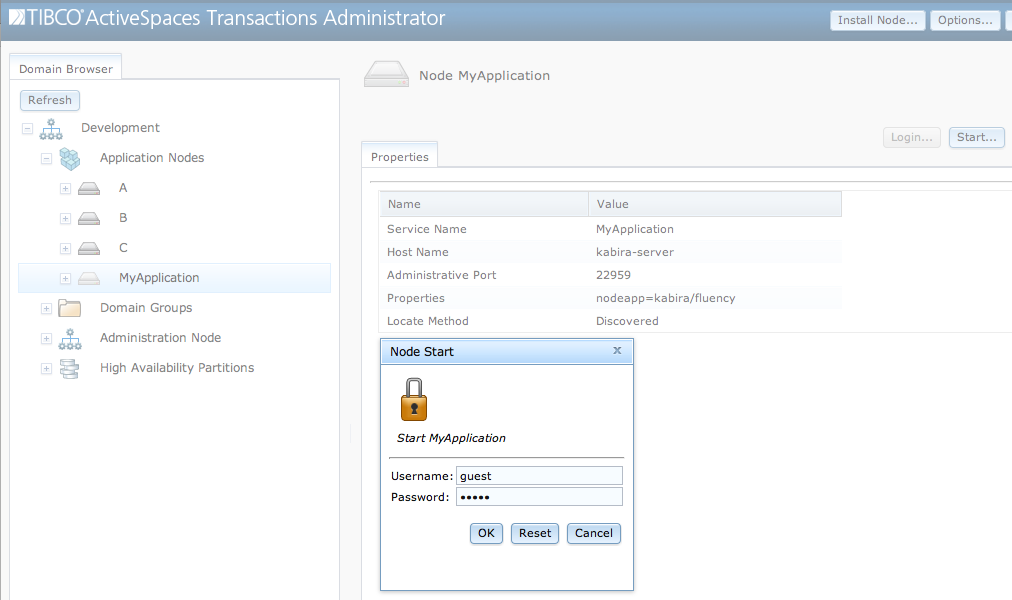
To complete the installation the node must be started. This is
done by selecting the node in the Domain Browser window and clicking on
the Start... button as shown in Figure 3.5, “Starting node”, or using this command:
administrator hostname=kabira-server adminport=22959 start node
As part of node installation, default configuration information is installed. This configuration information can be overridden before the node is started. Application specific configuration can also be installed after a node has been installed.
The default path where configuration for a node is located is
<node
directory>/../configuration/<node
name>. This path can be changed at node installation
time with the Configuration Path option. The
configuration directory has these top level directories:
node - contains the default node configuration files. The contents of this directory should not be changed.
application - application specific configuration files and overrides of the default node configuration.
The application directory has the
following behavior:
created during node installation if it does not exist.
all contained configuration files are loaded and activated in
ASCIIsort order during node start-up, after the node configuration was loaded and activated.individual configuration files are copied into an
activatedorrejecteddirectory in theapplicationdirectory depending on whether the configuration was successfully loaded and activated or not.a failure to load and/or activate a configuration file will cause node start-up to fail.
Configuration files copied to the activated
directory are named <filename>.<current
date>.
Configured files copied to the rejected directory are named
<filename>.<current date> and a
log file containing the failure reason is created. The log file is
named <filename>.<current
date>.log.
Removing a node does not impact the
application configuration directory in any
way.
A node inherits all environment variables set in the environment in which the node was installed. This provides a mechanism to make environment variables available to deployed applications. The inherited environment is printed in the system coordinator's log file. Any changes to environmental variables after the node is installed do not affect the node's inherited environment.
There is special handling of the executable search path, e.g.
PATH, and the shared library search path, e.g.
DYLD_LIBRARY_PATH. Both the executable and library
search paths inherited from the environment are appended to the paths
defined by the node. This ensures that a setting in the inherited
environment cannot cause incompatibilities with the node's required
environment.
When a node is installed, the following security policy is automatically configured:
Operating system user
Installation user
Trusted host configuration
A principal is defined when a node is installed using
the user name determined from the operating system context in which
the node installation was done. This is the name of the user logged
into the operating system when performing a node installation. This
principal has no password defined and they are granted
switchadmin role privileges, which give that
principal full administrative access to the node.
A principal definition is automatically defined for the
user name and password specified when installing a node. This
principal definition uses the user name as the principal name and the
password as the text credential that was specified to the node
installation command. This principal definition is also granted the
switchadmin role.
The operating system user name and the user name used to install a node may be the same or different. Both users are granted the same privileges and access to the node. The only difference is that the operating system user can perform administrative commands on the local node without specifying a user name or password because of the default trusted host configuration described next.
The default trusted host configuration defines
localhost and the actual host name where the node
is being installed, as trusted hosts. This allows the operating system
user to administer the node without specifying a username or password
when executing administrative commands from the same machine on which
the node was installed. This is accomplished by using the operating
system identify when executing administrative commands if no user name
and password is specified. Since the operating system user was defined
as a principal with administrative privileges on the node during
installation, they are allowed to execute any administrative
command.
A default user named guest with a
password of guest is configured for both
TIBCO BusinessEvents® Extreme
and Domain Manager nodes. This can be changed using
configuration.
![[Warning]](images/warning.png) | |
It is strongly recommended that the default user and password be changed for production systems. |
See Chapter 5, Security for details on the security architecture and configuration.
When a node is started the following occurs:
Start runtime services.
Start node management services.
Load default configuration.
Load application configuration and default configuration overrides (if any).
Initiate distribution initialization (if configured).
Start any JVMs that are deployed on the node.
The following steps are required to start a node from TIBCO BusinessEvents® Extreme Administrator
Log into the node
Start the node
This command can also be used to start a node:
administrator servicename=A start node
When a node is stopped the following occurs:
Stop any JVMs that were deployed to the node.
Terminate any distributed communication with other nodes.
Terminate node management services.
Terminate runtime services.
The following steps are required to stop a node from TIBCO BusinessEvents® Extreme Administrator
Log into the node
Stop the node
This command can also be used to stop a node:
administrator servicename=A stop node
A stopped node can be restarted to resume application execution.
An node must be stopped before it can be removed. When an node is removed the following occurs:
Terminate system coordinator
Remove the node directory and all contained files
The following steps are required to remove a node from TIBCO BusinessEvents® Extreme Administrator
Log into the node
Remove the node
This command can also be used to remove a node:
administrator servicename=A remove node
| |
To reclaim System V shared memory a node must be removed using the procedure described in this section. System V shared memory is not released by removing a node directory manually. |
An node must be reinstalled after it has been removed.
Applications running on a node can be upgraded without impacting other nodes in the cluster. When a node is upgraded with a new application version, the following steps are taken:
Audit that all classes being upgraded are in a partition with at least one replica node. This ensures that the objects can be migrated to another node during the upgrade process to avoid any data loss and to provide continuous service availability. This audit can be disabled by setting the Remove Non-Partitioned Objects option to True.
Setting the Remove Non-Partitioned Objects option to True can cause data loss, because non-replicated objects will be removed during the upgrade process. Use this option with extreme caution.
Leave the cluster. This causes all active partitions to migrate to their replica nodes.
Stop the node.
Update deployment directories for the node if new ones were provided in the upgrade or restore node dialog.
Remove all objects that are being upgraded. Replicated objects are still available on the nodes where the partitions migrated.
Restart the node.
Add the node as a replica to all partitions that were migrated off the node.
Join the cluster.
When the upgrade process completes, the new application version has been installed on the node, and the node is active in the cluster as a replica. The final step required to bring the node back online is to migrate partitions that should be active on this node back to the node. See the section called “Migrating partitions” for details.
Upgrading a node is initiated by clicking on the Upgrade
or Restore... button on the node screen in TIBCO BusinessEvents® Extreme
Administrator as shown in Figure 3.6, “Upgrade or restore node dialog”.
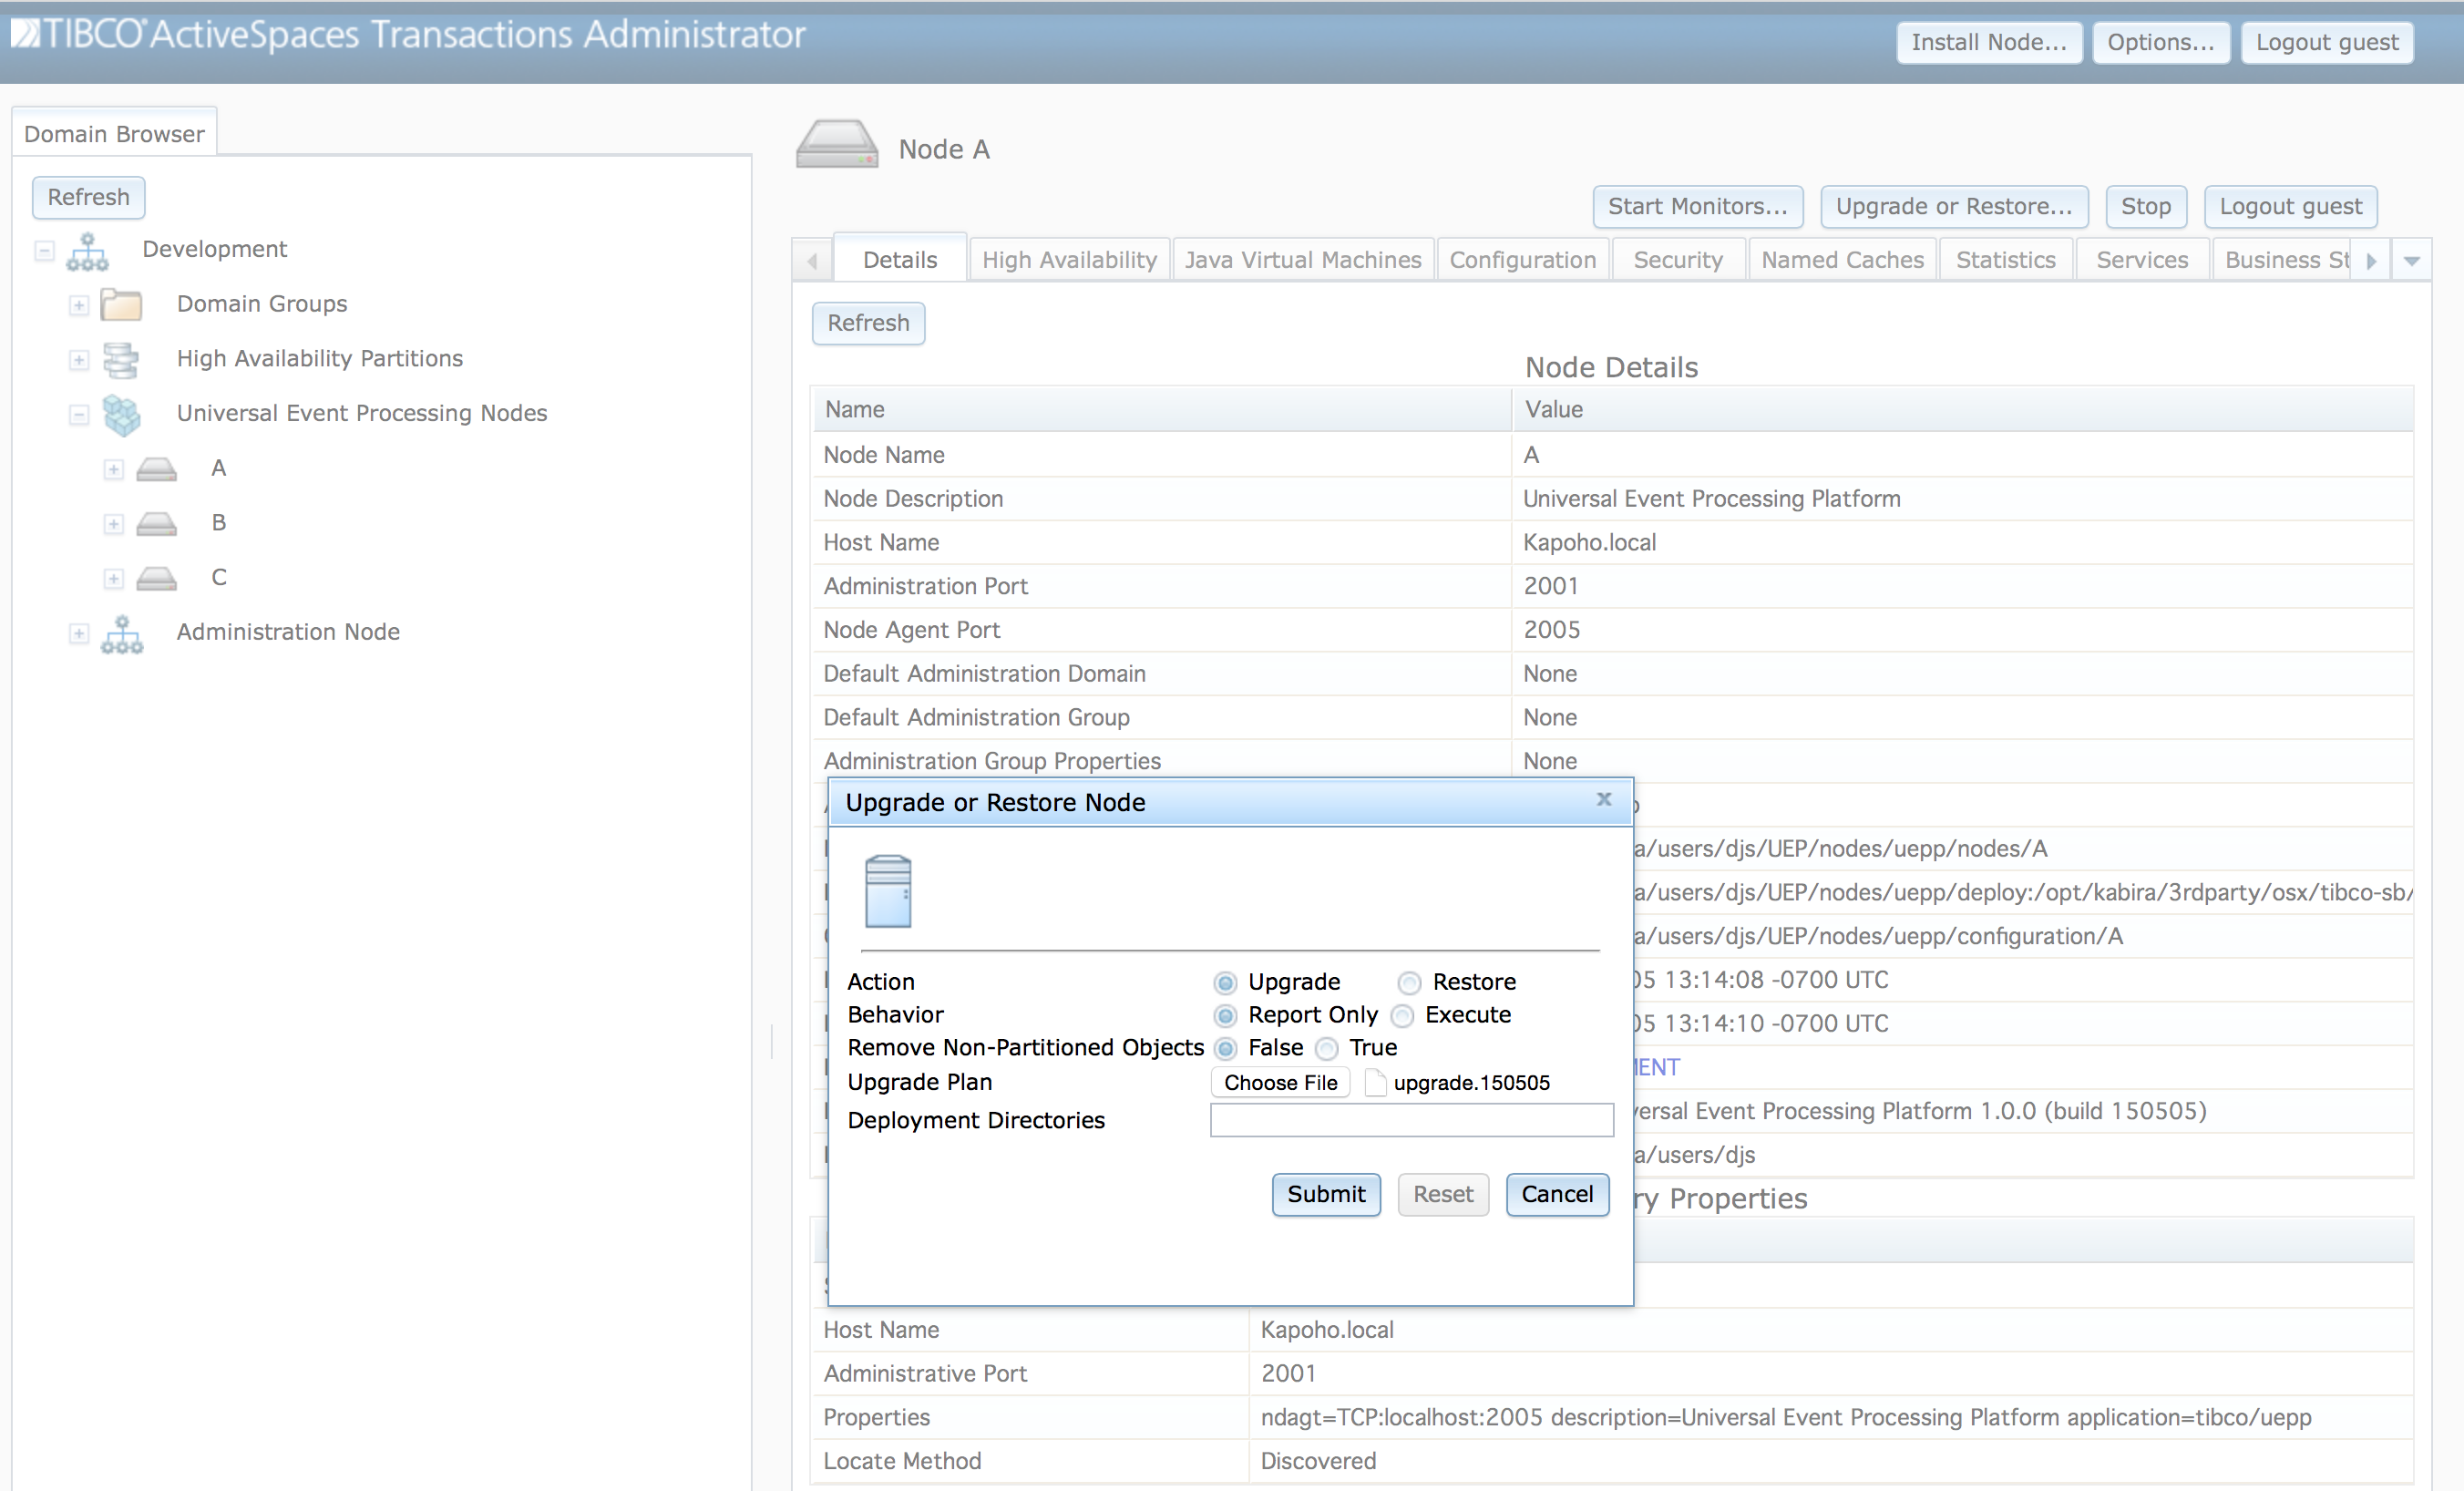
The Table 3.2, “Upgrade or restore options” table defines the values in the upgrade or restore dialog.
Table 3.2. Upgrade or restore options
Before performing the upgrade, the updated application JAR files
must be installed into the node deployment directories. It is
recommended that different deployment directories be used for each
version of an application being upgraded. This makes it easy to restore
the node to a previous application version by resetting the deployment
directories to their previous value. Deployment directories are changed
using the Deployment Directories field in the upgrade
or restore dialog.
To perform the upgrade, select the Upgrade
action in the dialog and set the behavior to Execute
and then click on the Submit button.
![[Note]](images/note.png) | |
It is recommended that the |
An upgrade can also be performed using this command:
administrator servicename=A upgrade node upgradefile=upgrade.150505
Current application versions on all nodes in a cluster can be displayed on the Application Nodes screen as shown in Figure 3.7, “Cluster version display”, or using these commands:
//
// Current active applications running in domain
//
administrator servicename=domainmanager display domain type=application

//
//  Display version inconsistencies
//
administrator servicename=domainmanager domainname=Development display cluster type=classmismatches
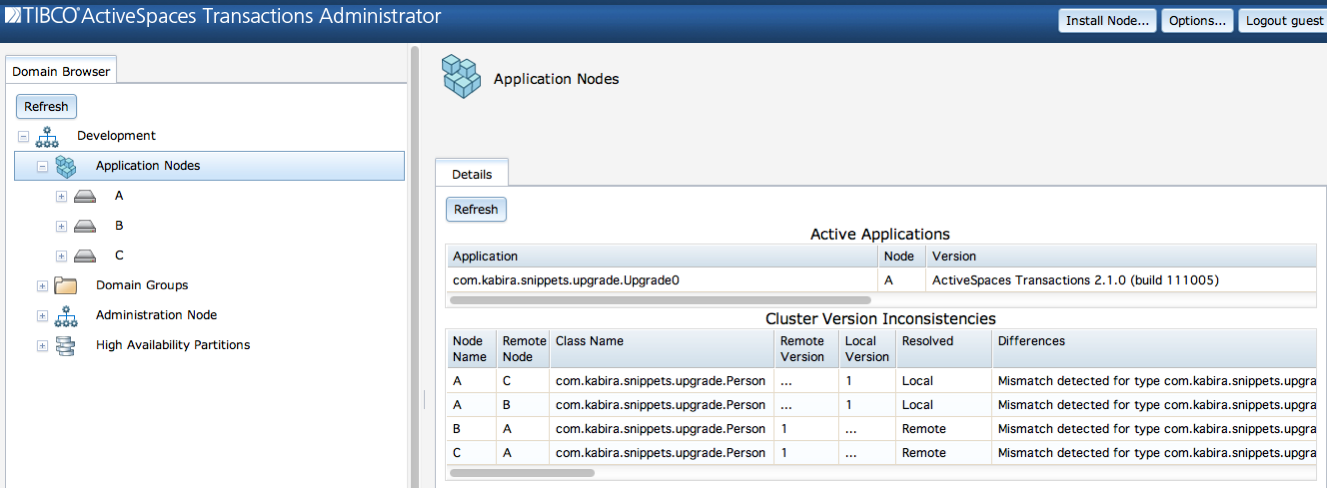
This information is displayed for each application running in the domain:
Application - application name.
Node - node on which application is running.
Version - product version.
This information is displayed for any application version inconsistencies in the cluster:
Node Name - Node reporting inconsistency.
Remote Node - Node to which inconsistency exists.
Class Name - Name of class that is inconsistent.
Remote Version - Remote class version.
Local Version - Local class version.
Resolved - Which node is resolving the inconsistency.
Differences - Description of differences.
Restoring a node to a previous application version is done using the upgrade or restore node dialog in Figure 3.6, “Upgrade or restore node dialog” described in the section called “Upgrading”, or this command:
administrator servicename=A upgrade node restorefile=upgrade.150505
Node restoration is useful to back-out a new application version that is causing errors. When a node is restored to a previous application version, the following steps are taken:
Audit that all classes being restored are in a partition with at least one replica node. This ensures that the objects can be migrated to another node during the restore process to avoid any data loss and to provide continuous service availability. This audit can be disabled by setting the Remove Non-Partitioned Objects option to True.
Setting the Remove Non-Partitioned Objects option to True can cause data loss, because non-replicated objects will be removed during the restore process. Use this option with extreme caution.
Leave the cluster. This causes all active partitions to migrate to their replica nodes.
Stop the node.
Update the deployment directories for the node if new ones were provided in the upgrade or restore node dialog.
Remove all objects that are being restored. Replicated objects are still available on the nodes where the partitions migrated.
Restart the node.
Add the node as a replica to all partitions that were migrated off the node.
Join the cluster.
When the restore process completes, the previous application version has been re-installed on the node, and the node is active in the cluster as a replica. The final step required to bring the node back online is to migrate the partitions that should be active on this node back to the node. See the section called “Migrating partitions” for details.
Before performing the restore, the previous version of the
application JAR files must be re-installed into the deployment
directories for the node. If different deployment directories were
specified when the application was upgraded, the previous ones should be
used, and specified in the Deployment Directories
field of the upgrade or restore node dialog. The Mismatch
File specified in the upgrade or restore node dialog must be
the same one that was used to upgrade to the new application
version.