Uploading and attaching assets
Overview
The add-on provides standard and quick-upload functionality. Administrators can use permission settings to determine this behavior. See Setting the upload mode for more information. Even when quick-upload is available, users can still access the Drive to upload and attach assets. See the following sections for more information:
Setting the upload mode
Administrators can specify which upload mode users can access. If you enable quick-upload, users will not see notification of duplicate assets, or errors indicating upload of invalid assets. For instance, if a user attempts to upload a file that does not meet conditions specified in D.A.C. settings, the file displays in the field with a red border and will not be attached to the field when saving.
To change the upload mode:
In the add-on's administrative area, navigate to and open the D.A.C. on which you want to adjust settings.
Open the appropriate user permission group and set the Allow to quick upload and attach property to the appropriate setting. Save and close.
Using quick upload mode
Use the following steps to upload and automatically attach an asset to a field:
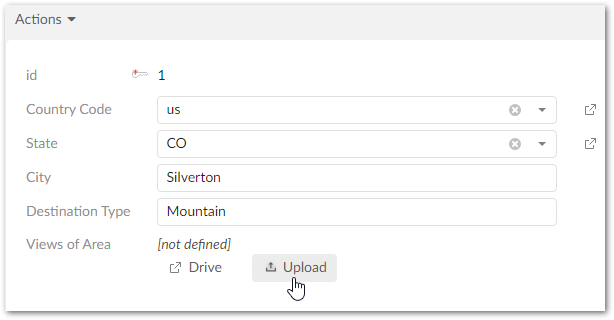
Create a new, or open an existing record in the dataset containing the media type field to which you want to attach an asset.
Click the Upload button that displays in the media type field. Note: You cannot use the Upload option when the maximum number of assets are already attached to the field.
In the pop-up window that displays, you can browse to select the files to upload and attach to the field. Once the add-on finishes attaching assets, you can edit their information. See Management overview for more information. Also, note that the quick-upload option displays no errors, or warnings during the upload process. However, if you've attempted to attach an assets that violates requirements for this field, it displays with a red outline indicating an error and it will not be attached to the field when saving. You can mouse over the asset to see information pertaining to the error.
After assets have been attached to the field, be sure to save before exiting.
Using standard upload mode
The following topics describe how to upload assets and attach them to a data model field:
Attention
The field and Drive must be properly configured before uploading and attaching assets. See Linking a Drive and data model field for more information.
Upload and automatically attach assets
If the Drive linked with a field doesn't contain the desired asset, use the following steps to upload and automatically attach an asset to a field:
Initiate the upload process in one of the following ways:
If enabled by an administrator, select the upload icon that displays in the tabular view.
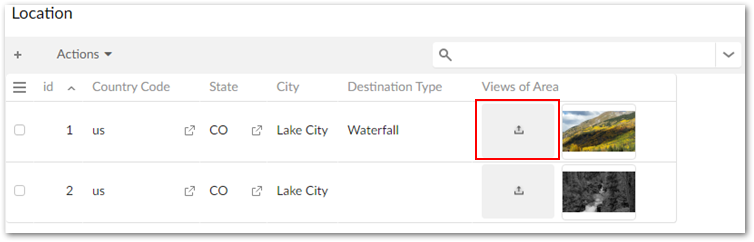
Create a new, or open an existing record and click the Upload button that displays in the media type field. Note: You cannot use the Upload option when the maximum number of assets are already attached to the field.
In the pop-up window that displays, you can drag and drop, or browse to select the files to upload and attach to the field. The following image highlights features in the upload screen. Once the add-on finishes attaching assets, you can edit their information. See Management overview for more information.
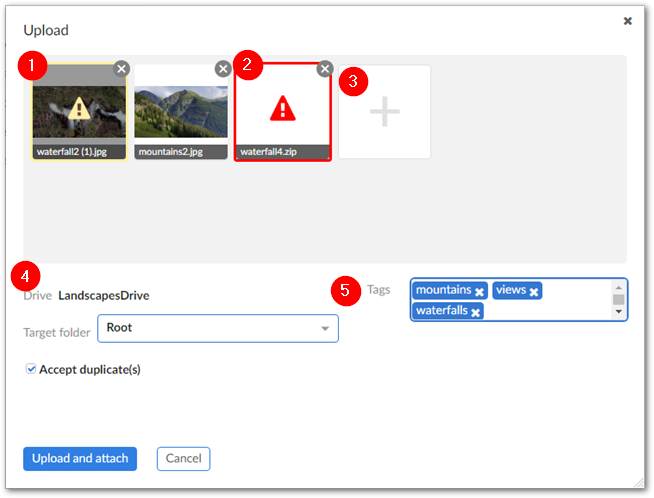
1)
If your Drive is configured to allow duplicates, the yellow icon overlay indicates an identical asset exists in the Drive. Use the Accept duplicate(s) option below to accept or reject upload of duplicates. When duplicates are not allowed, the red icon overlay displays and you cannot upload the asset.
2)
The red icon overlay indicates the asset does not meet D.A.C requirements. Mouse-over the icon for additional information.
3)
Select to browse you file system for another file to upload.
4)
Drive indicates where these assets are uploaded. Use the Target folder menu to select a folder location for the uploaded assets.
5)
Enter the tags to apply to the assets included in this upload.
Upload and attach in a Drive
The following steps describe how to upload an asset and attach it to a field using the Drive view:
Create a new, or open an existing record in the dataset containing the media type field to which you want to attach an asset.
Click the Drive button that displays in the media type field to open the Drive view.
In the Digital assets pane mouse over the + menu and select Add new assets.

In the pop-up window that displays, you can drag and drop, or browse to select the files to upload. If you've dropped files into the upload window and want to browse to select additional files, just click the large plus thumbnail. The upload window also allows you to add tags which the add-on applies to each asset in this upload. When adding tags, you can select from existing, or create new tags by adding text and clicking the Enter key.
Click Attach and upload. Note that you have the additional option here of selecting Upload to upload assets to the Drive without attaching them to the field. Once assets have uploaded, you can select them to perform additional actions. The Management overview section covers related topics in more detail.
Upload assets via administrative access
If you have administrative privileges, you can use perform the following steps to upload an asset:
Navigate to Administration > User interface > TIBCO EBX® Digital Asset Manager Add-on > Digital asset and from the Digital asset table's Actions menu and select Upload a new digital asset.
Browse to select the desired file.
You can create a label, description, version name, comments and tags. When adding tags, you can select from existing, or create new tags by adding text and pressing the Enter key.
Use the Drive drop-down list to indicate the Drive to which you want to add this asset.
Click Upload. After the process completes, the upload window refreshes and you can repeat these steps to upload additional assets.
Once you've uploaded assets, you can manage information such as label, description, state, tags and other metadata. The section, Management overview, covers the asset management topic in detail.
Attaching existing assets to a field
If you have previously used the add-on to upload files to a Drive, you can quickly attach them to the field by:
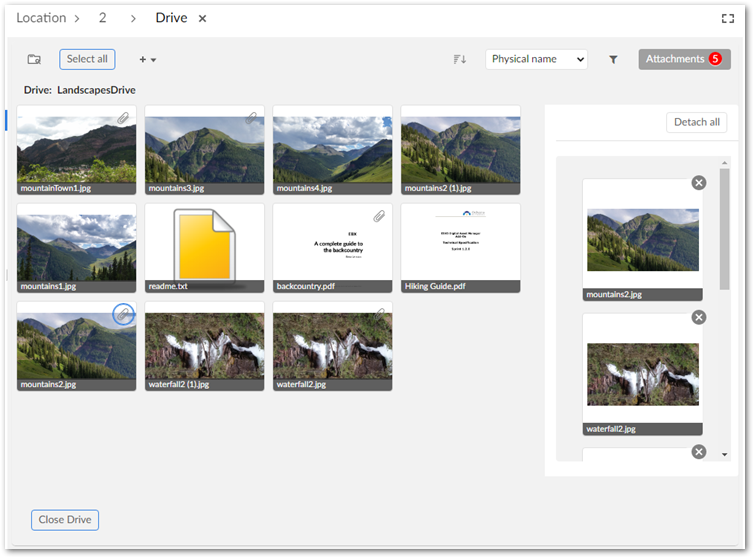
Clicking Drive to open the Drive view.

Attach assets:
Individual assets: Hover your mouse over an asset and select the paperclip icon.
Multiple assets: Select multiple assets and click the paperclip icon at the top of the screen.
Select one or more assets to attach. Select Attachments to show thumbnails of any assets attached to the field. Detach all assets by selecting Detach all, or select individual assets to open a preview with additional actions available.