Transferring to multiple tables
To transfer data between multiple tables:
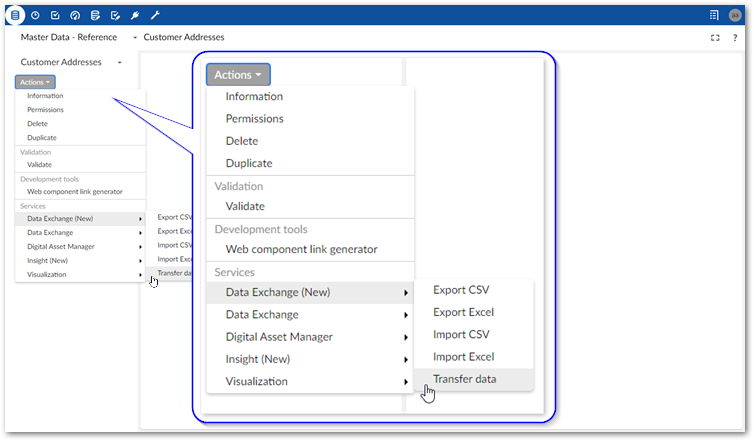
Initiate the transfer process:
Navigate to the dataset containing the source data you want to transfer.
Initiate the import process from the table by selecting: Actions > Data Exchange (New)> Transfer data.
Set transfer options:
The following image and list highlight some of the options when transferring data:
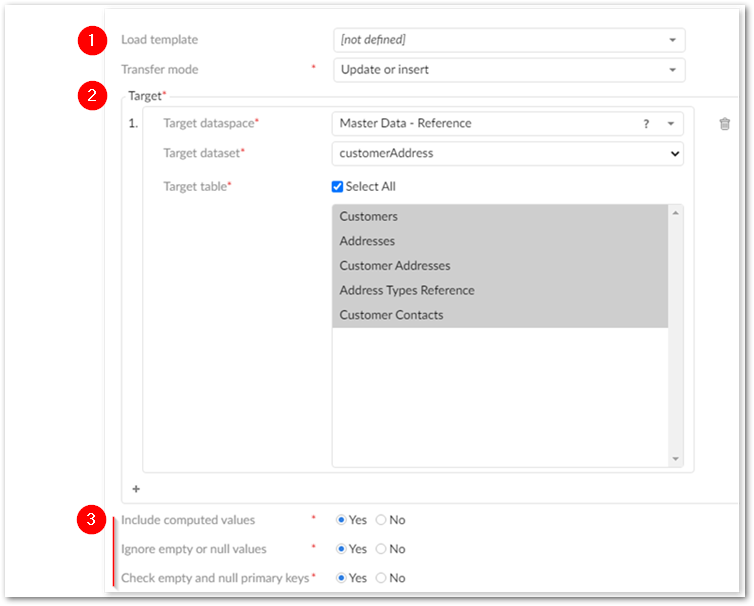
1)
Load template: Optionally, select a template to populate all data transfer settings and mappings.
Transfer mode: Select the desire transfer mode.
2)
Target: Use the menus to select the target table for this transfer. You can add additional targets by selecting the '+' icon in the bottom-left corner of the target group.
Note
You can add up to 7 target groups at a time. To add more, you must first select Save.
3)
Specify whether this transfer: includes computed values, ignores null and empty values, and checks empty and null primary keys.
Optionally, update or create mappings:
Note
The following steps provide only high-level mapping instructions. See Mapping interface reference for more detailed information on mapping and transformations.
Select Mapping to enter the mapping screen where you can update the default data mappings or add data transformations. The add-on automatically creates mappings where the source and target have the same labels. A mapping identifies which data is extracted from the source and where it is extracted to in the target.
The following image and list describe some features of table and field mapping:
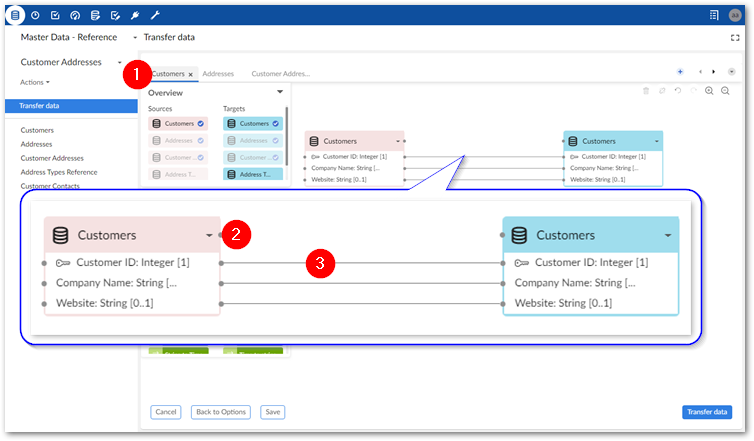
1) Table mapping tabs
Each tab contains the mappings between a different pair of source and target tables. The icons to the right allow you to locate and navigate between tabs. Additionally, you can create new tabs, and add any unmapped source and target tables by dragging them from the Overview box to the mapping pane. Note that the '+' icon is disabled when all sources are already included in a mapping tab.
2) Source (pink) and target (blue) tables
By default, the data source displays on the left and the target on the right. Each table header has a label and uses an icon to show its type and selecting the small arrow collapses and expands the table. The headers also have connection points. Drag this top point to automatically generate mappings between tables.
Please note that:
You can use the same source or target only once in the mapping screen. In other words, you cannot use a source or target in more than one table mapping tab.
Sources can have multiple targets, but targets can only have one source.
3) Mappings
Each line is a mapping. An orange color and icon indicates there is a warning for a mapping. Select the icon to view the warning. Drag from one field's connection point to another to create a mapping. To delete a mapping, select it and then the trash icon.
Optionally, add transformation functions:
Transformation functions allow you change the source data to meet technical or business requirements in the target. The add-on ships with several transformation functions that support common business cases. For more details on how to use transformation functions, see Mapping interface reference. For information on the available transformations and their descriptions, see Transformation function reference.
To add a transformation, select and drag the desired transformation function to the mapping screen.
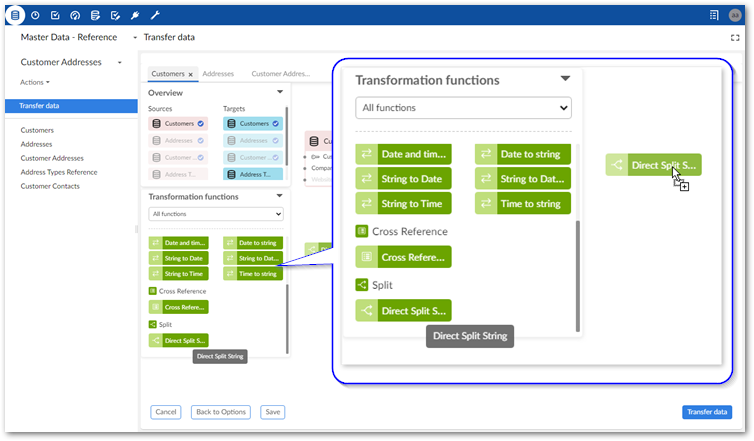
Select and drag fields from the source to the function's input (left) and connect the function's output (right) to target fields.
Double-click the transformation function to edit its parameters. Each function is different, for a complete list, see Transformation function reference.
Optionally, select Save to store your settings as a template for re-use. For more information on using templates, see Using templates.
Click Transfer data to complete the process.
Note
If an administrator set the transfer service to run in the background, you can go to and work in other areas of EBX® while the transfer is in progress. Access the list of in-progress and completed tasks by expanding the sidebar. See Viewing and managing background tasks for more information.