Contents
By default, StreamBase LiveView and StreamBase CEP use the platform's default character encoding when reading files or communicating over certain network protocols. If you require another character encoding, you can change the default settings as follows. This example uses UTF-8 as the new character encoding.
To set the file encoding for StreamBase Studio, edit the system properties for file.encoding and streambase.tuple-charset. These properties are set locally in a project's sbd.sbconf file.
Edit the sbd.sbconf file for your project as shown:
<java-vm>
    <sysproperty name="file.encoding" value="UTF-8"/>
    <sysproperty name="streambase.tuple-charset" value="UTF-8"/>
</java-vm>
This tells all StreamBase processes to emit tuples in UTF-8 encoding.
To set the default Java encoding for reading character data from files, set the environment variable STREAMBASE_STUDIO_VMARGS. In Windows, you can do this at the StreamBase command prompt with the set command (this one-line command is shown on two lines for clarity):
set STREAMBASE_STUDIO_VMARGS=-Dfile.encoding=UTF-8 -Dstreambase.tuple-charset=UTF-8
     -XX:MaxPermSize=256M -Xmx1500M
This environment variable is changing the default Java encoding when reading character data from files (file.encoding) and instructing the API to transfer character data as UTF-8 (streambase.tuple-charset). Start StreamBase Studio with the environment variables you just changed by using the command-line tool from the same StreamBase command prompt:
sbstudio
Once the STREAMBASE_STUDIO_VMARGS variable is set in StreamBase Studio, the character encoding for LiveView server will also be set to the new encoding.
To tell LiveView Desktop to read the new character encoding, start LiveView Desktop with the -vmargs argument. To do this at the command line, use this command:
lv-desktop -vmargs -Dstreambase.tuple-charset=UTF-8
This tells LiveView Desktop that incoming tuples are encoded as UTF-8.
Note
If your application uses a Feed Simulation that reads files and you start the simulation from outside StreamBase Studio, you need to give the same options to the simulation. For example, to use UTF-8, use the following:
sbfeedsim -J-Dfile.encoding=UTF-8 my-feedsim.sbfs
Readers familiar with the StreamBase CEP environment may be comfortable connecting to StreamBase Server from the command prompt with the sbc command. Those readers can still use sbc to connect to LiveView Server as a basic way to enqueue data into a running LiveView table.
To run the examples on this page, load and run the LiveView Minimal sample as described in Getting Started with LiveView Server.
The following information will clarify some of the important features of LiveView Server tables:
-
Each LiveView table is defined in a single LiveView configuration file. The basename of the lvconf file and the table name must be the same.
-
When LiveView Server loads the configuration file and generates one LiveView table per lvconf file, it places each table in its own container. The container's name is always the same as the table. Thus, the Minimal sample defines one table named Minimal that LiveView Server places in a container also named Minimal.
-
Each table container has exactly one input stream, always named
DataIn. -
Since we know the name of the container for each table, we know the StreamBase path to the
DataInstream for each table. For the Minimal sample, this path isMinimal.DataIn.
Using this information, we can obtain a description of the schema for the
Minimal.DataIn stream using the sbc describe command:
sbc describe Minimal.DataIn
This returns the following output:
<stream input="true" name="Minimal.DataIn" schema="DataSchema" uuid="BDBAC5D98E8
2EDFD75FB288938BA1FB8">
    <schema name="DataSchema" uuid="EFE1F8B44CCBB1E09AFEF4D15595A0BA">
        <field description="" name="PublisherID" type="string"/>
        <field description="" name="PublisherSN" type="long"/>
        <field description="" name="CQSReferredCount" type="long"/>
        <field description="" name="CQSDataUpdatePredicate" type="string"/>
        <field description="" name="pkey" type="string"/>
        <field description="" name="val" type="string"/>
    </schema>
</stream>
LiveView Desktop shows us only two fields for the Minimal table, but sbc describe shows us six fields. The first four fields are required by the inner workings of LiveView, and are handled internally by LiveView Desktop. To enqueue data manually to a running LiveView table with sbc enqueue, we must specify values for all six fields. We can use any values that match the specified data types.
The two fields of interest hold a generic key-value string pair. Start LiveView Desktop and connect to the running Minimal sample as described above, and double-click to open the Minimal table.
Then open a terminal window on Linux or a StreamBase Command Prompt and type the following
commands in sequence, watching the results in the LiveView Desktop window. We use
"sbc" as an arbitrary string for the PublisherID field, we increment the second field
by one for each input line, we leave the third field at zero for all lines, and we
leave the fourth field null for all lines. The pkey and
val fields hold the values that show up in LiveView
Desktop:
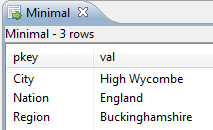
sbc enqueue Minimal.DataIn
sbc, 1, 0, null, City, London
sbc, 2, 0, null, Nation, France
sbc, 3, 0, null, City, Paris
sbc, 4, 0, null, Region, Buckinghamshire
sbc, 5, 0, null, City, "High Wycombe"
sbc, 6, 0, null, Nation, England
...
Continue entering geographical information or switch to another set of related
key-value pairs, as you prefer. Rows with the same pkey
primary key field replace previous rows with the same pkey text. For the entries above, the Minimal table in LiveView
Desktop shows the following results.
|
Alert rules can be set to read-only status. This is useful if you want alert rules to be preserved for multiple clients. Follow these steps:
-
Right-click in the project's root directory and select → . This opens the New StreamBase Server Configuration File dialog.
-
Select the root directory for your project.
-
Enter
sbd.sbconfin the Server Configuration file name field. -
Click . This creates an XML file with root element
<streambase-configuration>and opens the file in StreamBase Studio. -
Copy the following text into the file:
<java-vm>
  <sysproperty name="liveview.alert.disable.changes" value="true"/>
</java-vm>
Save this file and run the project. When LiveView Server next runs, directives in the
sbd.sbconf file that you just created is automatically
merged into the primary configuration file for the server. Thus, once LiveView Server
starts, any non-local host client sessions that connect to the LiveView Server will
receive a "Not authorized" message if the client tries to edit configured alert
rules. Clients running on the same machine as the server process (localhost) are
allowed to change alert rules.
Alert rules can be disabled with a system property so configured alert rules will not run with LiveView starts. This is useful if you have created an alert rule that might damage your system. The system properties liveview.alert.register.startup and liveview.alert.enabled control whether a project's alerts are registered and whether the alert service starts when the server starts. By default, these properties are set to true. If you set these properties to false, you can start LiveView Server without your configured alerts, and still use StreamBase Studio to edit or disable the alerts. To set either of these properties to false, follow these steps:
-
Right-click in the project's root directory and select → . This opens the dialog.
-
Select the root directory for your project.
-
Enter
sbd.sbconfin the Server Configuration file name field. -
Click . This creates an XML file with root element
<streambase-configuration>and opens the file in StreamBase Studio. -
To prevent configured alerts from being registered at startup, copy the following text into the file under the java-vm tag:
<sysproperty name="liveview.alert.register.startup" value="false"/>
Setting this property to false means that configured alerts will not be registered. This means that you can start the server and edit or disable the problem alerts.
-
To prevent the alert service from starting, copy the following text into the file under the java-vm tag:
<sysproperty name="liveview.alert.enabled" value="false"/>
LiveView server processes table queries in parallel. You can customize the
parallelization and threading to improve query performance. Two attributes of a
table's root tag, snapshot-parallelism and snapshot-concurrency, control the parallelism and concurrency of
query processing.
Snapshot parallelism determines the number of parallel regions used to publish to and scan from tables. Each parallel region contains approximately 1/N of the total rows in the table, where N is the snapshot parallelism value. Use snapshot parallelism to improve load performance and query performance where a query needs to scan many rows of a table.
Snapshot concurrency determines the number of threads used to service the snapshot portion of a query. By default, snapshot-concurrency is not enabled and the one parallel-region thread also services all snapshot queries. Setting snapshot-concurrency to X means there are X independent threads dedicated to servicing snapshot queries, and the parallel region thread is always available to handle data being published and all continuous query processing.
Higher snapshot-parallelism means that individual table scan snapshot queries will run faster. Higher snapshot-concurrency means more snapshot queries can be handled simultaneously.
Your LiveView deployment should have more cores then the aggregate total number of (snapshot-parallelism + snapshot-concurrency).