StreamBase LiveView takes data and gives you numerous way to view, query, and understand it.
This example simulates a very simple data feed of a single stock symbol with corresponding price and quantity fields.
-
Create a new LiveView Project.
-
Open StreamBase Studio.
-
In StreamBase Studio's Authoring perspective, select → → . The New StreamBase Project dialog opens.
-
In the New StreamBase Project dialog, enter a name for the project. This example uses my-first-liveview-project.
-
Clear the check box for Create empty EventFlow Application file. Keep the default selections for the check boxes Use default location, Options, and Java Build Path Options.
-
Click . A folder for the my-first-liveview-project appears in the Package Explorer view.
-
-
Create a table space configuration for the project.Table spaces are a convenient way to share configuration options across multiple tables. If you do not configure a table space, LiveView uses the default table space.
-
Select → → . The New StreamBase LiveView Configuration File dialog opens.
-
Select my-first-liveview-project for the parent folder.
-
Name the configuration file DefaultTableSpace.
-
Select the radio button for Table space.
-
Optionally, you can select the check box for Generate comments. This option generates comments in the lvconf file that provide additional assistance.
-
Click . The configuration file opens in the StreamBase editor view with the following contents:
<?xml version="1.0" encoding="UTF-8"?>
<liveview-configuration xmlns:xsi="http://www.w3.org/2001/XMLSchema-instance"
xsi:noNamespaceSchemaLocation="http://www.streambase.com/schemas/lvconf/">
    <!--A "table space" configures LiveView tables
         (such as memory settings and persistence options).
         Every table belongs to a default or specified table space.-->
    <table-space id="DefaultTableSpace"/>
</liveview-configuration>
-
You have now completed the initial project configuration. You will next configure a table for your data.
LiveView data tables process streaming data. They can receive data from multiple sources, including EventFlow Applications, external data sources, and other LiveView tables. This example configures a data table with three fields.
-
Create an lvconf file for the data table, Orders.lvconf.
-
Right-click the project folder and select → .
-
Select my-first-liveview-project for the parent folder.
-
Enter
Ordersfor the LiveView Configuration file name. -
Select the radio button for .
-
Optionally, select the check box for Generate comments.
-
Click Next. The Data Table Schema wizard opens.
-
Click the green plus sign to add the following fields to the table.
-
Symbol (type string).
-
Price (type double).
-
Quantity (type int).
-
-
Click Next. The Data Table Primary Key(s) dialog opens.
-
Select Symbol and add it to the Index Fields column.
-
Click . StreamBase Studio opens Orders.lvconf in the editor view:
<?xml version="1.0" encoding="UTF-8"?>
<liveview-configuration xmlns:xsi="http://www.w3.org/2001/XMLSchema-instance"
   xsi:noNamespaceSchemaLocation="http://www.streambase.com/schemas/lvconf/">
    <data-table id="Orders">
        <fields>
            <field name="Symbol" type="string"/>
            <field name="Price" type="double"/>
            <field name="Quantity" type="int"/>
        </fields>
        <primary-key>
            <field ref="Symbol"/>
        </primary-key>
    </data-table>
</liveview-configuration>
-
-
Alternatively, you can create an EventFlow interface and then copy or import the schema from a named schema in the interface.
-
Right-click the project folder and select → .
-
Select my-first-liveview-project for the parent folder.
-
Enter orders_schemas for the interface name.
-
Click . The orders_schemas.sbint application opens.
-
Click . The Edit Named Schema dialog opens.
-
Name the schema orders_schema.
-
Click the green plus sign to add the following fields to the schema.
-
Symbol (type string).
-
Price (type double).
-
Quantity (type int).
-
There are two ways to use the named schema in an lvconf:
-
Use the lvconf wizard to copy the schema. This copies the fields from the schema into the lvconf. Once the fields are copied, any changes you make to the named schema will not be carried through to the lvconf unless you re-copy them.
-
Create the Orders.lvconf file as detailed previously. In the lvconf wizard, instead of adding the fields with the green plus sign, click the
 Copy Schema from Existing Component
button. The Copy Schema From dialog opens.
Copy Schema from Existing Component
button. The Copy Schema From dialog opens.
-
Select orders_schema from the Locally defined Named Schemas entry in the Copy schema from field.
-
Click .
Complete the indexing as previously noted by using the Data Table Primary Key(s) dialog. The resulting lvconf has the schema copied directly into its text.
-
-
Use the import-schema tag. This references the named schema. This means that any changes you make in the named schema are carried through to the lvconf.
Warning
The import-schema tag imports by reference. Any processes that use that table schema, such as the generation of EventFlow applications configured for use with LiveView, will not accept a referenced schema.
-
Create the Orders.lvconf file as detailed previously. In the lvconf wizard, instead of adding the fields with the green plus sign, click Finish instead of Next. Orders.lvconf opens in the Editor tab with empty <fields/> and <primary-key/> tags:
<?xml version="1.0" encoding="UTF-8"?> <liveview-configuration xmlns:xsi="http://www.w3.org/2001/XMLSchema-instance" xsi:noNamespaceSchemaLocation="http://www.streambase.com/schemas/lvconf/"> <data-table id="Orders"> <fields/> <primary-key/> </data-table> </liveview-configuration> -
Replace the <fields/> tag with the <import-schema> tag:
<data-table id="Orders"> <import-schema schema="orders_schema" from="orders_schemas.sbint"/> <primary-key/> </data-table> -
Complete the indexing by editing the lvconf directly. Your lvconf file should look like this:
<?xml version="1.0" encoding="UTF-8"?>
<liveview-configuration xmlns:xsi="http://www.w3.org/2001/XMLSchema-instance"
 xsi:noNamespaceSchemaLocation="http://www.streambase.com/schemas/lvconf/">
 <data-table id="Orders">
   <import-schema schema="orders_schema" from="orders_schemas.sbint" />
   <primary-key>
     <field ref="Symbol" />
   </primary-key>
 </data-table>
</liveview-configuration>
-
-
Your data table is now fully configured and ready to receive data.
Now you can configure the EventFlow application that will populate your data table. This example uses a feed simulation to populate a DataOut stream.
-
Create a data source table, OrdersDataSource. This table will call the data-source. In this example, the data-source for the table will be an EventFlow application. This step is not strictly necessary; however, it is recommended that you store all of the project's EventFlow application files in a sub-folder under the project's root directory for convenience.
This step creates an lvconf that accesses the sub-folder where the applications are stored, so that successive project tables can reference this lvconf rather than individual EventFlow applications.
-
Select → →
-
Select my-first-liveview-project for the parent folder.
-
Enter OrdersDataSource for the LiveView Configuration file name.
-
Click . StreamBase Studio opens the OrdersDataSource.lvconf in the editor view.
-
Add the following <application> tag to the OrdersDataSource.lvconf file:
<?xml version="1.0" encoding="UTF-8"?>
<liveview-configuration xmlns:xsi="http://www.w3.org/2001/XMLSchema-instance"
 xsi:noNamespaceSchemaLocation="http://www.streambase.com/schemas/lvconf/">

<!-- This configuration file is simply declaring a StreamBase application file
     as a data source with the id 'OrdersDataSource'.  -->

  <application sub-folder="OrdersDataSource" filename="orders.sbapp"
    id="OrdersDataSource">
  </application>

</liveview-configuration>
The application specified in the OrdersDataSource table (orders.sbapp) will generate tuples that will, in turn, populate the data streams that you will view from the data tables.
-
-
Add the reference from OrdersDataSource to Orders.
The Orders table will use the OrdersDataSource.lvconf file to talk to EventFlow applications.
-
Create a sub-folder for the EventFlow application that will populate the incoming data stream.
-
Select → → .
-
Select my-first-liveview-project for the parent folder.
-
Enter OrdersDataSource for the Folder name.
-
Click .
-
-
Generate a data-source application with the correct schemas as given by the table configuration. You can do this by using the EventFlow application wizard, which will create an interface file with all the correct schemas.
Note
The EventFlow application wizard does not accept referenced schemas. Your table must have all fields explicitly specified in its lvconf file in order to use the EventFlow application wizard.
-
Select → → . The New StreamBase EventFlow Application dialog opens.
-
Select my-first-liveview-project/OrdersDataSource for the parent folder.
-
Enter orders for the EventFlow Application file name.
-
Select the check box for Configure for use with StreamBase LiveView.
-
Click .
-
Select Data Source from the Type of Application pull-down menu. Since this project has only on data-table, the wizard automatically selects Orders for the Table name.
-
Click . StreamBase Studio opens the OrdersDataSource/orders.sbapp file in the editor view.
The EventFlow application wizard created an interface file to store the correct schemas. You can see the generated schemas in the file lv-interfaces/OrdersSchemas.sbint. LiveView used the interfaces to create a data stream with the correct schema for the Orders table.
-
-
Click the DataOut icon in the editor, select General from the StreamBase Properties view, and make sure that the check box for Always expose Stream for Dequeue is selected.
-
Click the DataOut icon in the editor and select Schema from the StreamBase Properties view. You can see the schema for the DataOut stream contains the following fields:
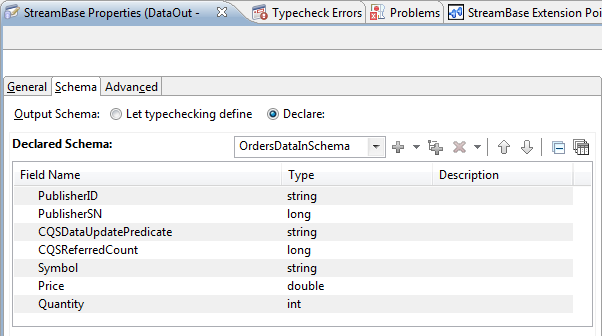
Note the schema name is OrdersDataInSchema. The schema is required to match the required schema for sending data into the Orders table.
-
Now, you can create the data to populate the data stream. This example uses a StreamBase Input Feed Simulation Adapter with a custom feed simulation. To add the feed simulation adapter to your application, follow these steps:
-
Open OrdersDataSource/orders.sbapp in the StreamBase Editor view.
-
Drag an Input Adapter from the Palette view onto the editor canvas. The Insert an Input Adapter dialog opens.
-
Enter
feedinto the filter and select Feed Simulation from the Global Input Adapters category. -
Connect the lower output port of the Adapter to the input port on the DataOut stream.
The adapter appears red. This is because the Feed Simulation adapter needs a feed simulation.
-
-
You will now create a feed simulation and connect it to the adapter. To create the feed simulation, follow these steps:
-
Select → → . This opens the New StreamBase Feed Simulation wizard.
-
Select my-first-liveview-app as the parent folder, specify the file name
Orders, and click . This creates a file namedOrders.sbfsand opens it in the editor. -
Enter a description in the Simulation Description field. This example uses Simple data feed.
-
In the Simulation Streams section, click .
-
Select the schema OrdersDataInSchema from the interface file in my-first-liveviewproject/lv-interfaces/OrdersSchemas.sbint.
-
Next, select the Custom generation method and click the button to open the Customize Fields dialog. We will use this dialog to specify the range of values for the feed simulation to generate for each field. For each field, select from the Generation Method drop-down list as shown in the following table.
Field Generation Method Values Reason PublisherID Constant feedsim A string to identify the data source. PublisherSN Incremented 0 to 10,000 by 1 Generate an incrementing serial number. CQSDataUpdatePredicate Constant null Set to null; non-null would update all matching rows of a table. CQSReferredCount Constant null Set to null; the system might use this field internally. Symbol Enumerated; Generate 20 random values with equal weights. Random values; Minimum length 4 and Maximum length 4. Generates 20 four-character random strings. Price Uniform 1.0 to 500.0, probability of generating null 0. Generates doubles in a uniform random distribution. Quantity Uniform 01 to 1500, probability of generating null 0. Generates integers in a uniform random distribution. When done, click OK.
-
Save the feed simulation with Ctrl+S.
-
-
Run the application. Right-click in the editor canvas or on the orders.sbapp file in the Package Explorer view and select Run As StreamBase Application.
-
Observe the application output tab. The output from the feed simulation is populating the outgoing data stream.
-
Click on a row in the application output tab and examine the tuple contents. Each tuple shows a value to Symbol, Price, and Quantity, in addition to the required fields.
-
Compile the project and start LiveView server.
-
Open LiveView Desktop.
-
Name the workspace my-first-liveview-project.
-
Look at the Orders table in a grid view. The grid view shows just the table fields, filtering out the internal fields from the feed simulation. When LiveView Server receives a tuple from the data source, it publishes a row in the table.
-
-
When done, close LiveView Desktop and stop LiveView server by clicking the red and green button in StreamBase Studio.
Now you have configured a simple LiveView project.