Accessing Data from Microsoft SharePoint Online
You can connect to and access data from Microsoft SharePoint
Online in Spotfire.
Before you start
Visit the Spotfire
system requirements page and make sure your version of Spotfire supports
accessing data from SharePoint Online.
You do not have to install a driver to access data from
SharePoint Online in Spotfire.
Prerequisites
Other preparations
If you are in an on-premises Spotfire environment and you
use Spotfire web clients (such as Business Author and Consumer), you must
configure your web clients to be able to access SharePoint Online data:
Certain settings in your organization’s Microsoft Azure
AD (Active Directory) environment might mean that an administrator has
to help you to enable Spotfire to access your SharePoint data. For more
information, see:
What SharePoint data can I access in Spotfire?
With the Spotfire connector for Microsoft SharePoint Online,
you can access data from lists available in
your SharePoint Online sites.
SharePoint Online is Microsoft’s cloud-based version of
SharePoint. A list in SharePoint is a way to collect and organize information,
in a format much like a table. Information from many apps on a SharePoint
site, such as calendars and announcements, is stored as lists and that’s
how you can access that data in Spotfire.
On-premises versions of SharePoint are not supported. Data
from sources other than lists, such as files or document libraries, are
not supported.
For more information, see Connector
for Microsoft SharePoint Online – Overview.
Connecting to Microsoft SharePoint Online
To access your SharePoint Online data in Spotfire, create
a connection to SharePoint Online. When you have created your connection,
you can share it in the Spotfire library. Then you and your team members
can reuse the connection for convenient access to the data you selected
in the connection.
Creating a new connection to SharePoint Online
Open the Files
and data  flyout and click Connect to.
In the list of connectors,
select Microsoft SharePoint Online. Then
click New connection.
In the Microsoft
SharePoint Online Connection dialog, click Sign
in with Microsoft to open the Microsoft login form in your
web browser.
To sign in, follow the instructions
in the login form in your web browser.
Note: After signing in
you might be prompted to allow the TIBCO Spotfire app in Microsoft
Azure to access your info. Click Yes.
For more information, see Allowing
access for the TIBCO Spotfire registered app in Microsoft Azure.
When you have signed in, return
to Spotfire. In the list of Top-level sites,
your organization’s root site is added automatically. In the list
of Sites for selected top-level site you
can see all the sites you have access to under the top-level site.
Tip: If you have access
to other sites that are not hierarchically located under the root
site, you must add them manually. See Adding
data from more sites.
Click to select a top-level
site. Then, in the list of Sites for selected
top-level site, select the sites and subsites you want to access
lists from. Then click OK to proceed.
In the Views in Connection
dialog, select the lists that you want to analyze in Spotfire. When
you are happy with your selection, click OK.
Tip: For more information,
see Selecting data
from SharePoint Online.
The final step is a summary
of the data you are about to add to your analysis. Here you can select
if you want the data tables to be Imported
or loaded On-demand.
To finish creating the data
connection and add the selected data tables to your analysis, click
OK.
Adding
and accessing data from more sites
When you sign in with Microsoft, Spotfire automatically
finds the root site of your organization in SharePoint Online. You can
see the root site in the list of Top-level sites,
and you can access lists from the root site and any of its subsites you
have access to.
You can add more sites in the list of Top-level
sites, so that you can access lists from sites other than your
organization’s root site. You can add any site as a top-level site, even
a subsite far down in the site hierarchy. Then you can access lists from
that site and its subsites.
Tip: When you add a site, it
is usually convenient to add the site highest up in the hierarchy. You
can then select from that site and all its subsites in the list of Sites for selected top-level site.
In the Microsoft SharePoint
Online dialog, after signing in, click Add….
In the Add
SharePoint Site dialog, enter the site address
(URL) of the site that you want to add.
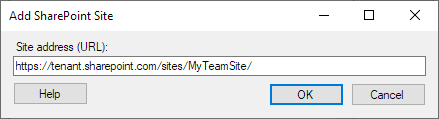
Click OK.
Result: The site you added
is now listed under Top-level sites. Click
the site to browse the list of sites and subsites available under that
site.
When do I have to add a site manually?
If you
do not have direct access to your organization’s root site.
In that case, Spotfire cannot list any sites automatically. Manually
add any subsites that you have access to as top-level sites.
If you
have access to other sites that are not hierarchically located under
your root site. Team sites for example are also located on
the top level and not under the root site. To access data from such
a site and its subsites, add it manually as a top-level site.
Selecting
data from SharePoint Online
Choice columns with multiple selections (multiple-choice
columns)
If a SharePoint list contains choice columns with Allow multiple selections (multiple-choice columns)
enabled, those columns are displayed as separate database tables in the
Views in Connection dialog.
You can relate and join a multiple-choice column with its
parent data to create a single data table in Spotfire. To do this, you
use the Add related tables functionality.
Note that you must first add the database table for the multiple-choice
column, and then join it with the full list.
In the list of Available
tables in database, double-click to add the table of the multiple-choice
column that you want to add.
In the Views
in connection list, right-click the multiple-choice column
table, and select Add related tables.
Result: The multiple-choice
column is joined with the database table of the SharePoint list it originates
from. The resulting joined table inherits the name of the multiple-choice
column.
When you add and join lists with multiple-choice columns,
Spotfire flattens the final data table. The result is a data table with
repeated values in columns. That means that when a cell in the multiple-choice
column contains more than one value, it is flattened into separate rows
for each value.
See the example below. The column Cities
previously lived in is a multiple-choice column, with more than
one value per row. In the resulting flattened data table in Spotfire,
you get rows with repeated values, one row per value:

More than one multiple-choice column
in a list
You can only join one multiple-choice column at a time
with its parent list. If you have more multiple-choice columns in the
same list, you must add and join each multiple-choice column with the
parent list separately. This means you will have a separate joined table
for each multiple-choice column that you want to add this way.
Tip: When you select data from
SharePoint Online, there is no functional difference between Add
related tables and Add all related tables.
Both actions join multiple-choice columns with their parent lists as described
above.
Metadata columns from SharePoint Online
Lists in SharePoint Online include many columns with metadata.
The metadata columns cover information like who created an item and when
the item was last modified. You might not be used to seeing all the metadata
columns when you work your lists in SharePoint Online, but in Spotfire
you can include them in the data table like any other column.
To make it easier to select only the metadata columns you
are interested in, the metadata columns are not selected automatically
when you select a list in the Views in Connection dialog. To add columns,
select the columns you want in the Columns in selected
view panel.
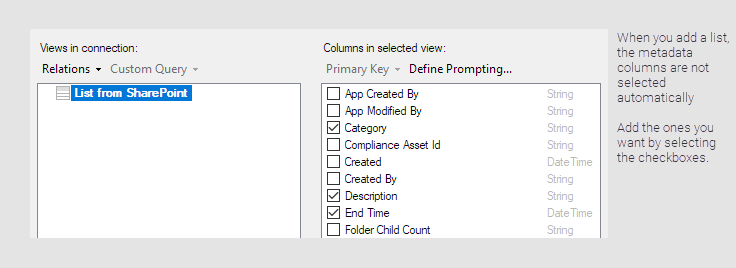
Tip: To add all the metadata
columns, right-click in the Columns in selected view
panel and select Select all.
Working with data from SharePoint Online in a Spotfire
analysis
When you have selected your list data in the connection
and added it as data tables in a Spotfire analysis, you can start to work
with and analyze the data. The following are some useful tips and information
specifically about working with data from a SharePoint Online connection
in Spotfire.
Marking many items with on-demand data
When you use the load method on-demand for SharePoint data,
you might sometimes see errors when you mark many items in visualizations.
With the load method on-demand, Spotfire sends queries for data to SharePoint
Online based on what you do in the analysis. Marking large numbers of
items in visualizations can result in complex and long queries that will
sometimes not succeed in SharePoint Online.
Use indexed columns as parameters for on-demand
data
When you use the load method on-demand for SharePoint data,
try to use a column that is indexed as the on-demand parameter for filtering
the data. Using columns that are indexed in the SharePoint list can often
improve performance.
You can use a column that is not indexed as the parameter
as well, but performance might be slower.