Click Files
and data ![]() .
.
In the Files and data flyout, click Connect to.
In the list of connectors, click TIBCO Data Virtualization.
In the TIBCO Data Virtualization flyout, click New connection.
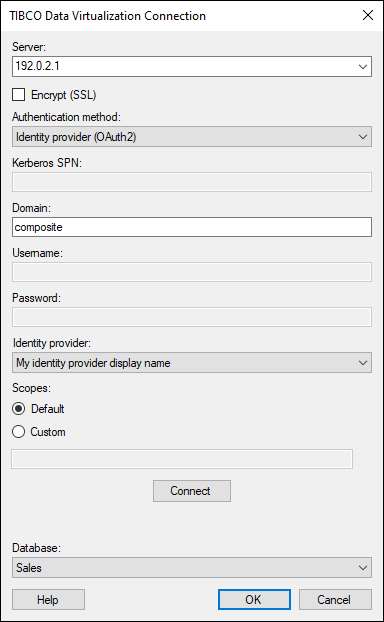
This dialog is used to connect to a TIBCO Data Virtualization system, where you can analyze data from different data sources (e.g. Oracle, Teradata, Salesforce, etc.), either in-database or by importing it into your analysis. You do not have to install a driver on your computer to get access to the TIBCO Data Virtualization connector, because the driver is included in the Spotfire installation. See Getting Started with Connectors to learn more about getting access to connectors in Spotfire.
Note: TIBCO Data Virtualization was formerly named Cisco Information Server (also branded as TIBCO Spotfire Advanced Data Services).
To add a new TIBCO Data Virtualization connection to the library:
On the menu bar, select Data > Manage Data Connections.
Click Add New > Data Connection and select TIBCO Data Virtualization.
To add a new TIBCO Data Virtualization connection to an analysis:
Click Files
and data ![]() .
.
In the Files and data flyout, click Connect to.
In the list of connectors, click TIBCO Data Virtualization.
In the TIBCO Data Virtualization flyout, click New connection.
Option |
Description |
Server |
The name of the server where your data is located. To include a port number, add it directly after the name preceded by colon. Example with port number: |
Encrypt (SSL) |
The TIBCO Data Virtualization connector has SSL support. |
Authentication method |
The authentication method to use when logging into the database. Choose from the following options: Username and password With Username and password the authentication is done using a database user. Database credentials can be stored, unencrypted, as part of the analysis file, using a setting in the Data Source Settings dialog. If credentials are found in the analysis file they will be used to automatically authenticate against the database. If no credentials or credentials profiles are found in the analysis file all who open the file will be prompted for database credentials. Note that there will be no prompting for credentials if the credentials embedded in the analysis file fail. Kerberos authentication When using Kerberos authentication the access token of the logged in user will be used. Users that have been given the appropriate access rights to the TIBCO Data Virtualization system will be able to connect and read data. Domain credentials are not stored in the analysis file. NTLM authentication When using NTLM authentication, the access token of the logged in user will be used. Users that have been given the appropriate access rights to the TIBCO Data Virtualization system will be able to connect and read data. Domain credentials are not stored in the analysis file. Identity provider (OAuth2) [Not available in TIBCO Cloud™ Spotfire environments.] Use an identity provider, such as Okta or Keycloak, to log in to TIBCO Data Virtualization. When you open the data connection, a web browser window opens, and you log in with the identity provider’s login procedure. If you use the same identity provider for authentication in Spotfire and TIBCO Data Virtualization, you can access your data with single sign-on in Spotfire. To be able to use this authentication method, you must add your identity provider in the Spotfire configuration. See Single sign-on for connectors with an identity provider (OAuth2). |
Kerberos
SPN |
[Only applicable when using Kerberos authentication.] The service principal name (SPN) used to identify the Kerberos authentication service. |
Domain |
The authentication domain to use when logging into the TIBCO Data Virtualization system. |
Username |
The username you wish to use when logging into the TIBCO Data Virtualization system. |
Password |
The password for the specified username. |
Identity provider |
Select the identity provider you want to use for logging in to TIBCO Data Virtualization. The options available in the drop-down menu are the identity providers you have added to the OAuth2IdentityProviders preference. |
Scopes |
Scopes determine what permissions Spotfire requests on your behalf when you log in to TIBCO Data Virtualization. Default Use the default scopes that you have specified for your identity provider in the OAuth2IdentityProviders preference. Custom Enter scopes manually in the text box. Separate values with a space. Scope_1 Scope_2 |
Connect |
Connects you to the specified server and populates the list of available databases below. |
Database |
Select the database of interest from the drop-down list. |