Saving an Analysis File in the Library
Using the library, you and your colleagues can work together
on the same analysis, keeping everyone up to date. When saving your analysis,
it is stored as a DXP file in the library. Files in the library can also
be opened by your colleagues who run the Spotfire web client. If this
is the intended use of the file, see the chapter Preparing
Analyses for Spotfire Web Clients to be aware of the limitations on
the files available to web users.
Files saved in the library cannot be opened if you are
working offline (without a connection to a server).
Tip: You can define your preferred
data loading settings for each data table or part of a data table in the
data canvas, as well as configuring
additional settings for each data table in the Data
Table Properties dialog, at any time while working on your analysis.
This way you will not have to define those settings when saving the analysis,
which makes the save procedure quicker.
Tip: An Administrator may change
the default data loading settings for file data sources, using preference
settings. The preference settings are reached in the Administration Manager,
Preferences tab, under Application > DataImportPreferences. The administrator
can also change the preference
default for embedded data or force embedding of data when saving to
library. You can find those preferences under Application > LibraryPreferences.
If the final data table is embedded, then you will not be able to change
any data loading settings for specific sources.
To save an analysis file in the library:
Note: If you are working with
linked data, you might want to select
key columns before saving the analysis. This is important if you want
to reapply any specified tags when reopening the analysis file, or if
you want to reapply
markings in unaggregated visualizations (including markings in bookmarks).
Make sure to select columns that uniquely identify all rows in the data
table.
Before saving the file, review
the Document
Properties, in particular the Library tab, to make sure all settings
are the way you want them.
Select File
> Save as > Library item.
Response: The Files and data
flyout is opened.
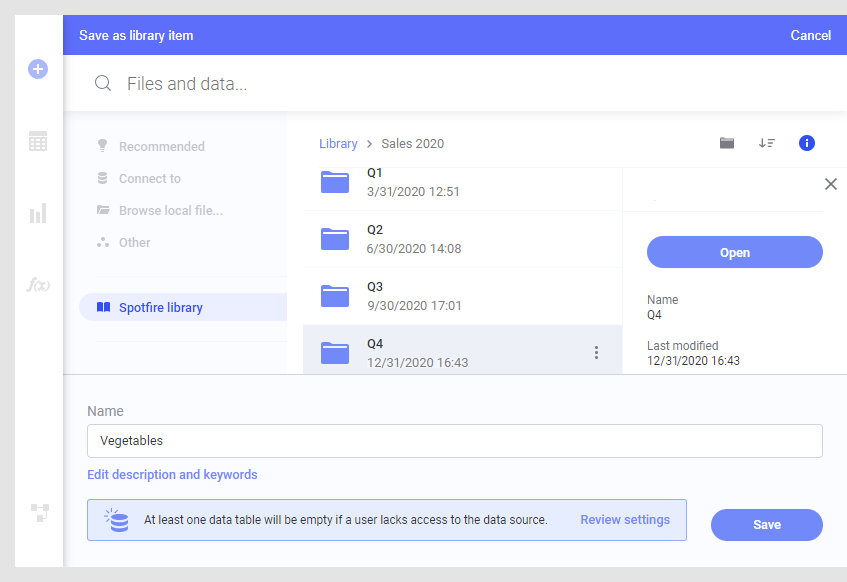
Navigate to the library folder
where you want to save the analysis.
Comment: To review or change the permissions for
a folder before saving your analysis, right-click the folder of interest
and select View details. Scroll to the
section named Folder permissions, and
click Edit if you need to change the current
permissions. To learn more about folder permissions, see Permissions.
Specify a Name
for the analysis file.
Comment: The name can be 256 characters at most,
and the following characters are not supported: \ / : * ? " <
> |
Optionally, click Edit
description and keywords, to show two additional input fields
where you can enter a description or add keywords specific to the
contents of the analysis.
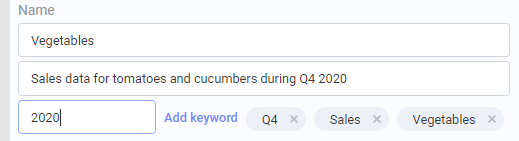
Comment: Keywords are used to enhance organization
and search capabilities.
Read the information in the
blue section at the bottom of the flyout. It is a summary of what
the implications will be to other users of the analysis if you save
the analysis with the current data loading settings. If you want to
keep the current data loading settings, continue to step 8. If you
want to see a detailed view of the current data loading settings or
edit them, click Review settings.
Comment: Depending on whether you want data to
be updated from a linked source each time you open the analysis, or,
whether you want to store a fixed version of the data in the analysis,
you might want to change the data loading settings for a data table
or a part of a data table. See Embedded
or Linked Data? for more information.
In the Data
Loading Settings dialog, review the settings for all data tables
in the analysis. You can click on the plus or minus sign for a data
table to expand or collapse the data table and show or hide details
about the various sources that were used to build the data table.
Click on the drop-down list to change the data loading setting for
a particular source.
Tip: If you want as
much data as possible to be stored in the analysis, use the Change all applicable data sources to
drop-down list and select Stored data.
Comment: If the final data table is embedded, then
you will not be able to change any data loading settings for specific
sources.
Click OK
in the Data Loading Settings dialog.
Click Save.
Response: The analysis is saved to the library
and a confirmation dialog
is displayed.
Click Close.
Tip: Right-click a library
item and select Edit properties if you want to review or edit the properties
of previously added files and folders.
It is also possible to delete and edit files in the library
via the Library Administration tool. You do not have to be a member
of the Library Administrator group to use the tool. To get access to the
Library Administration tool the license called Spotfire Administrator,
as well as the license feature Library Administration below it, must be
enabled.
To save a copy of an analysis in the library:
If you want to save a backup copy of the analysis you are
working on, without modifying the original file, you can use the Save
Copy As option instead.
Select File
> Save copy as > Library item.
Response: The Files and data
flyout is opened.
Navigate to the library folder
where you want to save the copy of the analysis.
Comment: To review or change the permissions for
a folder before saving your copy, right-click the folder of interest
and select View details. Scroll to the
section named Folder permissions, and
click Edit if you need to change the current
permissions. To learn more about folder permissions, see Permissions.
Specify a Name
for the copy.
Comment: The name can be 256 characters at most,
and the following characters are not supported: \ / : * ? " <
> |
Optionally, click Edit
description and keywords, to show two additional input fields
where you can enter a description or add keywords specific to the
contents of the analysis.
Comment: Keywords are used to enhance organization
and search capabilities.
Read the information in the
blue section at the bottom of the flyout. It is a summary of what
the implications will be to other users of the analysis if you save
the analysis with the current data loading settings. If you want to
keep the current data loading settings, continue to step 8. If you
want to see a detailed view of the current data loading settings or
edit them, click Review settings.
Comment: Depending on whether you want data to
be updated from a linked source each time you open the analysis, or,
whether you want to store a fixed version of the data in the analysis,
you might want to change the data loading settings for a data table
or a part of a data table. See Embedded
or Linked Data? for more information.
In the Data
Loading Settings dialog, review the settings for all data tables
in the analysis. You can click on the plus or minus sign for a data
table to expand or collapse the data table and show or hide details
about the various sources that were used to build the data table.
Click on the drop-down list to change the data loading setting for
a particular source.
Tip: If you want as
much data as possible to be stored in the analysis, use the Change all applicable data sources to
drop-down list and select Stored data.
Comment: If the final data table is embedded, then
you will not be able to change any data loading settings for specific
sources.
Click OK
in the Data Loading Settings dialog.
Click Save.
Response: The copy is saved to the library and
a confirmation dialog
is displayed. Note that you will continue to have the original analysis
open and any further changes will be made to that analysis and not
to your copy.
Click Close.
Tip: If you are an administrator,
you may want to configure scheduled
updates to specify that the data for an analysis should be updated
and pre-loaded at a certain time. This may improve the loading time for
an analysis. This is only applicable when a Spotfire Server Web Player
Service node has access to the library where you are publishing the analysis.
See Spotfire® Server and Environment Installation and Administration manual
for more information about scheduled updates.