Spotfire Developer Documentation

Creating a Spotfire extension in Visual Studio

This task demonstrates creating a Microsoft Visual Studio project that is based on the Spotfire extension project using the Spotfire Extension.zip or the Spotfire Extension VS.zip template.

About this task

The difference between the templates is that Spotfire Extension VS.zip adds a post build step to automatically build a Spotfire package when compilation is complete.

It is recommended to start using the template Spotfire Extension.zip to get familiar with the basic creation of an extension to Spotfire and use the template Spotfire Extension VS.zip when the concepts around building Spotfire packages are well understood.

Before you begin

You must have installed the zipped Spotfire extension project templates into the Visual Studio templates folder.

Procedure

  1. In Visual Studio, select File > New > Project and select the Spotfire Extension.zip or Spotfire Extension Net8.zip template. In this example, it is assumed that Spotfire Extension.zip is used, to avoid possible issues with the building of packages. For the templates to work out-of-the-box, the location of the new project must be in the MyExtensions folder in the SDK (or another folder at the same level). If you decide to store your extension somewhere else, some paths must be changed or updated.
    In the Create a new project dialog, provide the appropriate information in the Project name, Location, and Solution name fields, and select Place solution and project in the same directory before clicking Create.


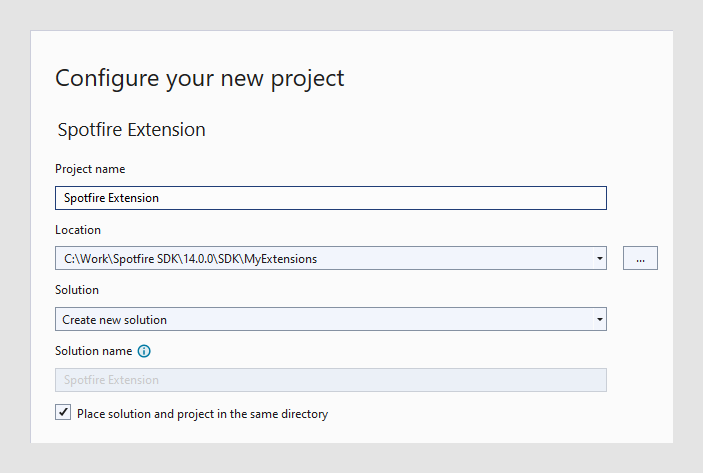
    Visual Studio creates the solution for the extension project.
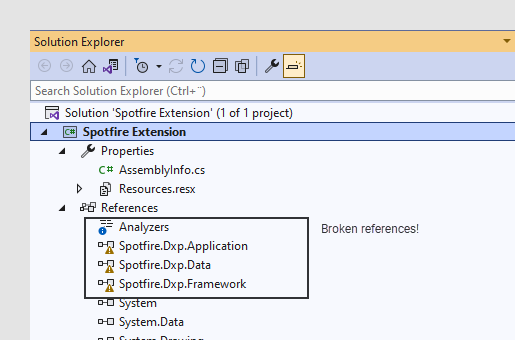
  2. In Solution Explorer, expand References and check whether any of the Spotfire Developer assembly references are broken.
    If the references are good, the project was successfully created. If not, complete steps 3 through 5.

    Project showing broken references

  3. If any assembly references are broken, right-click the extension in Solution Explorer and select Edit Project File (or simply double-click the project in Solution Explorer).
  4. Navigate to the <ItemGroup> that contains references to the Spotfire binaries and modify the <HintPath> so that it points the path to the applicable Binaries directory of the SDK.
    Note: Keep $(TargetFramework) in the path since this will automatically point to the correct sub-folder when compiling.
  5. Save the changes by pressing Ctrl+S.
    The warnings should now be gone in the Solution Explorer.
  6. From the Solution Configurations drop-down list, select Build Solution (or press F6).
    The default example solution should build without errors or warnings if a supported version of Visual Studio is used.
  7. The build artifacts are by default stored in a folder, ..\Build\bin, relative to the project folder. To change this, edit the project file in Visual Studio by right-clicking the extension in Solution Explorer and selecting Edit Project File (or simply double-click the project in Solution Explorer).
  8. Change the value of <OutputPath> to the desired location and save the project file by pressing Ctrl+S.
  9. Make a note of the new output path since this is needed when building a Spotfire package.
  10. If the extension is a Windows-only extension, for example, if it includes Windows Forms components, the building of net8.0 must be disabled. To accomplish this, edit the project file and modify the value of <TargetFrameworks> to only contain net48.

Results

The template project should be successfully created in Visual Studio.