Creating an extension using only Visual Studio
As an alternative to use Visual Studio to develop the source code and then use Package Builder to create the deployable package, it is also possible to stay in Visual Studio all through development, debugging and building of packages.
The example projects called Spotfire Extension_VS.zip (used for .NET 4.8 compatible projects only) and Spotfire Extension Net8 VS.zip (.NET 4.8 and/or .NET8) are available in the SDK from Spotfire 14 and forward. These projects contain a pre-defined "post-build step" that automatically calls the cli-tool Spotfire.Dxp.PackageBuilder-Console.exe, also known as the Package Builder Console, to build the packages.
Creating an extension in Visual Studio
- In Visual Studio, select
,
and, under
set the
User project templates location to the path to
the
Templates folder in the Spotfire SDK.

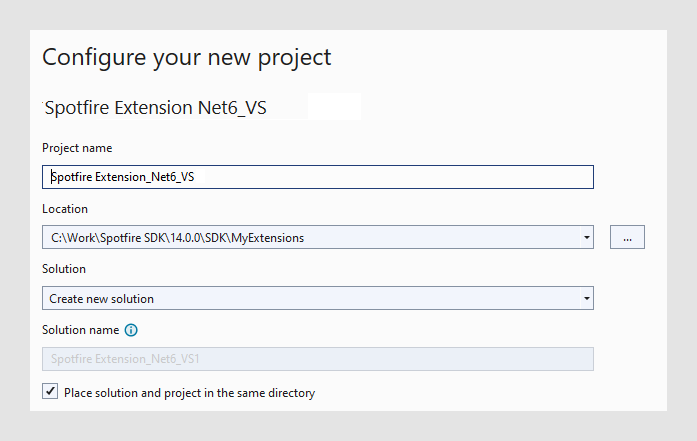
- In Visual Studio, select
and select the
Spotfire Extension_VS or
Spotfire Extension Net8_VS template. Note that
the
Spotfire Extension Net8_VS template is an
SDK-style project and it allows you to build for multiple platforms at the same
time. This is the template used in this example. For the pre-defined post-build
step to work, the location of the new project must be in the
MyExtensions folder in the SDK (or another
folder at the same level). If you decide to store your extension somewhere
else, some paths in the post-build step must be changed. More about that under
"Customizing the environment and advanced information" below.
Select the Place solution and project in the same directory check box.
- Compile the newly created
project by selecting
. (See also
Creating a Spotfire extension in Visual Studio
if you should have any issues when building.) This will result in a new
sub-folder,
MyExtensions\Build, where all build artefacts
will be stored:
- The compiled binaries together with the SDK binaries are stored in Build\bin\. For example, Build\bin\net8.0 or Build\bin\AnyCPU\Debug.
- One or more Spotfire package files (.spk) are stored in the Build folder.
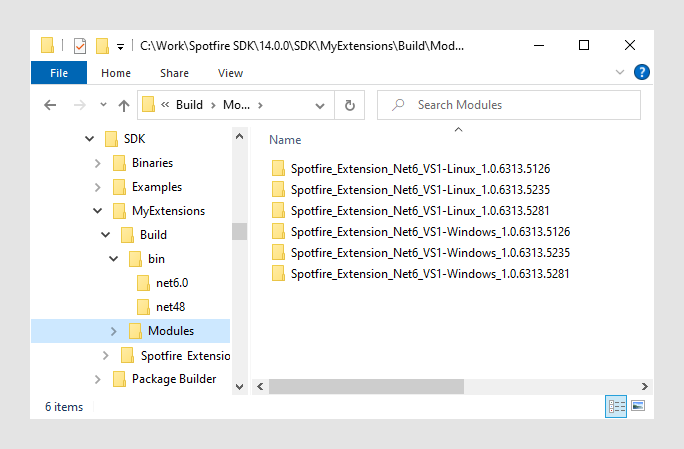
- Unpacked versions of the package files are stored in Build\Modules\<Extension-name>_<Version number>. For example, Spotfire_Extension_Net8_VS-Windows_1.0.6320.3907. This is similar to how Spotfire extensions are stored when downloaded from a deployment area, and this is how debugging becomes easy.
- To be able to debug the
extension, you must manually do the following configuration in Visual Studio:
- Select the extension project in Solution Explorer.
- Select .
- On the
Debug page, click
Open debug launch profiles UI, and, in the
Launch Profiles dialog, do the following:
- Click
Create a new profile
 , and choose
Executable.
, and choose
Executable.
- For your new profile, under Executable, point to a Spotfire.Dxp.exe on your computer. It could be your installed version, some intermediate beta-version or similar. For example, C:\Users\{username}\AppData\Local\Spotfire\14.5.0\Spotfire.Dxp.exe.
- Under
Command line arguments, enter
/loadallmodules /addmodulefolder:<path to the
Module-folder in your SDK>. For example,
/loadallmodules
/addmodulefolder:C:\SpotfireSDK\SDK\MyExtensions\Build\Modules.
Note: If the path contains a whitespace, it must be surrounded by quotes. For example:
/loadallmodules /addmodulefolder:"C:\Spotfire SDK\SDK\MyExtensions\Build\Modules"
The argument /loadallmodules forces Spotfire to load the highest version of all modules it can find in the set of module-folders, regardless of the deployed packages on the selected deployment area.
The argument /addmodulefolder adds a path to a folder where Spotfire should search for modules to load. The argument can be repeated if more folders needs to be added.
- Close the dialog.
- Click
Create a new profile
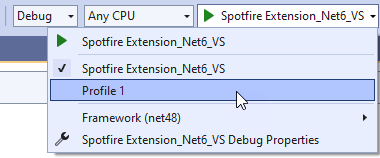
- To verify that the
extension is actually loaded, select the new Debug profile in Visual Studio and
run it to make sure that Spotfire is launched.
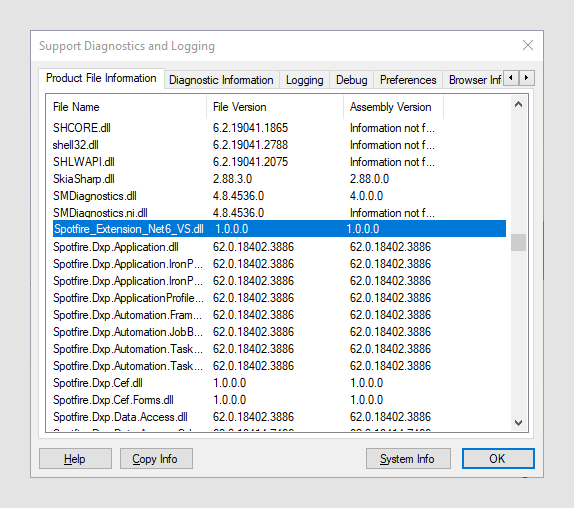
- In Spotfire, under
, scroll down the list of
loaded files to verify that the extension has been loaded.
- Deploy the package file stored in the Build folder to a Spotfire Server by using the standard administration user interface, Deployments & Packages.
Customizing the environment and advanced information
You can customize the Visual Studio environment by locating and editing the post-build command:
- Select the extension project in the Solution Explorer.
- Select .
- On the
Build Events page, see the
Post-build event command line entry.
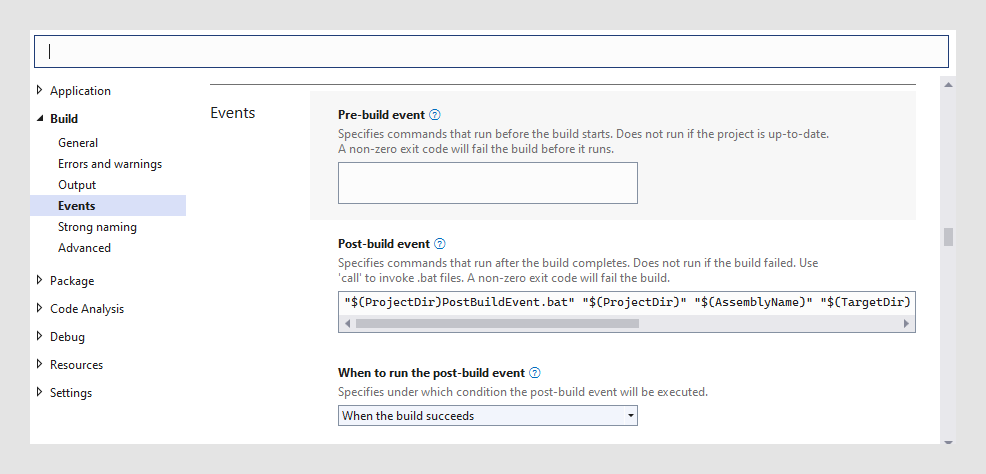
- Modify the post-build
command as desired.
The post-build command executes the PostBuildEvent.bat file, which is located in the project folder.
The post-build file for the Spotfire Extension_VS.zip template expects four arguments, and the Spotfire Extension Net8 VS.zip file expects six arguments:
- The full path to the
project folder. This is defined by the Visual Studio macro
$(ProjectDir). - The name of the
project. This is defined by the Visual Studio macro
$(ProjectName). - The folder where the
created package shall be stored. This is defined by the Visual Studio macro
$(TargetDir). - The build
configuration (Debug/Release). This is defined by the Visual Studio macro
$(ConfigurationName). - The target framework
("net48" for .NET Framework/Windows and "net8.0" .NET 8/Linux). This is defined
by
$(TargetFramework). - A semicolon separated
list of additional binary folders to be used in the refpath argument. This is
defined by
$(AdditionalBinaryFolders).
The post-build command included in the PostBuildEvent.bat file is:"%~1..\..\..\Package Builder\Spotfire.Dxp.PackageBuilder-Console.exe" /pkdesc:"%~1%~2.pkdesc" /target:"%~1..\..\build\%~2.spk" /basefolder:"%~3..\%~4" /refpath:"%~3..\%~4;%~1..\..\..\Binaries" /saveunpackedmodule /unpackedmodulefolder:"%~1..\..\Build\Modules" /automaticpackageversionnumberThis is basically a call to Spotfire.Dxp.PackageBuilder-Console.exe, with some specific arguments containing project references. If you choose to make any changes to where you store your extensions, or, if you want to change where the output is stored, you must make manual changes, either to the arguments that are sent to the post-build command file or make changes to the post-build file itself.
The command consists of the following parts:
-
"%~1..\..\..\Package
					 Builder\Spotfire.Dxp.PackageBuilder-Console.exe"
This must point to the Package Builder Console included in the SDK.
%~1is the full path defined by the first argument and it points to the folder where the csproj file is located (including trailing backslash).Note: If you want to store your extension project somewhere else, you have to make sure to edit the path accordingly.
/pkdesc:"%~1%~2.pkdesc"This argument identifies the pkdesc file for an extension package. Note that one pkdesc file can include multiple assemblies (that is, projects in Visual Studio), but this is not necessary.
-
%~1is the full path defined by the first argument and it points to the folder where the csproj file is located (including trailing backslash). -
%~2should contain the file name, without extension, of the pkdesc file.Note: The default value for this argument points to a pkdesc file stored in the same folder as the project file, with the project name as the file name, without extension. If you want to read the file from some other location or have a different name of the file, you must make sure to edit the expression accordingly.
-
/target:"%~1..\..\build\%~2.spk"This argument identifies the path and name of the output package file.-
%~1is the full path defined by the first argument and it points to the folder where the csproj file is located (including trailing backslash). -
%~2should contain the file name, without extension, for the pkdesc file, and the default value for this argument points to the build folder.Note: If you want to store the package file elsewhere or have a different name of the file, you have to make sure to edit the expression accordingly.
-
/basefolder:"%~3..\%~4"This argument identifies the root folder for files and folders mentioned in the pkdesc file.
-
%~3is the path to the build folder given by the third argument. This is by default set to "..\..\Build\bin\AnyCPU\Debug\", in the example project. Note that the macro includes the trailing backslash which means that a trailing double quote would not be recognized. Therefore, the trailing "..\%~4" is added to avoid errors when building. -
%~4is default the build configuration (Debug / Release).
Normally, you do not need to change this argument.
-
-
/refpath:"%~3..\%~4;%~1..\..\..\Binaries"This argument identifies the folders where all dependent assemblies are stored.
-
%~3is the path to the build folder given by the third argument. This is by default set to "..\..\Build\bin\AnyCPU\Debug\", in the example project. Note that the macro includes the trailing backslash which means that a trailing double quote would not be recognized. Therefore, the trailing "..\%~4" is added to avoid errors when building. -
%~4is default the build configuration (Debug / Release).
Normally, at least the Spotfire SDK assemblies should be included, but there might also be more assemblies that an extension depends on. The example project points to two folders separated by semicolons; the build folder for the extension and the folder for the SDK binaries. If more folders are needed for your extension, add semicolons to separate them.
If you have compiled your extension against some other Spotfire SDK binaries, you need to change the last path accordingly.
-
/saveunpackedmoduleThis argument makes the Package Builder Console unpack the created package and store it on disk. This is needed to be able to seamlessly debug the extensions.
/unpackedmodulefolder:"%~1..\..\Build\Modules"This argument points to the folder where the unpacked module should be stored.
-
%~1is the full path defined by the first argument and points to the folder where the csproj file is located (including trailing backslash).Note: If you make changes to this path, you need to change the path in the arguments list when debugging accordingly, see above.
-
-
/
automaticpackageversionnumberThis argument tells Package Builder Console to automatically generate unique version numbers for the package (not for any of the included files). This is a convenience feature to assure that a newly built package will replace an existing package when deployed to the Spotfire Server.
One side effect of using this argument is that you will get a new module folder in the "unpacked modules" folder each time you compile. Therefore, if you re-compile frequently, you might want to purge this folder occasionally.
Note: If you do not want to build package files for every compilation, just edit PostBuildEvent.bat and put arembefore the command.
- The full path to the
project folder. This is defined by the Visual Studio macro
.pkdesc-files instead of module.xml-files
Unlike the traditional Package Builder, there is no editing of module.xml files when working exclusively in Visual Studio. Instead, the module.xml files that are included in the package files, are created by the Package Builder Console based on specifications in .pkdesc files. The example project contains one minimal .pkdesc file, that can be used as a starting point, and a complete reference to the .pkdesc format can be found here.
Adding multiple projects to the solution
You can either package all projects together in the same package file, or you can add multiple packages to the solution.
If you want separate package files for each Visual Studio project, you can just instantiate multiple copies of the example project or make copies of your edited versions. Each project must have the post-build step, as described above.
However, if you want to include multiple assemblies in one package, you must do some changes to the projects in Visual Studio.
Instead of having a pkdesc file located in one of the project folders, with a name corresponding to one of the included assemblies, it is recommended that the pkdesc file is stored in the folder where the solution file (.sln) is located. This is normally one folder level up. And, you should also change the name to something that describes all the included assemblies together.
Only one of the projects should contain the post-build step. Make sure that the project is one of the last projects in the compilation dependency chain.
You must edit the pkdesc file to include information about all assemblies included in the package.
You must make sure that the post-build step has a correct value for
the argument
/pkdesc.
Using a .pkdesc file as a template
If you decide to use a pkdesc file as a template and make a copy of it, you must make sure that you create a new GUID as identifier in the file. This can easily be done in Visual Studio by executing . Because Spotfire Server identifies packages based on their id, failure to replace the GUID in the copy will cause the new package to overwrite the existing package when deployed. The package name should of course also be updated, to avoid multiple deployed packages with the same name.