Example 1: Classification via Boosted Trees
This example illustrates the use of classification trees for pattern recognition. The example data set used here is also discussed in the Classification Trees Analysis module [see Example 1: Discriminant-Based Splits for Categorical Predictors, as well as the General Classification and Regression Trees (GC&RT) module - Example 1: Pattern Recognition (Classification of Digits)].
The data for the analysis were generated in a manner similar to the way that a faulty calculator would display numerals on a digital display (for a description of how these data were generated, see Breiman et. al., 1984). The numerals from one through nine and zero that were entered on the keypad of a calculator formed the observed classes on the dependent variable Digit. There were 7 categorical predictors, Var1 through Var7. The levels on these categorical predictors (0 = absent; 1 = present) correspond to whether or not each of the 7 lines (3 horizontal and 4 vertical) on the digital display was illuminated when the numeral was entered on the calculator. The predictor variable to line correspondence is Var1 - top horizontal, Var2 - upper-left vertical, Var3 - upper-right vertical, Var4 - middle horizontal, Var5 - lower-left vertical, Var6 - lower-right vertical, and Var7 - bottom horizontal. The first 10 cases of the data set are shown below. The complete data set containing a total of 500 cases is available in the example data file Digit.sta. Open this data file via the File - Open Examples menu; it is in the Datasets folder.

- Specifying the Analysis
- We'll use the default analysis options in the Boosted Trees for Regression and Classification module. Select Boosted Tree Classifiers and Regression from the Data Mining menu to display the Boosted Trees Startup Panel.
Because the goal of this analysis is to build a prediction model for the different digits based on several (faulty) categorical predictor variables, accept the default Classification Analysis option and click OK to display the Boosted Trees Specifications dialog.
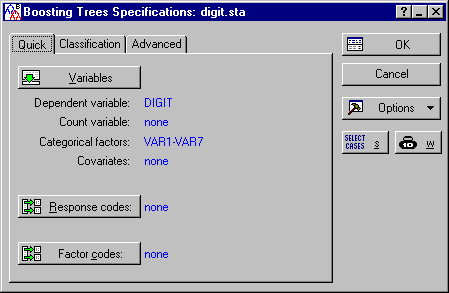
On the Quick tab, click the Variables button to display the variable selection dialog, select Digit as the categorical dependent variable and all others as the categorical predictor variables, and click the OK button to return to the Specifications dialog.
There are a number of additional options available on the Classification and Advanced tabs of this dialog, which can be used to "fine-tune" the analysis. You can use the options on the Classification tab to specify particular a priori class probabilities and unequal misclassification costs; using the options on the Advanced tab, you can determine the complexity of the individual trees you want to build in each boosting step, as well as the total number of boosting steps.
For the purpose of this analysis (and as a useful "first step" for most analyses), let's accept the defaults; thus, click OK. You will see the Computing dialog for a few moments as the consecutive boosting steps are computed, and then the Results dialog will be displayed.
- Reviewing the Results
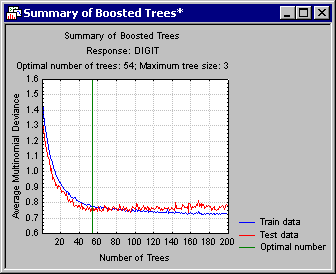
- First, click the Summary button to review how consecutive boosting steps improved the accuracy (quality of the prediction model) for the randomly selected training data and testing data.
This graph demonstrates the basic mechanism of how the stochastic gradient boosting algorithm implemented in STATISTICA can avoid overfitting (see also the Introductory Overview). As more and more additive terms (simple trees) are added to the model, the average squared error function for the training data (from which the respective trees were estimated) will decrease. However, the error estimate for the training data will at one point start to increase, clearly marking the point where evidence for overfitting is beginning to show.
By default, the program will designate 54 as the optimal number of trees (in this case; because of the random subsampling of training data in successive boosting steps, your results may be slightly different); this happens to be the point where the smallest error for the testing data occurred. You can use the Number of trees option on the Boosted Trees Results dialog - Quick tab to select a specific solution, i.e., number of trees in the final model.
- Accuracy of Prediction
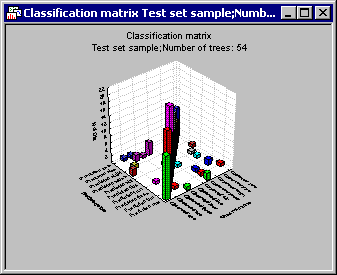
- Next, click on the
Classification tab of the
Results dialog, select the Test set option button in the Sample group box, and then click the Predicted vs. observed by classes button. The program will then compute the matrix of predicted and observed classification frequencies, which are displayed in a results spreadsheet, as well as a bivariate histogram.
As you can see, the final solution is remarkably accurate over all digits. You may want to review the various additional summary statistics (e.g., Risk estimates) to gage the quality of different solutions, i.e., for different numbers of additive terms (simple trees).
- Gains charts
- Another way to assess the accuracy of the prediction is to compute the gains chart for each category of the dependent variable. Select the Classification tab of the Results dialog to compute gains or lift charts for different samples.
- Interpreting the Results
- In general, stochastic gradient boosting of simple trees (see the Introductory Overview) is best considered a machine learning algorithm, i.e., a "black box" to some extent that will (usually) produce very accurate predictions, but yield models that are not easily interpretable (unlike, for example, classification and regression trees or linear models, where the final prediction model can usually be "put into words," i.e., explained). To interpret the results from the STATISTICA Boosted Trees module, there are two key tools:
- Predictor importance
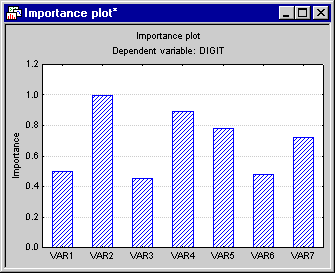
- The bar plot and spreadsheet of the predictor importance usually shed some light on the variables that make the major contributions to the prediction of the dependent variable of interest. For example, shown below is the bar plot of predictor importance for the current example.
The predictor importance is computed as the relative (scaled) average value of the predictor statistic over all trees. So, for example, in this case it is the average value of the sums-of-squares prediction over all categories and over all trees and nodes, scaled so that the maximum value of that sum is equal to 1. Hence, these values reflect on the strength of the relationship between the predictors and the dependent variable of interest over the successive boosting steps. In this case, variables Var2, Var4, and Var5 stand out as the most important predictors.
- Final trees
- You can also review the final sequence of (boosted) trees, either graphically or in a sequence of results spreadsheets (one for each tree). However, this may not be a useful way to examine the "meaning" of the final model when the final solution involves a large number of additive terms (simple trees). In this case, the final solution involves 54 binary trees, each with a simple split. So, most likely, in this case it would not be very useful to examine those trees.
- Deploying the Model for Prediction
- Finally, you can deploy the model via the Code generator on the Results dialog - Report tab. In particular, you may want to save the PMML deployment code for the created model, and then use that code via the Rapid Deployment Engine module to predict (classify) new cases.