QC Charts Example 9: Using IQC on the Shop Floor
In this example, you will learn how to set up real-time quality control projects for your product characteristics that require minimal input from the operator (e.g., collect data and select cause & action labels when necessary).
The XYZ Screw Company manufactures screws. To ensure the quality of the screws being produced, two characteristics, length and diameter, are measured and analyzed on a continual basis. Subgroups of five measurements (for both length and diameter) are currently being collected every 15 minutes. The dimensions are being measured with a caliper and entered manually into Statistica via the keyboard.
- Specifying the analysis
- First, create a blank data file with nine variables. Name them Time, Length, LCause, LAction, LExclude, Diameter, DCause, DAction, DExclude. For now, only specify one case. You can add more later when you are ready to enter data.
We will create an X-bar and R chart project in order to monitor length. After starting the Quality Control module, open the data file that has been set up for these dimensions (e.g., Screw Dimensions.sta). Select Quality Control Charts from the Statistics - Industrial Statistics & Six Sigma submenu or from the Data Mining - Process Optimization - QC Charts submenu to display the Quality Control Charts Startup Panel. Then select X-bar & R chart for variables on the Quick tab (or the Variables tab). Click the Real-time tab and select the Auto-update option button. Now click the OK button to display the Defining Variables for X-bar and R chart dialog.
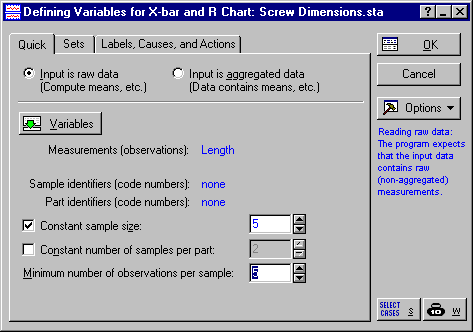
On the Quick tab, click the Variables button and select Length as the Variable with measurements and enter a value of 5 in the fields for both the Constant sample size and Minimum number of observations per sample options. This will ensure that Statistica charts consecutive sets of five values and identifies them as belonging to the same subgroup (sample). Note that the Quality Control module assumes that your subgroups are the same size.
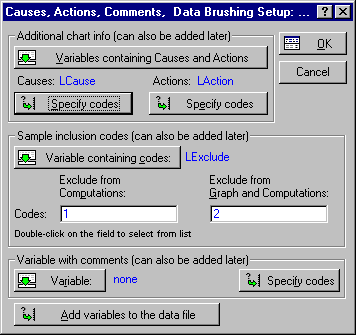
On the Labels, Causes, Actions tab, click the Causes, actions, comments, sample inclusion setup button to display the Causes, Actions, Comments, Data Brushing Setup dialog. Click the Variables containing causes and actions button and select LCause as the Variable with codes for causes and LActions as the Variable with codes for actions. Then click the Variable containing codes button and select LExclude. Note that rather than requiring operators to type the text each time, you can click the Specify codes buttons and then click the New button and predefine codes to be used.
For now, click OK to return to the Defining Variables for X-bar and R chart dialog and click OK again. Note you will receive a message stating No valid samples were found; will construct a blank chart. Click OK to display the X-bar & R Chart Results dialog.
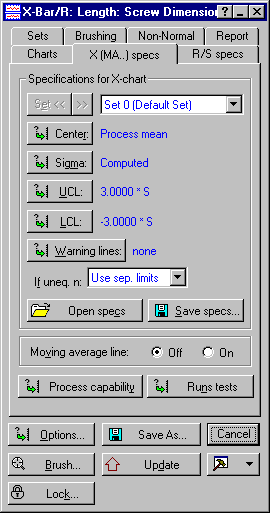
Select the X (MA..)-specs tab and click the Process capability button to open the Specifications for capability analysis dialog. You can enter your specification limits (engineering limits) in this dialog. Enter 15 in the Nominal field and 0.05 in the Delta field and click OK (compute).
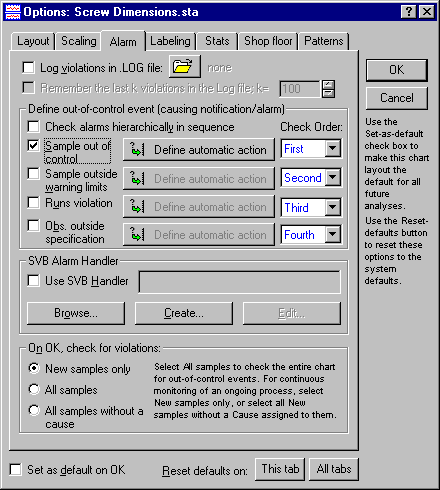
Click the Options button to display the Options dialog and select the Alarms tab. Check the Sample out of control check box and click the Define automatic action button. We want operators to be prompted for a cause and action every time an out of control sample is encountered.
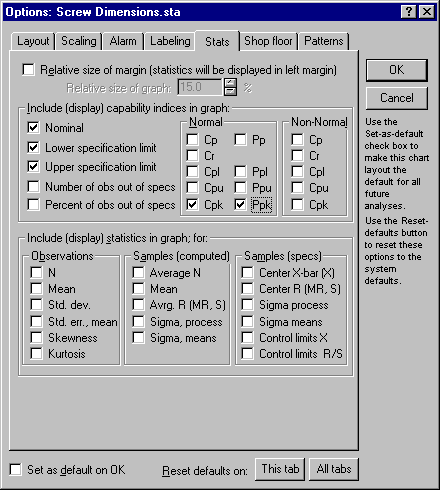
Click the Stats tab. As the shop-floor supervisor, you control what statistics will be displayed on the chart. Select the Nominal, Lower specification limit, Upper specification limit, Cpk, and Ppk check boxes.
Now, move to the Shop Floor tab. By default, the dialog is set so that users without knowledge of the password, will only be able to assign causes, actions, and comments. As the supervisor, you type in a Password, Verify the password, and click the Lock button to lock the project.
Once the project is locked, the X-bar and R Chart dialog will minimize. Restore the dialog. Only with the assigned password will a user be able to unlock the project (via the Unlock button) and edit the options. We have set up the project exactly as we want it to appear to the operators on the line. You could begin entering data now, or you can save the specifications in an *.ini file by clicking the Save as button to use later.
See Statistica Enterprise Systems for more information about our multi-user complete SPC system, which features state-of-the-art connectivity options that enable data acquisition from virtually any hardware available as well as external corporate databases.
See also QC Chart Examples.