Example 1: Creating Deployment Code for Scoring New Records
Most predictive analytic tools in STATISTICA offer deployment code generation in a variety of languages including PMML for deployment within STATISTICA via Rapid Deployment. Several options for building an external deployment application for scoring are also available. This example explores the various ways to create deployment code in STATISITCA. The three methods of creating predictive models are each shown.
Ribbon bar. Select the Home tab. In the File group, click the Open arrow and select Open Examples to display the Open a STATISTICA Data File dialog box. The CreditScoring.sta data file is located in the Datasets folder. Then, select the Data Mining tab. In the Trees/Partitioning group, click C&RT to display the General Classification and Regression Trees Startup Panel.
Classic menus. On the File menu, select Open Examples to display the Open a STATISTICA Data File dialog box. The CreditScoring.sta data file is located in the Datasets folder. Next, on the Data Mining menu, select General Classification/Regression Tree Models to display the General Classification and Regression Trees Startup Panel.
Accept the defaults and click the OK button to advance to the Standard C&RT dialog box.
Select the Categorical response (categorical dependent variable) check box.
Click the Variables button to display the variable selection dialog box. Select the Show appropriate variables only check box.
Select Credit Rating as the Dependent variable. Select variables 2-18 for Categorical predictors, and select variables 3, 6, and 14 for Continuous predictors. The variable selection should look like this.

Click OK to verify the variable selection, and click OK in the Standard C&RT dialog box to begin building the predictive model.
In the GC&RT Results dialog box, create output to examine the appropriateness of the model. Assume we have determined this model is good, and it should be used to score new records.
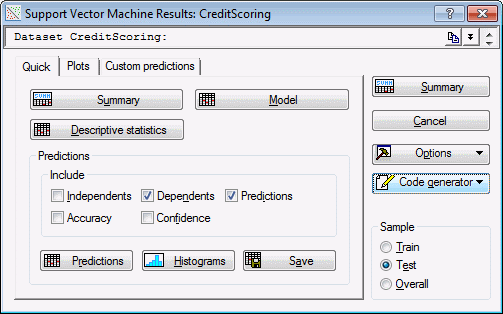
Select the Report tab. On the Code Generator drop-down menu, select PMML.

This will create the deployment code. The default output management settings send the results to a workbook.

Next, save the deployment code as a *.xml file. If the deployment code is contained in a workbook file, right click on the deployment node in the tree view of the workbook and select Save Item(s) As… Save the file.
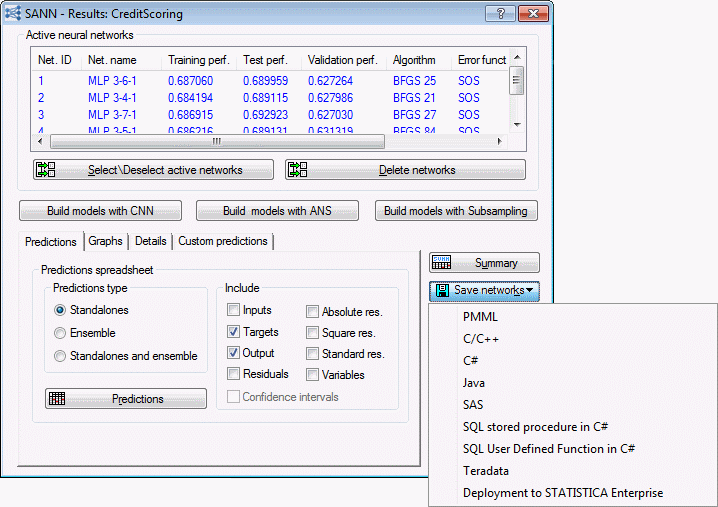
Neural networks offers a Save networks button to save the PMML code directly as an *.xml file. This tool bypasses the code generation as an object in the workbook and saves it to the specified location.
With each of these methods in the interactive analyses, deployment code has been generated and saved as *.xml files that can be uploaded in the Rapid Deployment tool in STATISTICA to score new records.
Workspace
When performing analyses in the workspace, creating deployment code is different. Additionally, deployment can be performed within the workspace or with the interactive Rapid Deployment Engine.
With the CreditScoring.sta data still open, select the Home tab. In the Output group, click Add to new workspace and select Add to workspace from the drop-down menu.
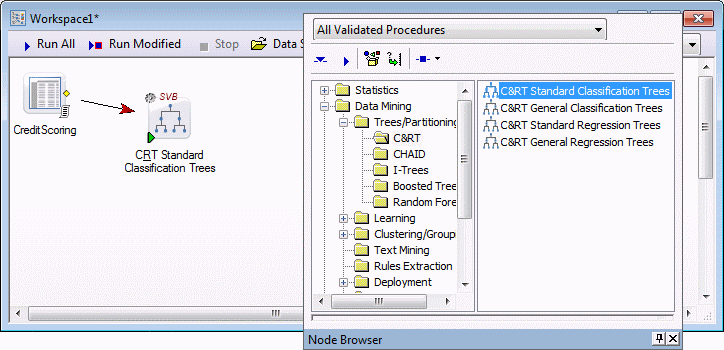
A new workspace is created with the CreditScoring.sta data set as the data source. On the workspace toolbar, click Node Browser to display the Node Browser. Browse to an appropriate modeling tool such as C&RT Standard Classification Trees found in the Data Mining - Trees/Partitioning - C&RT folder. Insert the node into the workspace.
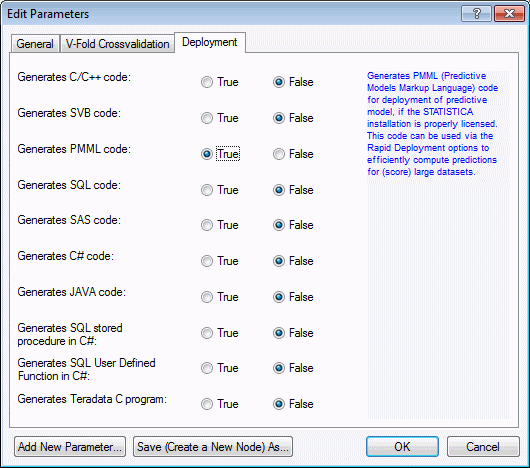
Double-click on the C&RT node to display the Edit Parameters dialog box. Select the Deployment tab and select True for any deployment code you want to generate in results. For this exercise, select Generates PMML Code: True.
Click OK to update the node parameters.
Next, select variables for analysis. In SVB nodes, as is used here, variable selection is performed on the data node in the workspace. Double-click on the data node CreditScoring to display the Select dependent variables and predictors dialog box. Select the same variable selection as before (ensure the Show appropriate variables only check box is selected, and select Credit Rating as the Dependent categorical variable; 3, 6, and 14 for Predictor continuous; and 2-18 for Predictor categorical).

Click OK to close the dialog box.
On the workspace toolbar, click Run All to create the output. Double-click the Reporting Documents node to view the results.
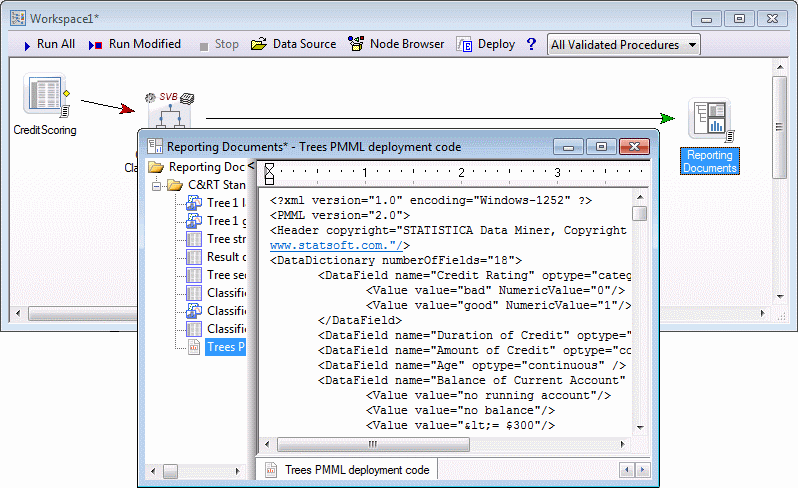
As before, right-click on the deployment code node in the workbook and select Save Item(s) As to save the deployment code. This deployment code can be used in the interactive Rapid Deployment tool or in the workspace node for Rapid Deployment.
See these examples for deployment within the workspace for regression type problems:
Predictive Data Mining and Deployment for a Continuous Output Variable
Predictive Data Mining for Categorical Output Variable (Classification)
Data Miner Recipes
Data Miner Recipes also generates deployment code. To start a recipe, select the Data Mining tab. In the Recipes group, click Data Miner Recipes to display the Data Miner Recipes Startup Panel. Click the New button to start a new recipe.
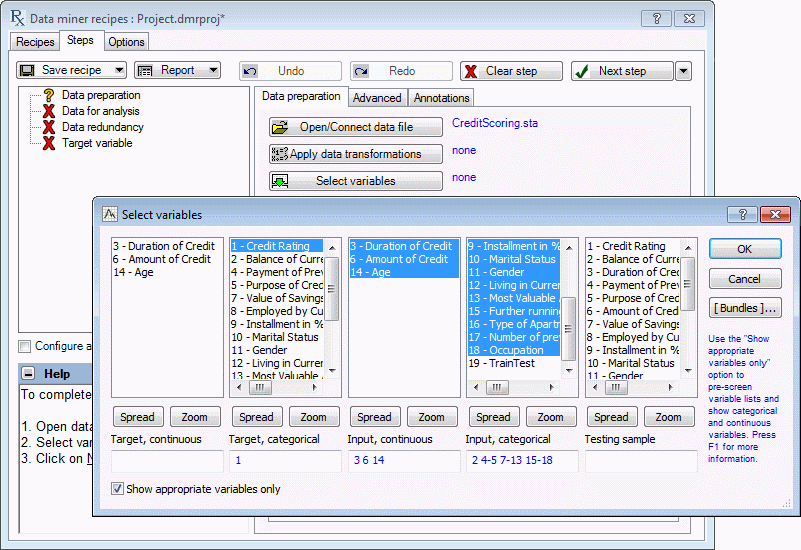
On the Steps tab, click the Open/Connect data file button, and open the CreditScoring.sta example file. Next, click the Select variables button to display the Select variables dialog box. Make the same variable selections as before: ensure the Show appropriate variables only check box is selected, and select Credit Rating as the Target categorical variable; 3, 6, and 14 for Input continuous; and 2-18 for Input categorical.
Click OK to accept the variable selections.
Click the down arrow next to the Next step button, and select Run to completion to work through the steps of the recipe and build models. This may take a few moments.

When complete, the recipe shows the Evaluation section, which uses diagnostic tests to automatically select the best model. Either accept the automatic selection or change the selection for use in deployment by selecting the preferred check box in the ID column.

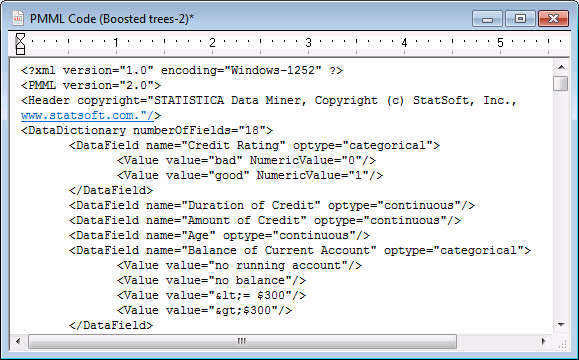
Next, select Deployment in the tree view on the left of the recipes dialog box. Select PMML from the Code Generator drop-down list to generate the deployment code in a stand-alone window for the selected model.
Close the Data Miner Recipes dialog box, as we are finished with it. Then save the deployment code by selecting the File tab and clicking Save. Change the file type to XML and name the file. Save the file for later use in Rapid Deployment.