Data - Auto Filter - Auto Filter
Ribbon bar. Select the Data tab. In the Transformations group, click Auto Filter and from the menu, select Auto Filter...
Classic menus. From the Data - Auto Filter submenu, select Auto Filter...
You can filter the selected variables in your data set. Filtering is a quick and easy way to display a specific portion of the data in your spreadsheet without sorting the data or creating a subset. When a variable is filtered, only the values that meet the specified criteria are displayed in the spreadsheet. Cases that do not meet the criteria are hidden from sight but not removed from the spreadsheet. Although they are hidden, they are still available for statistical and graphical analyses.
Note: The
Automatically copy auto filters to selection conditions option is located in the
Options dialog box,
Navigation / Defaults tab. When this check box is selected,
spreadsheet selection conditions are updated immediately as the auto filter criteria change. This causes any connected graphs to update.
| Option | Description |
|---|---|
| Copy, paste, and delete with auto filtering | Auto filtering works by cloaking all cases that do not meet the auto filter criteria. Thus, the copy, paste, and delete block conventions that apply to cloaked data also apply to auto-filtered data. When a block of cells that includes cloaked cases is copied, the cloaked cells are not included in the copy operation. Only the values that are displayed in the spreadsheet are copied to the Clipboard. In the same manner, if you select a range of cells that includes cloaked cases and delete that block of values (example, press DELETE or CTRL+X), only the values you can see are cut from the spreadsheet, not the cloaked cases. Selecting Cases from the Edit - Delete submenu removes all cases in the selected range from the spreadsheet, cloaked and uncloaked. Note that when pasting data into a block, the data is pasted into the cells of the spreadsheet regardless of the cell height or width; therefore, you can paste new data into cloaked (or auto filtered) cells. |
| Auto filtering, case states, and case selection conditions | Although auto-filtering only affects the appearance of the data set (and not the inclusion or exclusion of cases from analyses), you can easily create case selection conditions that match the auto filtering criteria by selecting Set as Selection Conditions from the Data - Auto Filter submenu. In a similar manner, you can update the case state of cases that meet the auto-filtering criteria using any of the usual methods for updating case states (example, right-click in the case names and select Marked Points from the Case Name shortcut menu). When you apply case states to a range of filtered cases (that is, a range that includes cloaked and uncloaked cases) only the visible (or uncloaked) cases are affected. Options to change the case state of cloaked cases to either Excluded or Hidden are also available from the Data - Auto Filter submenu. |
| Auto Filter Criteria | When you activate the
Auto Filter, down arrow button
|
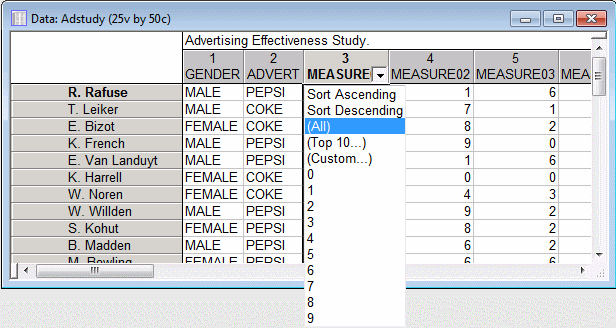
| Sort Ascending/Descending | Select Sort Ascending or Sort Descending from the Auto Filter Criteria menu to sort the selected variable in the specified order. If the selected variable has text values, then the sort is based on the text values and not the underlying numeric values. Note that if a sort filter criteria is applied to more than one variable, the most recently filtered variable is consider the primary sort variable. For example, in the spreadsheet shown above, if you were to specify a Sort Ascending filter criteria for the variable Gender, the cases would be sorted with Females first. If you were then to specify a Sort Ascending filter criteria for Advert, Advert would be treated as the primary sort, and the sorted values for Gender would be nested within the sorted levels of the Advert variable, that is, Females who prefer Coke would be followed by Males who preferred Coke. Then, Females who prefer Pepsi would be followed by Males who prefer Pepsi. |
| (All) | Select (All) from the Auto Filter Criteria menu to remove any filtering that has been applied to the selected variable. All available cases are displayed. Note that if you have filtered the data set using other variables, then selecting (All) for one variable results in the display of all cases that meet the filtering criteria for other variables. For example, if you were to filter Gender by Male and Advert by Pepsi, then only the cases for Males who prefer Pepsi would be displayed. If you then cleared the filtering for Advert by selecting (All) from the Advert Auto Filter Criteria menu, then all Male cases are displayed again. To quickly remove auto filtering for all variables, select Auto Filter from the Data - Auto Filter submenu (that is, turn off the auto filtering option). |
| (Top 10...) | Select (Top 10...) from the Auto Filter Criteria menu to display the Top 10 Auto Filter dialog box, which you can use to specify a filter criteria based on a minimum or maximum number of cases or percent of cases. For example, you can filter the Bottom 20 Percent or the Top 14 Items. Note that when this option is used, Statistica always cloaks all non-numeric values. |
| (Custom...) | Select (Custom...) from the Auto Filter Criteria menu to display the Auto Filter Criteria dialog box. From this dialog box, you can specify, using case selections, which cases you want to filter. Note that the options specified on this dialog box are only used for filtering purposes. When you perform statistical or graphical analysis from the filtered spreadsheet, all cases are still available. |
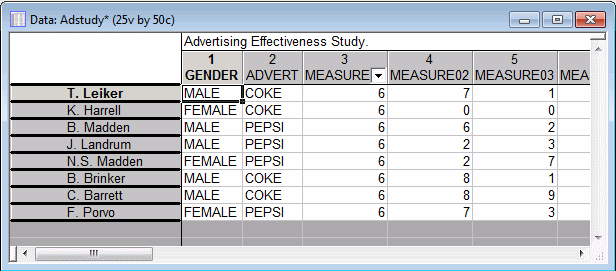
| Values | To filter the data by a specific variable value, select that value from the list. For example, in the illustration, if you select 6 from the list, then only the cases where Measure01 = 6 is displayed in the spreadsheet. |
| (Missing) | On the Auto Filter Criteria menu, select (Missing) to filter the variable using the missing data. When this is selected, only those cases that have missing values are displayed. Note that this option is only available if the selected variable contains missing data. |
| (Non-missing) | On the Auto Filter Criteria menu, select (Non-missing) to filter the variable using the non-missing data. When this is selected, cases that have missing values are hidden from sight. Note that this option is only available if the selected variable contains missing and non-missing data. |
Copyright © 2021. Cloud Software Group, Inc. All Rights Reserved.


