User Management Settings
Overview
This topic describes how administrators can
-
Manage users' permissions
-
Manage artifact deployments
To access AMS management options, click the selection button ![]() in the upper-right corner of the web client and select Management.
in the upper-right corner of the web client and select Management.
Permission Management
Use the Permission Management options to:
-
Add and delete users
-
Enable or disable users
-
Change user passwords
-
Assign roles to users
Changes you make from the web client persist across user logon sessions. However, on server startup if the local authentication realm is enabled, any users and roles present in AMS.conf configuration file are used instead to seed corresponding users and roles in the AMS database. Likewise, AMS configuration files are not affected by changes made to users through the web client. For example, if an AMSAdmin role is defined in configuration file and you delete that role from the web client, that role will return on the next server restart, if the local authentication realm is enabled.
Deleting a role causes users with that role to immediately lose any permissions associated with that role, unless they have the same permissions assigned through another role. Conversely, any user who gains a new role or privilege can immediately take advantage of that change.
By default, the Permission Management view displays configuration options for User Management.
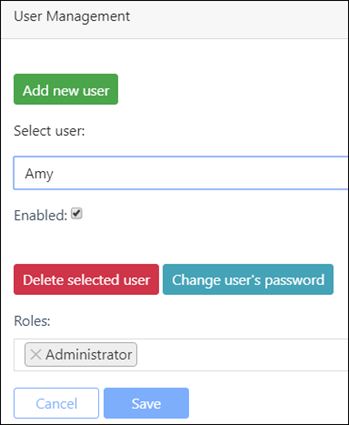 |
Adding Users
-
Click . Use the dialog that appears to enter the following:
-
Username
-
Password
-
Password confirmation
-
-
The user is then added to AMS and by default is not enabled nor has roles assigned. To enable the user, either select the user name or type it in the Select user field. Once the user is displayed, check the box.
-
Assign a role to the user by clicking in the Roles field to display a list of options. Zero or more roles are supported per user.
-
Click .
Editing User Settings
-
Select a user from the drop-down list and configure the following as required. Users currently logged on to AMS are not affected until the user logs on again.
-
Enable or disable the account. Disabling a user also logs that user off AMS.
-
Delete the selected user.
-
Change the selected user's password. Use the dialog that appears to update the password and click .
![[Note]](images/note_826758100.png)
Note Changing your own user password logs you out of AMS.
-
Edit the roles that are assigned to the user: Click the X next to the role to remove it. Double-click in the Role box to display available roles that you can assign to the user.
-
-
Click .
Managing Roles
Roles define the tasks that users can perform in AMS based on the privileges assigned to them.
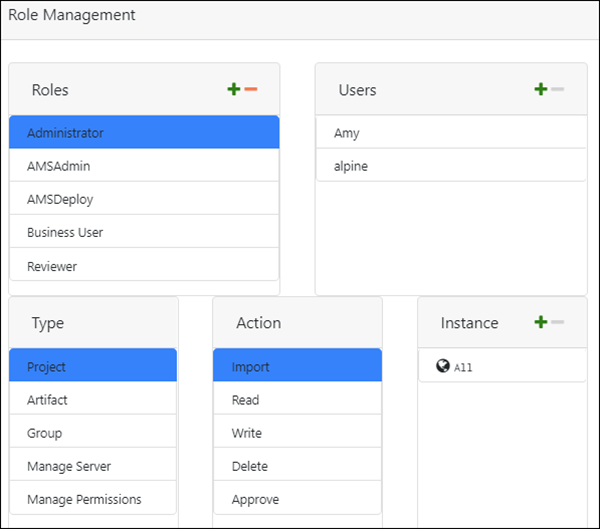
Use the Role Management view to add, change or delete roles — with immediate result to affected users.
-
Roles
-
Users
-
Type
-
Action
-
Instance
The following example explains how to add a new role and assign users and permissions to it.
-
From the Permission Management panel, click Roles. In the example below, a user named Amy is currently assigned to the
Administratorrole, with permissions to import any project into AMS. -
In the Roles field, click the plus sign and enter a name for the new role. Next, click the check mark that appears, to save the new role.
-
In the Users field, no users are currently assigned to the new role. Click the plus sign and click to assign available displayed users to the role. Alternatively, enter a user name (case-insensitive) to display a list of available names.
Click the check mark that appears to confirm your user selection.
-
Click to select a permission Type. Depending on your selection, a corresponding list of available actions displays in the Action field.
-
Select an Action. Depending on your selection, a list of selectable Instances may also display. See User Role Privileges for more information about actions.
-
Click the plus sign and enter an Instance. Changes take effect immediately.
Editing roles is similar — click the minus sign and click per operation.
Deployment Management
Use the Deployment Management panel to manage how artifacts are deployed, as well as manage deployment service addresses.
Managing Deployment Descriptors
You use deployment descriptors to configure how you want to deploy artifacts. Deployment descriptors are specific to an artifact and StreamBase operator and can be reused indefinitely.
Descriptors must be either be unique by Target Type, or within the same Target Type must contain unique URI(s), Service Name(s), or Service Address(es), per descriptor (for example, the same artifact can use the same service name if the Target StreamBase Operators are different).
For the service address Target Type, at least one service address (whether configured in the AMS.conf or as shown below) must be available.
Managing Service Addresses for Artifact Deployment
The Service Address panel is a convenience for:
-
building deployment descriptors based on available service addresses configured in the
AMS.conffile -
configuring your own service addresses to be included in a deployment descriptor
Service addresses are not tied to a specific artifact.
To build your own service address, configure the following properties as described here:
-
Address Name
-
Host Name
-
Admin Port
-
Userame
-
Password
-
Description
| Note |
|---|---|
|
Disabling the service address leaves the service address in the web client, but does not allow it to be selected for new deployment descriptors. Also, by disabling a service address, any existing deployment descriptor having the service address still works but not deployed to that service address. |