Contents
It is strongly recommended that you install and use the standalone TIBCO StreamBase® Studio included in your StreamBase installation kit. Nevertheless, for advanced Eclipse users, StreamBase also supports a plug-in version of Studio that you can install into your existing installation of Eclipse. Eclipse versions 4.34 and above are supported.
You install the plug-in version of StreamBase Studio from an Eclipse plug-in zip file that is structured the same way as an Eclipse update site. Download a zip file of the Eclipse update site from the TIBCO distribution site.
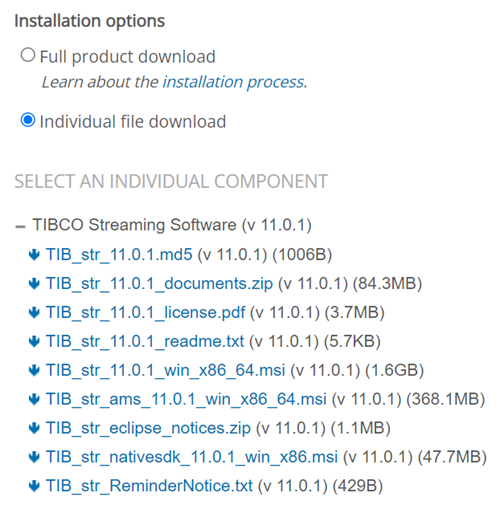
On the TIBCO eDelivery download page for the desired TIBCO Streaming software release, select the Individual file download method.
The StreamBase Studio Eclipse Update package is delivered as a zip file named with the following pattern:
TIB_str_eclipseupdate_version_platform.zip
The following example shows the individual files you can download from a recent release for Windows platforms:
 |
If you need assistance, contact product Support to request access to the TIBCO distribution site.
Note
The StreamBase Studio Eclipse Update package is not currently available for Spotfire Data Streams.
The Eclipse update site adds ONLY the StreamBase Studio authoring environment plug-ins to Eclipse. It does NOT provide:
-
The StreamBase deployment runtime for either EventFlow or LiveView fragment types.
-
Any sample files and projects.
-
Command-line utilities for querying and administering your servers.
-
Libraries, DLLs, JARs and other files to support using the StreamBase Client Library to develop client access programs.
The best use is to install both the Studio plug-ins in your own Eclipse and the full standalone StreamBase installation on the same machine. That way, the Studio-in-Eclipse edition can locate and use the StreamBase Server runtime and sample files provided only in the standalone version of Studio.
The plug-in folder is static and is designed to provide a snapshot of the Studio plug-ins at the time of each StreamBase release. To update your Studio plug-ins, you can run an additional installation of the plug-ins from the next StreamBase maintenance release, as described below in Upgrading Studio Plug-ins.
Be aware that the StreamBase Eclipse update site does not work the same as Eclipse update sites from the Eclipse Foundation or from other vendors. In particular, you cannot use the > feature to obtain updated components. The update-site folder contains a snapshot of a single release of the plug-ins.
The StreamBase Studio 11.2.1 Eclipse plug-ins are supported on the following platforms:
-
64-bit Eclipse 4.34 or above.
-
Configured with the prerequisites described below
-
Running on a supported 64-bit installation of Microsoft Windows or macOS
-
The Studio 11.2.1 plug-ins are developed against Eclipse 4.34 as the target platform. Eclipse 4.34 is the basis for the shipping StreamBase Studio in 11.2.1, and is thereby the preferred Eclipse version. However, the plug-ins may continue to work with newer versions of Eclipse.
To support the Studio plug-ins, your Eclipse installation must meet the following conditions:
-
Eclipse must already be running and working on a supported operating system.
-
You must be running Eclipse with a JDK, not just a JRE.
-
Eclipse must be running under a supported JDK 22 version. The ideal JDK version is the one shipped to support StreamBase Studio 11.2.1, as described the JDK row of the Supported Configurations table.
Important
When StreamBase Studio installs as a standalone product, it includes an Eclipse Adoptium JDK 22 for private use by Studio and the StreamBase Runtime. This private JDK is not available when installing the Studio plug-ins into your own Eclipse, so you MUST make sure you are running Eclipse with a supported 22 JDK. The Studio plug-ins will not load if Eclipse is running with a 1.6, 1.7, 1.8, 11 or 17 JRE or JDK.
-
The Eclipse JDK must be installed such that both java and javac commands are available on the search path of the logged-in username that will run Studio in Eclipse.
-
JDKs from vendors compatible with OpenJDK 22 are supported, older JDKs are not supported for running Studio.
-
Eclipse must have all prerequisite features installed, as described in the next section.
Note
When installing the Studio plug-ins into Eclipse, it is the best practice to do so while your machine has open access to the Internet, and with the Contact all update sites check box selected on the Available Software Install dialog.
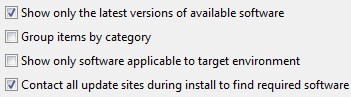 |
Under these conditions, Eclipse automatically downloads and installs prerequisite components, which makes the upgrade process proceed smoothly and quickly.
The ideal Eclipse version to host StreamBase Studio 11.2.1 plug-ins is Eclipse 4.34. If you are installing the Studio plug-ins into another Eclipse version, you may need to adjust these instructions accordingly.
The StreamBase Studio Eclipse plug-ins require the following Eclipse components to be installed in advance.
- — An Eclipse base installation
-
The recommended Eclipse 4.34 base kit is the following:
-
Eclipse for RCP and RAP Developers
Download the 64-bit version of this package, as appropriate for your target machine, from:
https://www.eclipse.org/downloads/packages/release/2024-12/r/eclipse-ide-rcp-and-rap-developers
-
- — Java Development Tools (JDT) Feature
-
The JDT feature is always included in all Eclipse base kits.
- — Eclipse Modeling Framework (EMF)
-
The Eclipse base kit you start with, if other than the recommended Eclipse for RCP and RAP Developers kit, may already include the Eclipse Modeling Framework. Confirm its presence by opening >>. Select the Plug-ins tab, and look for EMF Xcore in the Plug-in Name column. If EMF is already installed, skip now to install the Graphical Editing Framework.
If your Eclipse base kit does not include EMF, then install the EMF with the following steps:
-
From your running Eclipse base kit, invoke >.
-
In the Install dialog, select All Available Sites from the Work with drop-down list.
-
Wait a few moments for the plug-in options list to fill in.
-
Important! Clear the Group items by category check box.
-
Important! Confirm that the Contact all update sites checkbox is selected.
-
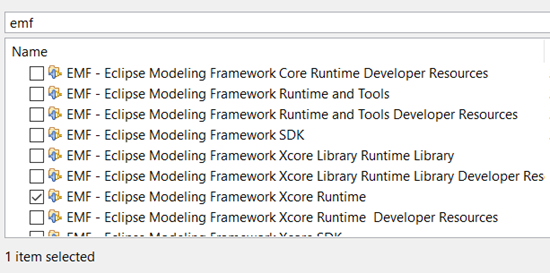
In the filter text field, type
EMFand press Enter. Wait for the filtered results. -
From the resulting list, select EMF - Eclipse Modeling Framework Xcore Runtime.
-
Click and go through the steps to accept the license, download, and install this feature.
-
Restart Eclipse when prompted.
-
- — Graphical Editing Framework (GEF)
-
Install the Graphical Editing Framework, using the same steps as for EMF above, except substituting the following for steps 6 and 7:
-
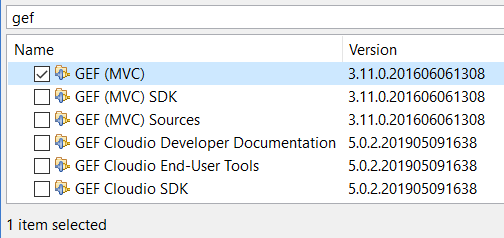
In the filter text field, type
GEFand press Enter. Wait for the filtered results. -
From the resulting list, select GEF (MVC).
-
When you have installed and configured Eclipse as described in the previous sections, follow the steps below to install the Studio 11.2.1 plug-ins.
-
Place the Eclipse update site package you downloaded above into a temporary folder. Do not unzip the downloaded update site package.
-
Start your target Eclipse version.
-
From the Eclipse main menu, invoke >.
-
Make sure the Group items by category checkbox is selected.
-
Click Add to add a software download site.
-
In the Add Site dialog:
-
Provide a name in the Name field, using the StreamBase release number. For example, enter
StreamBase 10.6.0 Update Site. -
Click and browse to the temporary folder containing the update site archive file and select it.
-
Click .
-
-
After reading the local update site zip file, Eclipse creates entries like the following in the Available Software grid:
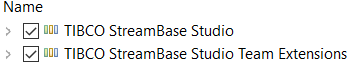
Select both checkboxes.
-
Click and proceed through the steps to accept the license and download the plug-ins.
-
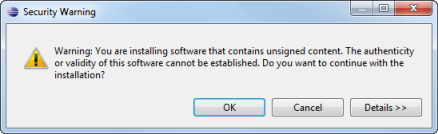
If Eclipse prompts for permission to install the unsigned Studio plug-in files, click .
-
Eclipse installs the Studio plug-ins into Eclipse.
-
Restart Eclipse when prompted.
-
When Eclipse restarts, a dialog prompts for permission to set Studio's location in the Eclipse preferences dialog.
-
If you have a separate installation of StreamBase Studio 11.2.1 on the same machine, click Yes to open the StreamBase Studio preference page.
-
Specify the location of your existing StreamBase 11.2.1 installation by clicking and navigating to the top level folder of your installation.
-
Click .
-
-
On the Welcome page, click the arrow-shaped Workbench button in the upper right, or click the X on the Welcome tab to close the Welcome page and open the Eclipse workbench.
-
Use >> to open the SB Authoring perspective.
Loading Studio into your own Eclipse is not meant to be an full alternative to a formal StreamBase Studio installation, but is made available as a convenience for experienced Eclipse developers. The following points describe the Studio-on-Eclipse configuration:
-
No license is required to run and develop applications on either StreamBase Studio or Studio-on-Eclipse.
-
The Studio-on-Eclipse configuration is most useful when installed on a machine that also has a licensed installation of StreamBase. You can run StreamBase applications on the licensed installation's StreamBase Deployment Runtime by specifying the location of the licensed installation in Studio-on-Eclipse's preferences.
-
The licensed installation on the same machine should be from the same release series as the Studio plug-ins on Eclipse, with the same major.minor release number.
-
Ideally, the StreamBase release number of your Studio-on-Eclipse plug-ins will have the same major.minor number as the remote Server. However, the StreamBase Deployment Runtime is somewhat forgiving of release numbers, and will try to run your application despite a release number skew.
From Eclipse, you can upgrade the StreamBase Studio plug-ins by repeating the installation steps, using the Eclipse update site archive from a newer maintenance release on the same major.minor release branch.
As an example, let's say you originally downloaded the Update site zip file from the StreamBase 11.2.0 eDelivery site. You installed the Studio plug-ins into Eclipse as described in Installing the Studio Plug-ins above.
Now, say release 11.2.1 comes along. Download and save the Eclipse update site zip file for the new release, using the same procedure described in Downloading.
Next, follow the same steps as in Installing for the new release. This time, however, Eclipse recognizes the plug-ins as updates for existing plug-ins, and lets you install the new release without having to uninstall first.