Contents
- Overview
- Where is JMS Configuration Information Stored?
- Legacy Configuration Files
- Opening the JMS Configuration Editor
- Best Practices and Cautions
- Minimum Server Configuration Requirements
- Configuring More Than One Server
- Server/Destinations Tab
- Timestamp Formats Tab
- Editor Section: Servers and Destinations
- Editor Section: Server Overview
- Editor Section: Destination Options
- Editor Section: Connection Type, JNDI
- Editor Section: Connection Type, Direct
- Editor Section: Advanced JNDI Options
- Editor Section: Connection Options
- Editor Section: Destination Overview
- Editor Section: Consumer Options
- Editor Section: Producer Options
StreamBase Studio includes the JMS Configuration Editor, which provides a forms-based method for editing the server connection and destination specifications for one or more JMS or TIBCO EMS message servers. The JMS Configuration Editor supports the JMS or TIBCO EMS operators.
The JMS and TIBCO EMS Adapter is implemented as a suite of five operators for JMS and five for TIBCO EMS, as shown in the following table:
JMS and TIBCO EMS Operators
| JMS Adapter | TIBCO EMS Adapter | Description |
|---|---|---|
| JMS Consumer | EMS Consumer | Connects to a JMS or EMS destination on the target server and reads messages from it. |
| JMS Producer | EMS Producer | Connects to a JMS or EMS destination on the target server and sends messages to it. |
| JMS Request/Reply | EMS Request/Reply | Implements the common request-reply design pattern by connecting to a JMS or EMS destination on the target server to send request messages, and waiting for the reply on a different destination (timing out if no reply is forthcoming). |
| JMS Connect | EMS Connect | Manually connects to or disconnects from the target JMS or EMS server. |
| JMS Ack | EMS Ack | Acknowledges receipt of messages from the connected server (when using the CLIENT_ACKNOWLEDGE or other explicit acknowledgement mode).
|
| JMS Commit | EMS Commit | Either commits or rolls back transactions on a transacted JMS or EMS session. |
Each server connection specification is saved with a unique connection name, and each JMS destination has a unique name per configured server. When using one of the JMS or TIBCO EMS operators, you specify a configured server and destination name, and the operator does the work of making and maintaining the connection to the specified server.
The specifications for connecting to JMS and TIBCO EMS message servers are stored in a configuration file of HOCON type com.tibco.ep.streambase.configuration.adapter, with root object JMSAdapter. The conventional filename is jmsAdapter.conf, but this name is not required.
Studio saves this file in the src/main/configurations folder of your Studio project, and you are free to edit the file directly using the HOCON editor. However, Studio provides the JMS Configuration Editor described on this page as an easy-to-use forms-based method of editing
JMS and TIBCO EMS specifications.
Note
The JMS Configuration Editor does not have an explicit button, and it does not automatically save changes. Be sure to save changes with Ctrl+S before switching between views and tabs of the Editor.
Prior to StreamBase 10.3.0, JMS/EMS adapter configurations were stored in src/main/resources/adapter-configurations.xml. Configurations in this format continue to be supported, with no modifications necessary for backward compatibility. Configuration
settings in such files are automatically converted to the new format.
If you click the button for a JMS or EMS operator in a project with an adapter-configurations.xml file, the JMS Configuration Editor reads that file, converts the information to HOCON format, and saves a new file src/main/configurations/jmsAdapter.conf. The JMS and EMS settings are then commented out of the adapter-configurations.xml file.
To open the JMS Configuration Editor for the current Studio project, use steps like the following:
-
Start with a JMS or EMS operator icon on the EventFlow canvas:
-
If you already have a JMS or EMS operator icon, select and double-click it to open its Properties view.
-
If the current canvas does not have a JMS or EMS operator, drag the Adapters, Java Operators icon from the Palette view to the canvas. Type
jmsoremsin the search field to narrow the list of results, and select any JMS or TIBCO EMS operator. Select and double-click the newly placed icon to open its Properties view.
-
-
Close any currently open JMS Configuration Editor. Close any other Editors of the current project's JMS HOCON configuration file or legacy adapter-configurations.xml file.
-
Click the button in the Operator Properties tab of the Properties view. This opens the JMS Configuration Editor.
Note
The JMS Configuration Editor cannot open a HOCON file that contain validation errors. Instead, the editor offers to drop you into the text-based HOCON Editor, which guides you to the validation problems. Correct the issue in the HOCON Editor, close it, and try again to open the file from the button.
Because the JMS Configuration Editor edits a configuration file for the current project, it is possible for more than one editor to have the same file open at the same time, which can lead to confusing and conflicting editing situations. For the utmost editing clarity, follow the rules and best practices in this section when using the JMS Configuration Editor:
-
Always close any other editor currently open on any configuration file in the current project before clicking the Edit button to open a new JMS Configuration Editor session.
-
In general, do not mix JMS operators and TIBCO EMS operators in the same EventFlow module.
-
If your JMS configuration file does define settings for both JMS and TIBCO EMS servers in the same file (such as when using a site-wide canonical JMS configuration file for use by many StreamBase projects), then:
-
Place operators for each connection type into separate EventFlow modules.
-
Configure one set of JMS or EMS server and destination connections at a time. Both sets can successfully co-exist in the same configuration file, but only one set can be edited at a time.
-
-
The JMS Configuration Editor takes on different characteristics, depending on whether it is opened from a JMS operator or from a TIBCO EMS operator. In particular, Editors opened from an EMS operator show an error message if you try to select a non-EMS provider from the JMS Provider drop-down list.
-
The JMS Configuration Editor retains the editing characteristics of the last-opened JMS or EMS configuration type, if you open a new Editor session while the last session is still open.
For example, consider the following sequence of events: 1. You open the Editor from a TIBCO EMS operator and leave that Editor session open. 2. You drag a JMS operator onto a canvas and click the Edit button in its Properties view. In this case, the newly opened Editor session behaves like an EMS editor, even though opened from a JMS operator. For example, it only allows you to select
TIBCO EMSfrom the JMS Provider drop-down list.To recover from this situation, close all open JMS Configuration Editor sessions and any other text or XML editor sessions on any of this project's configuration files. Then re-open the JMS Configuration Editor session from the JMS or EMS icon of choice.
-
If you inadvertently violate these rules and try to open the JMS Configuration Editor from a JMS operator while an EMS operator editing session is already open (or vice versa), Studio does open the Editor session, but only shows server definitions that use the last-opened EMS or JMS type. A message across the top of the Editor view reminds you of the problem, like the following example:

The Server/Destinations tab allows for maximum flexibility in configuring JMS server and destination definitions, and allows for many special-case settings. At first glance, the number of fields in this tab can appear daunting. However, to make a successful connection to a JMS or TIBCO EMS message server requires only a few settings.
The particular minimum settings required depend on the JMS Provider you are using. The required settings for several JMS providers are shown in Configuration on the Authoring Guide's JMS Operators page.
See Connection Type Section, JNDI and Connection Type, Direct below for examples and explanations of the fields you must configure in the Connection Type section to allow a simple JMS or EMS connection to proceed.
For a successful connection, you also need the JAR files that implement JMS client functionality for your JMS Provider, as listed in JAR File Requirements. These JAR files must be installed in the local Maven repository as described in Using External JAR Files.
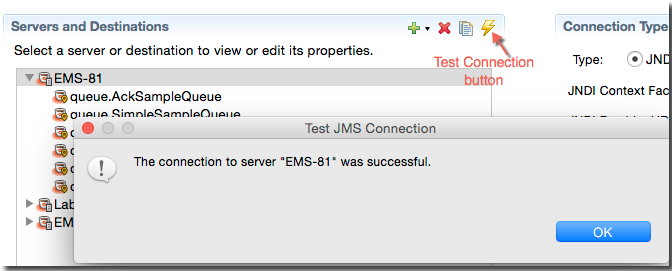
When the minimum configuration settings are in place, test your connection by selecting your server's name in the Servers and Destinations control, and clicking the Test Connection button. This results in a dialog that reports either the success or failure of the connection attempt.
 |
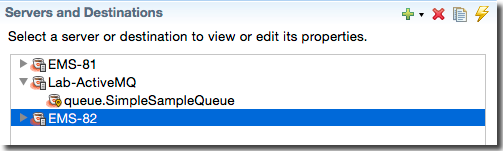
The JMS Configuration Editor supports the configuration of more than one JMS and/or EMS servers, and you can easily mix configurations for different JMS providers.
This allows you to have a single canonical site-wide configuration file that is copied into multiple StreamBase projects used by a team of developers.
There is no conflict when configuring JMS servers from different JMS Providers. However, when using the JMS Editor, you must configure each server's configuration one at a time, independent of each other, following the best practice rules in Best Practices and Cautions above.
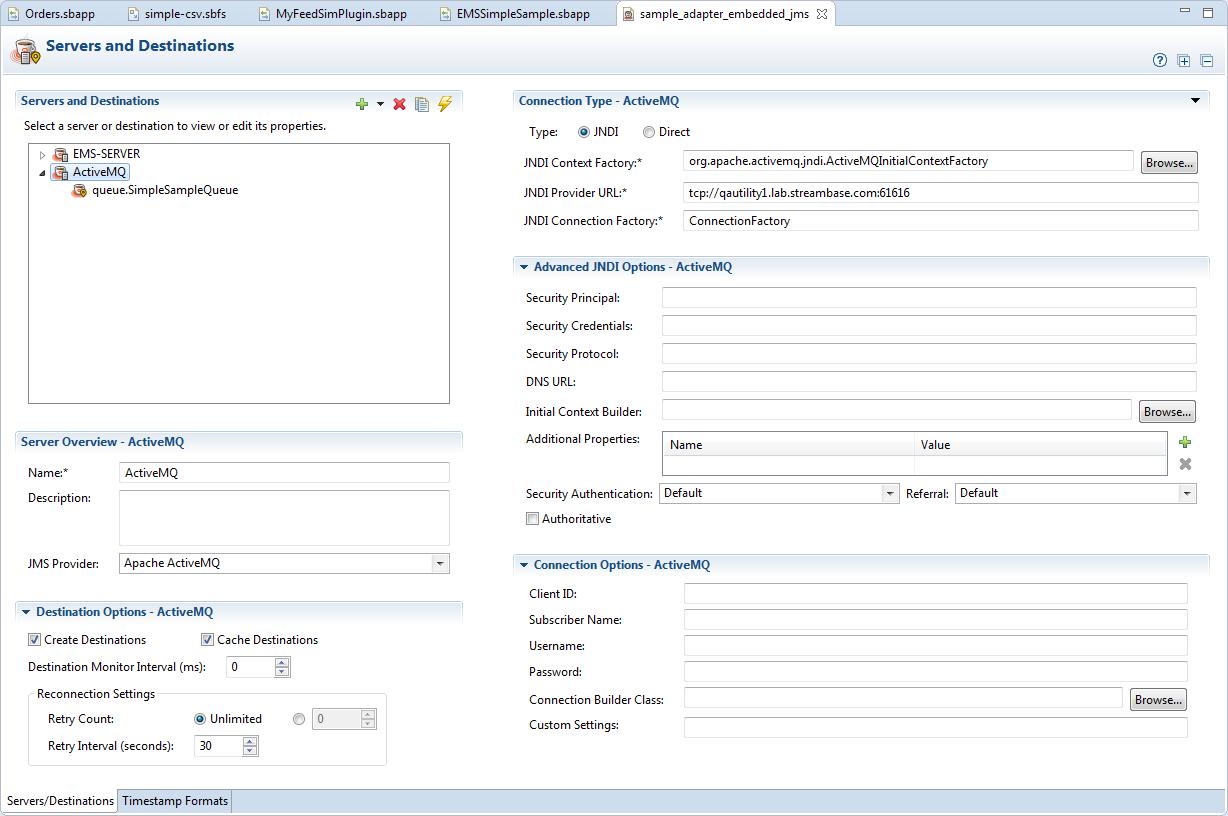
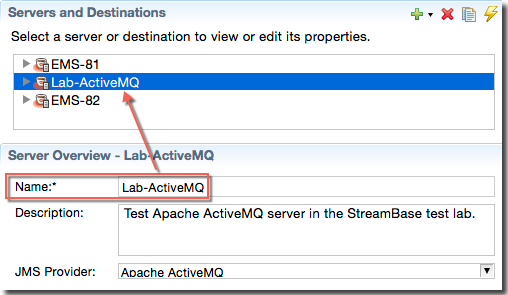
Use the Server/Destinations tab to define connection configurations for JMS and TIBCO EMS servers, and to configure destinations for defined servers. This tab takes on a different look, depending on what it is currently editing:
-
The tab shows server configuration fields when a server's name is selected in the Servers and Destinations control on the upper left.
-
The tab shows destination configuration fields when a destination's name is selected.
Moreover, the set of available server configuration fields adapts to whether you select Direct or JNDI as the server connection type in the Connection Type quadrant in the upper right.
If you open the JMS Configuration Editor in a project with no previous JMS or EMS configuration in the current Studio project,
then the Servers and Destinations control is blank. Click the green plus sign (![]() ) to create a new server definition. This creates a server with the default name
) to create a new server definition. This creates a server with the default name Server, which has one destination with the default name Destination. Each defined server must have at least one defined destination (except that JMS/EMS Connect operators only require a server
definition).
To rename a newly added server configuration, select the default name and enter a new name in the Name field of the Server Overview section. To rename the destination, select the default name and enter a new name in the Name field of the Destination Overview section.
The Timestamp Format tab has the single purpose of defining named timestamp formats that can be assigned in the configuration of destinations.
A field, property, or header in a JMS or EMS message might represent a timestamp as a string such as yyyy-MM-dd. Use this tab to specify the format of that string, and provide a name for that format. Your named formats then appear in
the Timestamp Format drop-down list in the Destination Overview section of each destination's configuration.
Define your time formats using the format characters recognized by the java.text.SimpleDateFormat standard.
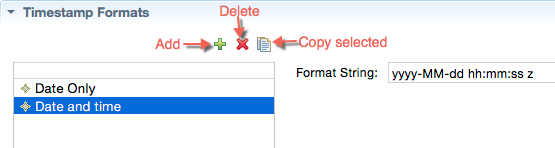 |
If you do not specify any custom timestamp format strings in this tab, the Timestamp Format drop-down list in the destination configuration section contains the single format Default. This default format string is:
MM/dd/yyyy hh:mm:ss aa
Each server and each destination within it must have a unique name per Studio project folder. When you add a new server in the Servers and Destinations section of the Servers/Destinations view, provide a name for it in the Server Overview section.
Use the tool bar at the upper right to add and remove servers and destinations, and to test server connections:
-
To add a server or a destination, click the green plus sign (
 ), or use the down arrow to the right of the plus sign to select Add Server. This adds an empty server definition named Server with one empty destination named Destination. To add only a new destination,
select a server name, then use the down arrow to select Add Destination.
), or use the down arrow to the right of the plus sign to select Add Server. This adds an empty server definition named Server with one empty destination named Destination. To add only a new destination,
select a server name, then use the down arrow to select Add Destination.
-
To remove a server or a destination, select it and click the red button (
 ). When you remove a server, all of its destinations are also removed. You can press Ctrl+Z to undo a deletion.
-
To duplicate the configuration for a server or a destination, select it and click the white button (
 ). When you duplicate a server configuration, all its configured destinations are also copied.
-
To test a configured server's connection, select a server name, and click the yellow button (
 ). You receive a report of connection success or a diagnostic if the connection does not succeed.
Newly added servers must have a certain minimum set of configured fields for a test connection to that server to succeed. See Minimum Server Configuration Requirements.
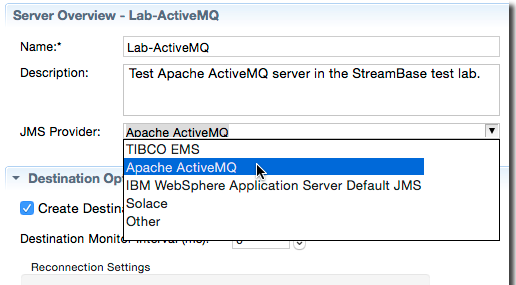
Use the Server Overview section to specify a name and optional description for the selected server.
If you opened the JMS Configuration Editor from a JMS operator, the JMS Provider drop-down list shows the four supported JMS Providers, plus Other. Select the appropriate JMS Provider or select Other if you intend to define your own JMS Provider configuration.
Use the Destination Options section for the selected server to specify certain defaults for all destinations configured for this server. The following image shows the default selections for this section.
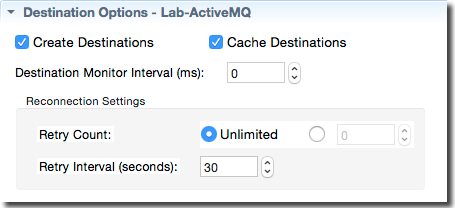
The following table describes the Destination Options settings of this section.
| Option | Description |
|---|---|
| Create Destinations | Boolean. When selected (the default), this indicates that destinations are to be created when first used. When unselected, this means to look up destinations in JNDI. If supported by the JMS provider, destinations can be created even if they already exist. Creating destinations is faster than looking them up in JNDI. |
| Cache Destinations | Boolean. When selected (the default), this indicates that destinations are to be cached once created. Caching provides better performance. However, if you are creating thousands of destinations, caching them may increase your memory footprint. |
| Destination Monitor Interval | Integer in milliseconds. When non-zero, enables monitoring the health of JMS destinations on a given server at intervals you specify in milliseconds. The default setting is zero, which means destinations are not monitored. |
| Reconnection Settings | |
| Retry Count | Select either Unlimited or use the number control to specify the number of retries to attempt. By default, JMS adapters makes unlimited attempts to connect to a JNDI or JMS server. Use this control to specify the number of attempts. |
| Retry Interval (seconds) | Integer in seconds. Set the value to specify the number of seconds between connection retry attempts. The default is 30 seconds. |
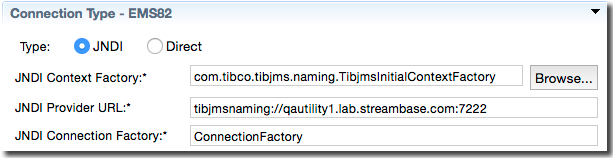
The minimum settings for a JNDI connection to TIBCO EMS and Apache ActiveMQ require only three settings for a JNDI type connection:
-
JNDI Context Factory: the fully qualified name of the class that implements the JNDI Context Factory API. For the four supported JMS Providers, this field is filled in for you when you select a provider name from the JMS Provider drop-down list in the Server Overview section. If you are configuring a different JMS Provider, obtain the name of this class from the provider vendor's documentation.
You must provide a connection factory class name to instantiate. It is assumed that this class implements a constructor taking one String parameter that represents the URL of the JMS broker, which you must also specify in the next field if it is not
localhost. -
JNDI Provider URL: The URI of the JMS server to connect to, whether running for development purposes on
localhostor on a host in your site's network. JNDI Provider URIs start with the name of the JMS protocol (which is proprietary for each JMS Provider), followed by the DNS name or IP address of the server of interest, followed by a colon and the port number on which the JMS service is running. -
JNDI Connection Factory: This is the default string
ConnectionFactoryor a string specific to your JMS Provider.
These minimum settings are made in the Connection Type section in the upper right quadrant of the Server/Destinations tab, when the JNDI connection type is selected.
 |
Remember that a successful connection requires that the JAR files that implement JMS client functionality for your JMS Provider are installed in a Maven repository accessible to your development machine, as described in Using External JAR Files.
Your Studio project must then add a Maven dependency on these installed JAR files using > or by editing the pom.xml file for your Studio project and using its Dependency tab.
You can test your configuration's connection to its specified server as described in Minimum Server Configuration Requirements.
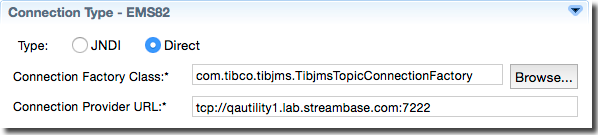
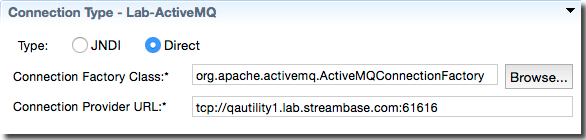
To specify a connection to a JMS or TIBCO EMS server using the Direct connection type, you must specify two fields:
- Connection Factory Class
-
With two of the four supported JMS Provider names selected in the JMS Provider drop-down list in the Server Overview section, when you click the Direct button to specify that connection type, the name of the connection factory class is automatically filled in in this field. Those two Providers are TIBCO EMS and Apache ActiveMQ.
For IBM WebSphere AS Default JMS and Solace Systems, you must provide the fully qualified name of the direct connection class provided in the documentation for those Providers.
- Connection Provider URL
-
Enter the URL for the JMS server in the form
tcp://host:port.
Examples, first for a direct connection to TIBCO EMS:
 |
For an Apache ActiveMQ direct connection:
 |
Of course, direct connections have the same JAR file requirements listed in the previous section, and can be tested with the Test Connection button described in Minimum Server Configuration Requirements.
The are sometimes needed to establish the proper InitialContext for JNDI lookups. These fields have no default values. Contact your site's JMS Network Administrator for the correct values for your site.
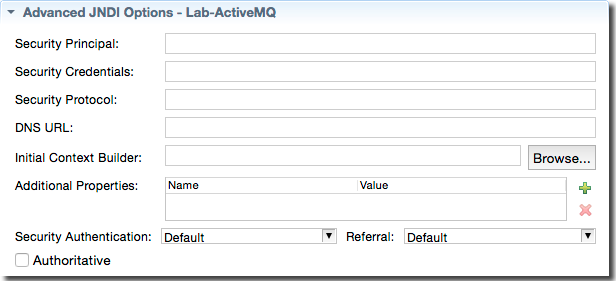 |
The following table describes the fields of the Advanced JNDI Options section
| Option | JNDI Correspondence or other |
|---|---|
| Security Principal | javax.naming.Context.SECURITY_PRINCIPAL |
| Security Credentials | javax.naming.Context.SECURITY_CREDENTIALS |
| Security Protocol | javax.naming.Context.SECURITY_PROTOCOL |
| DNS URL | javax.naming.Context.DNS_URL |
| Initial Context Builder | Fully-qualified name of the Java class implementing com.streambase.sb.adapter.common.jms.common.JNDIInitialContextBuilder |
| Additional Properties | Defines additional properties that may be required beyond those defined in javax.naming.Context. These may be site-specific
or JMS Provider specific properties. Use the green plus button to add a row, whose initial values are Name and Value. Select the newly added row to edit these values as needed.
|
| Security Authentication | javax.naming.Context.SECURITY_AUTHENTICATION |
| Referral | javax.naming.Context.REFERRAL |
| Authoritative | javax.naming.Context.AUTHORITATIVE |
The values of the Connection Options section are optional unless your JMS Provider requires authentication information such as a user name and password.
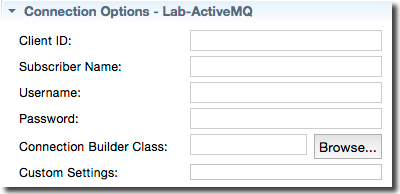
The following table describes the Connection Options properties, which are all string values.
| Option | Description |
|---|---|
| Client ID | Causes the operator to call javax.jms.Connection.setClientID() with the provided value.
|
| Subscriber Name | Causes a durable subscription to be made and used with the specified subscriber name. This setting is valid only when used in conjunction with destinations that are Topics. |
| Username | The username to use when connecting to the JMS server. |
| Password | The password to use when connecting to the JMS server. |
| Acknowledge Mode | The mode used to acknowledge JMS messages. Defaults to AUTO_ACKNOWLEDGE. You can also select CLIENT_ACKNOWLEDGE, DUPS_OK_ACKNOWLEDGE, INDIVIDUAL_ACKNOWLEDGE, EXPLICIT_CLIENT_ACKNOWLEDGE, EXPLICIT_CLIENT_DUPS_OK_ACKNOWLEDGE, SOL_CLIENT_ACKNOWLEDGE and for TIBCO EMS only, NO_ACKNOWLEDGE. In addition, the integer equivalents of these enumeration values may also be specified. |
| Connection Builder Class | The fully-qualified name of a class that implements the com.streambase.sb.adapter.common.jms.common. ConnectionBuilderInterface, responsible for creating and initializing JMS Connection objects. If this parameter is not specified, the operator's default implementation is used. |
| Custom Settings | An arbitrary string passed verbatim to the implementer of the CustomConnectionBuilder interface. |
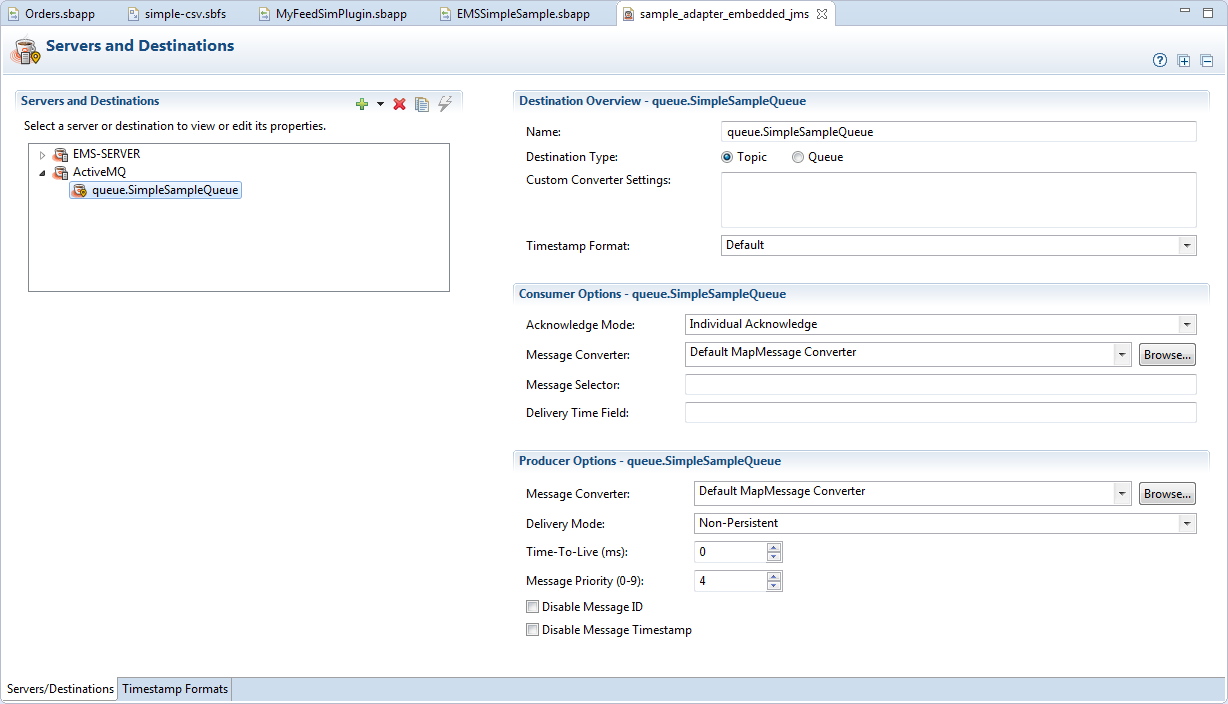
A destination is a queue or a topic on a particular server.
Select a destination name in the Server and Destinations control, which puts the JMS Configuration Editor into its destination editing mode.
Use the Destination Overview section to specify a name for the selected destination, and its Destination Type, either Topic or Queue.

Use the Custom Converter Settings field to enter an arbitrary string that is to be passed verbatim to the message converter specified in the Consumer Options or Producer Options section. Remember that the string you specify here will be stored in a HOCON property in the jmsAdapter.conf file.
The Timestamp Format control is a drop-down list that by default has a single entry, defaultTimestampFormat. This default format string is defined internally as MM/dd/yyyy hh:mm:ss aa. To add your own timestamp format entries to this drop-down list, use the Timestamp Formats tab as described in Timestamp Formats Tab above.
The options in the Consumer Options section apply when the currently selected destination is used by a JMS Consumer or EMS Consumer operator.
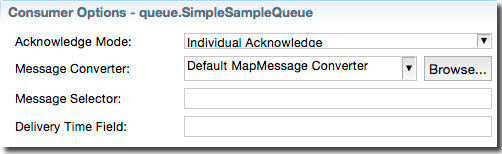
The following table describes the Consumer Options section of each destination's configuration.
| Option | Description |
|---|---|
| Acknowledge Mode | The mode used to acknowledge JMS messages for the selected destination. Defaults to Individual Acknowledge. You can also select Dups OK Acknowledge, Client Acknowledge, or Auto-Acknowledge.
|
| Message Converter | Specifies how the currently selected destination translates messages into a tuple. Four predefined message translation types
are supported: Default MapMessage Converter (this control's default selection), Default TextMessage Converter, Default BytesMessage Converter, and Default Simple Message Converter . You can also select Custom, in which case you must provide a class that implements the FromJMSMessageConverter interface.
|
| Message Selector | The message selector expression (if any) to use for this destination. |
| Delivery Time Field | The field in the StreamBase tuple that will be marked with a message's delivery time. |
The options in the Producer Options section apply when the currently selected destination is used by a JMS Producer or EMS Producer operator.
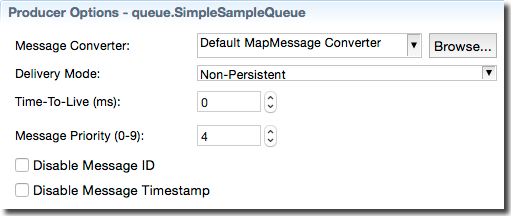
The following table describes the Producer Options section of each destination's configuration.
| Option | Description |
|---|---|
| Message Converter | Specifies how the currently selected destination translates tuples into JMS messages. Four predefined message translation
types are supported: Default MapMessage Converter (this control's default selection), Default TextMessage Converter, Default BytesMessage Converter, and Default Simple Message Converter. You can also select Custom, in which case you must provide a class that implements the ToJMSMessageConverter interface.
|
| Delivery Mode | Messages from JMS Producer operators can be delivered via either of two delivery modes, Non-Persistent (default) or Persistent. TIBCO EMS Producer operators have a third mode available, Reliable Delivery.
|
| Time-To-Live (ms) | Specifies the number of milliseconds to wait after a message is published before destroying the message if it is not yet delivered. The default is zero. |
| Message Priority (0-9) | Specifies the urgency of a message, from 0 (lowest) to 9 (highest). The JMS Provider tries to deliver higher-priority messages before lower-priority ones, but this is not guaranteed. The default setting is 4. |
| Disable Message ID | A JMS provider may be able to reduce message overhead when given a hint that a client does not use message IDs. Select this checkbox if your fragment design ignores IDs. |
| Disable Message Timestamp | A JMS provider may be able to reduce message overhead when given a hint that a client does not use timestamps. Select this checkbox if your fragment design ignores timestamps. |