Contents
- Changing Studio's Appearance
- StreamBase Studio Panel
- Authoring Panel
- Authoring > EventFlow Rendering Panel
- Cluster Panel
- Compiler Cache Panel
- Decision Table Panel
- Decision Table > Analyzer Panel
- Decision Table > Appearance Panel
- Launching Panel
- LiveView Perspective Panel
- Test/Debug Panel
- Typechecking Panel
- Setting Preferences
To view and set StreamBase Studio preferences, invoke > in the main menu (Windows) or > (macOS). On macOS, you can also use the Mac-standard shortcut command+,
You can control basic Eclipse settings with various pages in the Preferences window, and can manage StreamBase-specific settings in the StreamBase Studio panel.
The settings in the Studio Preferences dialog affect all projects in the current Studio workspace. You can also set project-specific Project Property settings.
Preferences are preserved separately for each Studio workspace. You can keep more than one workspace with different preference settings.
This section describes how to adjust StreamBase Studio's overall appearance:
-
Use the Appearance panel to make a large-scale change, such as switching between Light and Dark modes.
-
Use the Colors and Fonts panel to make small-scale changes, such as the font or color used by one individual feature.
Starting with TIBCO Streaming 10.6.0, Studio supports Eclipse Dark themes. Dark theme colors apply to all perspectives, views, and editors in Studio, with the exception of the Palette view in the SB Authoring perspective.
| Option | Description | Default |
|---|---|---|
| Appearance | ||
| Theme | Specifies a large-scale appearance theme to make consistent color and font changes throughout Studio. Changing the theme requires
restarting Studio.
To select a For example, Windows users see Mac users see Note: An Eclipse bug can cause Windows users to see duplicate themes in the selection menu. |
Light |
| Colors and Font theme |
When you select a Note that the reverse is not true: if you change the Theme from |
Default |
Use the Colors and Fonts panel to adjust the font, font size, background colors, and foreground colors for various individual Eclipse features, including StreamBase Studio features.
- StreamBase tree
-
Open the StreamBase tree to directly change the appearance of individual Studio visual features. The starting point for the colors and fonts in the StreamBase tree is determined by the Color and Font theme selected on the Appearance panel described above.
The expected starting point themes are:
-
Defaultfor theLighttheme. -
StreamBase Studio Dark, automatically selected for theDarktheme.
-
- LiveView tree
-
Open the LiveView tree to adjust colors and fonts for the LiveView Project Viewer. Adjust these features carefully when a Dark theme is selected, to avoid rendering the Project Viewer difficult to see.
| Option | Description | Default |
|---|---|---|
| StreamBase Installation Directory | ||
| Directory | Specifies the root directory where the current release of StreamBase is
installed.
This is where Studio looks for samples and other components at startup. If you modify this setting, restart Studio for the change to take effect. In general, do not change this setting, except under the direction of product Support. |
See Default Installation Directories |
| Automatic Perspective Switching | ||
| Switch to SB Authoring perspective ... |
A perspective is a collection of Eclipse views that are opened together to perform a set of related tasks. StreamBase Studio can be set to automatically switch between perspectives on certain triggering events. Studio automatically switches to the SB Test/Debug perspective when you launch one or more fragments, and stays in that perspective as you continue to launch fragments. By default, the setting for Switch to SB Authoring perspective when stopping the last fragment is enabled. |
Enabled. |
| Auto-save Options | ||
| When running a resource with unsaved changes: | When you attempt to run a fragment, StreamBase Studio checks for unsaved files and resources in the current project, or referenced
by the current project. At minimum, the primary EventFlow module must be saved before proceeding. This preference controls
how and when resources are saved before running fragments. The options are:
|
Ask me next time. |
| Advanced | ||
| Root directory for cloned sample repositories from GitHub | This provides a link to the local file system location of the clone of the TIBCO-supported and community contributed samples on GitHub. Click the link to open a system Explorer window on this location. A similar link is found on the StreamBase Sample Importer dialog described on this page. | Operating system dependent standard location. |
| Show deprecated Global Operators/Adapters | When disabled, Studio does not show deprecated operators or adapters in the
Insert an Operator or Adapter dialog. When enabled, deprecated
operators or adapters are displayed in that dialog.
An operator or adapter is
marked deprecated with the Java annotation StreamBase® occasionally marks certain components as deprecated to encourage the use of newer components. If you are working on a legacy application and need to continue using a deprecated component, enable this setting. With this setting disabled, the display of EventFlow fragments that were saved with now-deprecated components is not affected. However, such fragments cannot pass typechecking and cannot be run in Studio, because the code that underlies the deprecated components was not loaded. You can continue to work on such fragments by enabling this option, or by upgrading the deprecated components with their replacements. |
Enabled. |
| Use custom Component Exchange URL | When unspecified, the default behavior for the StreamBase Component Exchange dialog is to
retrieve its list of available components from the TIBCO-provided Component
Exchange. You can use this field to specify an alternate URL that contains an in-house
or company-specific location for downloading StreamBase components. Contact product Support for guidance
in setting up an in-house component exchange site.
Site-specific Component Exchange URLs can use the HTTPS protocol, in which case Studio prompts you for access credentials on the specified server. If you supply a URL that
begins with HTTPS or FTP, Studio automatically prompts for credentials. If you
supply a URL for another protocol, you can force authentication prompting for that
protocol by setting the Java property
|
Not specified. |
| Buttons | ||
| Restore Confirmation Messages button | Several StreamBase Studio confirmation dialogs include a checkbox labeled Do not show this again, which lets you suppress that confirmation dialog in the future. Click to restore the original behavior for all confirmation dialogs. | |
| Restore Defaults button | Restores all preferences settings to their as-installed defaults. | |
Use the > panel to set options for the SB Authoring perspective.
| Option | Description | Default | |
|---|---|---|---|
| EventFlow Editor | |||
| Automatically select newly inserted components | Specifies that components newly placed on the EventFlow canvas are automatically selected. This automatically opens the new component's Properties view. | Disabled | |
| Automatically edit names of newly inserted components. | With this checkbox enabled (the default), when you drag a component icon to the
EventFlow canvas (or use a keyboard shortcut to accomplish the same thing), the new
component's name is selected with an edit cell open, ready for you to start typing to
change the component's name. Press Enter to close the edit cell with
your new name, or press Esc to use the default name or to exit the
edit cell without saving your edits.
This feature adds an extra step to keyboard shortcuts that place new components on the canvas. For example, to add a Map operator, the keyboard shortcut is (at minimum) O M Enter with this option enabled, but is O M with this option disabled. You may prefer to disable this option temporarily when entering a long sequence of keyboard shortcuts to quickly fill a new canvas, then re-enable it. See Studio Keyboard Shortcuts. |
Enabled | |
| Use middle mouse button to scroll instead of pan | This option refers to a mouse with three buttons, or with a scroll wheel that can be used as a middle button. With this option disabled, hold down the middle button or scroll wheel (without scrolling the wheel) to move the entire EventFlow drawing within the frame of the canvas window. With this option enabled, holding down the middle button or scroll wheel lets you scroll in four directions, exactly like using the canvas' scrollbars. | Disabled | |
| Save and restore view location and zoom factor | When enabled, Studio preserves the current zoom level of EventFlow Editor sessions and the position of components relative to the top left corner of the EventFlow Editor canvas. These display features are saved when you save the EventFlow fragment, and are restored when you re-open the fragment. | Enabled | |
| Center canvas on selection during navigation |
When enabled, auto-centers the canvas on components selected when navigating in two ways:
With this checkbox cleared, Studio highlights the selected component on the canvas, but does not center the canvas. If the component is offscreen when selected, Studio moves just enough of the canvas to make the component visible. |
Enabled | |
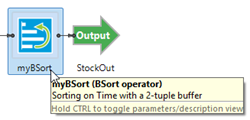
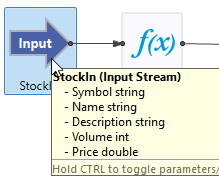
| Show tooltips | Specifies that summary information about each component is to be shown when you
hover the mouse pointer over an icon or arc on the canvas. For example:
|
Enabled | |
| Show overlay on operators using non-default cluster aware settings | Any non-standard cluster aware settings will create an overlay on the operator on the canvas. | Enabled | |
| Hide Control to toggle to/from text fields in Java Operator Properties |
When cleared, the check box, radio button, and drop-down menu controls in Java
operator and adapter Properties views display a icon (
When this preference is enabled, you can still convert a UI control to a text box with the keyboard shortcut when the control has focus. For additional details, see Parameterizing Java Operator and Adapter Properties. |
Enabled | |
| Zoom is centered on: | |||
Controls the zoom behavior.
|
Center of canvas | ||
| Typechecking | |||
| Automatically typecheck components |
Specifies that components are automatically typechecked as you build your EventFlow fragment. Disable this preference to suppress automatic typechecking. See also the related checkbox to enable Typecheck EventFlow Editors in background on the Typechecking panel, described below. |
Enabled | |
| Skip deep typechecking of strict module references and extension points | Enable to avoid full-depth typechecking of Extension Points and Module References that have all output schemas explicitly set. This can greatly speed up typechecking for some large fragments. | Disabled | |
| For new modules, store layout information in: | |||
Controls how graphical layout and EventFlow semantic elements are stored in
EventFlow source files. This setting takes effect only for newly created EventFlow
fragments.
StreamBase Studio respects the layout status it detects for each
EventFlow fragment individually. That is, if Studio detects an
This setting
controls only whether |
Separate layout (.sblayout) file
|
||
| Outline View | |||
| Show empty categories (EventFlow Editor) | Displays container folders in the Outline view for every component type, even if the fragment contains no instances of some components. By default, the Outline view only contains view categories for existing components. | Disabled | |
| Palette View | |||
| Show separate entries for Input, Output Adapters and Java Operators | The Palette view by default contains a single icon labeled Adapters, Java Operators that you drag to the canvas. Once there, a dialog opens that lets you select one or more adapters or global Java operators for placement on the canvas. | Disabled | |
| Show legacy decision table operator | The Palette view displays the legacy Decision Table operator. | Disabled | |
| Sort Operators palette alphabetically | The Operators and Adapters palette is sorted alphabetically. | Disabled | |
| Sort Data Science palette alphabetically | The Data Science palette is sorted alphabetically. | Disabled | |

For further information about using these options, see the EventFlow Editor topic.
Use the >> panel to set options for the EventFlow Editor.
| Option | Description | Default | |
|---|---|---|---|
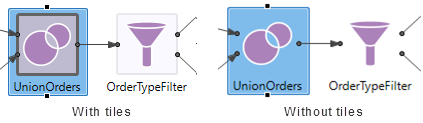
| Render tiles around component icons |
Enable this option (default) to show tiles around component icons, whose left and right edges are where ports attach. Disable to remove the tiles. The selection outline still appears with or without tiles.
|
Enabled | |
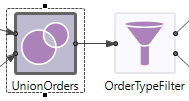
| Render selection without filled outline |
When disabled (default) the selection outline is filled with light blue as shown above. When enabled, the selection outline shows as an unfilled dotted line, as follows:
|
Disabled | |
| Show mouse hover feedback |
When enabled (default), shows a yellow information box for a component when hovering the mouse over it.
|
Enabled | |
| Use animations | When enabled (default), shows an animation effect when you use the Rearrange components and arcs function ( |
Enabled | |
| Use simple colors instead of gradients | When enabled, tiles and selection outlines are shown with flat colors. When disabled (default), colors are shown as gradients. | Disabled | |
| Hide adapter tiles when there is only one port | When enabled (default), adapters that have only one input port or only one output port are shown without an enclosing tile. When disabled, tiles are always shown for adapters. | Enabled | |
| Show indicator for components that run in a separate thread |
When enabled (default), if a component has the Run this component in a parallel region option selected in its Properties view, the component is shown with a circle inside the bounds of the icon.
When disabled, the circle decoration is not shown, and there is no visual indicator of the component's separate thread state. |
Enabled | |
| Use slanted arcs during arc routing and auto-layout | When enabled (default), arcs placed by the Layout Application (Ctrl+L) and Reroute Arcs (Ctrl+Alt+L) functions are shown with an angled slant between components. When disabled, arcs are only placed horizontally or vertically, with right angles for every direction change. | Enabled | |
| Ignore label widths during auto-layout | When disabled (default), EventFlow modules are laid out during auto-layout or arc routing by taking the widths of the names of each component into account. When enabled, text widths are ignored. | Disabled | |
| Display additional label above components | Specifies the amount and type of information to display in blue lettering above certain components on the EventFlow canvas.
Specify one of the following:
|
Module Reference/Class Name | |
| Abbreviate module reference labels and class names | When enabled (default), labels shown above module references show an abbreviated package name that emphasizes the last name in the fully-qualified package name. When disabled, the fully qualified package name is shown. | Enabled | |
| Desired character length for abbreviations | Designates the width in number of characters for the abbreviated package name, when package name abbreviations are selected as in the row above. | 32 | |
| Theme | Selects the style of EventFlow Editor canvas icons. The options are:
|

Use the > panel to set the default names for clusters and nodes launched by Studio. These settings are saved as part of the current Studio workspace's metadata, and must be re-specified if you change workspaces.
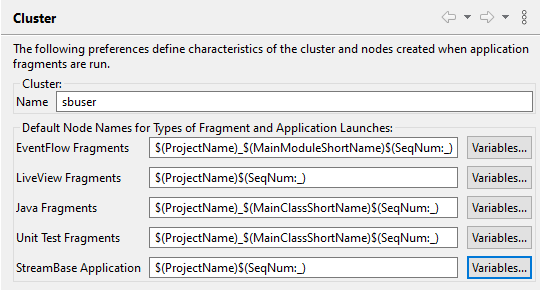 |
- Cluster name
-
Specifies the default cluster name used by Studio when launching fragments and applications in Studio. The cluster name is the second part of a node.cluster service name. The default value is the current user's system login name.
This selection does not affect applications run at the command prompt with the epadmin command, where the node.cluster name is specified as part of the command.
- Default Node Names
-
Specify the naming pattern for node names assigned by Studio when launching EventFlow, LiveView, and Java fragments into nodes; when launching a StreamBase Application in Studio; and when running a StreamBase Unit Test fragment. These settings only affect nodes launched in Studio, and not nodes launched on the command line. Node name assignments made in Studio are not saved as part of the fragment archive, and are not transitive into a StreamBase Application that incorporates these fragments.
The name patterns are composed of variables that represent information taken from the Studio project. Remember that you can install and start multiple nodes in Studio, including multiple instances of the same EventFlow or LiveView fragment. The default name patterns are designed to create a set of node names that are unique across the Studio workspace.
You can specify a simple string for your node naming pattern, or use any of the variables from the button to build a pattern from parts. The SeqNum token is required so that unique node names are guaranteed.
- EventFlow Fragments
-
The default node name is composed from the current EventFlow project's name, an underscore, the short name of the EventFlow module being launched (that is, not the fully qualified path name), and an automatically incremented sequence number.
- LiveView Fragments
-
The default node name for LiveView fragments is the LiveView project's name followed by an automatically incremented sequence number. (Remember that you install and run LiveView servers from the LiveView project as a whole, not from a single file in that project.)
- Java Fragments
-
The default node name for launches of Java fragments is the fragment's project name, an underscore, the unqualified primary class being run, and an automatically incremented sequence number.
- Unit Test Fragments
-
The default node name for launches of EventFlow Unit Test fragments is the project name, an underscore, the unqualified primary test class being run, and an automatically incremented sequence number.
- StreamBase Application
-
The default node name for launches of StreamBase Application archive files is the containing project name followed by an automatically incremented project number. This is the same naming pattern as for LiveView fragments, which are also installed and run from a StreamBase Application project as a whole. You can launch one StreamBase Application archive at a time per cluster.
Studio maintains a cache of compiled build artifacts when you run a module in Studio, and uses cached items when re-launching the same module. The cache is automatically maintained such that any portions of a fragment are rebuilt if the underlying EventFlow code changed, but unchanged portions are read from the cache.
You can control the location of the compiler cache and its persistence with three options:
- Use a temporary directory for each Studio session
-
This is the default setting. The cache is written to a directory created in the system temporary directory determined as described for the TMP environment variable.
- Use a workspace specific directory, and persist cache across sessions
-
The cache is written to a directory in the
.metadatafolder of your Studio workspace. - Persist cache at a specific directory
-
Use the button to navigate to your preferred location.
When you click , the full path to the selected cache directory is shown in the Current Location field.
Use the button to force all components to be rebuilt at the next launch.
You can specify the location of the compiler cache for use by the StreamBase Runtime by setting the streambase.codegen.cachedir system property.
Use the > panel to set initial state options for the Decision Table operator.
| Option | Description | Default |
|---|---|---|
| Show column alias if present | Displays aliases if present from an imported decision table or aliases manually entered in the Decision Table Editor. | Disabled |
| Automatically resize columns to fit content |
Resizes columns to fit content. |
Enabled |
| Automatically resize rows to fit content |
Resizes rows to fit content. |
Enabled |
| Automatically merge rows | Merges rows of similar content. | Disabled |
| Show expanded text | Displays full row syntax or expressions. | Disabled |
| Show domain descriptions if present | Displays domain descriptions if present. Currently not supported. | Disabled |
| Show column filter |
Displays filter when present. |
Enabled |
| Export column alias | Exports column aliases, for use by another Decision Table operator. | Disabled |
| Show condition area string | Displays condition area string when present. | Enabled |
| Rule ID Management | ||
| Use existing IDs when importing | Use existing rule IDs from imported decision table. | Enabled |
| Reuse highest deleted rule IDs | For this selection, if 5 (for example) is the last rule and it is deleted, the next rule added will have an ID of 5 (that is, the deleted ID is re-used). | Enabled |
| Always assign rule IDs based on their order in the editor | Renumbers each time a new rule is added, moved, or deleted. If a rule is inserted before rule 5, for example, then the inserted rule will be given an ID of 5, and the current rule 5 is renumbered to rule 6. | Disabled |
| Always maintain existing rule UIDs when inserting or reordering rules | Rules are never renumbered. | Enabled |
Use the >> panel to set initial state options for the Table Analyzer.
| Option | Description | Default |
|---|---|---|
| Highlight partial ranges | Highlights rows whose condition falls completely or partially within the specified condition range. | Disabled |
| Use Domain Model for Table Completeness |
The Table Analyzer takes into consideration the optional domain model when analyzing the decision table to report any uncovered domain entries. |
Disabled |
| Show Analyzer Contents while opening table |
Displays Table Analyzer contents when the decision table is open. However, you must click the button to invoke the analysis. |
Enabled |
Use the >> panel to set appearance options for the Decision Table Editor.
Use these default color sets or customize as needed.
- Alternate row colors in editor
-
Alternates decision table row colors. Enabled by default.
- Use color gradients in headers
-
Alters the decision table header color with a subtle light-to-dark change. Disabled by default.
- Built in Palettes
-
Select a color palette from the dropdown list. The number of colors displayed varies by palette. Select a field in the Colors group to view that field's color in the button. The default palette is Standard.
- Colors
-
Click to customize the palette selected above by field chosen in the Colors group.
- Font
-
Click to select the desired font for the column headers, condition data, or action data. A font menu appears based on category selected.
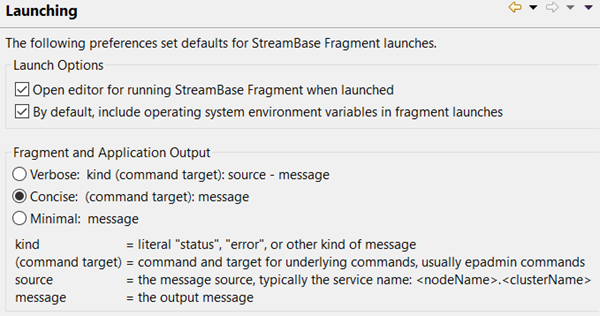
Use the > panel to set options for running StreamBase fragments and applications in Studio. Changes made in this panel do not affect any currently running fragments or applications.
 |
| Option | Description | Default |
|---|---|---|
| Launch Options | ||
| Open editor for running StreamBase Fragment when launched | When launched, the EventFlow Editor opens in the SB Test/Debug perspective for the EventFlow module selected to be run. | Enabled |
| By default, include operating system environment variables in fragment launches | By default, the system environment variables collected by Studio when Studio starts is included by Studio when installing
fragments into nodes. Clear this control to restrict fragment installations to the environment values defined in configuration.
This setting in Preferences is global for all projects. You can override this setting for individual fragment launches in the Environment tab of a fragment's Run Configuration dialog. NoteWhen working with the default setting, do not assume that the environment on your development machine will be the same at deployment time on another machine. |
Enabled |
| Fragment and Application Output | ||
| Fragment and Application Output | Configures the degree of information displayed in the Console view when fragments or applications are run. Options are:
|
Minimal |
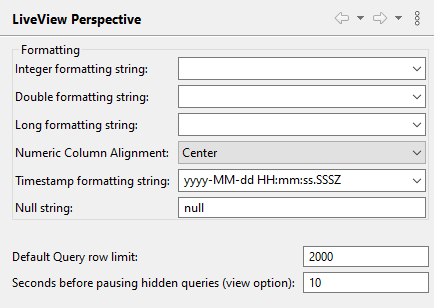
Use the > panel to set options for the LiveView perspective.
 |
| Option | Description | Default |
|---|---|---|
| Formatting | ||
| Integer formatting string |
When you specify formatting for numeric values, you can directly enter a format string that follows the Use this control to add human-facing formatting to incoming data fields, such as adding the appropriate currency symbol, commas, and two decimal places to an incoming double value to show it as a currency value. |
Not specified. |
| Double formatting string | Not specified. | |
| Long formatting string | Not specified. | |
| Numeric Column Alignment | Align numeric columns either left, right, or center. | Center |
| Timestamp formatting string | When you specify formatting for a timestamp field, you can directly enter a format string that follows the java.text.SimpleDateFormat standard. You can also use the field as a drop-down list that offers you timestamps selections, or select the link to view formatting examples.
|
yyyy-MM-dd HH:mm:ss:SSSZ |
| Null string | When a tuple arrives to a table, any fields that are not in the tuple, the table fills the values with nulls unless you specify otherwise, with this setting. | null |
| Default Query row Limit |
The row limit for query results allows a LiveView client to prevent the server from sending excessive data. The limit specifies the maximum number of rows that the server returns to the client. Without a row limit, an insufficiently restrictive query on a large table or a rapid-changing table might overwhelm the client with more data than it can process. Regard the row limit feature as a mechanism to protect clients from an extraordinary data load or from incorrectly defined queries. Because query results are not updated once the row limit is reached, It is a best practice that you do not run queries that consistently reach the row limit. (If a query does reach the row limit, you can use the menu option in Studio to see recent updates.) Set row limits low enough that client processing capacity is not exceeded, and define query predicates to be restrictive enough that the row limit is never or rarely reached. |
2000 |
| Seconds before pausing hidden queries (view options) | Increase or reduce this value as appropriate to pause n seconds after queries: When viewing a table in the LiveView perspective, there is an option (clicking on the arrow next to
the button) to pause the query automatically after n seconds.
|
10 |
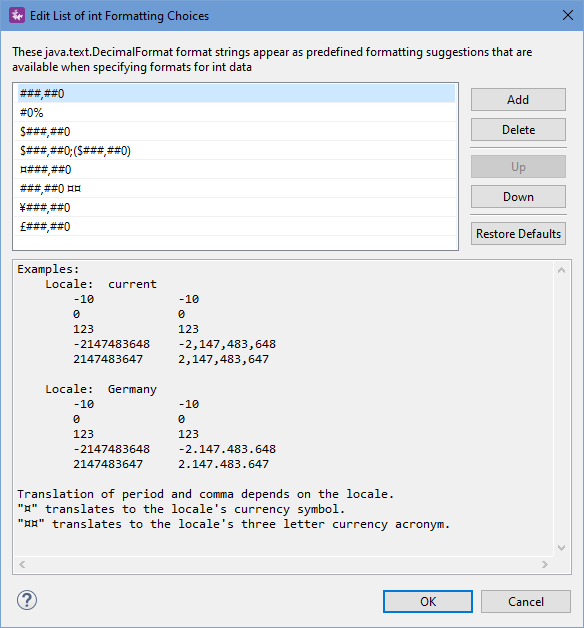
Select the Edit Recommendations link in any drop-down list of predefined format strings. This opens a dialog that lets you reorder the list to move your
favorites to the top, or to add your own entries. The Edit List of int Formatting Choices dialog shows a standard edit list of strings, with a large Examples section below. To duplicate an existing string as a starting point for a new format string, click to select a string, copy
it with Ctrl+C, then click Add, which opens an empty line in the edit list. Click in the empty line opened by the Add button, then paste your copied starting point string and click . Click to edit your newly added string.
The following image shows the Edit List of int Formatting Choices dialog for the list of numeric DecimalFormat strings:
 |
The next image shows the same dialog for the list of timestamp formatting choices:
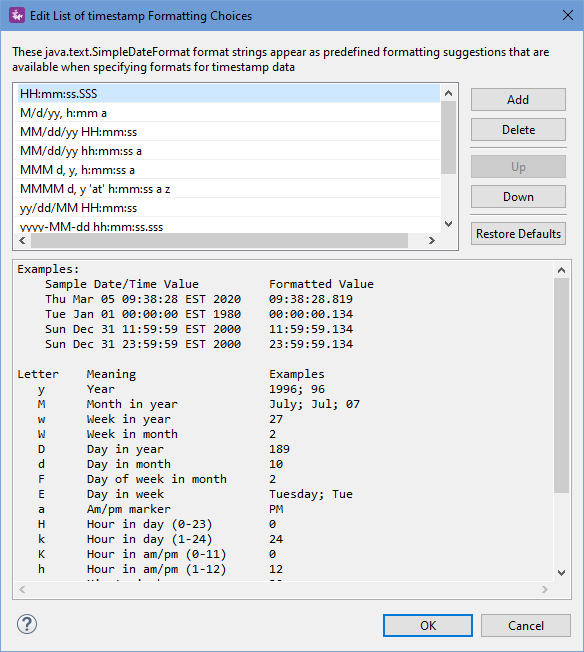 |
Use the > panel to set options for the SB Test/Debug perspective.
| Option | Description | Default |
|---|---|---|
| Input Streams/Output Views | ||
| Input View tuple buffer size |
When you run a fragment and enqueue data, the number of input tuples can become quite large. It can be helpful to limit the number of tuples in the Input Streams view's display buffer. When the limit is reached, newer tuples are kept in the view while older tuples are allowed to scroll off the view. The specified display buffer size applies to the total number of tuples in the Input Streams view, from the total of all input streams. |
400 tuples |
| Output View tuple buffers size |
Same as above, but for output tuples in the Output Streams view. The specified display buffer size applies to the display of each output stream, as well as when (All Output Streams) is selected. |
400 tuples |
| Output View highlight color | Specifies the color applied to matching rows in the Output Streams view when you have specified a filter in the Output Streams Filter dialog, and have specified the highlight selected option in the Results section of that dialog. | #FFFF00, a solid yellow |
| EventFlow Debugger | ||
| Default debug port | Specifies the port used by the EventFlow Debugger for Debug launches. | 8000 |
| Bring Variables view to front when a StreamBase breakpoint is hit | By default, the Variables view shares the lower-left quadrant of the SB Test/Debug perspective with the Output Streams, Input Streams, and Profiler views. When this option is selected, the Variables view is brought to the front when the EventFlow Debugger hits a breakpoint. You can also toggle the StreamBase button in the Variables view's toolbar to specify the same preference. |
Enabled |
| Field Value Formatting Options | ||
| Indicate nulls using | The null token is used in editors and views when a field contains no value. You can substitute any string to indicate nulls. |
"null" |
| Display blobs as | In the Input Streams and Output Streams views, and elsewhere in Studio, show the first few characters of blob fields as hexadecimal values or ASCII characters. | Hex |
| Maximum blob characters to display | Specifies the number of bytes of blob fields to display as character data in the Output Streams view. | 16 |
Use the > panel to enable or disable categories of typecheck warnings from appearing as decoration markers on the EventFlow Editor canvas, in the Project Explorer view, and as warning messages in the Properties view. You can set any typecheck warning category as Warning or Ignore. By default, all categories are set as Warning.
Use the button to return all typecheck warnings to their default enabled state.
The settings on this panel affect the Studio workspace as a whole. You can also specify typecheck warning preferences for Studio projects and for individual EventFlow modules:
-
To change typecheck warning settings for an individual EventFlow module, select the EventFlow Editor's Typecheck Options tab for that module.
-
To change warning settings for a project, right-click the project's name in the Project Explorer view and select Properties from the context menu. In the resulting dialog, select >.
In all three locations, the typecheck warnings have the meanings described in the table on the EventFlow Editor Typecheck Options Tab page. See Typecheck Warnings for an overview of where the warning text and warning icons appear.
The Typechecking panel in Preferences also has a checkbox for one Builder feature:
| Builder | ||
|---|---|---|
| Enable module signature change analysis during builds | Select this checkbox to have Studio store a hash of the signature for all modules and all intermediate stream schemas in the metadata of each module file. This allows Studio to build dependent modules only when the hash value changes, for a speedup when building large complex fragments. | Enabled |
Use the buttons on the Preferences page as follows:
-
Click to preserve your changes for the current page. If you set preferences on two pages, click on the first page before moving on to the next page.
-
Click to restore the state of a page's settings as installed.
-
Click to preserve changes for the current page and exit the Preferences dialog. Changes that require you to restart StreamBase Studio for the setting to take effect are noted in the tables above. Otherwise, changes take effect immediately, but do not affect any currently running fragments or applications.