Contents
The following terms are used in this document and in the Thomson Reuters RFA/Java Configuration Wizard.
- DACS
-
Data Access Control Systems.
- FID
-
Field Identifier, a unique number that identifies a field within a record in a data feed.
- RIC
-
Reuters Instrument Code, a ticker-like code used to uniquely identify financial instruments and indexes. RICs are used for looking up information on Reuters financial information networks.
- RFA/Java
-
Reuters Foundation API for Java.
- RTIC
-
Reuters TSA Information Cache, a Reuters data feed that combines features of the older TIBCO TIC and Reuters Triarch systems.
- RMDS
-
Reuters Market Data System, the former name of the TREP-RT system.
- TREP-RT
-
Thomson Reuters Enterprise Platform — Real Time.
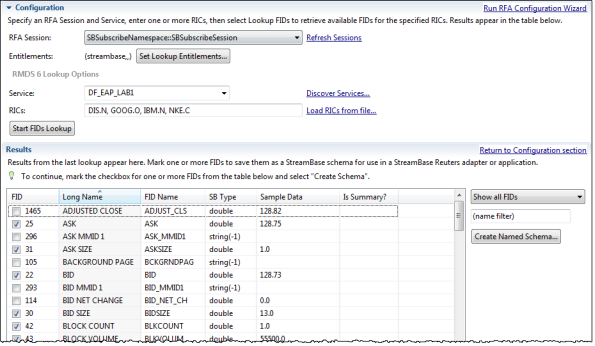
The goal of the Thomson Reuters Schema Designer view is to generate a StreamBase schema based on a selection of FIDs read directly from an TREP-RT data feed. The generated schema is saved as a named schema in the Definitions tab of a module or the Interface tab of a StreamBase interface.
The Schema Designer view supports RMDS 8+ infrastructures.
In the default installation, the Reuters Schema Designer view is open in the bottom center pane of the SB Authoring perspective. If you have closed the view, you can re-open it with >>.
Use the fields of the Reuters Schema Designer from top to bottom as described in this section.
Note
Seek the assistance of your site's TREP-RT network administrator to determine the information you need to fill in the fields in this view.
- Run RFA Configuration Wizard
-
The Run RFA Configuration Wizard link runs the Thomson Reuters RFA/Java Configuration Wizard, which configures and saves the global RFA/Java preference settings for this computer.
If your site has a policy that prevents changing the system's RFA/Java preference settings, then instead use >> to generate an RFA/Java configuration file. When your configuration file is ready, re-run the Run RFA Configuration Wizard link, and select Configure from existing file on the wizard's second page.
- RFA Session
-
From the RFA Session drop-down list, select the RFA session you want to connect to.
Studio reads the available RFA sessions from the TREP-RT infrastructure and populates this drop-down list automatically. If the RFA Session field is populated, it means the computer running Studio has already had its RFA/Java preferences configured at least once.
If the RFA Session drop-down list is empty, or if the entries it contains are obsolete or inappropriate, use the Run RFA Configuration Wizard link in the upper right corner of the view to configure this computer to access TREP-RT data. This will populate the RFA Session field.
- Refresh Sessions
-
Click the Refresh Sessions link to pull an updated list of RFA sessions from your TREP-RT infrastructure.
- Entitlements
-
If your site uses DACS Entitlements to authorize access to your TREP-RT infrastructure, you must specify your entitlements name and password before a connection can proceed.
Click the Set Lookup Entitlements button, and enter the requested information in the Entitlements Information dialog. If you are not sure what to enter, consult with the TREP-RT administrator for your site. When you click the Finish button in the dialog, the entitlement information you entered is summarized in the Entitlements section of the view.
- Lookup Options
-
The information in these fields is required to use the Discover Services feature, because the RMDS configuration does not store this information.
- Message Model
-
Select the RMDS message model from the dropdown list. The options are:
Market Price,Market by Order,Market by Price, andMarket Maker. - Dictionary
-
Use the Set Dictionary Options button to open the Set RMDS Data Dictionary Lookup Options dialog. The options are described in Data Dictionary Options.
- Service
-
Type the name of the TREP-RT service you want to connect to. The name is case-sensitive and must be an exact match for an TREP-RT service on your network. Use the dropdown list to re-enter service names you have entered previously in this field.
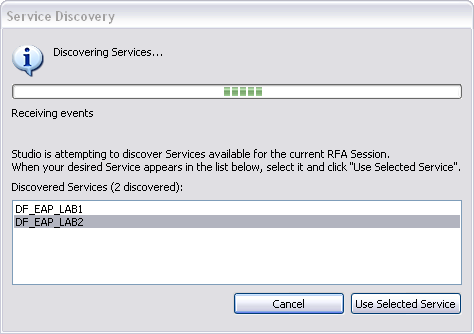
- Discover Services
-
Use the Discover Services link to identify TREP-RT service names on your site's TREP-RT infrastructure. The Service Discovery dialog attempts to discover services based on the current RFA Session setting. Select a service name from the Discovered Services list and click Use Selected Service.
Note
If your site uses DACS Entitlements, you must use the Set Lookup Entitlements button described above before using the Discover Services link.
- RICs
-
Enter one or more RICs, separated by commas. For example, enter:
GOOG.O,IBM.N,MSFT.ARC. - Load RICs from file
-
You can also populate this field from a text file containing a list of RICs, one RIC per line. Click the Load RICs from file link and navigate to the file system location of your RICs file.
- Start FIDs Lookup button
-
When the fields above are filled in, click the Start FIDs Lookup button. Studio connects to your site's TREP-RT server and retrieves a list of all FIDs for the specified list of RICs.
If the Performing Reuters FIDs lookup dialog runs for a while with no advancement in the number of RICs found, click the Cancel button. For example, if the number below the progress bar stays at 8/10 or 2/3 without showing progress, then cancel the operation. In this case, the Results table is populated with the FIDs from the successfully found RICs. The status line above the Results table shows the number of RIC lookups that failed. Click this link, then click Details to see a list of the RICs that failed.
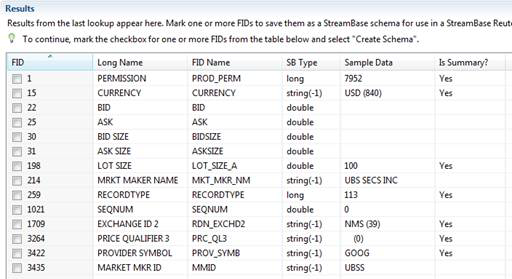
- Results Grid
-
When the Start FIDs Lookup action succeeds, the results are shown in the Results grid.
If any field has a fractional price the system will automatically generate a double field and a string field for that FID. An example of this would be the BID field having a price of "34 2/32", in the result grid you will see two fields for FID 22. The first will have a FID Name of "BID" with a SB Type of double and Sample Data "34.0625". The second will have a FID Name of "BID_as_string" with a SB Type of string(-1) and Sample Data "34 2/32". The subscription adapter will automatically parse fields from the Reuters feed into fields with "_as_string" as the end of the name and a type of string.
By default, the grid shows all FIDs in all requested RICs. Use the upper drop-down list control on the right of the Results grid to specify Show FIDs present in all RICs. This option displays the intersection of FIDs from the specified list of RICs.
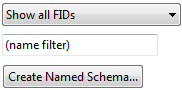
Select the check box for each FID you want to be in the generated StreamBase schema. To help you locate the FIDs of interest in a long Results table, use the following features:
-
Enter text in the search filter above the Create Schema button. (This field shows
(name filter)by default.) This restricts the table to rows with matching text in the Long Name or FID Name columns. The search field is not case sensitive. To redisplay the entire Results table, click the Clear button on the field's right, or erase the text you entered. -
The table is sorted by default by the Long Name column, in ascending alphabetical order. You can sort the table by any column by clicking a column header. Click again to sort in the reverse direction.
-
You can rearrange the column order. For example, click and hold the header of the FID Name column, and drag it horizontally to the left. Drop the column when it is over the Long Name column. This reorders the first three columns in the order: FID, FID Name, Long Name.
-
If you are generating a schema for summary fields only, click the In Summary column header to sort the list. This groups together all fields with summary=yes.
-
- Create Named Schema button
-
When you have selected the FIDs of interest, click the Create Named Schema button. This opens the Edit Named Schema dialog, which prompts for a name for this schema. The default name
FIDsis entered for you.Select Existing and use the button to select a module or interface file in the Studio workspace. This adds the new schema to the Definitions tab of the selected EventFlow module, or to the Interface tab of the selected StreamBase interface.
Select New to save the schema to a new interface or module file. Click the button and select a project directory. The suggested file name
SharedSchemas.sbintis entered for you. Click to create the new schema in an interface file with that name, or specify a different file name. If you change the file name's extension to.sbapp, Studio creates an EventFlow module instead of an interface file. If you specify any extension other than.sbintor.sbapp, Studio changes it to.sbint. If you specify the name of an existing file, Studio prompts for permission to overwrite and replace that file.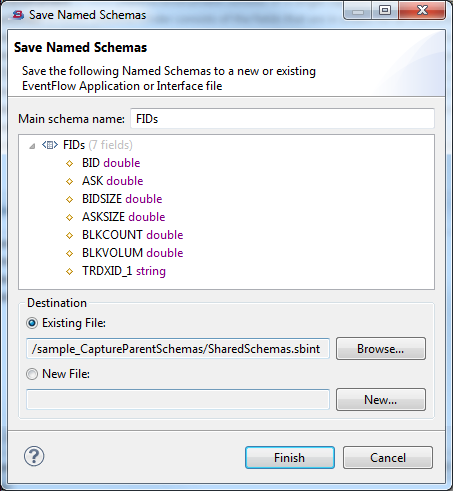
To display a context-sensitive Help view that provides a brief description of the view and links to further information, click any control in of the wizard page and press F1 on Windows, or Ctrl+F1 on Linux.
If your site uses a Reuters TSA Information Cache (RTIC) server, consider the following information before connecting to RTIC servers from StreamBase Studio.
A limitation in third-party communication libraries prevents StreamBase Studio from connecting to RTIC servers interactively from within Studio.
This limitation affects:
-
The Start FIDs Lookup button in the Thomson Reuters Schema Designer view is dimmed when the specified server is an RTIC server.
-
The Test Connection button on the Test Connectivity page of the RFA/Java Configuration Wizard is dimmed.
This limitation does not affect:
-
Using the file version of the RFA/Java Configuration Wizard (>>) to generate a valid RFA/Java configuration file. That is, you can still create a valid configuration file for connecting to RTIC servers, which you can use with Thomson Reuters adapters.
Thus, you can still develop StreamBase modules that work in conjunction with StreamBase Reuters Adapters to process streams from an RTIC server. Only the interactive aspects of Studio are affected by this limitation.