This topic explains how to use the Decision Table Editor, which you use to edit
decision table files that have the .sbdt extension. The
Decision Table Editor can only open, edit, and save decision tables of this type.
Use the Decision Table Editor to create and edit decision tables for your EventFlow application. The Editor is opened in two ways:
-
By double-clicking an existing decision table file with
.sbdtextension in the Package Explorer view. -
By specifying the
.sbdtfile type when creating new, empty decision table as described in the next section.
|
To create an .sbdt decision table, use the following
steps:
-
Start from the Decision Table Settings tab of a Decision Table operator's Properties view.
-
Leave the file name field empty, and click the Decision Table File link. Studio then opens the New StreamBase Decision Table wizard to help you create a new file. Select the project name, enter the name for your decision table file, and select the type of file:
-
On Windows or on a Mac, you can select the
.sbdtfile type. In this case, clicking opens the Decision Table Editor in Studio that allows you to create a decision table, row by row, then save it to the file name you specified. -
On Windows only, you can select the
.xlsxfile type. The use and editing of this file type is described on other pages.
-
-
As an alternative to the above steps, you can invoke FileNewStreamBase Decision Table from Studoi's top-level menu.
-
From either starting point, the New StreamBase Decision Table dialog appears. Enter a file name and select the
.sbdtDecision Table Format. -
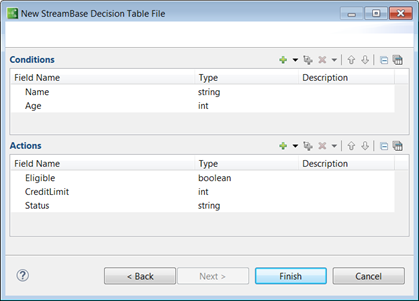
Click . Configure the Conditions and Action Schema properties with the names and types of your decision table's condition and action fields. Notice that you can only configure standard condition and action columns in this dialog. To add custom condition and action columns, continue creating the table, then add those in the Decision Table Editor.
-
Click , which opens the Decision Table Editor, showing a blank decision table. If you specified condition and action columns in page two of the wizard, then those column names and data types appear, but no rules yet exist.
-
From the Decision Table Editor, click the button to add rows, one row for each rule. Enter data as needed into the Condition and Action columns.
-
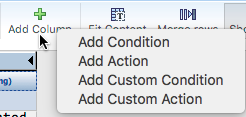
Click to include additional (standard) actions or conditions, or custom conditions or actions. The difference between standard and custom condition and action columns is described in Conditions and Actions in Decision Tables.
-
Enter an optional decision table version number. This is useful for auditing purposes, especially if you modify your business rules on a regular basis.
-
Enter an optional Effective Date. This opens the Date and Time Picker that allows you to select a date and time from a calendar interface.
-
Enter an optional Expiry Date.
In addition to using the Date and Time Picker dialog, both date fields support the following formats entered directly:
-
yyyy-MM-dd HH:mm:ss.SSSZ
-
yyyy-MM-dd HH:mm:ss (time zone is set to local time zone)
-
yyyy-MM-dd HH:mm (seconds is set to 00, and timezone is set to local time zone)
-
yyyy-MM-dd (hours/minutes/seconds are all set to 00, and timezone is set to local time zone)
-
-
Select the table priority from the drop-down list {1 highest, 10 lowest. Default: 5}.
-
Decide whether to select the check box that specifies single row rule execution mode. When enabled, the first rule runs that matches the input causes the operator to emit its output tuple. When disabled, all rules are run against each input tuple.
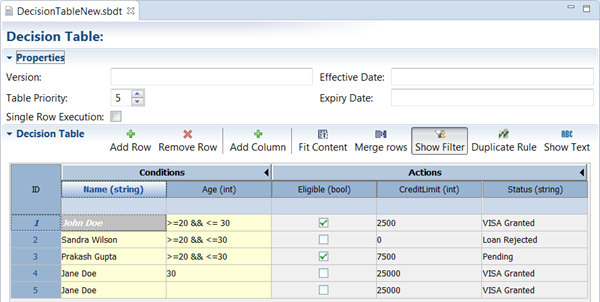
The following example shows five rules populated:
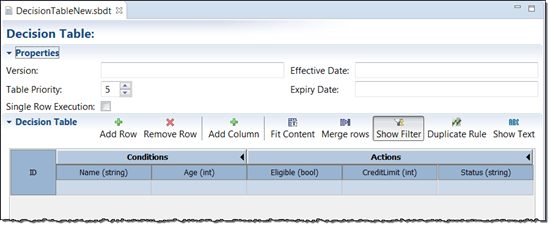
The Decision Table Editor has the following buttons:
| Button | Description | |
|---|---|---|
| Add | Adds rows, incrementing rule IDs per row. | |
| Remove | Removes rows. Deleted corresponding rule IDs do not reset numbering for next added row. | |
| Add Column |
Adds a new Action or Condition column. Choose:
|
|
| Fit Content | Fits all columns to cell contents. | |
| Merge Rows | Merge rows with the same conditions into a single row data. Actions for the first row are used for the merged row. The Merge Rows button acts as a toggle: to toggle between merged and unmerged rows, click the Merge Rows button again. | |
| Show Filter |
Click to display a row above the
first rule. You can filter on multiple columns. For example, you might
enter text in the filter row to filter column A to show only rows with one
value for A (John Doe in the name column, for
example), and another column B (25 in the age
column) to show only rows with one value for B.
|
|
| Duplicate Rule | This adds a new row with the same conditions and actions, but with a different ID. You can then edit the row as needed. | |
| Show Text | Displays full syntax for each cell. |
From your Decision Table project folder, double-click an .sbdt file to invoke the Decision Table Editor. Right-click the
following objects in the decision table to change their properties:
| Object | Option |
|---|---|
| row |
Enable or disable the rule in that row. |
| cell |
|
| column title cell |
Remove column Move:
Field Settings (see the next section)
Auto resize column |
| non-title cell |
Add comment Disable Auto resize column |
Use the Field Settings Dialog to edit features of your condition and action columns. Right-click a column to:
-
Specify the column name. For non-custom columns, the name must match the name of a field in the incoming tuple. For custom columns, the name can be any string not yet used in this decision table.
-
Set the column type. For standard non-custom columns, you can select from a drop-down list that includes: bool, double, int, list, long, string, timestamp, tuple. For custom columns, the type is restricted to a StreamBase expression.
Domain models restrict the set of values that can be placed in a condition or action cell. By default, a cell has no restrictions. The StreamBase Decision Table operator can optionally uses a JSON-formatted file to define one or more domain models. The Decision Table operator's Domain Model File property points to a domain model file, if available. Below is an example of an domain model file containing three arrays:
[
 {
 'name': 'Names',
 'field': 'Name',
 'isConditionField': 'true',
 'isActionField': 'false',
 'isMultiSelect': 'false',
 'values': ['Jim', 'Frank', 'Steve']
 },
 {
 'name': 'Ages',
 'field': 'Age',
 'isConditionField': 'true',
 'isActionField': 'false',
 'isMultiSelect': 'false',
 'values': ['5', '10', '> 15 && < 20']
 },
 {
 'name': 'Statuses',
 'field': 'Status',
 'isConditionField': 'false',
 'isActionField': 'true',
 'isMultiSelect': 'false',
 'values': ['Good', 'Bad', 'Indifferent']
 }
]
The JSON file consists of an array of elements that specifies the name of the domain model, the name of the condition and/or action fields to which it applies, whether a condition field is multi-select (the Excel Add-in does not use a drop-down to select values for multi-select fields), and the actual values available for the particular field.
-
From StreamBase Studio, select the
JSONfile to load when the Decision Table operator starts and run the EventFlow Table application. -
Launch the Excel Add-in and open the
.xlsxdecision table that the running EventFlow application is using.Note
Only
.xlsxdecision tables currently supported domain models. -
From the Excel Add-in, download the
JSONfile into your decision table and make changes as needed. -
From the Excel Add-in, upload the decision table to the StreamBase server in-memory.
-
From StreamBase Studio, test your changes by entering data into the InputStream.
Domain model files are used at authoring time to provide down-downs for fields governed by domain models; they don't affect the Decision Table operator's run time behavior.