Specifying Data Target Options
After the data targets have been added to the flow, there are two types of options that govern the behavior of the data flow when copying data into the targets.
- Data flow properties, which are set for the entire flow and, therefore, affect every data target. For convenience these options are displayed with each target. They are marked with an asterisk in the Target Properties dialog to indicate that they are set at the flow level.
- Target-specific properties, which can be set on individual target objects.
Data flow properties include:
- Load type, which specifies the method ibi Data Migrator uses to load the data. The options for load types depend on the target database type and may include: Insert/Update, Insert records from memory, Change Data Capture processing, Slowly Changing Dimension, Bulk load utility via disk file, and Extended Bulk Load Utility. If you are moving data to more than one data target, they will all use the same Load type. It will be displayed on all target objects and, if changed in one target, the change will be reflected in all the target objects. However, if you choose Insert/Update for the Load type, targets can have different settings for If the record exists/does not exist.
- Record logging, which allows you to create log files based on specific criteria. Each logging option can write information to a separate fixed format file. For example, if you choose Duplicate Rejection as a Record Logging option, a fixed format file called procedurename_dupl.ftm is created where duplicate records that are rejected will be recorded. You can use the log file as an input for other processes. For details, see Set the Data Flow Record Logging Options.
- Commit,
which specifies the number of rows to process before issuing a commit
to a relational database target, or CHECK to a FOCUS or XFOCUS target.
This option does not apply to file targets.
A commit value of 0 indicates that a commit is only issued when the data flow completes.
Note: A commit value of NONE can be used to indicate that ibi Data Migrator should not issue any commit. This may be useful in cases where two or more flows should complete successfully before any data is committed to the target tables. A commit (or rollback) are issued in a stored procedure after the data flows are complete. This option should be used with caution because if no commit or rollback is issued, the target table can become locked. - Blocksize, which is the number of rows for loading in a block. This option only appears when Insert records from memory are selected.
Target-specific properties include:
- General Properties, such as:
- Display Name. The name that appears on the data flow under the target icon. By default, the synonym name and location (optionally) appear.
- Notes. User entered notes. These notes only appear in the properties panel and now the data flow itself. To make the notes visible in the data flow, select the Show NotesEnable Notes on the Canvas option in the Data Flow Designer Options dialog. You can add notes, as needed, to any flow object (join, select, source, target, and so on). You can easily edit and manage notes within the text box.
- Prior to Load Options, which can be set for existing targets to clear the target before the flow runs. The available options will depend on the type of data target.
- If the record exists/does not exist options, which specify behavior for Insert/Update.
Target Load Options
Load options specify the way ibi Data Migrator loads data into the targets. If you are moving data to more than one target, they will all use the same load type. The load type is displayed on all target objects and, if changed in one target, the change will be reflected in all the target objects.
They can include:
- Insert/Update. Allows you to
set a behavior when loading records.
If you select this option, you can set a behavior to apply when duplicate records are found. Select an option from the If the record exists dropdown menu. Insert/Update options can be set on a per target basis.
If the record exists:
- Include the record. Allows the relational database target to handle duplicates.
- Reject the record. Issues a SELECT command against the target table to see if a record exists with the key values. If there are no key columns, ibi Data Migrator screens all columns. If the record is found, the record is rejected.
- Update the existing record. Updates records if the key value on the input record, or the entire record if there are no keys, are found in the table. All non-key values are updated in the target.
- Delete the existing record. Deletes the record if the key on the input record, or the entire record if no keys are founded in the table.
If the record does not exist:
- Include the record. Includes the key in the data target.
- Reject the record. Does
not include the key in the data target. This option is only available
if Update or Delete the existing
record was selected.
Note: When loading relational data targets, the Reject, Update, and Delete options can adversely affect performance, because they determine the existence of a key value on an incoming record before performing the specified action. This is done by issuing a SELECT command against the target table, and then waiting for the response. If one of these actions is required, try to limit the volume of records in the incremental change. These actions will perform best if there are unique keys on the table.
If you select Update the existing record or Delete the existing record from the If the record exists dropdown menu, you can also set behavior when the record does not exist using the If the record does not exist dropdown menu:
- Commit every row(s). Specifies
the row interval to commit or write transactions to the database.
When a new Flow uses the Optimized Load option:
The Commit every row(s) parameter is not available in the Target Properties.
For Load Type Slowly Changing Dimensions, the commit is issued when the job is completed.
For Load Type Bulk Load, the commit is issued according to the adapter settings BULKLOAD and BULKCHECK.
- Insert records from memory. Speeds
the loading of the data target by inserting a block of rows at once.
You can set the row interval to commit or write transactions, and
the number of records to load in a block.
Note: This option is only available for Db2/UDB CLI, MySQL, MS SQL Server, Oracle, Informix, Sybase ASE, and Teradata 13. For other databases, the number of records in a block will default to 1 and cannot be changed. For details about loading relational targets, see Set Options for Relational Targets, and Target Properties Pane for Relational Targets.
Insert records from memory:
- Loads much faster, since a block of rows are inserted at once.
- Requires input data to be clean. If any one row in the block causes a data source constraint violation, such as not null or unique index, the entire block is rejected for an MS SQL Server target. For other targets, it depends on the database.
- Does not provide row counts (the number of records inserted or rejected) in the detail log or statistics.
- Does not provide record logging (used to write rejected records to a fixed format file for review).
- Bulk load utility via a disk file. Uses
database bulk loaders instead of ibi Data Migrator to insert data into a target.
ibi Data Migrator automates bulk loading for Greenplum,
Hyperstage, Ingres, Informix, Microsoft SQL Server, IBM Db2, MySQL,
Teradata, Nucleus, Oracle, Sybase Adaptive Server Enterprise, and
Sybase Adaptive Server IQ. You can set format version, maximum number
of errors, first and last row to copy, packet size, and row interval
to commit or write transactions.
The options available will depend on the RDBMS of your target type.
Note that rows rejected by a DBMS vendor bulk load program are not counted as errors. Users of the bulk loader should look into the vendor-specific documentation on how to handle the error handling of the bulk loader program.
Note:- To use a database vendor bulk load program, such as bcp from MS SQL Server or Sybase, sqlload from Oracle, or mysql from MySQL, that program must be installed on the system where the Server is running and in the PATH.
- Does not provide row counts (the number of records inserted or rejected) in the detail log or statistics.
- Extended Bulk Load Utility. Uses
a database loader program with additional capabilities. Currently
available for Apache Hive, Cloudera Impala, Google BigQuery, EXASol, Greenplum, Hyperstage, Informix, Jethro, MongoDB, MS SQL Server ODBC, MySQL, Netezza, Oracle, PostgreSQL, Sybase ASE, Sybase IQ, Teradata, and 1010data.
The options available will depend on the RDBMS of your target type. For more information on the options available for each adapter, see Informix Extended Bulk Load Options.
Note: Does not provide row counts (the number of records inserted or rejected) in the detail log or statistics. - Change Data Capture Processing. Enables you to load a data target with only the records that have changed. This feature is an optional, add-on component to ibi Data Migrator available for selected relational databases.
- Slowly Changing Dimensions. Enables you to load a data target with column values that change over time. There are two column types. Type I simply overwrites the value. Type II allows you to track activity before and after the change. Type II changes are handled either using an activation flag or end date/begin date. When you update a Type II column, you do not actually change its value. Instead, you update the activation flag to inactive, or the end date to the current date. You then add a new record with the new value and the activation flag on by default or the begin date set.
- Change Data Capture/Slowly Changing Dimensions. A combination of the previous two load types. The Insert/Update/Delete indications in the CDC logs are not applied directly to the target. Instead, the SCD Types of the target are used.
- Allow Direct Load to Parquet File. Creates a file in the Hadoop Distributed File System (HDFS) in Parquet format, without first creating an intermediate text file. This option is available when using the Adapters for Hive and Impala.
Partitioning Performance Enhancement
A Partitioning option has been added to the Target Load Options properties for a regular data flow, direct load flow, and DBMS flow. This feature enables you to partition with automated bin detection, for better performance in the data flow. The Partitioning option is available only for optimized flows.
Possible values for the Partitioning option are No and Auto. No is the default value. If Partitioning is set to Auto, the input data is partitioned using the first numeric key (or the first numeric indexed field or first numeric field) in one of the input data sources.
All bins contain approximately an equal number of rows. The original request is split into multiple requests, each loading data only for the particular bin. The generated requests are run in parallel, which makes the request more efficient and faster.
Using the Partitioning Option
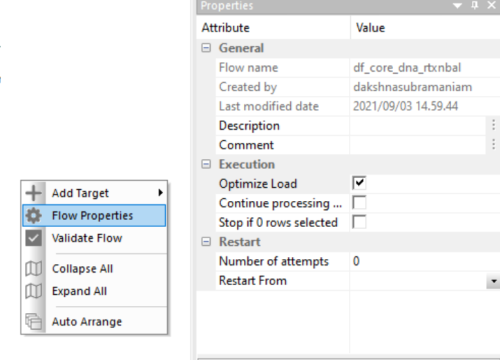
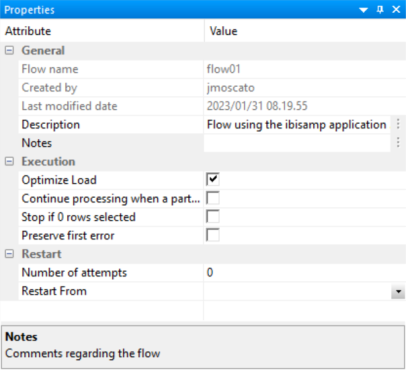
To take advantage of the new functionality, set Optimized Load to Yes for the Flow Property, as shown in the following image.
Setting the Partitioning Option
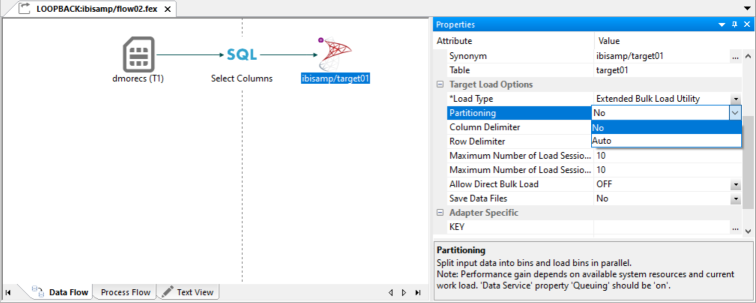
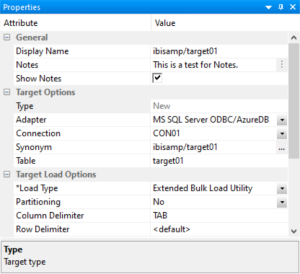
The following image shows the Partitioning option, set to No, for an Extended Bulk Load Utility load type.
Usage Notes for the Partitioning Option
For a regular data flow, the Partitioning option is available for the target only if the following conditions are met:
- Optimized flow only
- Single SQL target (new or existing)
- Only JOINS are supported
- No VALIDATEs
- No PIVOT
- No Distinct
- No Sort/Order By
- No 'Rows to retrieve'
- No GROUP BY/HAVING/aggregation
- No Slowly Changing Dimensions
- No Change Data Capture
For a direct load flow, the Partitioning option is available for the target only if the following conditions are met:
- Optimized flow only
- Only SQL targets
For a DBMS flow, the Partitioning option is available for the target only if the following conditions are met:
- Optimized flow only
- Only SQL targets (new or existing)
- No VALIDATEs
- No Slowly Changing Dimensions
- No Change Data Capture
Extended Bulk Load Utility Options
This option uses a database loader program with additional capabilities and is currently available for specific adapters. When extended bulk load is used for large data volumes, faster throughput is achieved by creating multiple load sessions (or threads). It reads from the source in parallel, a block at a time, where the block size is set by the Commit every rows parameter. It also creates multiple sessions for loading if the database load utility supports that functionality, up to the number specified in Maximum number of load sessions parameter.
- The options available will depend on the RDBMS of your target type.
- When ibi Data Migrator creates a new synonym, it generates the columns in the metadata (Master File), in the same order as in the underlying table in the database. You should not manually change the order of the columns in the Master File.
To use a synonym on a flow as a target with load type Extended Bulk Load Utility Options, ensure that the columns in the synonym are in the same order as they are in the underlying table. When the order of the columns in the Master file differs from the order of the columns in the table in the database, you should recreate the synonym or refresh it.
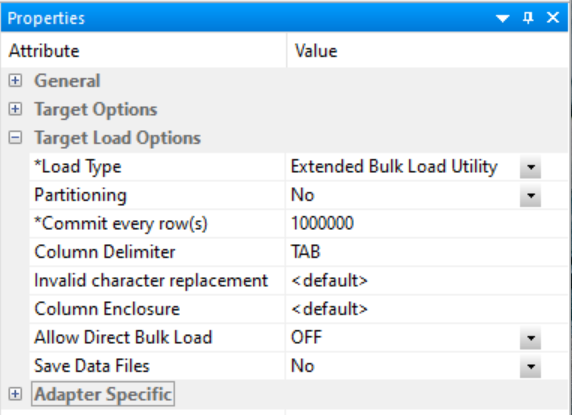
An example of the Extended Bulk Load Utility options for MS SQL Server can be seen in the following image.

The following option is available for every adapter that has an Extended Bulk Load Utility load type.
Number of rows in a block. Use at least the default value of 1,000,000.
The following parameters depend on the database:
The maximum number of the concurrent load sessions logged on to the database. This parameter is applicable when the BULKLOAD parameter is set to ON. Its setting can be defined on the flow level and also on the Adapter level. The level setting of the adapter applies to the designs of the new Data Flows. The value set on a flow level takes precedence during the execution.
The default value is set to 10. However, the user should set the value carefully and consider current environment factors, such as the number of CPU cores, available memory, the parameters on the data access agents on a server, network capabilities, and the number of users running the requests.
The maximum number of restart attempts after recoverable load session error. The default value is set to 10.
The above three options are the only Extended Bulk Load options available for the following adapters:
- EXASol
- Hyperstage
- MySQL
- MariaDB
- Netezza
- Oracle
- The Extended Bulk Load Utility option must not be used on a target synonym that is for an Oracle table containing a Sequence. This is due to the rejection of triggers by the Oracle API used in the Extended Bulk Load Utility.
- The "Bulk thread postponed: too many connections" information message means that the maximum amount of loading threads was already started, so the new available intermediate load file will be queued and started when one of the loading threads become available. This situation occurs when either the Maximum number of Sessions value is too low or Commit value is too low.
The following sections describe the additional options that are available for each adapter.
Apache Hive, Cloudera Impala, and Salesforce.com Extended Bulk Load Options
Apache Hive, Cloudera Impala, and Salesforce.com targets only have the default Extended Bulk Load Utility option, as shown in the following image.

However, it is possible to use ibi Data Migrator to load data into Hadoop, even when the servers are not co-located. In this case, the Server will create a temporary file and use FTP to copy it to the Hadoop node. This requires that an FTP server is available on the Hadoop cluster, and in addition for use with Impala REXEC daemon.
Configuring an Auxiliary Connection for Extended Bulk Load
Using Extended Bulk Load with several adapters requires that intermediate data files are transferred to the server where the database is running or a data node of a Hadoop cluster. These adapters include:
- Apache Hive
- Apache Drill
- Cloudera Impala
- EXASol
- Jethro
- MongoDB
- 1010Data
For these adapters, you must configure Bulk Load to stage using FTP. From the ibi Data Migrator desktop interface or WebFOCUS Reporting Server browser interface, perform the following steps:
- Expand the Adapters folder.
- Expand the Server Data Sources folder.
- Right-click the adapter connection and click Configure Bulk Load.
The Configure Bulk Load dialog opens.
- From the Protocol dropdown menu, select FTP or SFTP.
- In the Host Name box, type the name of the host for your server.Note: For Hive and Drill this must be a data node of your Hadoop cluster. For Impala, it must be a Data node or an Edge node. For Jethro, it must be the system where the Jethro server is running. For EXASol it should not be the system where it is running, rather it should be some other system that it can access using FTP.
- In the Initial Directory box, type the name of a directory that you have write access to, such as your home directory.
- In the User and Password boxes, type your user ID and password.
- Click Test.
The following message should appear: User has read access to the FTP server.
- Click OK to close the dialog.
- If successful, click Configure.
- Click Close.
Amazon Redshift Extended Bulk Load Options
Amazon Redshift targets have a few additional options, as shown in the following image.
Specifies delimiter characters between fields in the intermediate fixed format file that is loaded into the database. The delimiter can be up to four characters and can be defined as given in the following list:
- TAB. A tab character. This value is the default.
- a - A. A character string. For example, ~
- 0xnn. A hex code. For example, 0x44 (a comma) or 0x0D0A (a return and a linefeed). The hex code uses ASCII for Windows or UNIX systems and EBCDIC for IBM mainframes.
Specifies the ASCII character that is used to replace invalid UTF-8 characters.
Characters are used to enclose each alphanumeric value in the intermediate fixed format file that is loaded into the database. The enclosure consists of up to four printable characters. The most common enclosure is a double quotation mark ("). Numeric digits, symbols used in numbers, such as a period (.), plus sign (+), or minus sign (-), and 0x09 (horizontal tab), 0x0A (line feed), or 0x0D (carriage return) cannot be used in the enclosure sequence. To use a single quotation mark (') as the enclosure character, you must enter four consecutive single quotation marks ('''').
Greenplum Extended Bulk Load Options
Greenplum targets have the following additional options, as shown in the following image.

Specifies delimiter characters between fields in the intermediate fixed format file that is loaded into the database. The delimiter can be up to four characters and can be defined as given in the following list:
- TAB. A tab character. This value is the default.
- a - A. A character string. For example, ~.
- 0xnn. A hex code. For example, 0x44 (a comma), or 0x0D0A (a return and a linefeed). The hex code uses ASCII for Windows or UNIX systems and EBCDIC for IBM mainframes.
Specifies the single character that is used for escape sequences, such as ,, or @;. Also used for escaping data characters that might otherwise be interpreted as row or column delimiters.
Characters are used to enclose each alphanumeric value in the intermediate fixed format file that is loaded into the database. The enclosure consists of up to four printable characters. The most common enclosure is one double quotation mark ("). Numeric digits, symbols used in numbers, such as a period (.), plus sign (+), or minus sign (-), and 0x09 (Horizontal Tab), 0x0A (Line Feed), or 0x0D (Carriage return) cannot be used in the enclosure sequence. In order to specify a single quotation mark (') as the enclosure character, you must enter four consecutive single quotation marks ('''').
These options are only available when BULKLOAD=ON and apply to all new flows using Greenplum as the target.
Informix Extended Bulk Load Options
Informix targets have the following additional options, as shown in the following image.

Specifies delimiter characters between fields in the intermediate fixed format file that is loaded into the database. The delimiter can be up to four characters and can be defined as given in the following list:
- TAB. A tab character. This value is the default.
- a - A. A character string. For example, ~.
- 0x nn. A hex code. For example, 0x44 (a comma), or 0x0D0A (a return and a linefeed). The hex code uses ASCII for Windows or UNIX systems and EBCDIC for IBM Mainframes.
Jethro Extended Bulk Load Options
Jethro targets have the following additional options, as shown in the following image.

Delimiter characters between fields in the intermediate fixed format file that is loaded into the database. The delimiter can be up to four characters and can be specified as the following:
- TAB. A tab character. This value is the default.
- a - A. A character string. For example, ~.
- 0xnn. A hex code. For example, 0x44 (a comma), or 0x0D0A (a return and a linefeed). The hex code uses ASCII for Windows or UNIX systems and EBCDIC for IBM Mainframes.
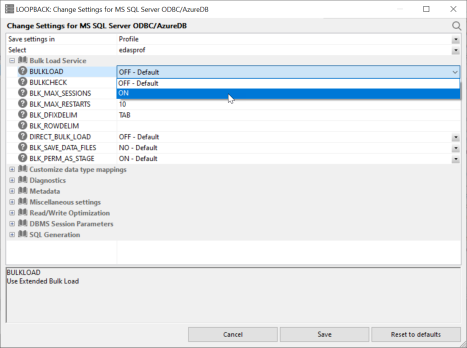
MS SQL Server ODBC Extended Bulk Load Options
MS SQL Server ODBC targets have the following additional options, as shown in the following image.

The packet size in bytes.
PostgreSQL Extended Bulk Load Options
PostgreSQL targets have the following additional options, as shown in the following image.
Specifies delimiter characters between fields in the intermediate fixed format file that is loaded into the database. The delimiter can be up to four characters and can be defined as given in the following list:
- TAB. A tab character. This value is the default.
- a - A. A character string. For example, ~.
- 0x nn. A hex code. For example, 0x44 (a comma), or 0x0D0A (a return and a linefeed). The hex code uses ASCII for Windows or UNIX systems and EBCDIC for IBM Mainframes.
Specifies the single character that is used for escape sequences, such as ,, or @;. Also used for escaping data characters that might otherwise be interpreted as row or column delimiters.
Characters used to enclose each alphanumeric value in the intermediate fixed format file that is loaded into the database. The enclosure consists of up to four printable characters. The most common enclosure is one double quotation mark ("). Numeric digits; symbols used in numbers, such as a period (.), plus sign (+), or minus sign (-); and 0x09 (Horizontal Tab), 0x0A (Line Feed), or 0x0D (Carriage return) cannot be used in the enclosure sequence. In order to specify a single quotation mark (') as the enclosure character, you must enter four consecutive single quotation marks ('''').
These options are only available when BULKLOAD=ON and apply to all new flows using PostgreSQL as the target.
Sybase Extended Bulk Load Options
Sybase ASE and Sybase IQ targets have the following additional options, as shown in the following image.

Is the delimiter character(s) used between fields. It is used by the intermediate fixed format file used to load the database.
The delimiter can be up to four characters and can be specified as:
TAB. A tab character. This is the default value.
a - A. A character string. For example, ~.
0x nn. A hex code, for example, 0x44 (a comma) or 0x0D0A (a return and a linefeed).
Is the delimiter character used between records. It is used by the intermediate fixed format file to the load the database. The row delimiter can be specified in the same manner as the (field) delimiter, except that character comma (,) is not permitted.
This parameter is available for Sybase IQ only.
Activate log information about integrity constraint violations and the types of violations. With this option two types of LOG files could be written into a temporary space in the configuration directory: MESSAGE LOG file etlblk.msg and ROW LOG file etlblk.log.
For Sybase IQ:
- Yes. Writes both MESSAGE LOG and ROW LOG files: etlblk.msg and etlblk.log.
- No. The LOG files are not written. This is the default value.
- Extended Bulk Load supports all Sybase IQ native data types, except BINARY and VARBINARY.
- A user running a data flow using Extended Bulk Load to Sybase IQ must have the following permissions:
allow_read_client_file = on

allow_write_client_file = on
This can be confirmed by using the following Sybase stored procedure:
sp_iqcheckoptions
If these permissions are not set, the flow will fail and display the following message:
FOC1261 PHYSICAL INTERFACE NOT FOUND FOR SUFFIX SQLSYB. MODULE

NAME : dbodbc12_r
1010 Extended Bulk Load Options
1010 targets have the following additional options, as shown in the following image.

Delimiter characters between fields in the intermediate fixed format file that is loaded into the database. The delimiter can be up to four characters and can be specified as the following:
- TAB. A tab character. This value is the default.
- a - A. A character string. For example, ~.
- 0x nn. A hex code. For example, 0x44 (a comma), or 0x0D0A (a return and a linefeed). The hex code uses ASCII for Windows or UNIX systems and EBCDIC for IBM Mainframes.
Teradata Extended Bulk Load Options
The Teradata Extended Bulk Load Utility uses TPT (Teradata Parallel Transporter) to load data.
Teradata targets have the following additional options, as shown in the following image.

The maximum number of rejected records that can be stored in one of the error tables before the job is terminated. If unspecified, the default is unlimited.
The Teradata Director Program ID.
The Account ID used to access the database.
Name of table to contain records that were rejected because of data conversion errors, constraint violations, or AMP configuration changes. This must be a new table name. The default is the database default.
Name of table to contain records that violated the unique primary index constraint. This must be a new table name. The default is the database default.
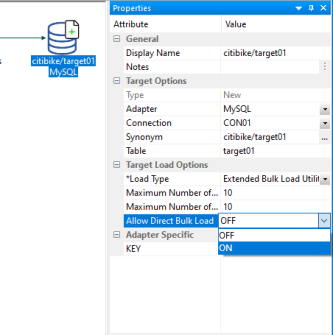
Using Direct Bulk Load for a Flow
Direct Bulk Load is a feature of ibi Data Migrator and Data Flow that can significantly shorten load times when a source file is in the expected format of the bulk load program for the database to be loaded. The faster load times result from loading the file directly, without creating an intermediate file.
Direct Bulk Load can be enabled as an adapter setting, meaning that all flows using that adapter use it. This can be problematic if some input files met the requirements of a database and some did not.
You can enable or disable Direct Bulk Load on each data flow. However, in order for Direct Bulk Load to be enabled for a flow, Extended Bulk Load must be used and Optimize Load must be enabled.
When Extended Bulk Load is used and Optimize Load is enabled, data is loaded directly to the target database without the additional extract and transformation steps provided the following conditions are met:
- The data source is a delimited file.
- The file attributes including Header, Enclosure, Delimiter, and Record Delimiter are supported by the target database.
- Only insert operations are used (no updates).
- No filters are used.
- No aggregation is specified.
- No transformations are used.
When Direct Bulk Load is used, the following message appears in the ibi Data Migrator log:
(ICM18637) Load Operation will use Direct Bulk Load Feature
The following are the supported databases and data stores:
- Apache Hive
- Apache Impala
- Apache Spark
- Amazon RedShift
- ExaSOL
- Jethro
- MariaDB
- MS SQL Server
- MongoDB
- MySQL
- PostgreSQL
- Snowflake
- Salesforce.com
- Sybase ASE
- Vertica
The following Change Settings for MySQL page shows Extended Bulk Load being enabled.
The following image shows Optimize Load enabled in the Flow Properties (by right-clicking the canvas to the right of the SQL object and selecting Flow Properties).
The following image shows the option to enable Direct Bulk Load in the Load Options for a flow.
Db2 Target Bulk Load Options
Db2 targets have the following additional options.
INSERT. Insert the rows only. This is the default.
REPLACE. Drops the existing destination table, and creates a new table.
- The bulk load option for Db2 is available for z/OS and IBM i only when configured for CLI, not CAF.
- For bulk load on IBM i, the target table name for Db2 must not exceed 10 characters.
- For bulk load on IBM i, the target table name must be a qualified name. The current library name must be specified, for example, library1/table1.
Db2 Target Insert Records from Memory Options
The Bulk Insert API (FASTLOAD) could be in effect for Db2 targets with load option Insert records from memory. The command that changes the settings for the Db2 FASTLOAD is:
ENGINE DB2 SET FASTLOAD [ON|OFF]
If effective, the default value for FASTLOAD is ON.
A SET command for Db2 to control whether or not the FASTLOAD operations are recoverable is:
SQL DB2 SET FASTLOAD_OPTION [RECOVERABLE/NONRECOVERABLE]
The default value is RECOVERABLE.
MySQL Bulk Load Options
There are no additional bulk load options for MySQL.
Nucleus Target Bulk Load Options
Nucleus targets have the following additional options.
Starts the server in exclusive mode. No other database sessions may be established.
The server must already be started in multi-user mode and listening on the default port 1285.
Creates a new file.
Appends to existing log.ndl file.
Issues a commit.
Issues a rollback.
Number of bytes to skip before loading data.
Specifies the character to represent null.
Number of rows to skip before loading data.
Number of rows to process before stopping.
Disconnects connections.
Skips rows with unprintable characters.
NDL server password. Required if Single User (ndls) mode and a server password actually exists.
Red Brick Target Bulk Load Options
Red brick targets have the following additional options.
Row number to begin copying data to the target.
Row number to end copying data to the target.
The combination of language and location.
The maximum number of discarded records allowed before loading stops. The default is the target RDBMS default.
File where duplicate records are discarded. The records will be stored for possible reloading.
File where discarded records based on referential integrity will be stored for possible reloading.
INSERT. Insert the rows only. If the table is not empty, the load operation ends. This is the default.
APPEND. Used to insert additional rows of data into an existing table. Each new row must have a primary-key value that does not already exist in the table. Otherwise, the record is discarded.
REPLACE. Replaces the entire contents of a table.
MODIFY. Used to insert additional rows or to update existing rows in a table. If the input row has the same primary-key value as an existing row, the new row replaces the existing row. Otherwise, it is added as a new row.
UPDATE. Updates existing rows in an existing table. Each new row must have a primary-key value that is already present in the table. Otherwise, the record is discarded.
MODIFY AGGREGATE. If the primary key of the input row matches an existing row in the table, the existing row is updated as defined for the specified aggregate operator. If the primary key of the input row does not match an existing row in the table, the row is inserted.
UPDATE AGGREGATE. If the primary key of the input row does not match the primary key of a row already in the table, the input row is discarded. If it does match an existing row, the existing row is updated as defined for the specified aggregate operator.
OFF. Indexes are updated when each input row is inserted into the data file, which provides better performance when the data being loaded contains many duplicate rows. This is the default.
ON. Overrides the global optimize mode setting in the rbw.config file.
Teradata Target Bulk Load Options
Teradata targets have the following additional options.
Two environment variables, $FASTLOAD_EXE and $MLOAD_EXE, should be set for using bulk load.
$FASTLOAD_EXE. Specifies the location of the Teradata FastLoad utility.
$MLOAD_EXE. Specifies the location of the Teradata MultiLoad utility.
Two lines should be added to the profile, or server start up shell script (edastart), that are similar to the following:
export FASTLOAD_EXE = ~teradata/fastload

export MLOAD_EXE = ~teradata/mload
The maximum number of rejected records allowed before loading stops. The default is the target RDBMS default.
The Teradata Director Program ID.
The account ID used to access the database.
The maximum number of MultiLoad or FastLoad sessions logged on to the Teradata database.
Row number to begin copying data to the target.
Row number to end copying data to the target.
Name of the work table.
This table provides information about all errors that occur during the acquisition phase of your Update operator job, as well as some errors that occur during the application phase if the Teradata RDBMS cannot build a valid primary index.
This table provides information about uniqueness violations, field overflow on columns other than primary index fields, and constraint errors.
INSERT. Inserts the rows only. This is the default.
UPSERT. Does inserts for missing update rows.
The MultiLoad response to a down Access Module Processor (AMP) condition.
ALL. Pauses the MultiLoad job when AMP is down.
NONE. Allows the MultiLoad job to start, restart, or continue as long as no more than one AMP is down in a cluster.
APPLY. Inhibits the MultiLoad job from entering or exiting the application phase when an AMP is down.
Restarts the log table for the MultiLoad checkpoint information. This option is available for existing target tables only.
Enter an annotation for this target.
Set the Data Flow Record Logging Options
Setting the data flow record logging options allows you to write particular types of transactions to log files.
Although Record Logging options appear in every data target, they are set on a per flow basis. Changing the options in one target will reset them for all targets.
- Procedure
- On the
Flow tab, in the Tools group, click Properties,
or right-click anywhere in the workspace and click Flow Properties.
The Properties pane opens.
- Expand the Record Logging attribute.
- Select
the checkbox next to the options that you want to log.
Record logging options are optional and are not available when the data target is a formatted file.
- Click Save in
the Quick Access Toolbar.
For more information on record logging options for a data flow, see Set the Flow Record Logging Properties.
Target Properties Pane
To access the Target Properties pane, right-click a target object and click Properties. The following image shows the Properties pane for an existing Relational target.
All targets have the following properties:
By default, shows the application name, if enabled, and synonym name. Controls the name that is shown under the object in the flow.
Type an annotation for this target.
If enabled, allows you to add notes to the palette for a flow and flow objects.
Is the target type.
Is the target adapter.
Is the synonym name.
The following sections describe the Target Options available for each different target.
Target Properties Pane for Relational Targets
The Target Options section of the Properties pane for relational targets contains the following additional options.
Is the connection for the data target. For a relational data target, this is a database server. For ODBC, this is a data source.
Is the synonym name for the relational data target.
Is the name of data target table.
Are the names of key columns in order. This option is only available for new targets.
These options are only available for existing targets.
Does not delete the records already in a data target.
Deletes all rows and creates a database log.
Deletes all rows from the table, but does not generate a database log. This is a faster option than using Delete all rows from table.
The Target Load Options include the following load options:
Specifies the behavior of ibi Data Migrator while loading data.
Insert/Update options can be set on a per target basis.
If you select this option, you can set a behavior when duplicate records are found from the If the record exists dropdown menu.
- Include the record. Allows
the relational database target to handle duplicates.
Note: If you select Include the record, the record is passed directly to the relational database, which determines whether to accept it or not. If inserting a record would result in a duplicate key, the RDBMS will reject it due to a Unique Index constraint violation and return an error. Processing continues even if such errors occur, up to the number of errors specified under Stop processing after __ DBMS errors in the General properties of the flow.
- Reject the record. Issues a SELECT command against the target table to see if a record exists with the key values. If there are no key columns, ibi Data Migrator screens all columns. If the record is found, the record is rejected.
- Update the existing record. Updates records if the key value on the input record, or the entire record if there are no keys, are found in the table. All non-key values are updated in the target.
- Delete the existing record. Deletes the record if the
key on the input record (or entire record if no keys) is found in
the table.
If you select Update the existing record or Delete the existing record from the If the record exists dropdown menu, you can also set behavior when the record does not exist using the If the record does not exist dropdown menu:
- Include the record. Includes the key in the data target.
- Reject the record. Does not include the key in the data
target.
Note: The Reject, Update, and Delete options can adversely affect performance because they determine the existence of a key value on an incoming record before performing the specified action. This is done by issuing a SELECT command against the target table, then waiting for the response. If one of these actions is required, try to limit the volume of records in the incremental change. These actions will perform best if there are unique keys on the table.
- Commit every row(s). Specifies the row interval to commit or write transactions to the database.
When you specify this load type, you need to specify:
- Commit every row(s). Specifies the row interval to commit or write transactions to the database.
- Block size. Specifies how many records you want to process at a time.
These options will depend on your target type.
Uses a database loader program with additional capabilities. For more information, see Extended Bulk Load Utility Options.
This option is only available for existing relational targets.
Enables you to load a data target with column values that change over time. There are two column types. Type I simply overwrites the value. Type II allows you to track activity before and after the change. Type II changes are handled either using an activation flag or an end date/begin date. When you update a Type II column, you do not actually change its value. Instead, you update the activation flag to inactive, or the end date to the current date. You then add a new record with the new value, and the activation flag on by default or the begin date set.
- Updates for Type I. Enables you to specify how updates will affect Type I fields. The options are Change all rows or Change only active rows. Change all rows is the default value.
- Commit every row(s). Specifies the row interval to commit or write transactions to the database.
Enables you to load a data target with only the records that have changed. This feature is an optional, add-on component to ibi Data Migrator. When this option is selected, the Prior to Load option is eliminated.
This load type is a combination of the previous two load types. The Insert/Update/Delete indications in the CDC logs are not applied directly to the target. Instead, the SCD Types of the target are used and deleted records in the source are marked as inactive in the target.
Set Options for Relational Targets
- Procedure
- In the
data flow workspace, right-click the data target, and click Properties.
The target Properties pane opens.
- For
existing targets, select whether to remove data prior to loading
the data target in the Prior to Load Option dropdown menu. The
options are:
- No Changes. Does not delete the records already in a data target.
- Delete all rows from table. Deletes all rows and creates a database log.
- Truncate table. Deletes all rows from the table but does
not generate a database log. This is a faster option than Delete
all rows from table.
Note: Truncate table is not supported by Db2 on IBM i.
- Select
a Load Type. The options are:
- Insert/Update. Allows you to set a behavior when loading records.
- Insert records from memory. Speeds the loading of the
data target by inserting a block of rows at once. You can set the
row interval to commit or write transactions and the number of records
to load in a block. This option is only available for relational
databases that support it, including Db2 on i V6R1 for CLI, Db2 on z, Informix, MS SQL
Server, MySQL, Oracle, Sybase ASE, Teradata
13, and UDB.
This option:
- Requires clean input data. If any row in the block causes a data source constraint violation, such as not null or unique index, the entire block is rejected.
- Does not provide row counts (the number of records inserted or rejected) in the detail log or statistics. NA (not available) will appear instead.
- Does not provide record logging. For example, rejected records cannot be written to a fixed format file for review.
- Bulk load utility via a disk file and Extended Bulk Load Utility. Use database bulk loaders instead of ibi Data Migrator to insert data into a target. ibi Data Migrator automates bulk loading for Hyperstage, Ingres, Informix, Microsoft SQL Server, IBM Db2, Teradata, Nucleus, Oracle, Sybase Adaptive Server Enterprise, and Sybase Adaptive Server IQ. You can set format version, maximum number of errors, first and last row to copy, packet size, and row interval to commit or write transactions.
- Slowly Changing Dimensions. Enables you to load a data target with column values that change over time. There are two column types. Type I simply overwrites the value. Type II allows you to track activity before and after the change. Type II changes are handled using either an activation flag or an end date/begin date. When you update a Type II column, you do not actually change its value. Instead, you update the activation flag to inactive, or the end date to the current date by default. You then add a new record with the new value and the activation flag on by default or the begin date set.
- Change Data Capture Processing. Enables you to load a data target with
only the records that have changed. This feature is an optional,
add-on component to ibi Data Migrator.
Note: The Change Data Capture Processing option is only available for existing relational targets.
- Change Data Capture/Slowly Changing Dimension. Is a combination of the previous two load types. The Insert/Update/Delete indications in the CDC logs are not applied directly to the target. Instead, the SCD Types of the target are used.
Target Properties Pane for FOCUS/FDS or XFOCUS Targets
The Target Options section of the Properties pane for FOCUS/FDS or XFOCUS targets contains the following additional options.

Is the name of the data file pointed to by the synonym.
On IBM z/OS, to create a file in HFS (hierarchical file system), enter the name. To create a dataset, enter the name as
//’qualif.tablename.FOCUS’
where:
Is a fully qualified location.
Should match the synonym name.
Is the number of key columns. This option is only available for new targets.
These options are only available for existing targets.
Does not drop (delete) the data target.
Drops and recreates the data target.
Specifies the method ibi Data Migrator uses to load data.
Since ibi Data Migrator uses Insert/Update to load FOCUS/FDS or XFOCUS targets, you can set a behavior when duplicate records are found from the If the record exists dropdown menu. These options can be set on a per target basis.
- Include the record. Includes the duplicate record in the data target.
- Reject the record. Issues a SELECT command against the target table to see if a record exists with the key values. If there are no key columns, ibi Data Migrator screens all columns. If the record is found, the record is rejected.
- Update the existing record. Updates records if the key value on the input record, or the entire record if there are no keys, are found in the table. All non-key values are updated in the target.
- Delete the existing record. Deletes the record if the
key on the input record (or entire record if no keys) is found in
the table.
If you select Update the existing record or Delete the existing record from the If the record exists dropdown menu, you can also set behavior when the record does not exist using the If the record does not exist dropdown menu:
- Include the record. Includes the key in the data target.
- Reject the record. Does not include the key in the data target.
- Commit every row(s). Specifies the row interval to commit or write transactions to the database.
Set Options for FOCUS/FDS or XFOCUS Targets
- Procedure
- In the
data flow workspace, right-click the data target and click Properties.
The Target Properties pane opens.
- For
existing targets, select whether to remove data prior to loading
the data target in the Prior to Load Options section.
The options are:
- No changes. Does not delete the records already in a data target.
- Drop Table. Drops and recreates the data target.
- Select
a behavior for loading records using the If the record exists and If
the record does not exist dropdown menus. These options can be
set on a per target basis. They are:
- Include the record. Includes the duplicate record in the data target.
- Reject the record. Issues a SELECT command against the target table to see if a record exists with the key values. If there are no key columns, ibi Data Migrator screens all columns. If the record is found, the record is rejected.
- Update the existing record. Updates records if the key value on the input record, or the entire record if there are no keys, are found in the table. All non-key values are updated in the target.
- Delete the existing record. Deletes the record if the key on the input record or the entire record if no keys is found in the table.
- If you
select Update the existing record or Delete
the existing record from the If the record exists dropdown
menu, you can also set behavior when the record does not exist using
the If the record does not exist dropdown menu:
Include the record includes the key in the data target.
- Click OK.
Note:
- For FOCUS/FDS or XFOCUS targets, the only Load Type available is Insert/Update.
- Synonym names for FOCUS/FDS files cannot be longer than eight characters.
Target Properties for New XML Targets
ibi Data Migrator can create a new XML document with name/value pairs. For more information on any other structures, see Creating a Data Flow Using a Target Based On a Predefined XML Schema.
The Target Options section of the Properties pane for XML targets contains the following additional options.

Is the name of the XML document described by the synonym. ibi Data Migrator will also create an XML Schema Definition with the same name as the data file and an extension of .xsd.
Is set to Insert/Update for XML documents. Note that no updates are currently performed.
Is the name of the top-level element.
Is the name of the row-level element.
Is the name of the column-level element.
New XML Targets
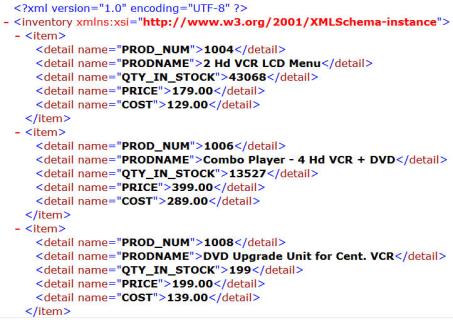
The following example uses the same table ibisamp/dminv as a source with all the actual columns, and then creates a new XML target called dminvx. The element names are entered as shown:
Records - Inventory
Record - Item
Column - Detail
The first three rows of the resulting XML document would look like the following example when viewed in a browser:
Target Properties Pane for Delimited File Targets
The Target Options section of the Properties pane for delimited file targets contains the following additional options.
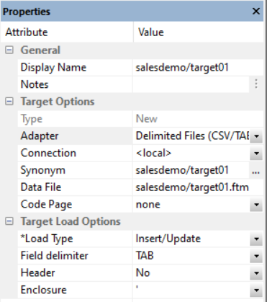
Select the connection, FTP or SFTP server, where the data should be written.
Is the name of the data file pointed to by the synonym.
On IBM z/OS, to create a file in HFS (hierarchical file system), enter the name. To create a dataset, enter the name as
//’qualif.tablename.DATA’
where:
Is a fully qualified location.
Should match the synonym name.
Specifies a code page for the target data.
Is the delimiter character(s) used between fields. The delimiter can be up to 30 characters. It can be specified as:
TAB. A tab character. This is the default.
a. A character string, for example ~.
0xnn. A hex code, for example, 0x44 (a comma), or 0x0D0A (a return and a linefeed). The hex code uses ASCII for Windows or UNIX systems and EBCDIC for IBM Mainframes.
Inserts column headings as the first row of data and surrounds the column names with the character specified in the Enclosure field. When set to Yes, the FIELDNAME is used for the header.
You can change this to use the TITLE as the header instead. To do so, expand the Adapters folder, right-click Delimited Files (CSV/TAB), and click Change Settings. From the HEADER dropdown menu, select Build header based on field title and click Save.
This character is used to surround the column headings when Header is set to Yes.
Target Properties Pane for Fixed Format File Targets
The Target Options section of the Properties pane for flat file targets contains the following additional options.
The connection configured for the selected adapter.
Is the name of the data file pointed to by the synonym.
On IBM z/OS, to create a file in HFS (hierarchical file system), enter the name. To create a dataset, enter the name as
//’qualif.tablename.DATA’
where:
Is a fully qualified location.
Should match the synonym name.
Specifies a code page for the target data.
This option is only available for existing targets.
Does not delete the data target.
Deletes and recreates the data target.
Target Properties dialog for Formatted File Targets
The Target Options section of the Properties pane for formatted file targets contains the following additional options.
Is the format of the target data.
Is the name of the data file pointed to by the synonym.
Set Options for Fixed Format, Delimited, Formatted, and XML File Targets
- Procedure
- In the
data flow workspace, right-click the data target and click Properties.
The Target Properties pane opens.
- For
existing targets, select whether to remove data prior to loading
the data target in the Prior to Load Options section.
The options are:
No changes does not delete the data target. New records are appended.
Delete File drops and recreates the data target.
- Click OK.
Note:
- For fixed format files and XML files, the Load Type cannot be changed from Insert/Update, and the data is always appended.
- For formatted file type EXL2K, the only Load Type available is Loading Fixed Format File using HOLD.
Loading Data to Salesforce.com
In order to insert or update rows in a Salesforce object, you can use a custom field identified as an External ID field.
Create a Custom Field as an External ID Using Salesforce Classic
- Procedure
- Log in to Salesforce.com.
- In the upper-right corner, click Setup.
- On the left pane, scroll down to Build, expand Customize, and then expand the object for which you want to create the custom field, for example, Accounts.
- Select Fields.
- Scroll to the bottom, and under <object name> Custom Fields & Relationships, click New.
- On the New Custom Field, Step 1. Choose the field type page, select a data type appropriate to an ID field, such as Text or Number, and click Next.
- On the New Custom Field, Step 2. Enter the Details page:
- Type a Field Label, for example, Account_ID_EXT.
- Type a Length, for example, 18.
- Type the Field Name, or select the field from the dropdown list, for example, Account_ID_EXT.
- Fill in the other fields, as desired.
- Select the External ID checkbox.
- Click Next.
- On the New Custom Field, Step 3. Establish field-level security page, leave the default values, and click Next.
- On the New Custom Field, Step 4. Add to page layout page, click Save.
The Account (or other object) Fields page opens. The new field is shown with its Field Label name, for example, Account_ID_EXT.
- Create, or update, a synonym for Account (or another object).
Create a Custom Field as an External ID Using Salesforce Lightning
- Procedure
- Log in to Salesforce.com.
- Click the Object Manager tab.
- On the left pane, select the object for which you want to create the custom field, for example, Contact.
- Select Fields & Relationships, and then click New.
- Scroll to the bottom, and under <object name> Custom Fields & Relationships, click New.
- On the New Custom Field, Step 1. Choose the field type page, select a data type appropriate to an ID field, such as Text or Number, and click Next.
- On the New Custom Field, Step 2. Enter the Details page:
- Type a Field Label, for example, Contact_ID_EXT.
- Type a Length, for example, 18.
- Type the Field Name, or select the field from the dropdown list, for example, Contact_ID_EXT.
- Fill in the other fields, as desired.
- Select the External ID checkbox.
- Click Next.
- On the New Custom Field, Step 3. Establish field-level security page, leave the default values, and click Next.
- On the New Custom Field, Step 4. Add to page layout page, click Save.
The Contact (or other object) Fields page opens. The new field is shown with its Field Label name, for example, Contact_ID_EXT.
- Create, or update, a synonym for Contact (or another object).
Identify an External ID Field In a Synonym Using Salesforce Classic or Salesforce Lightning
The synonyms created for Salesforce.com objects identify the ID field as the key. To use the External ID field as the key, you must edit the generated synonym and save a copy of it.
- Procedure
- In the ibi Data Migrator desktop interface, double-click the synonym for Account (or another object).
- Select the Segment View tab.
- Right-click the ACCOUNT segment and click Properties.
- For the attribute KEY, type the name of the External ID field, such as ACCOUNT_ID_EXT.
- In the ibi Data Migrator desktop interface, click Save As.
- Enter a new name, such as account, and then click Save.
Using an External ID Field to Insert or Update Rows in a Salesforce.com Object
Using the alternative synonym you can now use the External ID field to identify rows to be inserted or updated as you would with a table in a relational database. Salesforce.com will automatically do an upsert. If a value of the External ID field matches a value already in the object being loaded, an update will occur. If not, it will do an insert.
Deleting Rows from a Salesforce.com Object
The internal ID field is used to delete rows from a Salesforce.com object. To delete rows using the External ID, create a data flow that performs a DB_LOOKUP. You can also create a data flow that joins a table with a list of External ID values to be deleted to the Salesforce.com object to obtain the values of the corresponding ID field.