Setting Flow Properties
Flows properties allow you to view or set properties that apply to the entire data flow. These include:
- General properties. Includes who created the flow, the last time it was updated, a description, and comments.
- Execution properties. Includes stop processing options.
- Restart properties. Includes the number of restart attempts and their start points. A restart attempt occurs if the flow execution fails. Restart attempts can be made from the first record or from the last commit point.
- Record Logging. Shows actions to be taken when processing records with errors.
Specify flow properties in the Properties pane by clicking Properties in the Tools group of the Flow tab.
If you right-click anywhere in the Properties pane, a shortcut menu opens, with the following options available:
- Categorized. Displays all of the available properties for the selected flow by category.
- Alphabetic. Displays all of the available properties for the selected flow in alphabetic order.
- Find. Allows you to search for text in the Attributes column.
Set the Flow General Properties
- Procedure
- On the
Flow tab, in the Tools group, click Properties.
The Properties pane opens, as shown in the following image.
The General attribute section of the Properties pane has the following fields and options:
DescriptionIs a description of the flow. You can enter up to 150 characters. Descriptions appear in the navigation pane next to the flow name.
CommentAre comments regarding the flow.
This section also provides information on the flow name, the user who created the flow, and the date it was last modified.
- Make your desired changes and click Save in the Quick Access Toolbar.
Set the Flow Execution Properties
- Procedure
- On the
Flow tab, in the Tools group, click Properties.
The Properties pane opens.
- Expand
the Execution attribute, as shown in the
following image.
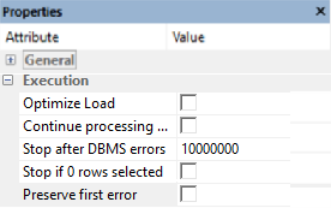
The Execution attribute section of the Properties pane has the following fields and options:
Optimize LoadAllows faster loading by combining insert and update operations in a flow. It also uses a more efficient algorithm in a Slowly Changing Dimensions flow. This option can be used with databases that use the MERGE command, as well as Insert only operations. When you create a flow in the ibi Data Migrator desktop interface, this option is selected, by default. If you do not want to use this option, you must deselect it.
Note: If you save a flow that cannot use the Optimize Load option, you receive a warning message indicating the reason, and the flow is saved as a non-optimized flow.Continue processing when a partial answer set is returnedWhen selected, a flow continues to run, even if an error is generated.
Stop after DBMS errorsCauses the flow to fail with a non-zero return code if the number of errors specified is exceeded. Applies to relational targets when Insert/Update or Insert records from memory is used. Any rows written to the RDBMS are committed to the RDBMS. The default value is 10000000, unless this is overridden in the Run Options found in the Tools group of the Home tab.
A relational database may return an error for a constraint violation, such as a Unique Index constraint, a Not Null constraint, or a user-specified constraint.
If such errors are not expected, you may want to fix their cause without waiting for the entire flow to be processed. Using a low value, such as 10, can provide enough information to determine the cause of the problem, without running the entire job.
If such errors are expected, and you want to continue processing anyway, use a high value, one greater than the number of records in the source, or do not select the Stop processing after checkbox.
Note:- When using the Load Type setting of the Bulkload utility using a disk file, this setting is not used.
- This setting is not available if the Optimize Load option is enabled.
Stop if 0 rows selectedAllows you to stop processing if no data is returned. When this option is selected, and no data is returned, code 18708 occurs.
Preserve first errorPreserves and propagates the first error that occurs on any object in a process flow.
- Make your desired changes and click Save in the Quick Access Toolbar.
Set the Flow Restart Properties
- Procedure
- On the
Flow tab, in the Tools group, click Properties.
The Properties pane opens.
- Expand
the Restart attribute, as shown in the following
image.
The Restart attribute section of the Properties pane has the following fields and options:
Number of attemptsIs the number of times a flow is restarted if the execution fails.
Note: The amount of time between restart attempts can be set for the server. The default value is 60 seconds. For more information, see Setting Up ibi Data Migrator.Restart FromIs the point from which the next attempt will be made. The options are Beginning or Last Commit.
Note: Last Commit cannot be used for a fixed format file, a delimited file, or XML targets. Last Commit can only be used for existing targets, and cannot be used with Prior to Load Options of Delete all rows from table, Truncate table, or Drop table. - Make your desired changes and click Save in the Quick Access Toolbar.
Set the Flow Email Notification Properties
- Procedure
- Right-click
the Start object in a process flow and click Properties.
The Properties pane opens.
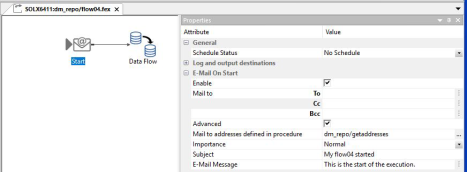
- The E-mail attributes open, as shown
in the following image.
The Log and output destinations section has the Send HTML output as inline message. When selected, if any stored procedures called by the flow generate an output, the message is included as message text, instead of as an attachment.
Note: This option for a flow schedule works with the Merge formatted output into log option that is available for a Scheduler Special Service. The following considerations should be considered:- When the Send HTML output as inline message and Merge formatted output into log options are selected, the submitted flow emails the attached ETLLOG file and the HTML output is embedded into the body of the email.
- When the Send HTML output as inline message and Merge formatted output into log options are not selected, the submitted flow emails the attached ETLLOG file and the HTML output is embedded into the attached ETLLOG file.
E-Mail On Start, E-Mail On Completion, and E-Mail On Failure all have the following fields and options:
EnableSelect this to enable when an email should be sent.
Mail ToThe email addresses to which the messages are sent. Place each email address (or user ID configured on the server with an associated email address) on a new line with no separators.
AdvancedSelect this option to get the following options:
- Mail to addresses defined in procedure. You can send the messages to email addresses defined in the procedure by either typing in the location of the procedure, or clicking the ellipses and manually selecting it from the Select Procedure dialog. For more information, see Send an Email to Addresses Defined in a Procedure.
- Importance. Select the importance for the email from the dropdown menu. Choices are Low, Normal, or High.
- Subject. The subject line of the message.
- E-Mail Message. The body of the message.
Note: Your Server must be configured for email notification to use this option. See Configure the ibi WebFOCUS Reporting Server for Email Notification. - Make your desired changes and click Save in the Quick Access Toolbar.
Send an Email to Addresses Defined in a Procedure
- Procedure
- Create a file with the list of the email recipients.
For example, the following file is called addresses.txt.
addresses

user_one@ibi.com

user_two@google.com

user_three@eserve1.com
This list can be considered a delimited file, even though it has only one column and no delimiters.
- Create a synonym for the file containing the email address, specifying that it has a header line.
For example, call the synonym addresses.
- Create and save a new stored procedure to read the email addresses.
For example, the following procedure is called getaddreses.
TABLE FILE ADDRESSES

PRINT ADDRESS

ON TABLE PCHOLD FORMAT COMT FORMATTED

END
- Open a flow and switch to the Process Flow tab.
- Double-click the Start object to open its properties.
- In E-Mail on Start, E-Mail on Completion, or E-Mail on Failure, select the checkboxes Enable and Advanced.
- In the Advanced section, fill in the value for Mail to addresses defined in procedure by entering the application directory and procedure name you just created (for example, baseapp/getaddresses) or by clicking the ellipses and manually selecting the procedure from the Select Procedure dialog, as shown in the following image.
Set the Flow Record Logging Properties
- Procedure
- On the Flow tab, in the Tools group, click Properties.
The Properties pane opens.
- Expand the Record Logging attribute,
as shown in the following image.
The Record Logging attribute section of the Properties pane has the following fields and options:
DBMS ErrorsLogs transactions rejected by an RDBMS due to a constraint violation or data type error. For fixed format file targets, format errors are also recorded.
Duplicate RejectionsLogs transactions rejected due to a duplicate key.
Invalid DataLogs transactions rejected for not meeting a VALIDATE condition.
No Match RejectionsLogs transactions rejected when a required key is not found.
Format ErrorsLogs transactions rejected due to a format error. Format errors only apply to direct load flows.
Accepted TransactionsLogs transactions that were accepted.
All TransactionsLogs all transactions.
- Make your desired changes and click Save in the Quick Access menu.