Configuring Source Management and Setting Up Source Control That Uses SCC API
If you have a source control system that uses SCC API configured, you can use it to source manage ibi Data Migrator procedures, synonyms, and flows.
ibi Data Migrator provides access to basic source management functions through right-click menu options in the navigation pane which only appear if you have a source control system configured.
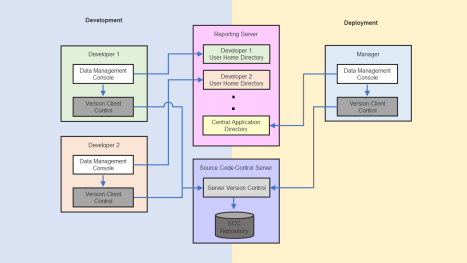
Source control systems consist of a repository that holds a master copy of each revision. The local working copies of these files are stored on the WebFOCUS Reporting Server inside the user home directory. These files are the files changed by developers, before the file is committed or checked-in to the source control repository, which creates the next revision. ibi Data Migrator can add synonyms, procedures, and flows to source control by exporting ACCESS, MASTER, FOCEXEC, and ETG files, respectively. Intermediate files are created in the user home directory of the developer. It is the role of the manager to create a user home directory for each developer that contains the local working copies. When a developer checks out a flow, ibi Data Migrator sends a command through the SCC API plug-in or by invoking client command line utility to source control to check out the file. The source control system then puts the latest version of the file into the user home directory of the developer. All other functions, such as add, check in, undo checkout, view history, and get latest version functions, are invoked the same way.
The intermediate work space of the manager is the actual central application directory. Only the manager has write privileges to the central application directory. The manager can deploy the latest files from the source control repository to the central application directory by invoking get latest version. The following diagram shows the model of the workflow.
To implement source control that uses the SCC API, all developers and the manager must:
- Set up source control
folders in your source management system. These folders are called
Projects in ChangeMan DS,Views in
ClearCase, and Modules in CVS.
Note: Source control folders work essentially like ibi Data Migrator application directories. You should create folders in your source control system that mimic your node/application directory structure. Creating folders using your server node names help you distinguish application directories with the same names on different servers.
- Configure ibi Data Migrator to work with your source control system.
- Create associations between ibi Data Migrator application directories and the source control folders that you created.
You can then add files to your source control system, check them out or in, and see file history, versions, and differences from the ibi Data Migrator desktop interface.
For detailed information on installing and configuring your source control system, and setting up source control databases and projects/views/modules, see your source control system documentation.
Setup, Configure, and Associate ibi Data Migrator to Work With ChangeMan® DS
Creating a ChangeMan DS project provides a way to logically associate files with a project. Files are associated with the project by attaching them when the project is created.
Create ChangeMan DS Projects
- Procedure
- Log into ChangeMan DS.
- From the
Tools menu, click System Configuration.
The Global Process Control window opens.
- From the
Edit menu, click Users.
Select New User or New Group from the bottom left of the Global User Configuration window, and create and edit user and group profiles. Provide privileges to the users.
- From the
Edit menu of the Global Process Control window, click Areas.
Select New from the bottom left of the Global Area Configuration window. Create and edit areas, such as development, production, QA, and end users. The development area usually represents a directory on the local computer where the development work takes place. Files may be checked in and out of this directory.
- From the
Edit menu of the Global Process Control window, click Projects.
Select New from the bottom left of the Project Configuration window to create and edit projects. ChangeMan DS projects help to manage logically related files. Attach files to a project during configuration.
Note: Currently, identical sources cannot be used for the same projects. This feature is planned for a future release. - From the
Process Control window of the new project that was created, click
the New Rule icon located right under the
File menu.
Create a rule by adding the appropriate nodes and connecting the Development Area with the Production Area.
Configure ibi Data Migrator to Work With ChangeMan DS
To use a source control system to source manage your ibi Data Migrator flows, stored procedures, and synonyms, you must have a source control program and database configured. The source control program then appear as an SCC Provider.
In the ibi Data Migrator desktop interface:
- Procedure
- On the Home tab, in the
Tools group, click Configure Source Control.
Note: If you have not properly configured ChangeMan DS Client, this option does not appear in the Tools group.
The Configure Source Control dialog opens.
- Select ChangeMan
DS as the SSC Provider from the dropdown menu.
Note: Selecting none removes source control from your system.
- Optionally, click Test to make sure you can connect to the source control system from the ibi Data Migrator desktop interface.
- Click OK.
The Set Source Control Provider dialog opens.
- Click Yes.
Once an SSC Provider has been set, source control options appear on the right-click menus.
Create Associations Between Application Directories and ChangeMan DS Projects
Creating a source control project provides a place to manage your ibi Data Migrator files. Creating an association between your application directory and that project tells ibi Data Migrator where to manage those files.
In the navigation pane of the ibi Data Migrator desktop interface:
- Procedure
- Right-click
an application directory and select Source Control,
and then click Create Association with Source Control.
The Associate Application with Source Control Project window opens.
- Click Associate.
The ChangeMan DS Login dialog opens. Type your User Name, Password, and MainServer for your ChangeMan DS environment.
- Click OK.
The SCC Project Path from ChangeMan DS dialog opens.
- Enter Local Area and Project and click OK.
- Click OK to
close the Associate Application with Source Control Project dialog.
The Application Directory icon displays a lock to indicate the source control association.
At this point, you have associated your application in ibi Data Migrator with a project in ChangeMan DS.
Setup, Configure, and Associate ibi Data Migrator to Work With ClearCase®
Source control folders, called views in ClearCase, work essentially like ibi Data Migrator application directories. You should create folders in your source control system that mimic your node/application directory structure. Creating folders using your server node names help you distinguish application directories with the same names on different servers.
Create ClearCase Views
- Procedure
- From the
Start Menu, select Rational Software, Rational
ClearCase, and then click Create View.
The View Creation Wizard's Choose a Project dialog opens.
- Click Next.
The View Creation Wizard's Choose Snapshot View or Dynamic View dialog opens.
- Select Dynamic and
click Next.
The View Creation Wizard's Choose Name and Drive dialog opens.
- Use the default view name or enter an alternate name.
- Select a drive. In this example, the default drive, Z, is used.
- Enter a comment for the view.
- Click Advanced
Options.
The Advanced View Options dialog opens.
- Enter the name of your ClearCase storage share and click OK.
- When the
Choose Name and Drive dialog reopens, click Finish.
The Confirm dialog opens.
- Click OK.
The ClearCase View Tool dialog opens.
- Click OK.
Once you have created a ClearCase view, you should navigate to its drive/folder and create subfolders that match the application directories that you want to source manage.
Configure ibi Data Migrator to Work With ClearCase
To use a source control system to source manage your ibi Data Migrator flows, stored procedures, and synonyms, you must have a source control program and database configured. The source control program then appear as an SCC Provider.
In the ibi Data Migrator desktop interface:
- Procedure
- On the Home tab, in the
Tools group, click Configure Source Control.
Note: If you have not properly configured ClearCase Client, this option does not appear in the Tools group.
The Configure Source Control dialog opens.
- Select ClearCase as
the SSC Provider from the dropdown menu.
Note: Selecting none removes source control from your system.
- Optionally, click Test to make sure you can connect to the source control system from the ibi Data Migrator desktop interface.
- Click OK.
The Set Source Control Provider dialog opens.
- Click Yes.
Once a SSC Provider has been set, source control options appear on the right-click menus.
Create Associations Between Application Directories and ClearCase View Folders
Creating a source control folder provides a place to manage your ibi Data Migrator files. Creating an association between your application directory and that folder tells ibi Data Migrator where to manage those files.
- Procedure
- Right-click
an application directory, select Source Control,
and then click Create Association with Source Control.
The Associate Application with Source Control Project dialog opens.
- Click Associate.
The Browse for Folder dialog opens.
- Select the folder that you want to associate with this application directory and click OK.
- Click OK to
close the Associate Application with Source Control Project dialog.
The Application Directory icon displays a lock to indicate the source control association.
You are now ready to use ClearCase for source management.
Setup, Configure, and Associate ibi Data Migrator to Work With Concurrent Versions System (CVS)
CVS is an open source system widely used in the UNIX world. It has a Windows implementation called CVSNT. Since CVS is a command-line system, it cannot be used directly by ibi Data Migrator (or any other application that uses the SCC API). To use CVSNT, the PushOK CVS SCC Proxy is needed to convert the SCC API calls into CVS commands. Source control folders, called modules in CVS, work essentially like ibi Data Migrator application directories.
Create Concurrent Versions System (CVS) Modules
Before you can create CVS Modules, you need to create a repository and add users. A repository needs a root directory where both the files under version control and auxiliary files for use by the CVS server are stored. After creating the repository, create users that can access (store and retrieve) files from the repository. Once this is complete, there are two ways to create modules:
- Procedure
- You can
add a new module through the command line. For instance, to add
a new module with the name app1:
mkdir $CVSROOT/app1# makes an empty module.cvs checkout -d ./ app1# checks it out to the current directory - Use a CVS client tool, such as TortoiseCVS. This tool allows you to work with files under CVS directly from Windows Explorer, thus eliminating the need to code. Other CVS client tools include CVSGui, SmartCVS, and many others.
Configure ibi Data Migrator to Work With CVS
To use a source control system to source manage your ibi Data Migrator flows, stored procedures, and synonyms, you must have a source control program and database configured. The source control program then appear as an SCC Provider.
In the ibi Data Migrator desktop interface:
- Procedure
- On the Home tab, in the
Tools group, click Configure Source Control.
Note: If you have not properly configured PushOK CVSSCC NT Proxy, this option does not appear in the Tools group.
The Configure Source Control dialog opens.
- Select PushOk
CVSSCC NT as the SSC Provider from the dropdown menu.
Note: Selecting none removes source control from your system.
- Optionally, click Test to make sure you can connect to the source control system from the ibi Data Migrator desktop interface.
- Click OK.
The Set Source Control Provider dialog opens.
- Click Yes.
Once an SSC Provider has been set, source control options appear on the right-click menus.
Create Associations Between Application Directories and CVS Modules
Creating a source control folder provides a place to manage your ibi Data Migrator files. Creating an association between your application directory and that folder tells ibi Data Migrator where to manage those files.
In the navigation pane of the ibi Data Migrator desktop interface:
- Procedure
- Right-click
an application directory, select Source Control,
and then click Create Association with Source Control.
The Associate Application with Source Control Project window opens.
- Click Associate.
The Please select a CVSROOT, module and local path dialog opens, as shown in the following image.
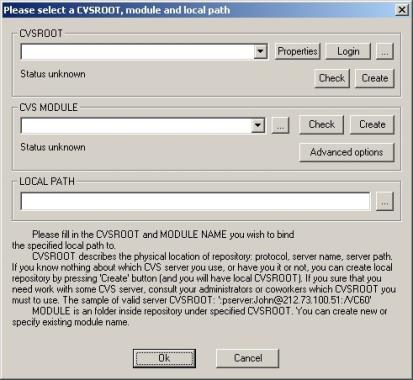
- Enter the
repository information in the CVSROOT field. CVSROOT describes the
physical location of repository, the directory that stores the master
copies of the files.
The syntax for the CVSROOT is:
:protocol:pcname/path
where:
protocolIs for a Windows server, the recommended protocol is sspi.
pcnameIs the name of the machine running CVS.
pathIs the location of the CVS repository.
An example of a complete syntax is:
:sspi:PC1/cvs
- Click Check.
If CVSROOT is valid, the following message should appear:
The CVSROOT is OK.
- Click Properties.
The PushOK CVS Proxy properties window opens.
- Click the CVS Options tab, deselect the Enable file remove monitoring checkbox, and click OK.
- Create a module or specify the existing module name. Module is a specific directory (tree of directories) in the main repository, CVSROOT.
- Click Check.
If Module is valid, the following message should appear:
The MODULE is OK.
- Set the local path to c:\ibi\srv82\dm\etlgtemp\serverc:\ibi\srv90\dm\etlgtemp\serverc:\ibi\srv91\dm\etlgtemp\serverc:\ibi\srv92\dm\etlgtemp\server. The local path is where the source managed files temporarily reside.
- Click OK to close the select a CVSROOT, module and local path dialog.
- Click OK to
close the Associate Application with Source Control Project dialog.
The Application Directory icon displays a lock to indicate the source control association.
You are now ready to use CVS for source management.
Setup and Configure ibi Data Migrator to Work With Git
Git is a free, open source Distributed Version Control System (DVCS), that allows multiple developers to work on the same remote repository, while having a full copy of the remote repository locally. The Adapter for Git in ibi Data Migrator allows you to work on your local Git repositories and share files between the local and remote Git repositories.
Unlike other source control programs currently supported by ibi Data Migrator, Git can be used in both the WebFOCUS Reporting Server WebFOCUS Reporting Server browser interface and in the ibi Data Migrator desktop interface. It is recommended that you consistently use only one source control program while working in an Application Directory, as this makes it easier for your development team.
Configure and Use an Adapter for Git
To use Git with ibi Data Migrator you need to install Git on the same machine where the ibi Data Migrator Server is installed and configure an Adapter for Git.
- On Windows, the Environmental Variable PATH should include the directory where the Git utilities are installed. For example, C:\Program Files\Git\usr\bin.
- To use Git with ibi Data Migrator, a set of JAR files should be downloaded from the Internet, saved on your system, and the path to these files should be added to the IBI_CLASSPATH parameter on your server. For more information on preparing the Git environment using JAR files, see the ibi™ WebFOCUS® Adapter Administration manual.
The Adapter for Git allows you to create a local repository inside of your Application Directory and provides access to the remote Git repositories. To configure an Adapter for Git:
- Procedure
- Expand the Adapters folder in the navigation pane, followed by the Available folder.
- Right-click GIT and click Configure.
The Add GIT to Configuration dialog opens.
- Click Configure.
When you configure the Adapter for Git, the <local> pre-configured connection is added by ibi Data Migrator automatically. To create a connection for a remote repository:
- Right-click GIT in the Adapters folder and click Add Connection.
The Add Connection dialog opens.
- Enter the following parameter values for the connection:
GIT URL
The full computer name or URL for the site where the remote repositories are located.
Note: A remote repository can be located on a remote network location or on your local file system.UserThe user ID used to connect to the Git server.
PasswordThe password is used to connect to the Git server.
Select profileSelect a profile from the dropdown menu to store the configured connection.
The following image shows the Add Connection dialog with sample parameters.

- Right-click GIT in the Adapters folder and click Add Connection.
Create a Git Repository
It is recommended that users work on their user's home directory, in homeapps. The homeapps applications are visible and available only to the connected users and server administrators. For more information on how a user creates a home directory, see Create and Configure User Home Directory.
You can start working on your local repository by performing either Init or Clone operations.
- Procedure
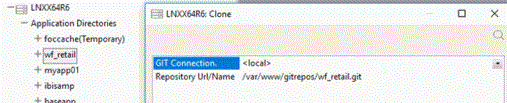
- To create a local Git repository by cloning an existing remote repository, right-click the application directory, point to Git, and then click Clone.
- Select the connection and enter the value for the Repository URL/Name field.
The image below illustrates an example of the Clone operation with the default <local> connection. The repository is accessed by Git using the local protocol.
The image below illustrates another example of Clone operation. In this example, the connection, added by a user, is set for the repository that is accessed by Git using the HTTP protocol.

Update a File in Your Git Repository and Send Your Changes to the Remote Repository
Once your Git connection is set up, you can work in a file located in your application directory and then send (or push) the changes to the remote repository, using the following steps:
- Procedure
- Edit a file in the application directory where you created a repository, click Save, and close the file.
- To move your file into the staging area in your local Git repository, right-click the file, point to Git, and then click Stage.
- To commit your changes, right-click the file, point to Git, and then click Commit.
The Commit dialog opens.
Enter any desired commit comments and click Commit.
- To send your changed file to the remote repository, right-click the application directory, point to Git, and then click Push.
Setup, Configure, and Associate ibi Data Migrator to Work With Perforce
Perforce do not store directories. Directories are simply components of the filespec which uniquely identify each file. However, it is recommended that you create folders in your source control system that mimic your node/application directory structure. Creating folders using your server node names help you distinguish application directories with the same names on different servers.
In order to create an empty directory or structure of empty directories, you need to anchor those directories using a place-holder file. The place-holder file is added to Perforce and then deleted, creating a deleted revision that anchors the directory.
You can do this by using P4V or using the command line.
Create Perforce Projects
Create Perforce Projects Using P4V:
- Procedure
- Open P4V and connect to the server using proper connection settings.
- Select a workspace whose view includes the area of the depot in which you wish to create directories.
- Create the directory by right-clicking (in your system file tree) the folder where you want to create the directory, and clicking New Folder. When prompted, enter the directory name Empty.
- Open a text editor of your choice and create a file in the Empty directory named .place-holder. Using a period (.) in front of the name makes this a hidden file on Linux, UNIX, or Mac operating systems, though it remains visible in Windows workspaces. The file can be empty, it just has to be present.
- In P4V,
right-click the .place-holder file and click Mark
for Add.
Right-click .place-holder again and click Submit. A submit dialog opens. Enter something in the description (such as Create Empty) and click Submit.
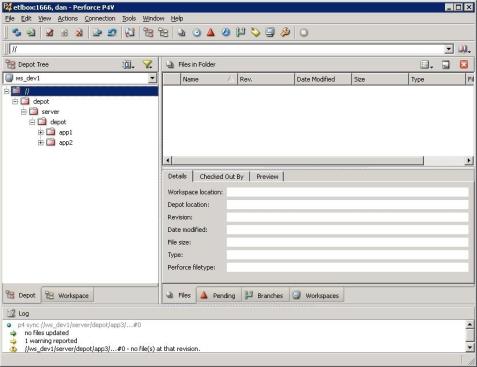
Note: If the .place-holder file is visible, right-click Empty and click Refresh Empty. - Click Depot tab.
In the depot, you see the Empty directory and the .place-holder file it contains.
- Right-click .place-holder and
click Mark for Delete. Right-click it again
and click Submit.
A submit dialog opens.
- Enter a
description in the appropriate field and click Submit.
The .place-holder file disappears from the directory, leaving an empty directory in the depot.
- If you do
not see the directory in P4V, confirm that Show Deleted
Files is selected from the Filter Depot menu at the
top of the depot tree.
The following image shows an example of what the tree structure should look like.
Create Perforce Projects Using the Command Line:
The following commands reproduce the procedure described above. Issue these commands from the directory where you wish to create the directory.
mkdir Empty

cd Empty

vi .place-holder (on Windows, try edit .place-holder)

p4 add .place-holder

p4 submit -d "Create Empty"

p4 delete .place-holder

p4 submit -d "Create Empty"
Configure ibi Data Migrator to Work With Perforce
To use a source control system to source manage your ibi Data Migrator flows, stored procedures, and synonyms, you must have a source control program and database configured. The source control program then appear as an SCC Provider.
In the ibi Data Migrator desktop interface:
- Procedure
- On the Home tab, in the
Tools group, click Configure Source Control.
Note: If you have not properly configured Perforce Client, this option does not appear in the Tools group.
The Configure Source Control dialog opens.
- Select Perforce
SCM as SSC Provider from the dropdown menu.
Note: Selecting none removes source control from your system.
- Optionally,
click Test to make sure you can connect to
the source control system from the ibi Data Migrator desktop interface.
Note: If you do not have a license for the Source Control, you might be prompted to get one at this time.
- Click OK.
The Set Source Control Provider dialog opens.
- Click Yes.
Once an SSC Provider has been set, source control options appear on the right-click menus.
Create Associations Between Application Directories and Perforce Project
In the navigation pane of the ibi Data Migrator desktop interface:
- Procedure
- Right-click
an application directory, select Source Control,
and then click Create Association with Source Control.
The Associate Application with Source Control Project window opens.
- Click Associate.
The Open Connection dialog appears, as shown in the following image.
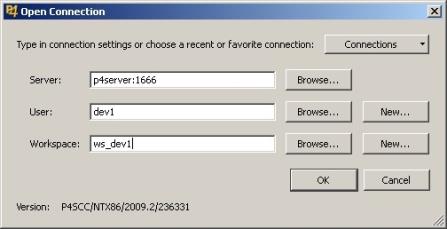
- Enter the
Server, User, and Workspace connection information:
- Server. The name of the computer where your Perforce server is running.
- User. Your Perforce username.
- Workspace. Folders or directories on the client computer where you work on revisions of files that are managed by Perforce.
Note: To display a list of existing users and workspaces, click Browse. The server and port must be specified before clicking Browse. Click New to create users and workspaces. - Click OK to
close the Associate Application with Source Control Project dialog.
The Application Directory icon displays a lock to indicate the source control association.
You are now ready to use Perforce for source management.
Setup, Configure, and Associate ibi Data Migrator With Subversion®
Subversion is an open source revision control system and successor to Concurrent Versions System (CVS) that can run on cross-platform operating systems. This section discusses the Windows implementation. Subversion is a command-line system and cannot be used directly by ibi Data Migrator. To use Subversion, PushOk SVN SCC Proxy is needed to convert the SCC API calls into Subversion commands. It is recommended that the source control folders, also known as modules, are structured the same as the ibi Data Migrator application directories.
Create Subversion Modules
Before you can create Subversion modules, you need to create a repository and add users. Once this is complete, you can create the modules through the Subversion command line, Subversion client, or at the ibi Data Migrator configuration. The following procedure shows how to create a module with a Subversion client, TortoiseSVN. For details on how to create modules at ibi Data Migrator configuration, see Create Associations Between Application Directories and Subversion Modules.
- Procedure
- Install TortoiseSVN.
- From Windows
Explorer, right-click the Subversion Repository folder,
point to TortoiseSVN, and then click Repo-browser.

- Right-click
on top of the tree path and click Create folder,
as shown in the following image.
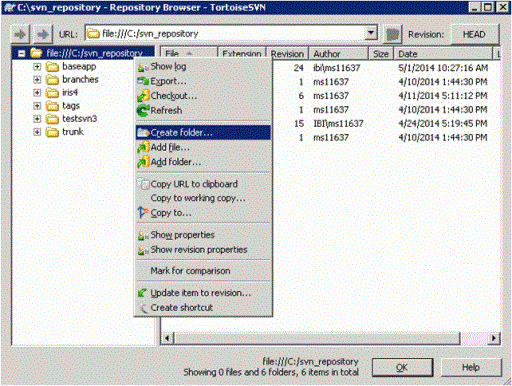
- Enter the folder name. This should be the same as the ibi Data Migrator Application Directory, such as ibisamp.
Configure ibi Data Migrator to Work With Subversion
To use Subversion from the client, you must install the client program. In Windows environment, this would be PushOk SVN SCC Proxy. Once this is installed and configured, the PushOk SVNSCC provider shows as an SCC Provider.
In the ibi Data Migrator desktop interface:
- Procedure
- On the Home tab, in the
Tools menu, click Configure Source Control.
Note: If you have not properly configured PushOk SVNSCC Proxy, this option does not appear in the Tools group.
The Configure Source Control dialog opens.
- Select PushOk
SVNSCC as the SCC Provider from the dropdown menu.
Note: Selecting none removes source control from your system.
- Optionally, click Test to make sure you can connect to the source control system from the ibi Data Migrator desktop interface.
- Click OK.
The Set Source Control Provider dialog opens.
- Click Yes.
Once an SCC Provider has been set, source control options appear on the right-click menus of the application directories.
In PushOk SVNSCC configuration plug-in:
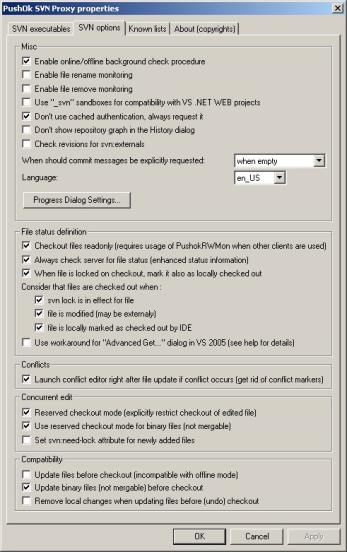
- Open the SVNSCC plug-in by going to Start, All Programs, PushOk Software, SVNSCC, and Configure Plugin.
- Click the SVN
Options tab and verify that the options are set the
same, as shown in the following image.
Create Associations Between Application Directories and Subversion Modules
Creating a source control folder provides a place to manage your ibi Data Migrator files. Creating an association between your application directory and that folder tells ibi Data Migrator where to manage those files.
In the navigation pane of the ibi Data Migrator desktop interface:
- Procedure
- Right-click
an application directory, select Source Control,
and then click Create Association with Source Control.
The Associate Application with Source Control Project window opens.
- Click Associate.
The Select SVNURL, module and local path dialog opens, as shown in the following image.
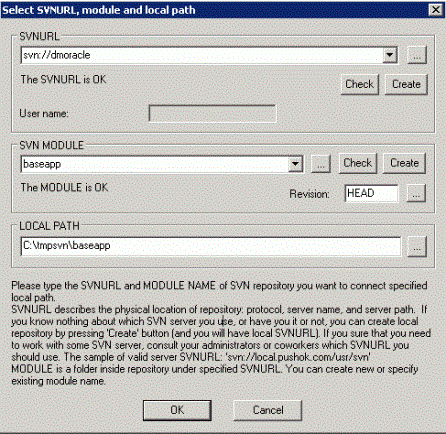
- Enter the
repository information in the SVNURL field. SVNURL describes the
physical location of the repository. The repository is the directory
that stores the revision copies of all the files.
The syntax for the SVNURL is:
:protocol:pcname/path
where:
protocolIs the recommended protocol for a Windows server is svn.
pcnameIs the name of the machine running Subversion.
pathIs the location of the SVN repository. An example of a complete syntax is:
svn://user1@PC1.Note: Each developer must connect with a unique username and password set in Subversion. - Click Check.
If SVNURL is valid, the following message should appear:
The SVNURL is OK.
- Create a module or specify the existing module name. Module is a specific directory (tree of directories) in the main repository, SVNURL. This should mimic the name of the ibi Data Migrator application directory for consistency.
- Click Check.
If Module is invalid and does not exist, click Create. The module needs to be created only once by the developer, who is the first to associate the application directory with the Subversion module. The rest of the developers need to connect to, and work with, the created or pre-existing module created by the first developer.
If Module is valid, the following message should appear:
The MODULE is OK.
- The local path can be set to any local directory, such as C:\temp, but a different local path for each module must be specified. It is recommended that you create and keep the same module name inside a single local path, such as C:\temp\ibisamp.
- Click OK to close the Select SVNURL, module and local path dialog.
- Click OK to close the Associate Application with Source Control Project dialog. If association is successful, the Application Directory icon should display a lock to indicate the source control association.
You are now ready to use Subversion for source management.
Setup, Configure, and Associate ibi Data Migrator to Work With Team Foundation Server (TFS)
Before you can create TFS Team Projects, you have to create a TFS Collection and setup users. A TFS Collection contains Team Projects, which can be associated with ibi Data Migrator Application Directories. It is recommended that you use TFS Collections to differentiate various stages of the product life cycle, such as development, quality assurance, and production. This gives you the option to track different revisions across various deployment stages. However, the setup can vary depending on the requirements of the organization.
To use TFS for source control solution with a 32-bit version of DatamMigrator, Team Foundation Server MSSCCI Provider 2010 (or 2012) 32-bit is needed to convert the SCC API calls into TFS commands.
To use TFS for source control solution with a 64-bit version of ibi Data Migrator, Team Foundation Server MSSCCI Provider 2012 (or higher) 64-bit is needed to convert the SCC API calls into TFS commands.
|
TFS MSSCCI Provider |
Link Available: |
|---|---|
|
2010 32-bit |
http://visualstudiogallery.msdn.microsoft.com/bce06506-be38-47a1-9f29-d3937d3d88d6 |
|
2012 32-bit |
http://visualstudiogallery.msdn.microsoft.com/b5b5053e-af34-4fa3-9098-aaa3f3f007cd |
|
2012 64-bit |
|
|
2013 & 2015 64-bit |
Create TFS Collection and Team Projects
TFS Collections are created from the TFS Administration Console. Please contact your TFS administrator to have a collection created if you do not have one already set-up.
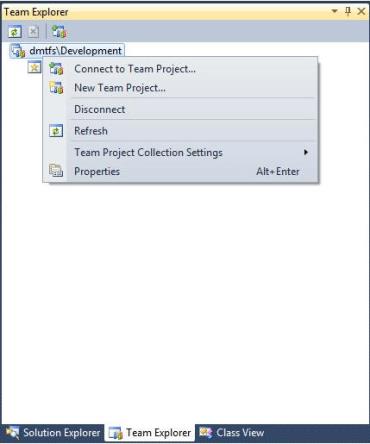
TFS Team Projects are created through Visual Studio. You can create a Team Project by right-clicking TFS Collection from the Team Explorer tab and clicking New Team Project, as shown in the following image.
A wizard guides you in specifying the Team Project settings. The key setting is to name the team projects that correspond to the ibi Data Migrator application directories. You can then click Finish. However, you can continue to the next steps if you want to specify the process template settings.
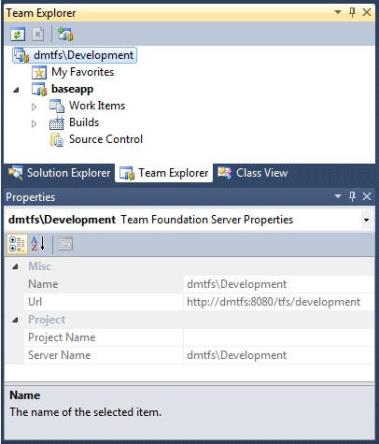
Use the information in the Properties pane to associate the TFS team project with ibi Data Migrator application directories, as shown in the following image.
Set an Exclusive Check-out Configuration
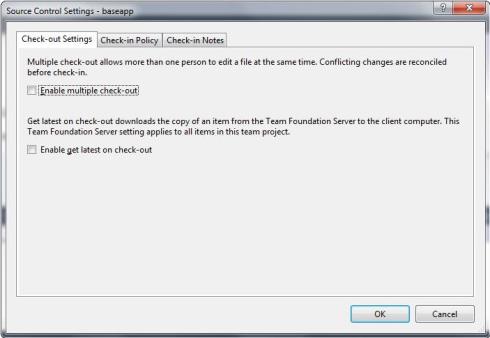
TFS allows concurrent check-out by default. It is required that you switch to an exclusive check-out method technique. To do this from Visual Studio, go to Team Explorer, right-click the Team Project, select Team Project Settings, and then click Source Control. Deselect the Enable multiple check-out checkbox and click OK, as shown in the following image.
Configure ibi Data Migrator to Work With TFS
To use a source control system to source manage your ibi Data Migrator flows, stored procedures, and synonyms, you must have TFS Collection and Team Projects set up and TFS MSSCCI Provider 2010 (or 2012) 32-bit installed on client machines.
In the ibi Data Migrator desktop interface:
- Procedure
- On the Home tab, in the
Tools group, click Configure Source Control.
Note: If you have not properly configured Team Foundation Server MSSCCI Provider, this option does not appear in the Tools group.
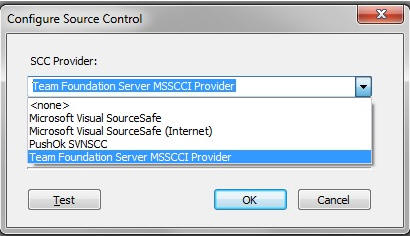
The Configure Source Control dialog opens.
- Select Team
Foundation Server MSSCCI Provider from the SSC Provider
dropdown menu, as shown in the following image.
 Note: Selecting none removes source control from your system.
 - Click OK.
The Set Source Control Provider dialog opens.
- Click Yes.
Once an SSC Provider has been set, source control options appear in the context menus.
Create Associations Between Application Directories and TFS Collection Projects
Creating a source control folder provides a place to manage your ibi Data Migrator files. Creating an association between your application directory and that folder tells ibi Data Migrator where to manage those files.
In the ibi Data Migrator desktop interface:
- Procedure
- Right-click
an application directory in the navigation pane, select Source
Control, and then click Create Association
with Source Control. In this procedure, baseapp is used as an example. The Associate Application with Source Control
Project dialog opens, as shown in the following image.
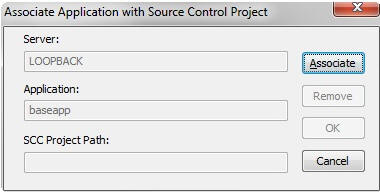
- Click Associate.
- Select the
appropriate TFS Collection, as shown in the following image.
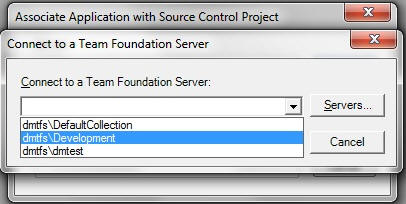
If the desired Team Foundation Server name is not listed in the dropdown list of the available Server names, you can perform the following steps to add the name:
- Click the Servers button.
- Click the Add button on the screen that opens next and enter the full URL of the Team Foundation Server name (for example, http://mydomain:8080/tfs/DefaultCollection).
- Click the OK button.
- Click OK.
- You can
now specify the local and server locations for the project. Specify
the server path to match Team Projects. Specify the local path to
the designated directory, which should be etlgtemp\tmp directory
within your Server install path. For example, C:\ibi\srv82909192\DataMigrator\etlgtemp\server.
The local path is where the source managed files temporarily reside.
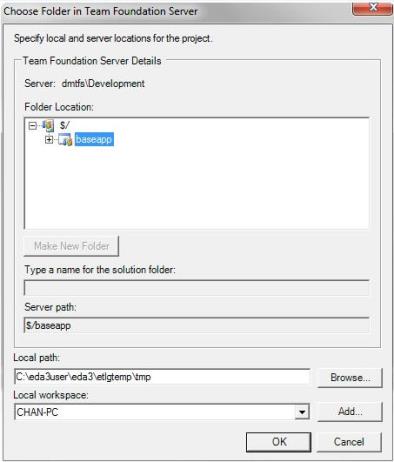
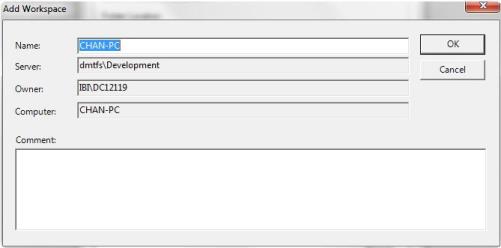
- You should
use the default value for the local workspace, which should be generated
for you, as shown in the following image.
 Note: The name of a temporary directory that is set for the Workspace on the Team Foundation Server is also used by ibi Data Migrator as a ‘Local path’.
 - Click OK to close the Associate Application with Source Control Project dialog. The Application Directory icon displays a lock to indicate the source control association.
You are now ready to use TFS for source management.
Setup, Configure, and Associate ibi Data Migrator to Work With Visual SourceSafe
Source control folders, called projects in Visual SourceSafe, work essentially like ibi Data Migrator application directories. You should create folders in your source control system that mimic your node/application directory structure. Creating folders using your server node names help you distinguish application directories with the same names on different servers.
Create Visual SourceSafe Projects
- Procedure
- Open Visual SourceSafe Explorer.
- On the File menu, click Create Project.
- In the Create Project in dialog, type the project name in the Project field.
- Optionally, enter a brief description of the project in the Comment box.
- Click OK to
create a single empty project.
Normally, SourceSafe requires you to set a working folder, but since ibi Data Migrator is a client/server application, that is not required. ibi Data Migrator sets an internal working directory for files under source control and pushes those files to the server when they are changed.
Configure ibi Data Migrator to Work With Visual SourceSafe
To use a source control system to source manage your ibi Data Migrator flows, stored procedures, and synonyms, you must have a source control program and database configured. The source control program then appear as an SCC Provider.
In the ibi Data Migrator desktop interface:
- Procedure
- From the
Tools menu, click Configure Source Control.
Note: If you have not properly configured Visual SourceSafe Client, this option does not appear on the Tools menu.
The Configure Source Control dialog opens.
- Select Microsoft
Visual SourceSafe as the SSC Provider from the dropdown
menu.
Note: Selecting none removes source control from your system.
- Optionally,
click Test to make sure you can connect to
the source control system from the ibi Data Migrator desktop interface.
Note: If you do not have a license for the Source Control, you might be prompted to get one at this time.
- Click OK.
The Set Source Control Provider dialog opens.
- Click Yes.
Once an SSC Provider has been set, source control options appear on the right-click menus.
Create Associations Between Application Directories and Visual SourceSafe Projects
Creating a source control folder provides a place to manage your ibi Data Migrator files. Creating an association between your application directory and that folder tells ibi Data Migrator where to manage those files.
In the navigation pane of the ibi Data Migrator desktop interface:
- Procedure
- Right-click
an application directory, select Source Control,
and then click Create Association with Source Control.
The Associate Application with Source Control Project dialog opens.
- Click Associate.
The Visual SourceSafe Login dialog opens.
- Type your
User ID, Password, and Path to the srcsafe.ini file for your SourceSafe
database.
Tip: For convenience, it is recommended that you use the same user ID and password for both ibi Data Migrator and SourceSafe.
- Click OK.
The Add to SourceSafe Project dialog opens, as shown in the following image.
- Select a project folder and click OK. If you have not created a project through Visual SourceSafe Explorer, you can do so here by specifying project name and clicking Create.
- Click OK to
close the Associate Application with Source Control Project dialog.
The Application Directory icon displays a lock to indicate the source control association.
Note: While the ibi Data Migrator desktop interface lists application directories according to their position in your Application Path, SourceSafe lists project folders alphabetically.
Visual SourceSafe offers a Share function, which enables files to be shared among multiple projects. If an item is modified in one project, the changes are reflected in other projects simultaneously. This can be beneficial in development environments that require projects to be synchronized when there are changes made to file. ibi Data Migrator can work with shared projects as long as you associate and configure it with VSS.