Installing the ibi WebFOCUS Client
The following procedures describe how to install the WebFOCUS Client.
Install Using the Typical Installation Option
- Procedure
- Download the WebFOCUS Client installation file from the eDelivery site at:
- Double-click the executable application file (
.exe). - Choose the
appropriate language from the dropdown list and click OK.
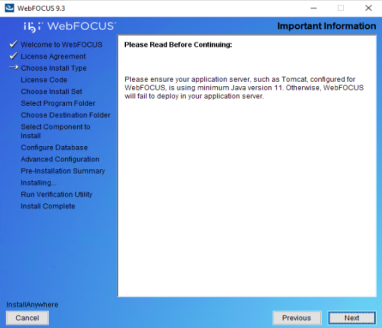
The Welcome to WebFOCUS window opens, recommending that you quit all programs before continuing with the installation.
- Click Next to
continue the installation.
The License Agreement dialog box opens.
- Select I accept the terms of the License Agreement, and click Next to
continue the installation.
A message ia displayed indicating that this release includes several updates to search capabilities in WebFOCUS.
Note:- For an upgrade installation from Release 9.0.1 or earlier, the repository must be reindexed to use these search capabilities.
- For a new installation, the repository must be reindexed if you are using a pre-existing repository from a previous release.
For more information on how to reindex, see the Indexing Content and Data topic in the ibi™ WebFOCUS® User Guide or in the WebFOCUS Online Help system.
If you have an earlier release of WebFOCUS installed on your machine, the Choose Install Type window opens.
- To update your existing release installation to a later version, select Update and the existing instance you want to
update.
-
Click Next, a dialog opens with a prompt to provide WebFOCUS Administrator credentials. This is used to import new roles and new portal page templates into the WebFOCUS repository. For this to be successful, the database must be running. The installation validates the connection to the database and the credentials to ensure permission to perform the import of the Change Management packages that load the roles and templates.
- To install all available features of WebFOCUS, select Full Install. Continue to step 6.
- Click Next to continue the installation.
The Choose Install Set dialog opens.
- Select Typical and
click Next to continue the installation.
The Select Program Folder dialog box opens.
- Accept the
default program folder (WebFOCUS93) or specify a different program
folder name by adding a suffix to the Program Folder name. Then, click Next.
Note: A message is displayed if the provided folder name already exists. The folder name must be unique in order to proceed.
The Choose Destination Locations dialog box opens.
- Perform
the following steps:
- Specify a path for the WebFOCUS application folder. The default
is
C:\ibi.Note: You can specify any path on the local machine or use a Universal Naming Convention (UNC) path. - Choose the appropriate disk from the Disk Space Information dropdown list.
- Click Next.
The Select Components to install dialog opens, as shown in the following image.
 Note: If you specified a UNC path for the WebFOCUS application folder, then the ReportCaster Distribution Server must be installed separately. In the Select Components to install dialog, the ReportCaster Distribution Server checkbox is not available. In the Advanced Configuration dialog, you must provide the ReportCaster Distribution Server host and port values that correspond to the system where you are going to install the ReportCaster Distribution Server.
 - Specify a path for the WebFOCUS application folder. The default
is
- Perform the following steps:
- In the WebFOCUS component area, in the Mail Server Host Name field, type the host name or IP address for your mail server.
- In the Choose
Applications Path field, type a path where WebFOCUS applications are saved or accept the default location (
C:\ibi\apps).Options to install Tomcat and Derby are enabled if these components are not preinstalled on your system. Allow these options to be installed and configured with WebFOCUS if you want to use default configuration options.
- If you clear the options to install and configure Tomcat, an application server needs to be configured postinstallation.
- If you clear the option to install Derby, or Derby is preinstalled, continue to the next substep.
- Select a database (for example, Apache Derby or Microsoft SQL Server) from the
Configure pre-existing Database dropdown list.
Note:
- If you want
to use an existing WebFOCUS repository that already has tables defined,
clear the Create WebFOCUS Repository option.
After the installation is completed, you must drop and re-create
the existing tables in the repository if you plan on working with a new WebFOCUS repository. Alternatively, you can run the
WFReposUtilCMDLine.batfile with the CREATE_INSERT mode to update your database and create the required tables and columns. - If you select the Create WebFOCUS
Repository option, you are prompted for WebFOCUS
administrator credentials. The credentials that you enter
become the WebFOCUS administrator credentials. During the database creation, the user name and
password supports ASCII characters from 32 to 126 and cannot
include the following characters: caret
(^),
ampersand (&), percent (%),
or double quotation mark (").
Refer to the ASCII character table to
determine the characters to use for the WebFOCUS administrator
credentials.
The password for the user name must be between four and 20 characters. Leading blanks and trailing blanks are removed. You are not prompted for credentials if the Create WebFOCUS Repository option is not selected.
- If you select the Create WebFOCUS Repository option, the installation checks the database to see if it contains existing tables. If it contains tables, the Create WebFOCUS Repository option is not performed and a message is displayed. In this case, you can:
- Provide information for a new empty database.
- Post-installation, create the tables using the WFReposUtilCMDLine WebFOCUS utility. For more information, see ibi WebFOCUS Repository Postinstallation Tasks.
- If you are performing a new installation and pointing to a database created in
- If you want to use a web or application server other than Apache Tomcat, then clear the Configure Apache Tomcat option. The Configure WebFOCUS Client area appear and you must enter the port number that is currently used by your web server in the corresponding field.
- If you want
to use an existing WebFOCUS repository that already has tables defined,
clear the Create WebFOCUS Repository option.
After the installation is completed, you must drop and re-create
the existing tables in the repository if you plan on working with a new WebFOCUS repository. Alternatively, you can run the
- Click Next to accept the remaining default installation components and configuration settings.
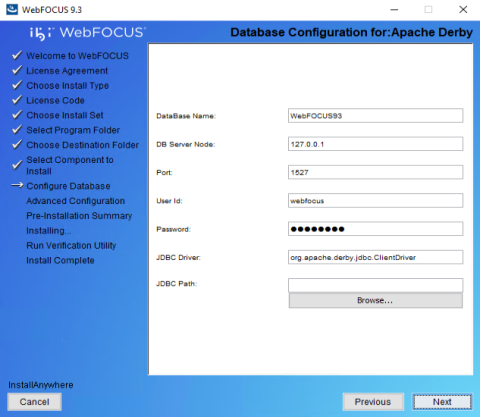
The Database Configuration dialog opens, as shown in the following image. In this example, Apache Derby is being configured, since it was the pre-existing database that was selected.
 Note:
Note:- The Database Configuration
for Apache Derby dialog opens if you have an existing version
of Derby installed on your system. In this case, the Derby 10.15.2.0 checkbox
is not available in the Select Components to install dialog. The Database Configuration for Apache Derby dialog also
opens if you clear the Derby 10.15.2.0 checkbox and select the
option to use an existing Derby installation.
If the installer detects an existing Derby installation on the machine, the JDBC Path is populated automatically. Otherwise, the JDBC Path text box is blank, and the user has to enter the full path to the jar files.
- For security reasons, Derby is restricted to localhost by commenting line -
#derby.drda.host=0.0.0.0. If you want to open up derby to your network, outside of your localhost, then uncomment as follows:derby.drda.host=0.0.0.0 - If outside resources such as your application server or report caster are on different machines than the derby server, then derby needs to be opened up to the network. You can do this by uncommenting
#derby.drda.host=0.0.0.0. Consult your security team or system administrator for this.
- Click Next to
continue the installation.
The Pre-Installation Summary window opens.
- Verify that
all of the information is correct and click Install to
continue with the configuration and installation.
As WebFOCUS is being configured on your system, the Please Wait window is displayed.
After WebFOCUS is configured, the Installing WebFOCUS dialog opens. As WebFOCUS is being installed, the installation dialog informs you about the installation tasks that are being performed.
When the installation is complete, the Run Verification Utility dialog appears.
- Select the
verification utilities you would like to run and click Next.
The available utilities are:
The WebFOCUS Console Verification UtilityWebFOCUS Online Documentation
The Install Complete window opens, listing the installation directory.
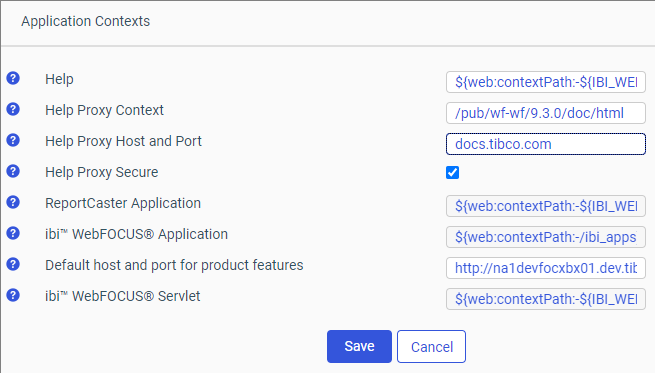
Note:Online Help is hosted by our servers. This Help configuration is applied for new installations or when upgrading from an earlier release. The installation package no longer includes the help files, which greatly reduces the installation file size and time required to install and configure the software. If you want to confirm hosted help, you can check the Help Proxy fields on the Application Contexts page of the Administration Console Configuration tab, as shown in the following image.
If you are restricted from using Hosted Help, see Configuring WebFOCUS Help for instructions on how to install Online Help on your own internal application server.
- If you performed an upgrade installation, ensure that the application server cache is cleared prior to using the new installation.
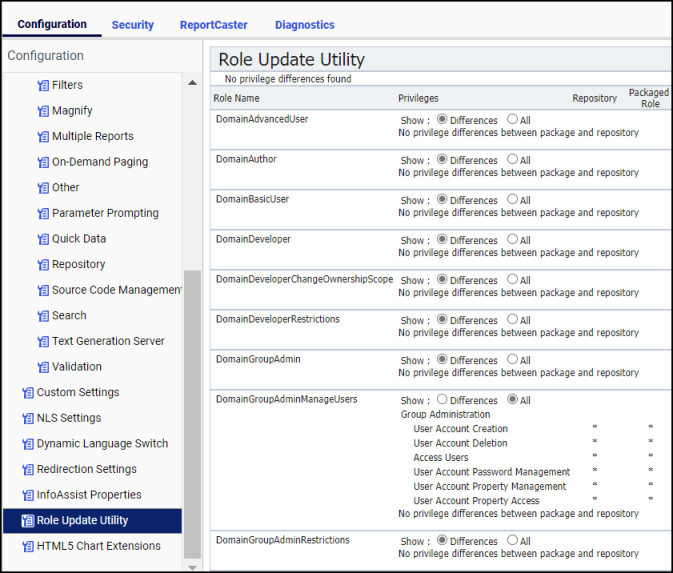
In addition, use the Role Update Utility available in the Administration Console to update repository roles and privileges. The utility enables you to identify differences between roles and privileges available in your existing repository and the new roles and privileges provided with the new installation.
It is recommended that you replace your repository with new roles and privileges to use new functionality and features.
The following is an example of the Role Update Utility upgrading to Release 9.3.3. The Run Procedures with Insight and Designer privileges are required to use new functionality, run Insight content, and access ibi™ WebFOCUS® Designer.
- Sign in to WebFOCUS as an administrator.
- On the ibi™ WebFOCUS® Hub, from the side navigation pane, select Management Center and then Administration Console.
- In the Configuration panel, click Role
Update Utility.
At the top of the table, you see a message that identifies new roles and high-level differences between your existing roles.
- Examine the differences between the Repository and Packaged roles and privileges and apply the new roles and privileges to enable new functionality and features.
Install Using the Custom Installation Option
- Procedure
- Download the WebFOCUS Client installation file from the eDelivery site at:
- Double-click the executable application file (.exe).
- Choose the
appropriate language from the dropdown list and click OK.
The Welcome to WebFOCUS window opens, recommending that you quit all programs before continuing with the installation.
- Click Next to continue the installation.
- Select I accept the terms of the License Agreement, and click Next to
continue the installation.
A message displays indicating that this release includes several updates to search capabilities in WebFOCUS.
Note:- For an upgrade installation from Release 9.0.1 or earlier, the repository must be reindexed to use these search capabilities.
- For a new installation, the repository must be reindexed if you are using a pre-existing repository from a previous release.
For more information on how to reindex, see the Indexing Content and Data topic in the ibi™ WebFOCUS® User Guide or in the WebFOCUS Online Help system.
The Choose Install Type dialog box opens. Select one of the following:
- To update your existing installation to a later version, select Update and the existing instance you want to
update.
If you select Update, a dialog opens with a prompt to provide WebFOCUS Administrator credentials. This is used to import new roles and new portal page templates into the WebFOCUS repository. For this to be successful, connection to the database must be available (database must be running). The installation validates the connection to the database and the credentials to ensure permission to perform the import of the Change Management packages.
The Pre-Installation Summary dialog opens. Continue to step 13.
- To install all available features of WebFOCUS, select Full Install. Continue to step 6.
- Click Next.
The Choose Install Set dialog opens.
- Select Custom and
click Next to continue the installation.
The Select Program Folder dialog opens.
- Accept the
default program folder (WebFOCUS93) or specify a different program
folder name by adding a suffix to the Program Group name. Then, click Next.
Note: A message is displayed if the provided folder name already exists. The folder name must be unique in order to proceed.
The Choose Destination Locations dialog opens.
- Perform
the following steps:
- Specify a path for the WebFOCUS application folder. The default
is C:\ibi.
Note: You can specify any path on the local machine or use a Universal Naming Convention (UNC) path.
- Choose the appropriate disk from the Disk Space Information dropdown list.
- Click Next.
The Select Components to install dialog opens, as shown in the following image.
 Note: If you specified a UNC path for the WebFOCUS application folder, then the ReportCaster Distribution Server must be installed separately. In the Select Components to install dialog, the ReportCaster Distribution Server checkbox is not available. In the Advanced Configuration dialog, you must provide the ReportCaster Distribution Server host and port values that correspond to the system where you are going to install the ReportCaster Distribution Server.
 - Specify a path for the WebFOCUS application folder. The default
is C:\ibi.
- Perform the following steps:
- In the WebFOCUS component area, in the Mail Server Host Name field, type the host name or IP address for your mail server.
- In the Choose
Applications Path field, type a path where WebFOCUS applications are saved or accept the default location (
C:\ibi\apps).Options to install Tomcat and Derby are enabled if these components are not preinstalled on your system. Allow these options to be installed and configured with WebFOCUS if you want to use default configuration options.
- If you clear the options to install and configure Tomcat, an application server needs to be configured postinstallation.
- If you clear the option to install Derby, or Derby is preinstalled, continue to the next substep.
- Select a database (for example, Apache Derby or Microsoft SQL Server) from the
Configure pre-existing Database dropdown list.
Note:
- If you want to use an existing WebFOCUS repository that already has tables defined, clear the Create WebFOCUS Repository option. After the installation is completed, you must drop and re-create the existing tables in the repository if you plan on working with a new WebFOCUS repository. Alternatively, you can run the WFReposUtilCMDLine.bat file with the CREATE_INSERT mode to update your database and create the required tables and columns.
- If you select the Create WebFOCUS
Repository option, you are prompted for WebFOCUS
administrator credentials. The credentials that you enter
become the WebFOCUS administrator credentials. During the database creation, the user name and
password supports ASCII characters from 32 to 126 and cannot
include the following characters: caret
(^),
ampersand (&), percent (%),
or double quotation mark (").
Refer to the ASCII character table to
determine the characters to use for the WebFOCUS administrator
credentials.
The password for the user name must be between four and 20 characters. Leading blanks and trailing blanks are removed. You are not prompted for credentials if the Create WebFOCUS Repository option is not selected.
- If you select the Create WebFOCUS Repository option, the installation checks the database to see if it contains existing tables. If it contains tables, the Create WebFOCUS Repository option is not performed and a message is displayed. In this case, you can:
- Provide information for a new empty database.
- Post-installation, create the tables using the WFReposUtilCMDLine WebFOCUS utility. For more information, see ibi WebFOCUS Repository Postinstallation Tasks.
- If you are performing a new installation and pointing to a
database created
- If you want to use a web or application server other than Apache Tomcat, then clear the Configure Apache Tomcat option. The Configure WebFOCUS Client area appear and you must enter the port number that is currently used by your web server in the corresponding field.
- Click Next to accept the remaining default installation components and configuration settings.
The Database Configuration dialog opens, as shown in the following image. In this example, Apache Derby is being configured, since it was the pre-existing database that was selected.
 Note:
Note:- The Database Configuration
for Apache Derby dialog opens if you have an existing version
of Derby installed on your system. In this case, the Derby 10.15.2.0 checkbox is not available in the Select Components to install dialog. The Database Configuration for Apache Derby dialog also
opens if you clear the Derby 10.15.2.0 checkbox and select the
option to use an existing Derby installation.
If the installer detects an existing Derby installation on the machine, the JDBC Path is populated automatically. Otherwise, the JDBC Path text box is blank, and the user has to enter the full path to the jar files.
- For security reasons, Derby is restricted to localhost by commenting line -
#derby.drda.host=0.0.0.0. If you want to open up derby to your network, outside of your localhost, then uncomment as follows:derby.drda.host=0.0.0.0 - If outside resources such as your application server or report caster are on different machines than the derby server, then derby needs to be opened up to the network. You can do this by uncommenting
#derby.drda.host=0.0.0.0
- Click Next.
The Advanced Configuration dialog is displayed as shown in the following image.
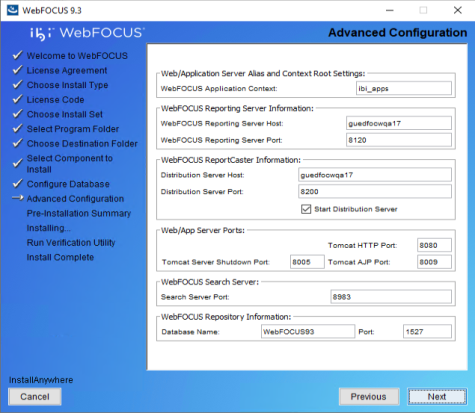
- Perform
the following steps:
- In the WebFOCUS Application Context field, type a context root or accept the default (ibi_apps).
- In the WebFOCUS Reporting Server Host field, type a host name or accept the default. The default WebFOCUS Reporting Server host is the name of the machine where WebFOCUS is being installed.
- In the WebFOCUS Reporting Server Port field, type a server port or accept the default (8120).
- In the Distribution Server Host field, type a host name. The default Distribution Server host is the name of the machine where WebFOCUS is being installed.
- In the Distribution Server Port field, type a server port or accept the default (8200).
- In the Web/App Server Ports area, specify the port values that are being used by your application server.
- In the WebFOCUS Search Server area, the installation checks if default port 8983 is open and available to use. If the port is in use (busy), the installation program checks for another port and allows you to change and specify a custom port.
Note: Online Help is hosted by our servers and the WebFOCUS Help Context field has been removed from the Advanced Configuration dialog. This Help configuration is applied for new installations or when upgrading from an earlier release. The installation package no longer includes the help files, which greatly reduces the installation file size and time required to install and configure the software. If you want to confirm hosted help, you can check the Help Proxy fields on the Application Contexts page of the Administration Console Configuration tab, as shown in the following image.
If you are restricted from using Hosted Help, see Configuring WebFOCUS Help for instructions on how to install Online Help on your own internal application server.
- Click Next to
continue the installation.
The Pre-Installation Summary window opens.
- Verify that
all of the information is correct and click Install to
continue with the configuration and installation.
As WebFOCUS is being configured on your system, the Please Wait window is displayed.
After WebFOCUS is configured, the Installing WebFOCUS dialog opens. As WebFOCUS is being installed, the Installing WebFOCUS dialog informs you about the installation tasks that are being performed.
When the installation is complete, the Run Verification Utility dialog appears.
- Select the
verification utilities you would like to run and click Next.
The available utilities are:
The WebFOCUS Console Verification UtilityWebFOCUS Online Documentation
The Install Complete window opens, listing the installation directory.
- If you performed an upgrade installation, ensure that the application server cache is cleared prior to using the new installation.
In addition, use the Role Update Utility available in the Administration Console to update repository roles and privileges. The utility enables you to identify differences between roles and privileges available in your existing repository and the new roles and privileges provided with the new installation.
It is recommended that you replace your repository with new roles and privileges to use new functionality and features.
The following is an example of the Role Update Utility upgrading to Release 9.3.3. The Run Procedures with Insight and Designer privileges are required to use new functionality, run Insight content, and access WebFOCUS® Designer.
- Sign in to WebFOCUS as an administrator.
- On the WebFOCUS® Hub, from the side navigation pane, select Management Center and then Administration Console.
- In the Configuration panel, click Role
Update Utility.
At the top of the table, you see a message that identifies new roles and high-level differences between your existing roles.
- Examine the differences between the Repository and Packaged roles and privileges and apply the new roles and privileges to enable new functionality and features.
Install ibi WebFOCUS Client Using the Silent Install
- Procedure
- To generate
the silent install properties file from the command prompt, navigate
to the directory where the
IBI_wf-wf_release_win_x86_64.exefile resides. - Enter the
following command:
IBI_wf-wf_release_win_x86_64.exe -r drive:\fullpath\name.properties
Note:- Replace release with
the specific WebFOCUS release, for example,
IBI_wf-wf_93_win_x86_64.exe. - Always generate the properties file before performing the silent install to ensure that the properties are correct.
- The properties file
has the extension
.properties. - You need to specify the full path to where the properties file are created.
- Replace release with
the specific WebFOCUS release, for example,
- To install
in silent mode, navigate to the directory where the
IBI_wf-wf_93_win_x86_64.exefile resides and enter the following command:IBI_wf-wf_93_win_x86_64.exe -i silent -f drive:\fullpath\name.properties
Troubleshooting the Installation
- If you experience issues during the installation, due to Java memory resources:
- Start the Command Window with the option Run as administrator and either of the following commands:
set _JAVA_OPTIONS=-Xmx1024m

set _JAVA_OPTIONS=-Xmx2048m
Note: The set_JAVA_OPTIONS=-Xmx2048mcommand is recommended.The memory allocated through this command must be available on your system.
This is a temporary variable applicable for the duration of the Command Window session.
- From the same Command Window, navigate to the location of the WebFOCUS installation program and run the installation program.
- Start the Command Window with the option Run as administrator and either of the following commands:
- The following are the main trace files for the installation.
The names are generated with a date and random number, where userprofile is
the user ID logged on during the installation.
C:\Users\userprofile\WebFOCUS93_inst_date_######.log

C:\Users\userprofile\WebFOCUS93_Install_inst_date_######.log
If the server cannot find the Java VM, the JSCOM Listener is not able to start and the messages are written to the server log file (
edaprint.log), stating that the Java VM cannot be found. To resolve this issue, specify the location of the Java VM inJDK_HOMEorIBI_JNIPATH. For more information, see the ibi™ WebFOCUS® Reporting Server Installation guide.