Procedure: How to Create a Schedule in the Advanced Scheduling Tool
- Open the Advanced Scheduling tool, as described earlier in this section.
- In the Properties
tab, you can edit the name for the schedule Title box.
This is a required field and is blank, by default.
- In the Summary box, type a descriptive summary.
- Select a
Job Priority Level.
Normal - 3 Job Priority Level is the default.
- Specify the action that will be performed if there is
no report to distribute.
Note: This option is set to the default value configured by the administrator. To trigger error notification if no report is generated, set this value to Error. If you do not want to trigger notification when no report is generated, set this value to Warning.
- Select the Delete
this schedule if it is not scheduled to run again check
box if you want this schedule to be deleted if it will not run again
based on its Recurrence settings.
Use this option if you do not plan on using this schedule again.
- Leave the Enabled (Scheduled job runs at specified time) check box selected if you want scheduled jobs to run as you have specified in the Recurrence settings.
- Make the
following selections in the Recurrence tab.
- Click New.
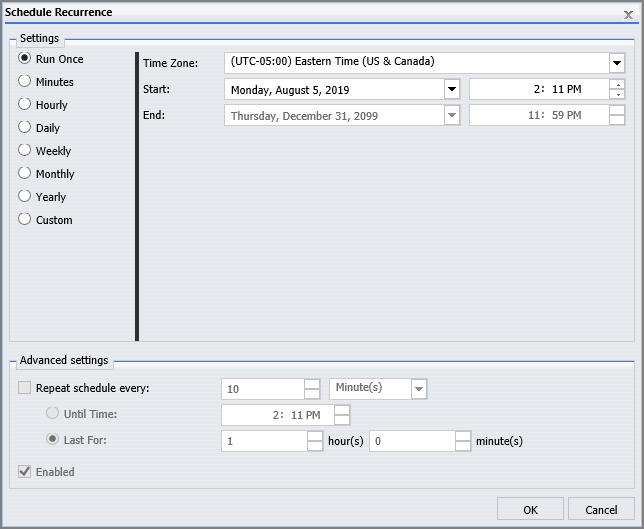
The Schedule Recurrence dialog box displays, as shown in the following image.

- From the Settings radio button list, select the run interval
that the schedule will use to run.
You can set the interval to Run Once, Minutes, Hourly, Daily, Weekly, Monthly, Yearly, or at Custom intervals.
- From the Time Zone list, select the time zone of the recipients of the scheduled content if they are not located in the default time zone.
- Select the Start date from the drop-down calendar, and select the time that you
want the schedule to begin running.
Note: To change the time setting, select either the hour or minutes and use the arrows to increase or decrease the value.
- If applicable to the run interval selection, select the End date and time to specify when you want the schedule to stop running.
- If applicable to the run interval selection, from the Advanced settings, click the Repeat schedule every check box to enable custom intervals.
- Click New.
- In the Tasks
tab, the fields are populated according to the Task type you select
to schedule. For example, if you select to schedule a WebFOCUS report,
the Path and Procedure are populated according to the procedure
(FEX) information stored in the WebFOCUS Repository. In this tab,
you can add additional tasks, preprocessing and post-processing
procedures, and parameters. For more information on the Task tab,
see About Tasks in the Advanced Scheduling Tool.
Note: When a path and FEX name are entered manually into the Procedure field of the Scheduling Tool, the Save As field must also be manually populated. The parameters are populated by clicking the Refresh button in the Task Parameters window. In addition, if you create a schedule with more than one task, you will only be able to specify Email or Printer as your distribution method.
- In the Distributions
tab, select the method to distribute the report from the New drop-down
list. The distribution methods are:
- Email - supports multiple tasks
- FTP
- Printer - supports multiple tasks
- Report Library
- Repository
Note: If you are working with a schedule with a single task, you can specify any of the above distribution options. Email and printer are the only options for schedules with more than one task specified.
Select the appropriate distribution options. For more information, see Distribution Options in the Advanced Scheduling Tool.
- In the Notification tab, select whether
or not you want to send a notification when the schedule runs and
under what conditions to send it. The notification options are:
- Never. ReportCaster will not send a notification of the schedule status under any circumstances. This is the default value.
- Always. Sends a notification each time the schedule runs. Fill in the Reply Address, Subject, Brief Message To, and Full Message To fields.
- On Error. Only sends a notification when there is an error running the schedule. Fill in the Reply Address, Subject, Brief Message To, and Full Message To fields.
- In the Log Reports tab, you can view the log reports available for each time the schedule has run.
- To save
the schedule, click Save & Close in the Scheduling
tool toolbar.Note:
- The maximum length of a title value for a file is 256 characters.
- If the title of your file has the same name of an existing file in the folder, you will receive a message asking if you wish to replace the file.