Tutorial Procedure

This tutorial describes how to create a fully functioning application using WCC components.

Procedure

  1. Start General Interface Builder and create a workspace if you haven’t created one yet (the General Interface workspace must be set to the directory that contains the GI_Builder.html file, as shown below).

    General Interface Builder can be started by executing the following:

       StudioHome\wcc\version\GI_Builder.html

    where:

    • StudioHome is the directory in which TIBCO Business Studio was installed.
    • version is the version number of Workspace that was installed with TIBCO Business Studio.

      For more information about starting General Interface Builder, see the "Starting TIBCO General Interface Builder" section in TIBCO General Interface Getting Started.

  2. From the Project menu in General Interface Builder, select New Project.

    The Choose a Project Type dialog is displayed.

  3. Select a "General Interface Application", then click Next.

    The Choose a Project Template dialog is displayed.

  4. Select an "Empty Project" template for this tutorial, then click Next.

    The Choose a Project Path dialog is displayed.

  5. Enter a name for a new project, then click Finish. This can be any name because this new project will be closed when you start a “WCC” (Workspace Client Components) project.
  6. On the Project menu, select Project Settings.

    The Project Settings dialog is displayed.

  7. Click on the Add-ins icon on the left side of the Project Settings dialog.

    Check boxes for the available add-ins are displayed.

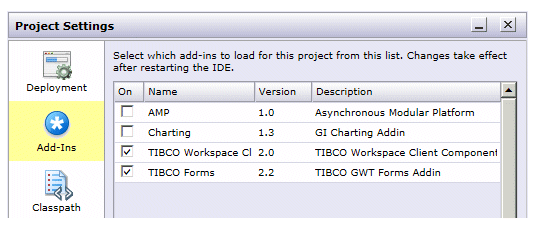
  8. Click in the TIBCO Workspace Client Components (WCC) check box, then click Save (leave all other check boxes as you found them — for more information about Add-ins, see the TIBCO Workspace Configuration and Customization guide).

    The TIBCO Workspace Client Components add-in provides access to the WCC components from within General Interface Builder at design-time.

    A dialog is displayed informing you that you must restart General Interface Builder for the add-in change to take effect. Click OK on this dialog.

  9. Refresh the browser window to restart General Interface Builder (in Internet Explorer, select Refresh from the View menu). This causes the TIBCO Workspace Client Components (WCC) add-in to be loaded.
  10. From the Project menu, select New Project.

    The Choose a Project Type dialog is displayed.

  11. Choose a "Workspace Client Components (WCC) Application", then click Next.

    The following dialog is displayed:

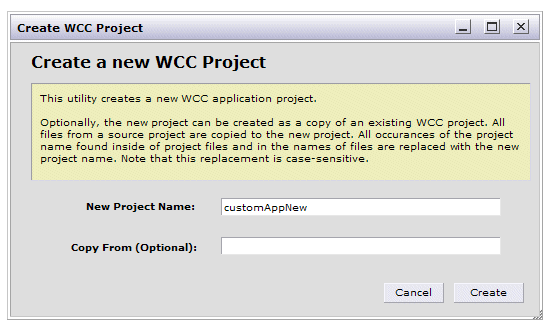
    This dialog is used to create a new WCC project. Creating a custom application that includes Workspace components requires that you create a WCC project that is based on an existing WCC project.

    A base-level WCC project upon which you can base your project is provided. This base-level WCC project includes the Workspace components as an Add-in. This allows you to use those components, as well as the standard General Interface Builder components, to create your custom application.

    The default is to create your new WCC project based on the provided base-level WCC project. You can override this by specifying, in the Copy From field, the name of the existing WCC project upon which you want to base the new project.

  12. In the New Project Name field, enter the name you would like to give your new project. Use “Accounts” for this tutorial.

    In this tutorial, you’ll use the base-level WCC project as our starting point, and leave the Copy From field blank.

  13. Click the Create button.

    After General Interface Builder reloads the new project, notice the JSXAPPS/Accounts link in the lower left-hand corner of the General Interface Builder dialog. This tells you what project you are currently in, as well as provides a way to easily navigate via the browser to the directory that contains all of your project files.

  14. From the New menu in General Interface Builder, select GUI Component.

    The following dialog is displayed:

    If you are going to add Workspace components to your application, they must be inside of a WCC prototype. You can think of the WCC prototype as a component container.

    Creating a WCC prototype sets up the PageBus so that it can wire-up all of the component events you add to the prototype.

  15. Enter a model name for the prototype, then click Create. Use “AccountsPrototype” in this tutorial.

    The prototype model name is used in the subject string internally by the PageBus to identify events associated with specific prototypes/components.

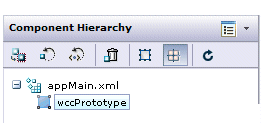
    After creating the WCC prototype, the Component Hierarchy palette will appear as follows:

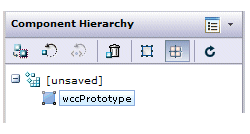
    Notice that the model name does not appear in the Component Hierachy. However, if you view the source XML for the WCC prototype, the model name is defined in the prototypeModelName attribute:

    <strings jsxname="wccPrototype"
   jsxwidth="100%"
   jsxheight="100%"
   appModelName="com.tibco.wcc.Accounts"    prototypeModelName="AccountsPrototype"
       ...

    Also, notice that the WCC prototype is actually contained within a top-level prototype object, which is unnamed at this point. This top-level prototype represents a General Interface user-defined prototype in our project — this prototype can contain WCC prototypes.

  16. From the File menu, select Save (or right click on the work area tab and select Save).

    The file you are saving at this point is the General Interface user-defined prototype. Save the prototype in the appMain.xml file, overwriting the existing appMain.xml file, in the following directory:

       GIWorkspaceDir\JSXAPPS\WCCProjectName\application\prototypes

    where GIWorkspaceDir is the TIBCO General Interface workspace directory you established the first time General Interface Builder was started (see step1) and WCCProjectName is the name you gave the WCC Project in step 12 (“Accounts” in this tutorial).

    The Component Hierarchy palette now appears as follows:

    The tab in the work area also now contains the name of the General Interface user-defined prototype, appMain.xml.

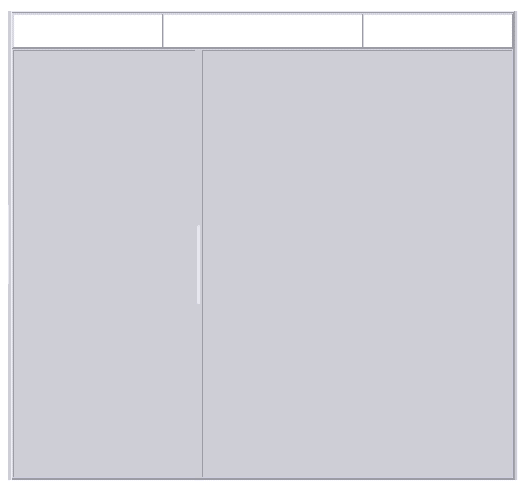
  17. Using the standard TIBCO General Interface Builder Layout and Splitter components, create a screen layout similar to the following:

    Note - If you are not familiar with TIBCO General Interface Builder, you can refer to Creating the Tutorial Screen Layout for detailed steps about how to create this layout using the standard General Interface Builder components.

  18. From the Component Libraries palette, select and drag the WCC Login component into the left-side pane created by the vertical splitter.

    Note that you could also drag and drop WCC components onto the appropriate pane in the Component Hierarchy palette.

    The Login dialog appears in the pane.

  19. From the Component Libraries palette, select and drag the WCC Toolbar Button component into the top right area created by the Layout components.

    You will later designate this toolbar button the Logout button.

  20. From the Component Libraries palette, select and drag the WCC Data Mask component into the top center area created by the Layout components.

    The Data Mask component provides a “Loading Data ...” message while the application is retrieving data from the server and rendering it on the screen.

  21. From the Component Libraries palette, select and drag the WCC Work Views component onto the appropriate pane in the Component Hierarchy palette that represents the area to the left of the vertical splitter, i.e., the pane in which the Login component is located.

    Note that you cannot place the Work Views component directly in the work area because the Login component is already in that area. (When a component is dropped into a container in the work area, it, by default, consumes 100% of the container. If you want to place another component in the same container, General Interface Builder requires that you place it in the pane in the Component Hierarchy tree.)

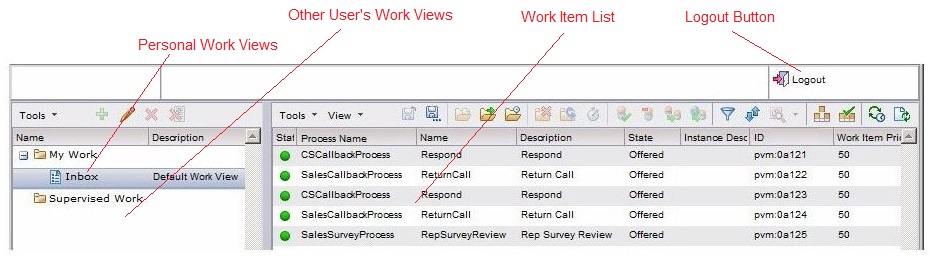
    The Work Views component displays a list of work views (note that by default, the only work view is the "Inbox" — you can create additional work views using the view wizard, if desired). You will later configure events so that this list is displayed when the user is authenticated through the Login component.

    Note: When dragging and dropping WCC components onto the Component Hierarchy, do not drop them anywhere above the WCC prototype in the component tree. WCC components must be placed in a WCC prototype.
  22. From the Component Libraries palette, select and drag the WCC Work Items component into the right-side pane created by the vertical splitter.

    The Work Items component displays a work item list containing the work items for a particular work view (the user’s "Inbox", by default, contains all of that user’s work items).

    You will later configure events so that this list is displayed when the user clicks on a view in the work view list.

    Notice that a grid pattern representing each component is shown in the containers to provide visual feedback.

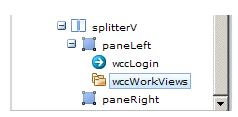
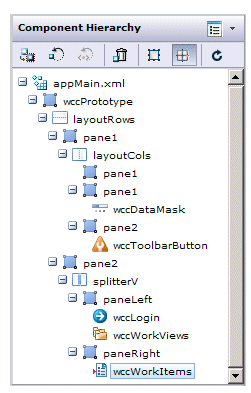
    The Component Hierarchy should now look like this (if the components are not in this order, move them by dragging and dropping them in the proper location):

    Now you’ll wire-up the events that will cause the work view list to display when the user is authenticated, and the work item list to display the work items in the selected work view.

  23. In the Component Hierarchy palette, click on the wccWorkViews component, then click on the wccWorkViews button in the taskbar (lower left part of the General Interface Builder dialog) to display the Properties/Events Editor dialog.
  24. Click on the Events tab.
    Note: In this tutorial, you will not change any of the property settings on the Properties tab for the purpose of specifying access to the functions provided by the component. For information about setting properties, see Properties Editor .

    You will, however, set a property on the Toolbar Button component to designate it as a Logout button — this is explained later.

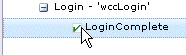
  25. Double-click the LoginComplete event, which causes the check box to become checked:
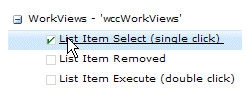
    This causes the wccWorkViews component to subscribe to the “LoginComplete” event, which the Login component publishes.

    This results in the work view list being rendered when the user’s login credentials are authenticated.

  26. Click Commit to save the changes.
  27. In the Component Hierarchy palette, click on the wccWorkItems component.

    This causes the Properties/Events Editor to now control the properties and events for the wccWorkItems component — the header bar on the Properties/Events Editor dialog displays "wccWorkItems".

  28. On the Properties/Events Editor dialog Events tab, double-click on the “List Item Select (single click)” event for the wccWorkViews component.

    This causes the wccWorkItems component to subscribe to the “List Item Select (single click)” event that the wccWorkViews component publishes.

    This results in the work item list being rendered when a work view in the work view list is selected (note that the first work view in the list is selected by default when the work view list is displayed, causing that work item list to be automatically displayed when the work view list is rendered).

  29. Click Commit to save the changes.
  30. In the Component Hierarchy palette, click on the wccToolbarButton component.
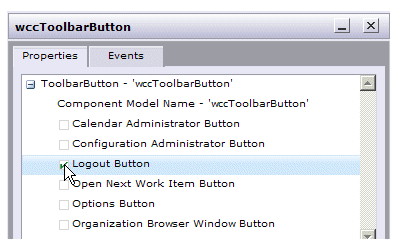
  31. On the Properties/Events Editor dialog Properties tab, double-click the “Logout Button” property:

    This causes the wccToolbarButton component to render as a Logout button.

  32. While the wccToolbarButton component is still selected, click on the Properties/Events Editor dialog Events tab, then double-click the “LoginComplete” event:

    This causes the wccToolbarButton component to subscribe to the “LoginComplete” event that the wccLogin component publishes.

    This results in the Logout button being rendered when the user’s login credentials are authenticated.

  33. Click Commit to save the changes, then minimize or click Close to close the editor dialog.
  34. From the File menu, select Save.

    You have now created an application that will allow a user to log in and view their work views and display a list of work items for each view. They can also perform any functions available from these lists, for which they have the proper permissions.

    The next three steps describe how to implement a change to make the browser window close when the user clicks the Logout button.

    As an alternative, you can make the Login dialog be re-displayed when the user logs out by reloading the appMain prototype (appMain.xml). To do this, perform the steps in Reloading the appMain Prototype Upon Logout, then proceed to step 38.

  35. Open the Application.js file in the following directory:
       GIWorkspaceDir\JSXAPPS\WCCProjectName\application\js

    where GIWorkspaceDir is the TIBCO General Interface workspace directory and WCCProjectName is the name you gave the WCC Project (“Accounts” in this tutorial).

  36. Locate the postLogout function and add the following line:
       window.close();

    This will cause the browser window to close when the user clicks the Logout button.

    For more information about using the postLogout function, see postLogout.

  37. Save and close the Application.js file.
  38. Open your custom application’s config.xml file, which is located as follows:
       GIWorkspaceDir\JSXAPPS\WCCProjectName\config.xml

    where GIWorkspaceDir is the TIBCO General Interface workspace and WCCProjectName is the name you gave the WCC Project in step 12 (“Accounts” in this tutorial).

  39. Locate the ActionProcessors record and set its baseUrl attribute to the location of the Action Processor. The string in the baseUrl attribute must be in the form:
       http://Host:Port/bpm/actionprocessor/actionprocessor.servlet

    where:

    • Host is the name or IP address of the machine hosting the Action Processor. This must be the same machine on which the application is running (i.e., the Action Processor and the application must be running on the same machine).
    • Port is the port number used by the ActiveMatrix WebApp Implementation Type to communicate with web applications.
      Note: In a production environment, the baseUrl is normally set to an empty string, which causes the URL of the Action Processor to be determined from the URL entered in a browser by the user to start the application. In a testing environment, however, you will be starting the application via the file system, therefore the Action Processor URL needs to be explicitly specified in the baseUrl attribute.
  40. Save and close the config.xml file.
  41. In Windows Explorer, navigate to the General Interface workspace directory and execute the ProjectName.html file. In this tutorial, that is Accounts.html. (Note that you can also test/run the application from within General Interface Builder, rather than via Windows Explorer.)

    The Login dialog is displayed.

  42. Enter a valid user name and password, then click OK.
    Note: By default, Workspace is configured with a default user that can log in so that other users can be configured using the Organization Browser component (for information about configuring users, see the TIBCO Organization Browser User’s Guide, or the How to Map Users to the WelcomeUsers Organization Model tutorial).

    The default user is "tibco-admin" with a password of "secret". If additional users have been configured on your system, this admin user name and password may have been changed. If so, contact your system administrator for a valid user name and password.

    The default work view (Inbox) is displayed in the left pane, and the work item list is displayed in the right pane. For example:

    Note that if you log in as the tibco-admin user, there will not be any work items listed in the work item list as work items do not get sent to the tibco-admin user.

  43. Perform any of the available functions for which you have permission.

    Clicking on the Logout button logs you out of the server, then either closes the browser window or re-displays the Login dialog, depending on which steps you performed earlier.