Customizing Event Components
By default, the Event Viewer displays events from specific ActiveMatrix BPM components.
For example:
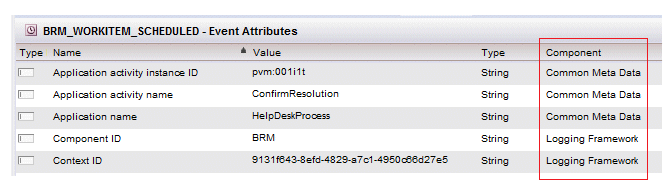
The components whose attributes are displayed in the Event Viewer are configured in the eventComponents.xml:
    <EventComponent Name="N2LF"
                Description="eventComponents.Description.N2LF"/>
    <EventComponent Name="Common"
                Description="eventComponents.Description.Common"/>
    <EventComponent Name="EC"
                Description="eventComponents.Description.EC"/>
    <EventComponent Name="BX"
                Description="eventComponents.Description.BX"/>
    <EventComponent Name="PFE"
                Description="eventComponents.Description.PFE"/>
    <EventComponent Name="BRM"
                Description="eventComponents.Description.BRM"/>
                   .
                   .
                   .
Each <EventComponent> element contains the following attributes:
- Name - The name of the event component.
- Description - A key that corresponds to a record with a matching "id" attribute value in the JSXAPPS/base/locale/eventLocale.xml resource file. At runtime, the value of the "text" attribute, for the corresponding record in eventLocale.xml, is substituted for this attribute value and becomes the component description that is displayed in the list of attributes.
If a new component has been added to the system, it can be added to Workspace so it appears in the Event Viewer, as described in the following procedure.
Procedure
Copyright © Cloud Software Group, Inc. All rights reserved.