Send Email
A job can be set up to send an email to a number of recipients when it is executed.
Important: To
enable this task, you must add SMTP settings to the
Spotfire.Dxp.Worker.Automation.config file; for
instructions, see
Adding
SMTP settings to the Spotfire.Dxp.Worker.Automation.config file.
| Option | Description |
|---|---|
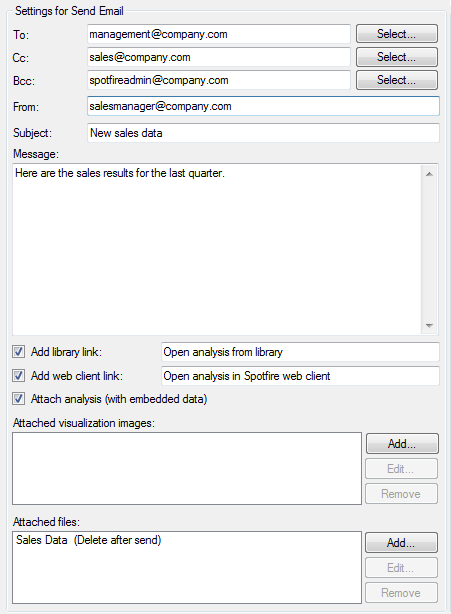
| To | Type the email addresses to which the email should be sent. The separator to use depends on the regional settings of your computer. |
| Cc | Type the email addresses to which a copy of the email should be sent. |
| Bcc | Type the email addresses to which a hidden copy of the email should be sent. |
| From | Type the email address from which the email
should be sent. If unspecified, the email address from the configuration file
will be used.
Note: Only use an address that you are authorized to send email
from. When the job runs on the server, the email is relayed through the SMTP
server configured for the
Spotfire Automation Services
service. However, the recipients see the
From and
Reply to addresses that are specified
in the job. Your SMTP server may reject email that uses any other sender
address.
|
| Reply to | Type the email address to which a reply to the email should be sent. If unspecified, the From address is used. |
| Select | Click to open a dialog where you can select recipients from your LDAP directory. This only works if you have an LDAP directory. |
| Subject | Enter a subject for the email. |
| Message | Enter the body text of the email. |
| Add library link | Select the check box to include a link to
the analysis in the library.
Optionally, enter text for the link in the text box, such as "Click to open analysis from the library." If you leave the field blank, the link is shown as the actual path to the library. |
| Add Web Player link | Select this check box to include a link to
the analysis in the web client.
Optionally, enter text for the link in the text field. If you leave the field blank, the link is shown as the actual path. |
| Attach analysis (with embedded data) | Select this check box to attach the analysis to the email. |
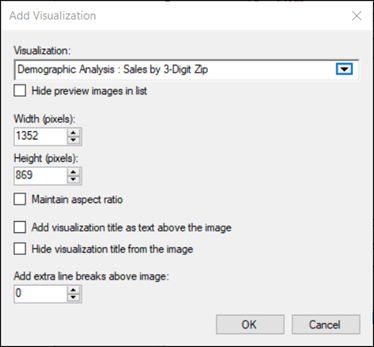
| Attached visualization images | You can include images from visualizations in the email. The images will be shown in the message body. The data will be embedded in the email. See the Add Visualization dialog below this table. |
| Add... | Open to select the visualization images to add. |
| Edit | Edit the settings for an added image. |
| Remove | Removes the selected image from the list. |
| Attached files | You can include files in the email, for example a PDF created by the Export Report to PDF task. |
| Add... | Opens the
Select File Attachment dialog, where you
select the file to attach, specify the name of the attachment, and select if
the file should be deleted after the email has been sent.
Note: Only
select to delete the file if you are absolutely sure that the file should be
deleted after the email has been sent. It is recommended to only delete
temporary files, such as PDF files created by the Export Report to PDF task for
the sole purpose of being sent out in an email. To avoid deleting files that
should be saved, files can only be deleted if they have a create or
modification time in the last 30 minutes. The time can be changed in the
allowDeleteOfFilesModifiedLastMinutes
setting in the
Spotfire.Dxp.Worker.Automation.config
file.
Note: Allowed
file paths may be limited by the
allowedFilePaths setting in the
Spotfire.Dxp.Worker.Automation.config
file. For more information, see the
Spotfire Server
and Environment Installation and Administration help.
|
| Edit | Edit the settings for an added attachment. |
| Remove | Removes the selected attachment from the list. |
| Option | Description |
|---|---|
| Visualization | Select the visualization image that you want to appear in the email. |
| Hide preview images in list | If the check box is selected, the list of visualizations directly above the check box does not display previews for each visualization. This reduces download time. |
| Width | You can change the height and width of the image. Select the Maintain aspect ratio check box to keep the image's original proportions. |
| Height | |
| Maintain aspect ratio | |
| Add visualization title as text above the image | If the check box is selected, the title of
the visualization, followed by a colon, appears just above the visualization.
This is the default.
|
| Hide visualization title from the image | If the
Show title bar check box is selected in
the visualization Properties dialog, select this check box to prevent the
visualization title from appearing in the upper-left corner of the image.
This is the visualization title appearing within the image:
|
| Add extra line breaks above image | Select this check box to add space above the image in the email message. |