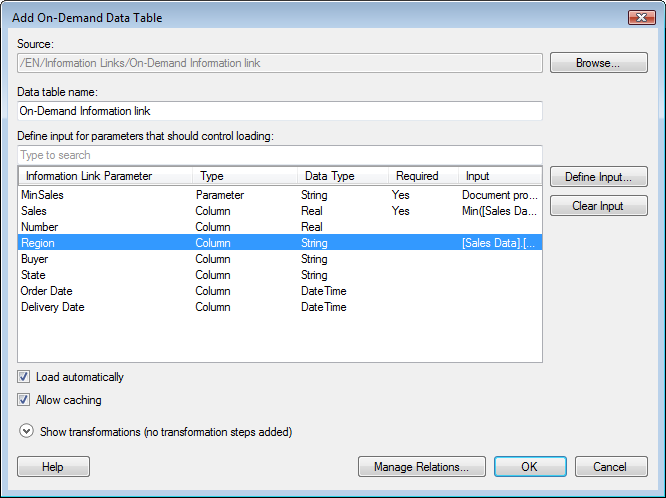
This dialog is used when you want to add a data table where data is loaded only when requested. You can specify what input to control the loading in a number of different ways.
To reach the Add On-Demand Data Table dialog:
Select File > Add On-Demand Data Table....
Browse to the information link holding the desired data and select it in the list.
Click OK.

Option |
Description |
Source |
Lists the path and name of the selected information link. |
Browse... |
Allows you to select a different information link. |
Data
table name |
Allows you to specify a name for the new on-demand data table. |
Define
input for parameters that should control loading |
This is where you select what will affect the loading of data from the perspective of the information link. All columns and parameters available in the selected information link are listed. Click to select the parameter in the list and click Define Input... to specify a condition that must be fulfilled for any data to be loaded. For example, this is where you specify that the marking based on a certain column from one data table will limit what is shown in the on-demand data table. If you would like to retrieve only data for a certain Region as shown in the picture above, you would select Region in this list and click Define Input to specify that only those rows corresponding to the set condition (e.g., marked rows in the data table "Sales Data") should be retrieved. Any required prompts or parameters that were specified upon the creation of the information link will be listed as Required parameters in this field. This means that you must specify input handling of these parameters to be able to load any on-demand data at all. |
Define
Input... |
Opens the Define Input dialog where you can tie the selected parameter to a value or a range. |
Clear
Input |
Removes the previously added input definition from the selected column or parameter. |
Load
automatically |
Select
this check box if the on-demand data should be loaded automatically
each time the specified input conditions are changed. If the check
box is cleared the visualization can be manually updated using
the refresh icon, A data table set to load automatically will switch to manual update if cyclic dependencies are detected in the analysis. |
Allow
caching |
Select this check box to allow caching of data. This may speed up the process when loading new subsets of data. However, if the underlying information link data are updated during the current TIBCO Spotfire session you may end up with different results for a specific set of input values depending on whether or not the current selection is stored in the cache. You should always clear the check box if you know that the underlying data may be updated during your current session. |
Show
transformations |
Expands the dialog and allows you to apply transformations on the data table you want to add. For more information, see the Show transformations topic. |
Manage
Relations... |
Opens the Manage Relations dialog where you can define how the on-demand data table should be related to other data tables in your analysis. If you want marked rows in one data table to also show up as marked in the other data table, then adding a relation is necessary. |
See also:
How to Insert Multiple Data Tables into the Analysis