In this topic we will complete the stub StreamSQL application named MyFirstApp.ssql that we created earlier using the New Project
wizard. MyFirstApp.ssql will do exactly the same work
as the MyFirstApp.sbapp application, and in subsequent
topics, you will be able to run either version of the application with identical
results.
Note
If you have already created the EventFlow version, you can generate MyFirstApp.ssql by simply right-clicking MyFirstApp.sbapp and choosing . If you prefer to create it manually, continue with this topic.
Note
Conversion to StreamSQL is deprecated as of release 7.6.0.
In StreamBase Studio:
-
In the Package Explorer, navigate to the MyFirstApp project. and double-click the
MyFirstApp.ssqlfile to open it in the StreamSQL Editor. -
Run → → . In the resulting dialog, make sure the MyFirstApp project is selected, and specify
MyFirstAppas the new file's name. The dialog automatically appends the.ssqlextension, and opens the StreamSQL Editor with the new, blank application file. -
Before you begin editing, take a look at the first statement in the application (don't enter it yet):
CREATE INPUT STREAM TradesIn (
  symbol string,
  quantity int
);
This StreamSQL statement creates an input stream for the application and defines its schema. If you look at the EventFlow application you created earlier, you can see that the stream names and schemas match. We will continue to emulate that application in the remaining lines.
Note
Entering StreamSQL keywords in uppercase is a StreamBase convention, but is not required to pass typechecking.
-
Now enter just the first line of the statement and press Enter. Notice that as soon as you start typing, StreamBase Studio begins typechecking your work. In the screen below, a red typecheck error icon is displayed side of the editor:

The error is to be expected, because the statement is incomplete, and therefore not valid. The important things to remember are:
-
As you resolve errors, the error icon moves to the line where the next detected error occurs, until all typecheck errors in your application are gone. When the icon disappears, you know your code is valid.
-
You can get an idea of what the error is by pausing your cursor over the icon, as shown in the preceding figure. With some knowledge of StreamSQL and experience, these errors can help you troubleshoot your code.
-
-
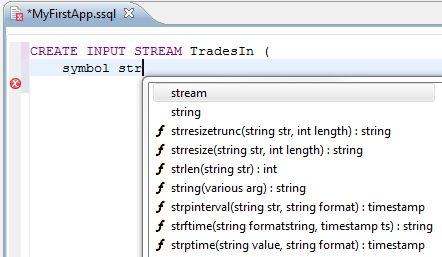
As you type, you can press Ctrl+Space to open the autocompletion window of the StreamSQL Editor. This window shows a list of candidates to help you complete the term or expression you are typing. The candidates are drawn from both StreamSQL syntax and the StreamBase expression language.
In the example below, you can select string from the list to complete the phrase you are typing:

By suggesting options like this, autocompletion can help you code more quickly and avoid errors.
-
Finish entering the rest of the statement as shown in Step 3. Once you correct any typing errors, the typecheck error icon should disappear.
-
Define the output streams:
CREATE OUTPUT STREAM BigTrades;
CREATE OUTPUT STREAM AllTheRest;
At this point, the StreamSQL Editor displays an error message that the first output stream has no source defined. This is normal, so go on to the next step to define the source.
-
Read all the fields from the input stream, and direct the data into each output stream based on the number of trades:
SELECT * FROM TradesIn
WHERE quantity >= 10000 INTO BigTrades
WHERE true INTO AllTheRest
;
The WHERE statements here do the same thing as the Filter operator in the equivalent EventFlow application. That is, they restrict the SELECT statement, which would otherwise select all tuples:
-
The first WHERE clause restricts the selection to tuples for which the predicate resolves to
true, and only those tuples are selected and emitted on theBigTradesoutput stream. -
The second WHERE clause selects all the tuples that were not selected by the previous WHERE statement, and dequeues them to a second output stream named
AllTheRest.
-
-
Use → , Ctrl+S or the button to save
MyFirstApp.ssql.
In this topic you learned how to add StreamSQL statements to define a StreamBase schema and a simple query. You also saw how StreamBase typechecking helps detect errors as you write. Your application is now ready to run.
Do not close StreamBase Studio. To continue the tutorial, please click to go on to the next topic.
