Editing the Model Diagram
Discovery lets you rearrange the model diagram and display details about the resources and their relationships. See these sections for more information:
Rearranging the Tables, Views, and Relationships
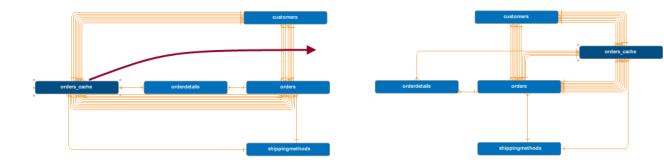
You can rearrange the tables, views, and relationship lines on the model diagram in many ways:
• Move any object—Click on the object and drag it to another location.
• Select multiple objects—Ctrl+click or drag a box around to select multiple tables/views and relationship/dependency lines.
• Move around in the diagram—Use the scroll bars or the track wheel on your mouse.
• Click the pan or zoom controls.
Discovery automatically arranges the relationship and dependency lines when you make changes.
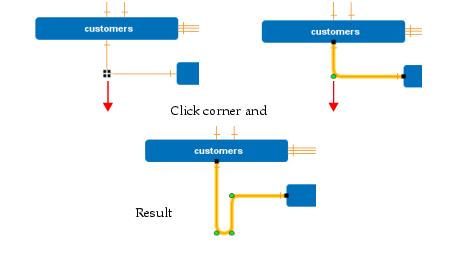
You can also select a corner or piece of a relationship line, and move the relationship line:
Note: If you save the model after rearranging tables and relationship lines, the table arrangement is saved, but the line changes you made are not saved with the model. Also note that there is no “undo” command. Once you rearrange the objects, you cannot automatically move them back to their previous arrangement unless you had saved it; in this case you can close the model without saving and reopen it. Be sure to save the model when you have an arrangement that you like.
Refreshing the Layout
If you have rearranged the resources in the model, you can have Discovery organize the model into its current layout type: orthogonal or hierarchical. See
Changing the Layout Type for more information.
To refresh the layout
1. Click the Refresh Layout button on the model toolbar.
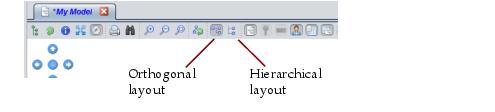
Changing the Layout Type
Discovery provides two layout types for the model diagram: orthogonal and hierarchical.
• Orthogonal—Arranges the resources so that the relationship lines are as short as possible.
• Hierarchical—Arranges the resources in a hierarchy where the resources with the most dependencies are on the top level.
To change the model layout display type
1. Open a model.
2. On the model Diagram, click one of the layout buttons:
The shaded layout button indicates the current layout selection.
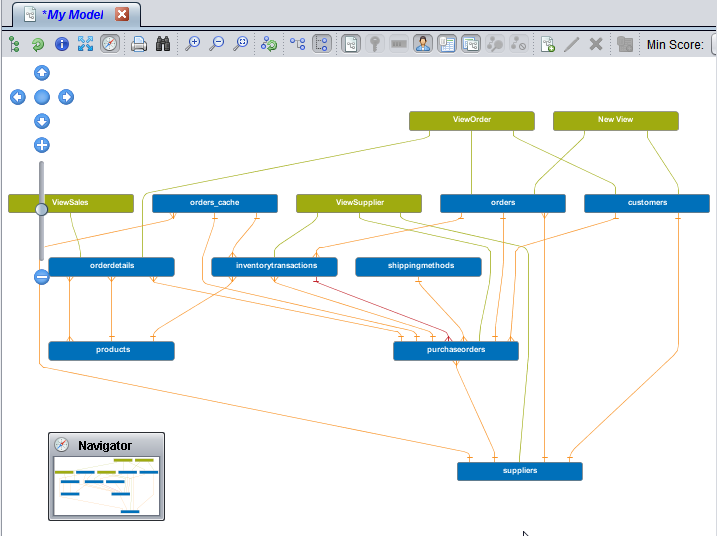
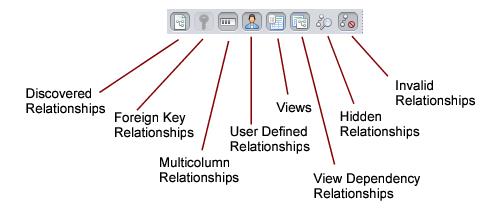
Showing and Hiding Tables, Views, and Relationships
The show and hide buttons on the model toolbar control what is currently displayed. When you use one of these buttons to show or hide a table, view, or relationship type, Discovery remembers that state and it is saved as your preference for every model that you subsequently open.
Displaying Table Information
From the Model diagram, you can view a table columns as well as access details about the table.
To view information about a table
1. Expand the table to view its columns in one of these ways:
— Double-click a table once to see its keys and double-click again to see all columns in the table.
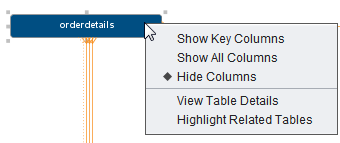
— Select a table and right click to show the menu of options.
The diamond indicates the current selection.
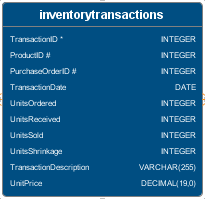
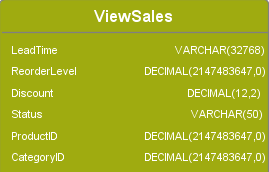
Show Key Columns | Displays the primary key columns for the selected table, as in this example: An asterisk indicates that this is a primary key column. A number (#) indicates any kind of relationship, including discovered or foreign key. A plus (+) indicates that this is a denormalized column. An @ symbol indicates a data domain relationship. |
Show All Columns | Displays all columns for the selected table as in this example: An asterisk indicates that this is a primary key column. A number (#) indicates any kind of relationship, including discovered or foreign key. A plus (+) indicates that this is a denormalized column. An @ symbol indicates a data domain relationship. |
Hide Columns | Hides the columns you displayed. |
View Table Details | |
Highlight Related Tables | Highlights and selects all related resources and the relationships between them. This enables you to move all related resources to another part of the diagram. |
Displaying View Information
Views are displayed in green and are connected by dashed lines to the resources on which they depend. From the Model diagram, you can display a view’s columns as well as access details about the table.
To view information about a view
1. Double-click a view or select a view, right click, and choose one of these menu options.
Show All Columns or Hide Columns | Displays or hides the columns for the selected view. When displayed, the column data types are displayed as in this example: |
Highlight Related Tables | Highlights and selects all tables that are related to this view as well as their relationship lines. Because the relationships and tables are selected, you can move them as a group. |
Note that you can hide the views by clicking the Hide Views button on the model toolbar.
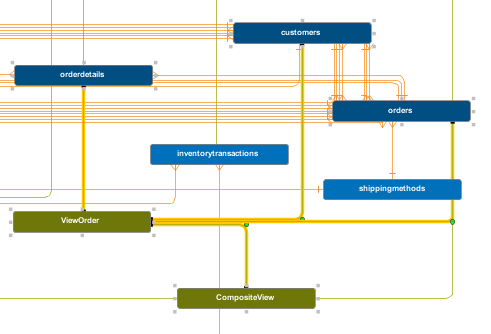
Working with Related Resources
If a model is complex with lots of resources, it can be difficult to see what is related to what. In the Model diagram, you can easily identify all resources related to a selected resource and move the related resources as a group.
To highlight and select related resources
1. In the model diagram, select a table or view.
2. Right-click, and select Highlight Related Tables from the pop-up menu.
Discovery highlights and selects all related resources and relationships:
3. Move them as a group to another part of the diagram.
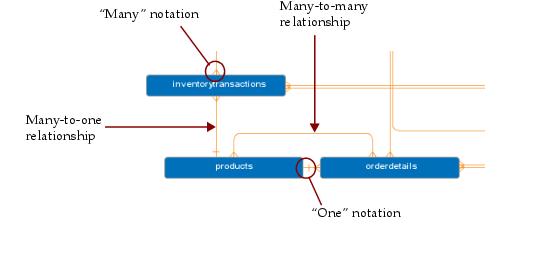
Displaying Relationship Information
A relationship between two nodes in the model is indicated by a connecting line. The ends of the connecting line indicate the cardinality of the relationship using crow’s-foot notation.
There are four types of relationships: discovered (orange), foreign key, (blue), multicolumn (brown), and user-defined (red). You can hide or redisplay the relationships by type using the buttons on the toolbar.
The buttons are available only if the selected model has relationships of that type. If you have marked relationships as hidden or invalid, you can still show them on the model diagram. Hidden relationships are shown with dashed lines, and invalid relationships are shown with dotted lines.
Displaying View Dependency Information
Views that are dependent on the resources in a model are automatically displayed. The dependencies that a view has on other resources are indicated by green lines between the view and the resources. You can:
• Hide the views by clicking the Hide Views button on the model toolbar.
• Hide the view dependency relationships by clicking the Hide View Dependency Relationships button on the model toolbar.
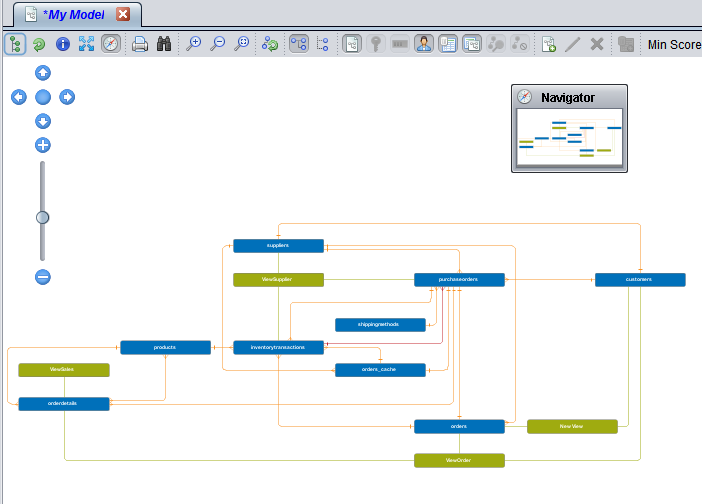
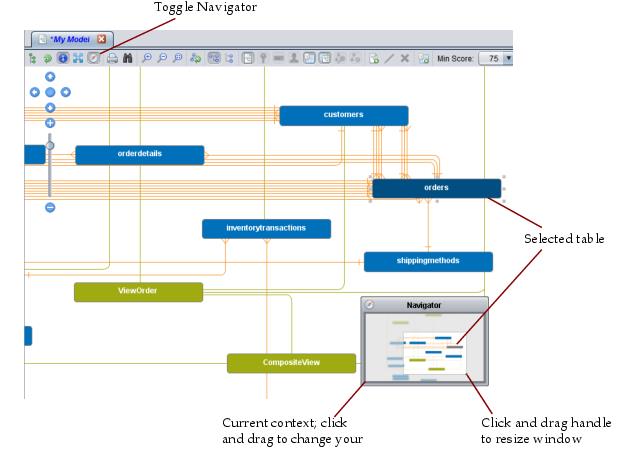
Using the Navigator
The Navigator gives you a small view of the entire model and shows your current context within that model.
The Navigator:
• Lets you click the current context area and drag it to change your view.
• Displays selected tables in gray.
• Can be resized and moved around the model diagram.
• Can be removed from the model diagram using the Navigator button.
• Lets you select a table in its window to center it in the model diagram.
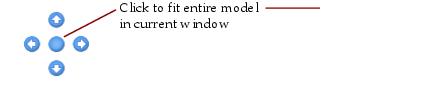
Changing Your View Using the Pan Controls
You can change your view up, down, right, or left using the graphical pan controls in the model diagram. You can also instantly fit the entire model into the current window.
Panning the model in the model diagram can also be done using the keyboard.
Spacebar | Zoom to fit the entire model in the current window. |
Arrow Keys | Move the model up, down, right, or left by a set increment. |
> (Greater Than) | Zoom in for a closer view. |
< (Less Than) | Zoom out for a larger view. |
+ (Plus) | Zoom in for a closer view. |
- (Minus) | Zoom out for a larger view. |
Moving around in the Model Diagram
You can zoom in and out of the model diagram to change your view using buttons in the tool bar or the zoom controls in the model diagram. You can also move mouse track wheel to increase or decrease the zoom.
If the diagram is larger than the window area, scroll bars are made available.
Displaying the Model in a Full Screen
You can display a full screen view of the model using the Full Screen button. Click again to return to the normal view.